Export SPUM characters
1. Prefab extraction capability
Characters created through SPUM are saved in Prefab format. Export can be leveraged in a variety of Unity projects.
2. Extract Prefab
- Click Export Package
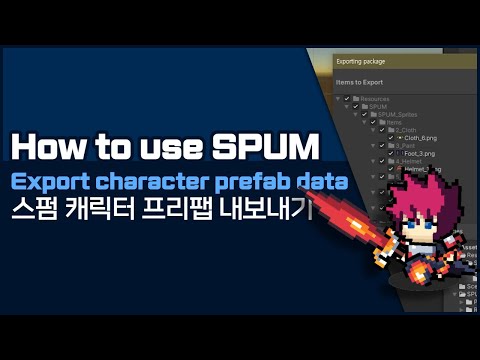
[Assets->Resources->SPUM->SPUM_Units] Character prefabs created and saved through SPUM in the path exist. Right-click and click Export Package.

- Export Progress
When the ‘Exporting package’ window appears, press the ‘Export’ button to extract the character. After setting the desired save path, press ‘Save’ to complete the save as a Package file.

The character whose extraction is completed is in the designated path Saved in ‘character name.unitypackage’ format.

1. Atlas, GIF extract?
SPUM can extract created characters in image and gif file formats. It can be used in Atlas format and Gif, which shows the moving image of the character.
2. Extracting Atlas, GIFs
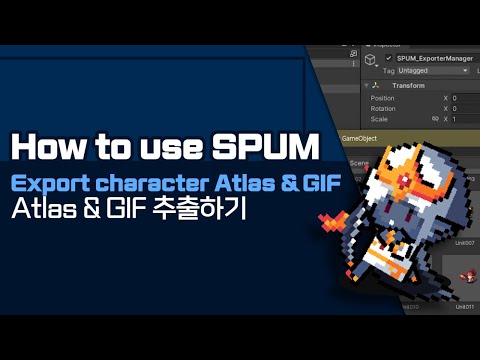
- Run ‘SPUM_SheetExporter’ in the path [Assets->Spum->Sprite_SheetExporter(Beta)->Scene].

- Click on ‘SPUM_ExporterManager’ inside Hierarchy.

- Click the icon next to property ‘Unit Prefab’ in the Inspector internal ‘SPUM_Exporter’.

- When the ‘Select GameObject’ window appears, click ‘Asset’ and select the character prefab you want.

- Select the Unit Type of the character you want. There is a difference in animation motion by Unit Type.

- Utilize the ‘SPUM_Exporter’ internal property to set various property values such as image name and size. Each property is shown below.
- SPUM_Exporter Clean up each property
- Unit Prefab – Selected Character Prefab
- Unit Type – Tribe Animation Selection
- Separated – Create an Individual Image File
- Image Name – the name of the image to be output
- Image Size – Size of the character image
- Full Size – Animation Sheet Size
- Scale Factor – Character Output Size Scale
- Frame Rate – Number of frames to be seen per second
- Disable Gif Export – Whether to create a Gif file
- Animation TimeDelay – Time Interval Between Gif Frames
- Disable Background Transparency – Background Transparency
- Gif Alpha Back Color – Transparent Settings
- When setup is complete, click ‘Make Sprite Images’ to create Gif and Sprite images.

- When you are done creating the image, you can check the generated Atlas in the [Assets->Spum->ScreenShots] path. You can also view Gif files categorized by each motion in the GifExports folder.

*. If the Game window in the Unity Editor is smaller than a certain size, Atlas and Gif results will turn gray. If you look in the Console window, you will see an error similar to the one below. If you increase the size of the Game window and then extract it again, you can see that it works properly.

1. What is Unity Project Prefab Apply?
Characters created through SPUM can be extracted in Package format through Export and added to My Project. See Extract Prefab for information on how to extract characters.
2. Apply Unity Project Prefab
- Click [Import Package->Custom Package] in the Unity project to bring up the SPUM character.

- Select the saved SPUM character in the folder.

- When the Import Unity Package window appears, click ‘Import’ to add it.

- You can see that the elements required for the project and the character prefabs have been added.

- Let’s write a script for the prefab operation you added. Create a new C# script with [Create->C# Script] in your project.

- File name is set to ‘move_test’. You can set the name to suit your purpose.

- You have created a source for testing simple movements and attacks. Using the sources below, you can experience the attack by clicking Move through the arrow keys, Z.
using System.Collections;
using System.Collections.Generic;
using UnityEngine;

public class move_test : MonoBehaviour
{
    private Animator animator;

    private void Awake(){
        animator = GetComponent<Animator>();
    }

    // Start is called before the first frame update
    void Start()
    {

    }

    // Update is called once per frame
    void Update()
    {
        float moveX = Input.GetAxis("Horizontal");
        float moveY = Input.GetAxis("Vertical");

        Vector3 moveVector = new Vector3(moveX, moveY, 0f);

        transform.Translate(moveVector.normalized*Time.deltaTime*5f);

        if (moveX!=0||moveY!=0)
        {
            animator.SetFloat("RunState", 0.5f );
        }
        else
        {
            animator.SetFloat("RunState", 0 );
        }

        if (Input.GetKeyDown(KeyCode.Z))
        {
            animator.SetTrigger("Attack");
        }
    }
}
- Then, we placed the character prefab in Scene to check the actual operation. Select ‘UnitRoot’ inside the character prefab.

- Insert the C# code for character manipulation inside the Inspector of ‘UnitRoot’. Drag and drop the script ‘move_test’ and add it.

- After you run the project, you can verify that movements and attacks work. The SPUM character can be utilized in various ways by applying the above method.

1. What is the apply of Unity Project Atlas
Characters created through SPUM can be extracted in Atlas and Gif formats through Export and added to My Project. See Sheet image & Gif for the character Atlas extraction method.
2. Applying Unity Project Atlas
- Inserts the character Atlas you created in the Unity Editor.

- Change the required property values in the Inspector window of the Atlas you inserted. Set the ‘Texture Type’ property value to Sprite (2D and UI). Set the ‘Spring Mode’ property value to ‘Spring Mode’.

- Click ‘Sprite Editor’ to enter.

- If no changes have been made, the pop-up window below will be displayed. Click Apply to apply.

- When the ‘Spring Editor’ window is launched, click the ‘Slice’ menu. Then set the property value ‘Type’ to ‘Grid by Cell Count’.

- Change the value of the ‘Type’ property and specify the ‘Column & Row’ value to 4 respectively.

- Set the property value of ‘Pivot’ to ‘Custom’ to set the character’s reference point.

- Enter the appropriate number for ‘Custom Pivot’.

- Press the ‘Slice’ button to divide the image after all settings have been completed.

- You can see that the images are divided by area. You can adjust the Pivot position individually by selecting each area.

- See if Atlas is well divided, then click ‘Apply’ to save your changes.

- Drag & Drop Atlas to be applied inside ‘Scene’ on Unity Editor.

- Set and save the file name.

- You can look at the creation of an animation-related file. You can then run the scene to verify that the animation is working. You can apply this method to animate and utilize Atlas you want.
