HOWTO devops build_pipeline_setup
- Wiki: Cold-Deploy Server set-up, framework intro and overview
- CodeClimate.com docs: configuring test coverage 🔗
- CodeCov.io docs 🔗
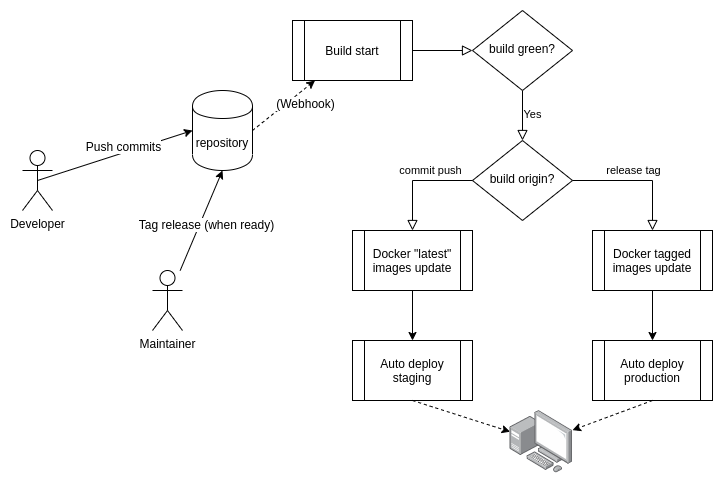
The simple idea behind the current build pipeline is to be as fully automated as possible, with the least human intervention. As additional bonus, we'll add:
- support for both
staging&productionservers - test suite run for different destination devices
- auto-deploy successful builds on
staging, for eachlatestupdate - auto-deploy successful builds on
production, for each tagged release
Any push to the main|master branch of a project will trigger a latest update build.
Conversely, tagged release builds are spawn by simply tagging the current main or master branch of a project, directly from the GitHub account of the maintainer.
Tags should be equal to - or at least coherent with - the current sematic versioning of that specific project (MAJOR.MINOR.PATCH).
Given that we're aiming at running dockerized applications, the normal test suite build has first to be promoted to a Docker build; then, in turn, it has to be promoted for actual deployment only when completely successful.
The resulting simple flow behind the current Build Pipeline setup:
Each sub-project thus includes several build configurations, depending on scope, target and environment.
Each build is composed of different steps, the majority of which start automatically as soon as the changes are pushed back to the repository (or the release is made from GitHub).
Some additional or redundant build checks can be run from localhost or invoked manually, such as most of the linters used, the documentation scans by Inch or the license scan results from FOSSA.
Regarding code linters & documentation scans, each project has a dedicated Guardfile that should take care of everything else the builds occurring on code push do not. Currently that is indeed "not much", meaning everything is basically automated - but keep an eye on the configuration files because things may change from time to time depending on the project.
For this reason, do keep a running guard in the background while you code in order to catch early failing builds and to prevent cluttering the build queue.
- Make sure the build is locally green 💚 (check locally, including
Brakeman) - Update
lib/version.rbto reflect the upcoming release - Check eager loading on
localhostfor possible conflicts with a simpleRAILS_ENV=production rails zeitwerk:check(orapp:zeitwerk:checkforgoggles_dbor any other engine)
Optional steps:
- Update the
TAGenvironment value of your local.envfile in case you need to create a container onlocalhost - Update the versioning used for the build cache in
.semaphore/semaphore.yml(typically something likebundle-X.YY-$(checksum Gemfile.lock yarn.lock)) only if you need or want to force the usage of a brand new cache set up
Each project using containers has different docker-compose.yml script for the most common usage scenarios:
-
dev: development on localhost. Uses (or builds) tagged images specified by the local.envfile. -
staging: manually testing staging on localhost. Uses (or builds) thelatestimages. -
prod: manually testing production on localhost. Uses (or builds) tagged images asdev. -
deploy_staging: running staging anywhere while using thelatestimages. -
deploy_prod: running production anywhere while using tagged images specified by the local.envfile.
The first 3 have context definition for building locally an image and obtaining the resulting composed service, while the latter 2 use available Docker images to run in their target environment.
Depending on the project, additional configuration files may be mapped onto the container to bespoke the setup for the running host. For instance, the docker-compose.deploy_<ENV_SHORT_NAME>.yml files for goggles_main add mapping for config/environment/*.rb in order to use host-specific versions of them.
development |
production |
staging |
test |
|
|---|---|---|---|---|
| Assets type | uncached | cached & precompiled | cached & precompiled | uncached |
| Usability | localhost-only | localhost & deploy-ready | localhost & deploy-ready | localhost & test-suite ready |
| Versioning | tagged version | tagged version | latest version | latest version |
| Rails DB | goggles_development |
goggles |
goggles |
goggles_test |
| app & DB Docker services | main |
main |
main.staging |
/ |
api |
api |
api.staging |
/ | |
goggles-db |
goggles-db |
goggles-db.staging |
/ | |
| app & DB containers | goggles-main.dev |
goggles-main |
goggles-main.staging |
/ |
goggles-api.dev |
goggles-api |
goggles-api.staging |
/ | |
goggles-db.dev |
goggles-db |
goggles-db.staging |
/ | |
| Docker ports | 8080 (main) | 8080 (main) | 9080 (main) | / |
| 8081 (api) | 8081 (api) | 9081 (api) | / | |
| 33060 (db) | 33060 (db) | 33070 (db) | / |
-
production&stagingare designed to coexist & being run at the same time, pointint to different services and different volumes (although the DB has the same name, it's actually a different set of files). -
when run locally with Rails from a cloned project root all environments should be able to cohexist, with
production&stagingpointing to the same local DB.
Aiming towards a cold deploy, or just for running any composed service locally without cloning any repo, you'll need to make all sensible data files accessible locally using the same volume mappings stored inside each docker-compose.<ENV_SHORT_NAME>.yml that you intend to use.
For goggles_main, the main sensible data files are the .keys, the .env and any available DB data dump.
Make sure to recreate the following structure on the running host:
 /home/deploy # (any custom deploy user will do)
         |
         |  # Needed for remote ssh auto-deploy run from the build pipeline:
         |- deploy_staging.sh
         |- deploy_prod.sh
         |
         +----- Projects
                   |
                   +------ goggles_deploy
                             |
                             |  # Needed for actual execution on localhost:
                             |- docker-compose.deploy_prod.yml
                             |- docker-compose.deploy_staging.yml
                             |- production.rb       # /app/config/environments/ bespoke version
                             |- staging.rb          # /app/config/environments/ bespoke version
                             |- .env                # stores running prod TAG & DB credentials
                             |- master-api.key      # goggles-api credentials key
                             |- master-main.key     # goggles-main credentials key
                             |- any extracted DB dump file when needed
                             |
                             +------ backups        # stores compressed DB dumps
                             +------ db.prod        # actual data files for production DB
                             +------ db.staging     # actual data files for staging DB
                             +------ log.prod       # production log files
                             |          +------ api # production API log files
                             |
                             +------ log.staging    # staging log files
+------ api # staging API log filesIsolated base engine & common gem, no container usage.
-
Semaphore 1.0: dual stage legacy build configuration, w/ full test suite run in one single stage
-
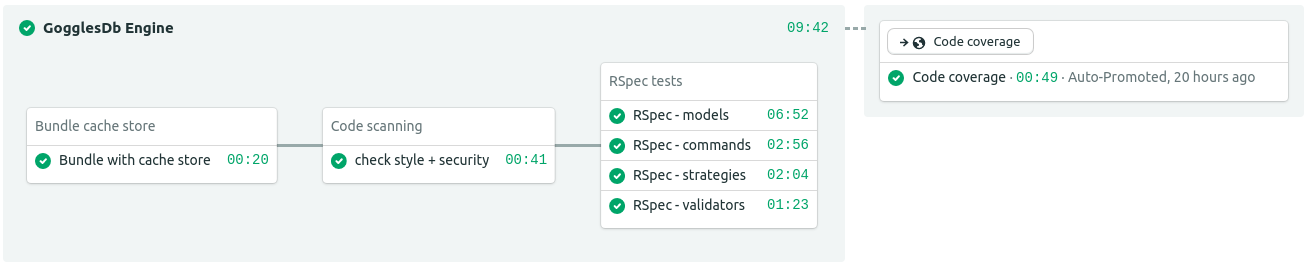
Semaphore 2.0: multi-staged build separated by testing context => auto-updates code coverage at the end
=> any tagged release on GitHub will yield another build, bearing the GitHub tag as parameter
-
CodeClimate.com: code-coverage & maintainability build
-
CodeCov.io: code-coverage & maintainability build
-
Coveralls.io:code-coverage build(NO LONGER SUPPORTED) -
FOSSA: license scan
API service

-
Semaphore 2.0: multi-staged build separated by testing context
=> auto-updates code coverage at the end
=> starts automated Docker build on
latestwhen successful=> any tagged release on GitHub will yield another build, bearing the GitHub tag as parameter
-
CodeClimate.com: code-coverage & maintainability build
-
CodeCov.io: code-coverage & maintainability build
-
Coveralls.io:code-coverage build(NO LONGER SUPPORTED) -
Docker.org: container build; version-tagged images updated upon GitHub release publication
-
FOSSA: license scan
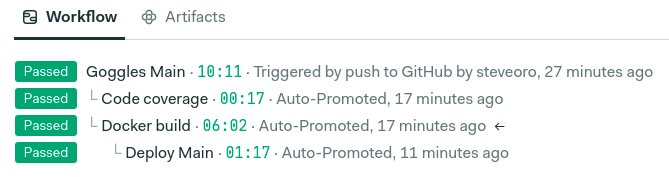
Full Continuous Delivery Pipeline, with auto-deploy on successful builds for both staging & production environment.
Phases toward delivery:
Main front-end UI
-
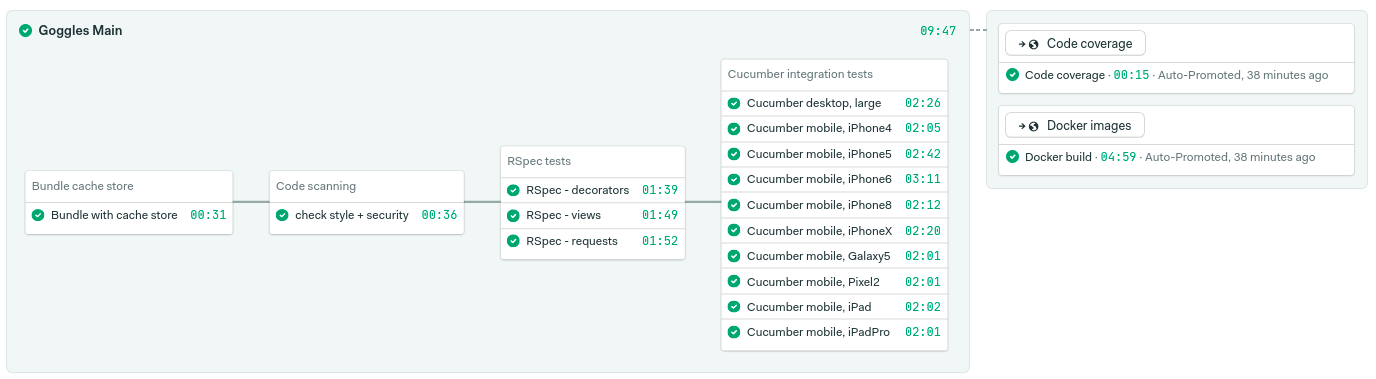
Semaphore 2.0: multi-staged build separated by testing context and job phases
=> Multiple Cucumber runs to tests different devices & display sizes
=> auto-updates code coverage at the end
=> starts automated Docker builds when successful
=> starts automated deployment after successful Docker builds
=> any tagged release on GitHub will yield another build, bearing the GitHub tag as parameter
-
CodeClimate.com: code-coverage & maintainability build
-
CodeCov.io: code-coverage & maintainability build
-
Docker.org: container build; version-tagged images updated upon GitHub release publication
-
FOSSA: license scan
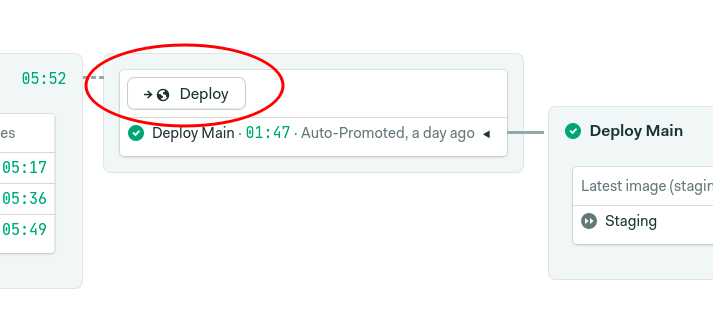
Starting directly from Semaphore UI for any completed build, scroll the build pipeline until the Deploy stage becomes visible.
Click on the "Deploy" button => click on "Promote now".
Chronometer sub-app for direct race timing recording, editing & upload.
=> [2021-05-05] Moved into goggles_main
Admin UI, working stand-alone as a Docker container, interfacing directly to a server hosting the API container, runnable anywhere (typically: localhost).
-
Semaphore 2.0: multi-staged build separated by testing context and job phases
=> Multiple Cucumber runs to tests different devices & display sizes
=> auto-updates code coverage at the end
=> starts automated Docker builds when successful
=> any tagged release on GitHub will yield another build, bearing the GitHub tag as parameter
-
CodeClimate.com: code-coverage & maintainability build
-
CodeCov.io: code-coverage & maintainability build
-
Docker.org: container build; version-tagged images updated upon GitHub release publication
-
FOSSA: license scan
(WIP: 🚧)
CodeClimate relies on a stand-alone binary utility to report the code coverage to the remote service.
The automated builds on Semaphore automatically take care of downloading & installing the utility, so these setup steps are not actually needed for your day-by-day usage.
-
Download the separate test-reporter binary from CodeClimate here
-
Assuming you're on Linux AMD64, the downloaded file should be
test-reporter-latest-linux-amd64; make it executable and rename it tocc-test-reporter:
$> mv test-reporter-latest-linux-amd64 cc-test-reporter
$> chmod +x cc-test-reporter- Move the exe to
/usr/local/bin:
$> sudo mv cc-test-reporter /usr/local/binYou are now able to run cc-test-reporter for any project that has an associated build on CodeClimate.
Before running the test suite:
$> cc-test-reporter before-buildRun all tests to recompute /coverage:
$> rspecAt the end of the test run, push the code coverage specifying both the format & the destination TOKEN for the project:
$> cc-test-reporter format-coverage -t simplecov
$> cc-test-reporter upload-coverage -r <YOUR_CODECLIMATE_REPO_TOKEN>
Steve has a convenient send_coverage.sh Bash script that updates the coverage from localhost for any project. Ask him one copy, in case you are interested.