How to get SSL on Jekyll?
If your website or Jekyll blog URL is in the format
username.github.io
then you can use https right away just by enforcing it. But before you do that, verify if
https://username.github.io
renders the same thing and you see a green padlock before the URL.
If it works but you do not see a green padlock then the reason must be that your website is requesting something from a non-secure (http) server. Read warning to solve this.
If you are not using a custom domain name then you can use the Enforce HTTPS option found in settings page. It redirects the website to https from server side which is better than doing it from client side.

If you are using a custom doamin then this option will not be available. You have to skip to this step.
If you want to do it from the client side(not recommended) then use this JavaScript code at the top of your website to redirect to https. Change username to your GitHub username.
var host = "username.github.io";
if ((host == window.location.host) && (window.location.protocol != "https:"))
window.location.protocol = "https";You should let search engines read your content only in https site. Use canonical URL in the head section.
<link rel="canonical" href="https://username.github.io" />for Jekyll, it should be
<link rel="canonical" href="{{ site.url }}{{site.baseurl}}{{ page.url }}" />Make sure that the url is https in _config.yml. Also use
enforce_ssl parameter.
url: https://username.github.io
enforce_ssl: username.github.io
This way, there will be no trace of your http website anywhere on the internet even though it works.
If you are using a custom domain, say
yoursite.com then you may have to use a different approach. If enforcing works then great! Otherwise follow the procedure given below.
CloudFlare is a CDN service which offers pretty decent service on free account. I’m using CloudFlare for all my websites. CDN provides local copies of the website through a nearby server so that there is no delay in website loading.
It also has other advantages like handling DNS, analytics, providing SSL certificate - flexible and paid, firewall, speed optimization, caching etc., Watch the video on their website to know how it works. And it doesn’t matter where you have bought your domain and where you are hosting your website.
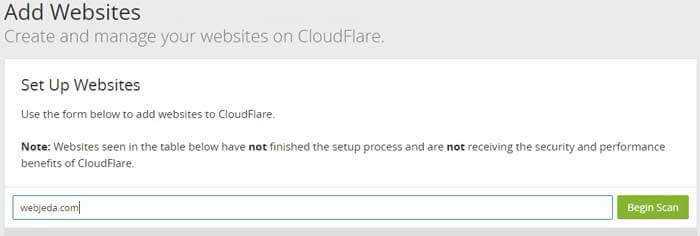
Among these, we are concentrating only on DNS handling. So create an account in CloudFlare. Now select Add site option, enter your domain and click on Begin scan.
Once the scanning is done, click on Continue to setup where you will see an option to verify all your DNS records. You don’t have to change anything here. click on Continue.
Now select a package that suits your requirement. I would suggest you to try the free version first and then upgrade if you like their service.
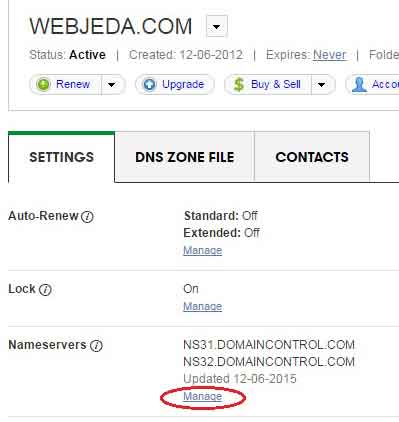
Now is the crucial part where you have to change the name servers (NS31.DOMAINCONTROL.COM) in your domain registrar to the following or whichever is provided to you by CloudFlare.
dan.ns.cloudflare.com
may.ns.cloudflare.com
You have to login to your domain registrar and add these custom name servers. Once it is done, click on Continue. It may take a while to reflect the changes but once it is successfully done, you will see a Status: Active message on CloudFlare.
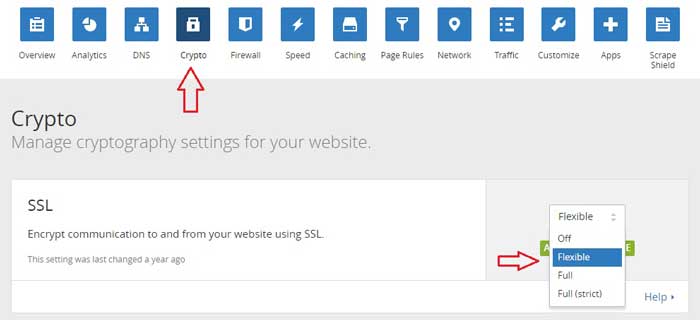
Now navigate to Crypto option in CloudFlare. You should see an option called SSL. In the drop-down menu select Flexible. This is all the changes we need to do in the server end.
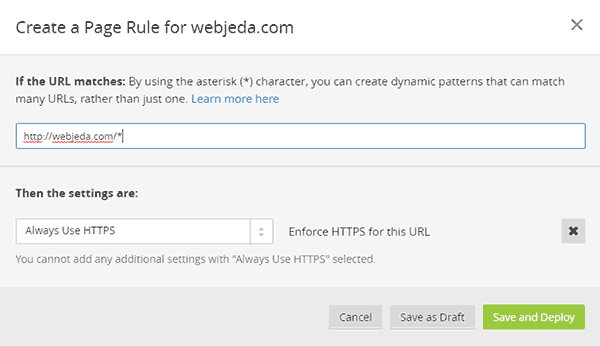
Use Page-rule to redirect http to https. Use * symbol to create dynamic patterns that match many URLs.
If you prefer to redirect in the website then use the below JavaScript code. I would recommend using CloudFlare Page-rule instead of this.
Follow the enforcing procedure.
Use this JavaScript at the top of the default template. Replace yoursite with your domain name.
var host = "yoursite.com";
if ((host == window.location.host) && (window.location.protocol != "https:"))
window.location.protocol = "https";Your website is NOW ready for SSL. Check again if the https link is working(all pages of the website). If not troubleshoot using the warning.
Use canonical URL in the head section to let search engines know that you are using https.
<link rel="canonical" href="{{ site.url }}{{ page.url }}" />Make sure that the url is https in _config.yml and use
enforce_ssl parameter
url: https://yoursite.com
enforce_ssl: yoursite.com
All the resources that are requested by a ssl activated website should also be secured. That is, if you request any file with a http link then the green padlock will not appear. In order to avoid that use relative url. For example, instead of
http://yoursite.com/css/webjeda.css use
//yoursite.com/css/webjeda.css
This article is written by sharu725. Read the original article at SSL Certificate (Https) For Jekyll.