11 Setup Script (en)
Install the following packages on the freshly installed Debian server:
apt install openssh-server unzip wget sudo nano
You download the installation script file using “wget” to a directory on your server and unzip it there:
wget https://github.com/sunweaver/nextcloud-high-performance-backend-setup/archive/refs/tags/1.2.6.zip
unzip 1.2.6.zip
Then go to the folder:
cd nextcloud-high-performance-backend-setup-1.2.6
With 'ls -lha' you should get the following view:

Switch to root user:
su root
( Optional ) You now have the option of entering all settings in a settings file beforehand. Of course, this saves paperwork if you want to run the script again. To do this, read Installation mit Einstellungsdatei
Start the installation with the command
sudo ./setup-nextcloud-hpb.sh
Now the first selection menu opens in which you can choose whether you want to install the Talk Server and Collabora Office or just one or the other. This can make sense in larger environments. We recommend installing both on one server first

In the following dialog you must enter the URLs of the Nextcloud instances that will later be allowed to access the server. If you want to give access to multiple Nextclouds, please separate the domains with a comma, as shown here in the dialog. In our example here these are the domains “nextcloud.domain01.org, nextcloud.domain02.org”:

In the following dialog you must enter the domain of the server on which the script is running. The script will later create a Let's Encrypt certificate for this domain so that all communication between Nextcloud and the server is encrypted.
In our example here this is the domain “nc-workhorse.examle.org” :

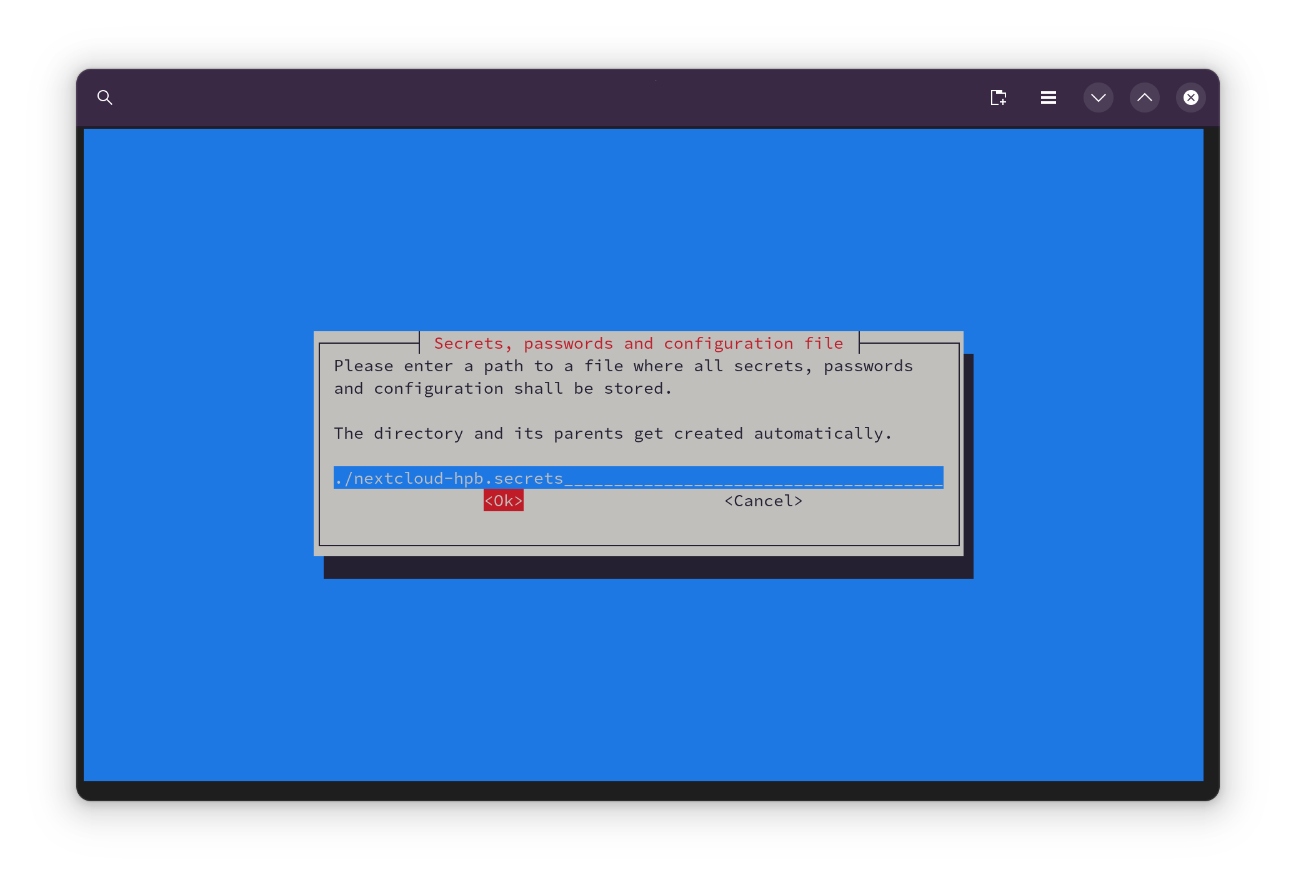
Here the script gives you the opportunity to adjust the storage location for the keys you have now created. By default, the file is created in the script directory as “nextcloud-hpb.secrets” .
Here you can enter your email address and a mail server so that the server can also send you status information. Please enter the following data so that the appropriate smart host can be configured on the server in msmtp :
- E-Mail-Adresse (für Let's Encrypt)
Smarthost Data Mailserver:
- Passwort
- Benutzername
- Mailserver
- Port
Here you enter the email address to which the system will then send the messages. This email address is also stored with Let's Encrypt.

Here you now enter the password for the SMTP account through which the system should send the emails.

Here you now enter the user name (e.g. johndoe@example.org ) of the SMTP account through which the system should send the emails.

Here you now enter the SMTP mail server through which the emails should be sent.

Here you now enter the port (default is 587) for SMTP mail server. You can only use the script to configure SMTP servers that allow TLS encryption.

In the following dialog, please confirm the Let's Encrypt certificate. This is necessary so that your Nextcloud instance and the server can communicate encrypted:

In the following dialog you can deactivate SSH access. By default we would recommend not disabling it. But if you want to secure the server even better, you can simply switch off SSH access here:

Depending on the Debian version, you can choose here whether the package is installed or whether everything is created/built from the sources. For Debian versions below 13 (Trixie), we recommend building from the package sources.

Now the script runs, configures and installs everything automatically. Once everything has gone through, you will receive a summary with all the data.

Edit the settings.sh-file with:
nano settings.shAll setting options are explained here and in the file (but in English).
Exit via STRG+X the Nano editor. Follow the instructions at the bottom of the screen.
Start the installation with the command:
sudo ./setup-nextcloud-hpb.sh settings.sh
As an output you will receive all the keys and URLs that you need for the Nextcloud extension. Here you can see an example output, which was also saved in the “nextcloud-hpb.secrets” file in the install folder. You enter this data in your Nextcloud under Settings in the Talk and Nextcloud Office module. Copy the output of the script as you now Nextcloud eingeben müssen!

Please enter the keys and URLs in the Nextcloud. You can find the appropriate instructions here
-
DRY_RUN: Iftrue, then nothing is really changed in the system. -
UNATTENDED_INSTALL: Iftrue, then as many questions as possible are left out. However, it may be that (especially when starting for the first time) -
NEXTCLOUD_SERVER_FQDNS: The domain of the Nextcloud server. Several can be specified here, separated by commas. -
SERVER_FQDN: The domain of the high-performance backend server. -
SSL_*: Please don't change it. Unless you know what you're doing (otherwise look at source code). -
DHPARAM_PATH: Please don't change it. Unless you know what you're doing (otherwise look at source code). -
SHOULD_INSTALL_*: Controls whether this package should be installed (applies only if UNATTENDED_INSTALL=true). -
SIGNALING_BUILD_FROM_SOURCES: hould signaling (and its dependencies) be built directly from the sources? (Instead of installing from public Debian repositories). -
LOGFILE_PATH: Saves the complete text output by the script. This is very useful for the developers if they want to create an Bugreport erstellen möchten. -
TMP_DIR_PATH: Files important for the script are temporarily stored in this folder. -
SECRETS_FILE_PATH: File name where the Output geshould be saved. - SMTP E-Mail Config:
Please enter the email provider details provided here!
-
EMAIL_USER_ADDRESS: Email adresse -
EMAIL_USER_PASSWORD: password -
EMAIL_USER_USERNAME: Username (usually also email address) -
EMAIL_SERVER_HOST: Domain of the mail server -
#EMAIL_SERVER_PORT: mostly 25 oder 587
-
-
#DISABLE_SSH_SERVER: Should the SSH server (openssh-server) be turned off? -
DNS_RESOLVER: Own DNS resolver server.
Query services status:
sytemctl status nginx
systemctl status nextcloud-spreed-signaling.service
systemctl status janus.service
systemctl status nats-server.service
systemctl status coturn.service
View log files:
journalctl -u nginx -f
tail -f /var/log/nginx/access.log
tail -f /var/log/nginx/error.log
journalctl -u nextcloud-spreed-signaling -f
journalctl -u janus -f
journalctl -u nats-server -f
journalctl -u coturn.service -f
Advanced Logs:
To do this, install the following: apt install rsyslog logrotate
apt install rsyslog logrotate
less /var/log/syslog + STRG+F
To end: STRG+C + q