Home
It appears that perhaps this only works with Ubuntu 16.04 because of some issues with gdb-py and the "textinfo" tool in 14.04.
first, make sure you are in the dailout group
sudo adduser <user_name> dialout
restart the computer
From my experience, the only way to get QtCreator to function is to download the latest edition of Qt, which comes bundled with QtCreator.
Go to Qt Download and click "Download Now"
then,
cd ~/Downloads
sudo chmod +x qt-unified-linux-x64-2.0.4-online.run  (or whatever the file name is)\
sudo ./qt-unified-linux-x64-2.0.4-online.run
you can skip the login, just make sure that QtCreator gets installed
Open OCD (On-Chip-Debugger) is the software that will control the debugger. We are going to install the version that is configured to work as a plugin for the eclipse IDE. To get this version, go to the releases page of the OpenOCD github page and download the latest .tgz file
cd ~/Downloads
tar -xvf gnuarmeclipse-openocd-debian32-0.10.0-201610281609-dev.tgz (or whatever)
sudo mv openocd /opt/.
Then, for convenience, I normally create a script to run openocd for me. Here is my start_openocd_f1 script
#!/bin/bash

cd /opt/openocd/0.9.0-201505190955/bin
./openocd -f interface/stlink-v2.cfg -f target/stm32f1x.cfg
Which, I move to the /usr/local/bin directory so I can call it from anywhere
sudo chmod +x start_openocd_f1
sudo mv start_openocd_f1 /usr/local/bin/.The ARM compiler will take your C and C++ code and turn it into ARM ELF files that can be loaded to the microprocessor.
The easiest place to get these is from launchpad. Download the latest .tar.bz2 file for Linux.
cd ~/Downloads
tar -xvf gcc-arm-none-eabi-5_4-2016q3-20160926-linux.tar.bz2
sudo mv gcc-arm-none-eabi-5_4-2016q3 /opt/.
Then install 32-bit python bindings (QtCreator needs this to run GDB)
sudo dpkg --add-architecture i386
sudo apt-get update
sudo apt-get install libpython2.7:i386Open up the new QtCreator you just installed (make sure it's the new one, and not the version you get from apt-get)
Help -> About Plugins -> Enable "Bare Metal"
Restart QtCreator
Now, we're going to configure a new "Kit" for ARM development (this allows you to quickly switch back and forth between ARM and normal development)
- Tools -> Options -> Build & Run -> Compilers -> Add -> GCC -> C++.
- Name the new compiler "G++ ARM" (or something)
- Point the compiler path to where you just installed your fresh GCC.
- The path for G++
/opt/gcc-arm-none-eabi-5_4-2016q3/bin/arm-none-eabi-g++
Do the same for GCC (if you are going to be doing any C-only code)
- Tools -> Options -> Build & Run -> Compilers -> Add -> GCC -> C.
- Name the compiler (I named my compiler "GCC ARM)
- The path for GCC is
/opt/gcc-arm-none-eabi-5_4-2016q3/bin/arm-none-eabi-gcc

- Tools -> Options -> Build & Run -> Debuggers -> Add -> GDB.
- Name it something
- Point it to the new debugger you just installed
- The Path for
/opt/gcc-arm-none-eabi-5_4-2016q3/bin/arm-none-eabi-gdb-py

Go to the Bare Metal Plugin
- Tools -> Options -> Devices -> Bare Metal -> Add -> OpenOCD
- Leave all options at default values and click Apply
- Tools -> Options -> Devices -> Devices -> Add -> Bare Metal Device -> Start Wizard
- Name: ST-Link V2
- GDB Server Provider: OpenOCD
- Tools -> Options -> Build & Run -> Kits -> Add
- Name: ARM
- Device Type: Bare Metal Device
- Device: ST-Link V2
- Compiler: GCC ARM/G++ ARM
- Debugger: ARM GDB
- Qt Version: None

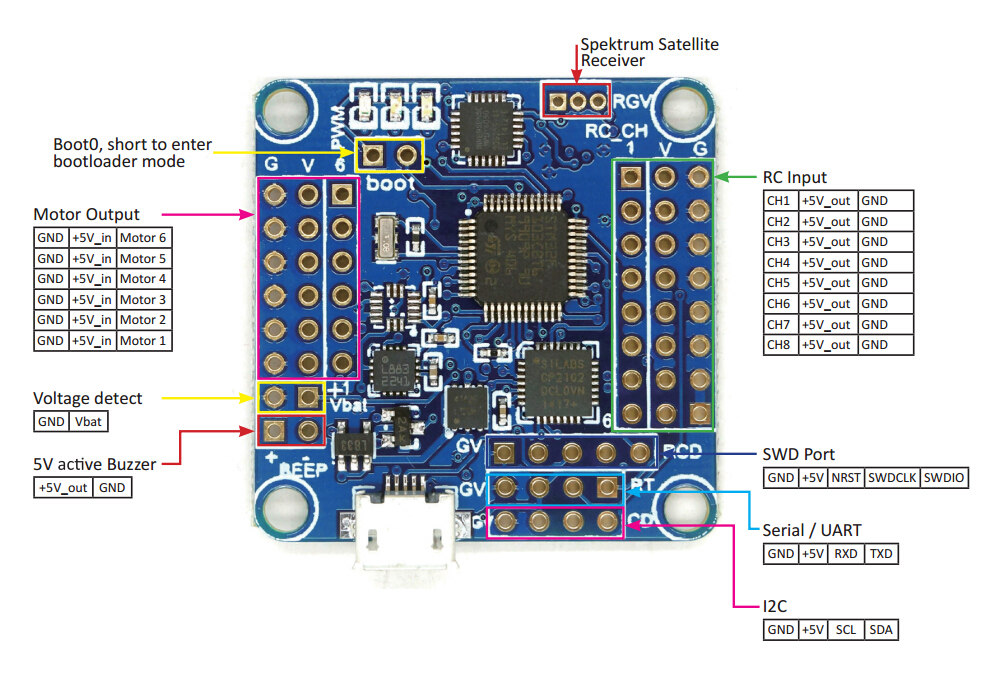
Connect the Debugger to your flight controller. Here is the pinout for the Flip32 and flip32+
Plug in the debugger and start openocd (you'll need sudo privileges)
sudo start_openocd_f1
- Import Existing Project
- Open to the root of the airbourne directory
- Do not add .creator files to the Git repository
- Go to the Projects Tab on the left hand side
- Switch to the ARM Kit we just created
- Build Settings:
- Change Build Directory to the example folder (in this case i2csniff)
.../airbourne/examples/f1/i2csniff(needs full path) - Build Steps:
make -j4
- Change Build Directory to the example folder (in this case i2csniff)
- Run Settings:
- Change Run Configuration to hardware debugger
- Choose the
.elffile in theobjdirectory (you'll need to build first).../airbourne/examples/f1/i2csniff/obj/i2csniff.elf
You're done! Just select the Debug tab and debug your project!