![]()
Music Binder is a demo project showcasing what you can do with a Python-backed frontend, featuring htmx and TailwindCSS.
- Table of Contents
- 🧐 About
- 🏁 Getting Started
- 🔧 Run pytest
- ☁️ Deployment
- 🎈 Guide
- 💪 Advanced
- ⛏️ Built Using
- ✍️ Author
- 🎉 Acknowledgements
You can build a beautiful web application using nothing more than Python, htmx, and TailwindCSS. Create dynamic pages using the power of Jinja templates and server-side rendering to create a Hypertext driven application.
Also, it contains infrastructure files for easy deployment using Azure Developer CLI (azd up) and Azure App Services. No database needed!
This repository was prepared for a PyCon tutorial on how to create a python-backed frontend, featuring Jinja templates for HTML rendering, TailwindCSS for style, and htmx for pizzazz! 😎
The tutorial is scheduled for Wednesday, April 19th, 2023 from 9 - 12:30pm (Mountain Time).
The example app was created with Python 3.11, but it is likely compatible with earlier versions. However, I would highly recommend using the latest version of Python. The rest of the dependencies are listed in the requirements.txt file.
fastapi[all]
jinja2
jinja2-fragments
pytailwindcss
pytest
python-multipart
tinydb
Note The
fastapi[all]dependency installs some other optional dependencies and features. It also includesuvicorn, which is used as the server to run your code. (You could choose to just usefastapianduvicorn[standard]separately, if you prefer.)
There are two methods to get started. The first and recommended method is using Codespaces. The second, more traditional route is to clone/copy the repo and install locally.
Either way, make sure you are in the main branch and locate this button above:

Press the Use this template button above and select Open in a codespace. This will open a new window in your browser, where you can run the code in a dedicated, containerized environment in the cloud.
Tip: If you don't know what that means, don't worry! It just means that you can run this codebase without having to install anything on your computer, all through your browser!
The first time you open the Codespace, the build might take a couple of minutes, but this only happens the first time.
Note You can alternatively start up a Codespace by clicking on the
<> Codebutton next to theUse this templatebutton. This gives you access to git history, as well as giving you the option to copy all branches to your Codespace.
Create a copy of the repo using the Use this template button above. Select Create a new repository.
Note You may want to
Include all brancheswhen cloning the repo to view some advanced features.
After cloning or using this template, you will need to create a virtual environment. Navigate to the location where you have cloned the project (your project root) and run the following command in your terminal:
python -m venv .venv
This will create a .venv directory within your project.
Next, activate your environment:
# On Windows
.\.venv\Scripts\activate

# On MacOS/Linux
$ source .venv/bin/activate
Then, install the requirements:
python -m pip install -r requirements.txt
Warning Make sure you are only using one of the above options to get started. If you use Codespaces, you will NOT need to install any dependencies, nor need to "activate" your environment when using the in-browser terminal.
As a recap... To get started, use ONE of the methods listed below:
| 🥇 Method 1: Codespaces (recommended) | 🥈 Method 2: Locally |
|---|---|
| Click on "Use this template" | Check for latest Python version |
| Select "Open in a codespace" | Clone repo or use template |
| Wait for the build | Navigate to project root in terminal |
| Start Coding | Create virtual environment |
| ... | Activate virtual environment |
| ... | Install from requirements.txt |
| ... | Run tailwindcss init |
Tip: If you use VSCode, you can transfer the browser session of Codespaces to your Desktop application, which allows you to use your own extensions and settings.
After activating your virtual environment, you can run tests by typing pytest on the command line. This makes sure that your application is able to generate the index page.
pytest
Note The application does not include comprehensive testing (yet). As of now, if the tests pass, it means that the application runs and generates a response.
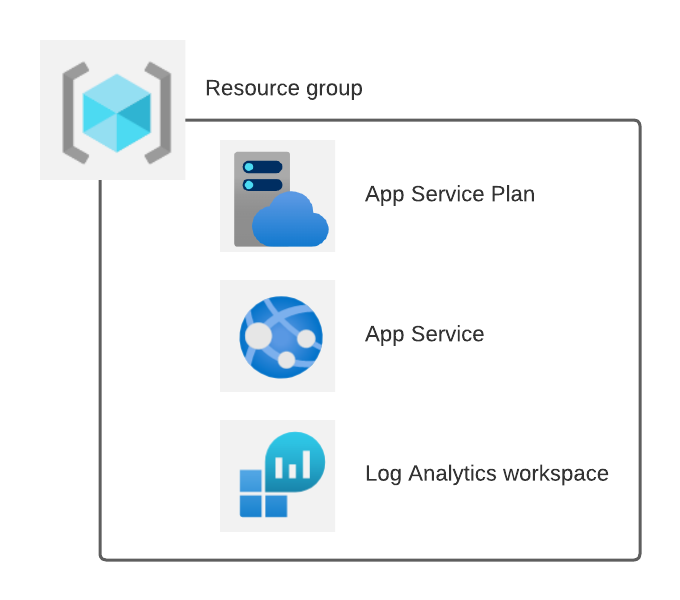
This repo is set up for deployment using Azure App Services, with a Log Analytics workspace. It does not require a database provision, since we are using a local file with TinyDB.
Steps for deployment:
-
Sign up for a free Azure account and create an Azure Subscription.
-
Install the Azure Developer CLI.
-
Login to Azure through the terminal:
azd auth login -
Provision and deploy all the resources:
azd upThis will prompt you to provide an environment name (such as "musicbinder-app"), select a subscription from your Azure account, and select a location (I recommend "useast", as choosing a different location may have availability constraints). This will provision the resources in your account and deploy your latest code. If you receive an error, try changing locations again or seek out support.
-
When the deployment is done, you'll see an endpoint URI in the terminal output. This should send you to the Music Binder front page!
-
If you make any changes to the app code, you can redeploy by running:
azd deploy
Warning
⚠️ To avoid unnecessary costs, remember to take down your app if it's no longer in use, either by deleting the resource group in the Portal or runningazd downin the command line.
If you would like to learn how to build a site like this from the ground up, consider following the instructions over on the Simple Site repository.
The repo includes documentation on how to get started from scratch, with more information on some of the libraries used in this application, including FastAPI, Jinja2, pytailwindcss, and htmx.
The advanced-features branch showcases a few more features of TailwindCSS and htmx. If you're learning how to use either of the tools, try to tackle them yourself before looking at the branch for solutions. Some of this will be covered in the workshop.
- @tataraba - Mario Munoz, Python By Night
- @kjaymiller - Jay Miller, Senior Cloud Advocate-Python, Microsoft