OpenBehaviourTree is an open source tool to design and monitor behaviour trees visually in Unity.
- Custom editor window to design trees, and watch nodes being evaluated in real time during Play Mode
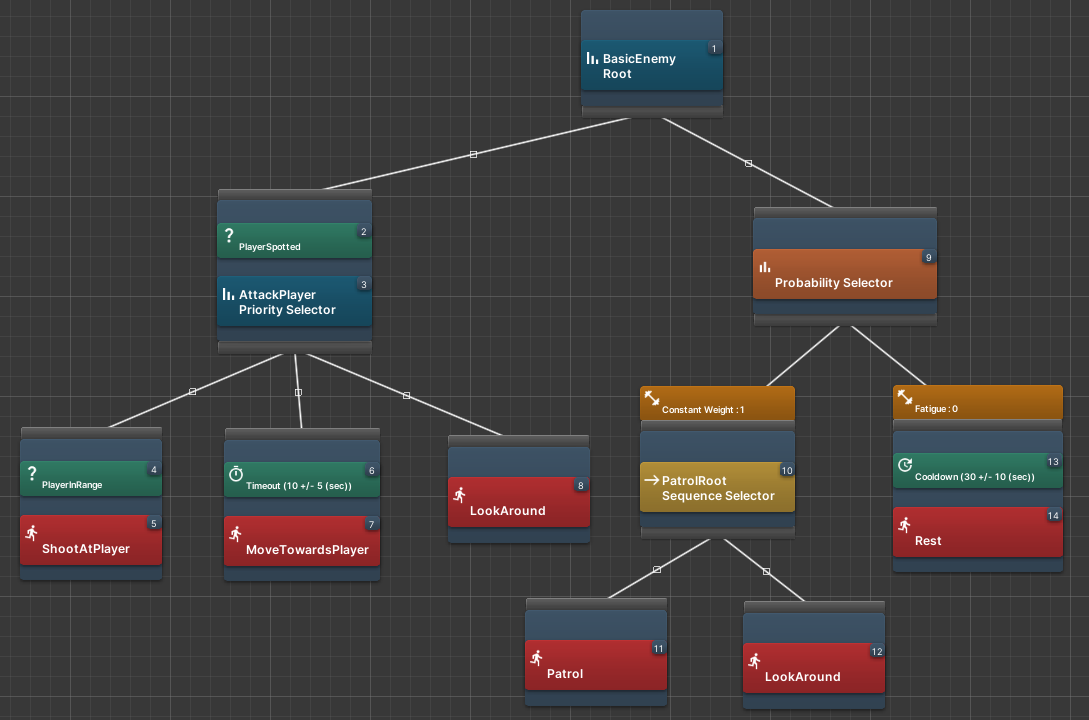
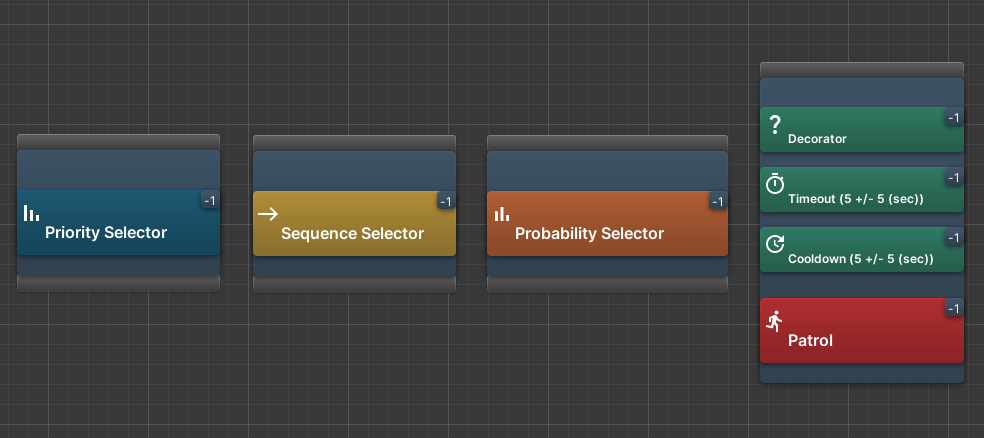
- Priority, sequence, and probability selector nodes
- Action nodes that can run user-defined class coroutines
- A blackboard to share variables between nodes
- Boolean, timeout, and cooldown decorators
- User-defined probability weights for all children of probability selector nodes
- Decorators and probability weights can use constant values or values from the blackboard
Tested on Windows 10 using Unity 2021.2.11f1
- Install Git (e.g. for Windows https://gitforwindows.org/)
- In Unity open the package manager (
Window-->Package Manager) - Use the plus button to add a new package, and choose
Add package from git URL - Add the URL
https://github.com/toastisme/OpenBehaviourTree.git
OpenBehaviourTree works as a custom editor. To create a behaviour tree right-click in a given folder in your Project view, and choose Create --> BehaviourTree.
Most behaviour trees will also need a blackboard (Create --> BehaviourTreeBlackboard).
Double-clicking on the newly created BehaviourTree will then open an editor window with a single Root node. This is the base of your tree.
To move around the tree left-click and drag the mouse. Zoom is controlled with the mouse wheel, and nodes can be moved by left-clicking and dragging them.
On the right-hand side is the Details panel. Clicking on the Blackboard tab will allow you to add a given blackboard. Here you can also add blackboard keys that can be used in the behaviour tree.
To begin adding nodes left-click the bottom connection point of the Root node. This will begin to draw a connection from the node to your cursor. Left-clicking anywhere on the grid will then give a series of options for creating a node. Right-clicking while drawing a connection cancels the connection. When left-clicking on a given node, its details are shown in the Details panel when looking at the Selected tab, along with any properties that can be modified by the user. Decorators can be added to a node by right-clicking on the nodes.
Action nodes can be created from anything that derives from BehaviourTreeTask. A new action class just needs to implement two things:
public override void Setup(MonoBehaviour monoBehaviour), which passes in theMonoBehaviourof theGameObjectrunning the behaviour tree. Here you can cache any references to components needed for the action, such as aRigidBodyorNavMeshAgent.public override IEnumerator ExecuteTask(System.Action<Behaviour.NodeState> CurrentState). This is the coroutine that carries out the action.CurrentStateis the state of theActionNode, and it is assumed that at the start of the coroutine this will be set toBehaviour.NodeState.Running, and when the coroutine finishes it will be set toBehaviour.Nodestate.Succeeded. All classes derived fromBehaviourTreeTaskhave access to the blackboard, and can get and set blackboard keys using the methods:
GetInt(string keyName)
GetBool(string keyName)
GetFloat(string keyName)
GetGameObject(string keyName)
GetString(string keyName)
GetVector3(string keyName)
GetVector2(string keyName)

SetInt(string keyName, int val)
SetBool(string keyName, bool val)
SetFloat(string keyName, float val)
SetGameObject(string keyName, GameObject val)
SetString(string keyName, string val)
SetVector3(string keyName, Vector3 val)
SetVector2(string keyName, Vector2 val)
So, for example, an action that added force to the GameObject can be written like this
using System.Collections;
using System.Collections.Generic;
using UnityEngine;

public class ExampleTask : Behaviour.BehaviourTreeTask
{
    Rigidbody rb;

    public override void Setup(MonoBehaviour monoBehaviour){
        rb = monoBehaviour.GetComponent<Rigidbody>();
    }

    public override IEnumerator ExecuteTask(System.Action<Behaviour.NodeState> currentState){

        // Put the node in the Running state
        currentState(Behaviour.NodeState.Running);

        // Get values from the blackboard
        Vector3 force = blackboard.GetVector3("currentForce");
        float timeDelay = blackboard.GetFloat("timeDelay");

        // Carry out the task
        rb.AddForce(force);
        yield return new WaitForSeconds(timeDelay);

        // Put the node in the Succeeded state
        currentState(Behaviour.NodeState.Succeeded);
    }
}
- Behaviour trees are attached to a
GameObjectby attaching theBehaviourTreeControllerscript, and then adding theBehaviourTreeto theBehaviourTreeController. - The tree can then be started and stopped using the
BehaviourTreeControllerRunTree()andStopTree()methods, respectively. - In
Play Mode, when selecting aGameObjectthat has aBehaviourTreeController, theBehaviourTreewill be shown in the editor window, with active/disabled nodes highlighted.
- Priority Selector: Calls child nodes in the order they were connected. If any return
Succeededwhen evaluated the remaining child nodes are not called and the node returnsSucceededto its parent. - Probability Selector: Selects a single child node to call at random, based on probabilities defined by probability weights. Returns the result of the selected node to its parent.
- Sequence Selector: Calls child nodes from left to right. If any return
Failedthe node returnsFailedto its parent. Only returnsSucceededif all child nodes returnSucceededwhen called. - Action: Executes a coroutine, the inner workings of which determine the state of the node. This type cannot have any children.
- Decorator: The node it is attached to is only evaluated if the boolean condition is met (or the opposite if
invert conditionis selected) - Timeout: If the node it is attached to remains in the
Runningstate longer than the timeout, the node is cancelled and returnsFailed. - Cooldown: Stops the node it is attached to from being run while the cooldown is active. Can be set to start when the node fails, succeeds, or both.
- In your project packages folder, open the manifest file and add
"com.davidmcdonagh-openbehaviourtree"to"testables"(see the Enabling tests for a package section here). - In the Editor open `Window -> General -> Test Runner
- Under
PlayModeyou should now see tests for OpenBehaviourTree
- Undo/Redo
- Full documentation
- See also OpenGOAP