![]()
example.mp4
To see more examples, scroll to the end
This project is a library and a CLI tool written in Python with OpenCV for generating and decoding a custom matrix barcode similar to a QR code. This project is not trying to be a serious contender to a QR code - it is just a hobby project that I work on in my free time that I wanted to make available for others. I tried to keep the code simple and clear so that people not well versed in computer vision (me included) can experiment with it and learn from.
SR is a tongue-in-cheek acronym for Sufficient Response, since QR stands for Quick Response (at least that's what Wikipedia tells me).
It's available via pip:
pip install srcode# Create a 600x600 SR code which encodes 'Hello world!'
sr generate -s 600 -m 'Hello world!' hello.png
# Decode an SR code from an image
sr decode hello.png
# Decode from a video
# Press 'b' to toggle between color and black&white mode
sr video video.mp4
# Alternatively use the system camera
sr videoCheck the help message of the individual commands, e.g. sr generate --help for more info.
Import the relevant functions:
import cv2
from sr import generate, decode, decode_video

# Generating an image
image = generate(size=400, "Test image")
cv2.imwrite(image, "test.png")

# Decoding an image
image = cv2.imread("test.png")
# Expectes a 'BGR' image (opencv's default)
result = decode(image, find_all=True, use_bw=False)
# Result is an instance of 'DecodeResult'
print(result.success)
# Typically multiple candidate contours are found.
# Only those which are successfully read will have a message.
for contour in result.contours:
  if contour.success:
    print(f"Message: {contour.message}")
  else:
    print(f"Error: {contour.error}")


# Decode from a video
# Pass '0' to open the default camera stream
decode_video(filename, visualize=True, verbose=True, stop_on_success=False)
For more info, check how the CLI uses these functions in sr/sr.py
Before I get into how it works, here are the limitations of the SR code. These are mostly because I really wanted to keep the design simple while still having some built-in robustness.
- Maximum message length of 16 characters - the SR code uses a simple error correction mechanism which requires more bits per message.
- The characters must be from this set:
!0123456789abcdefghijklmnopqrstuvwxyzABCDEFGHIJKLMNOPQRSTUVWXYZ. This is basically base64, but I included space and!(this way I can encodeHello world!). - The SR code cannot handle mirrored images - This could be easily fixed, but at a cost of added complexity.
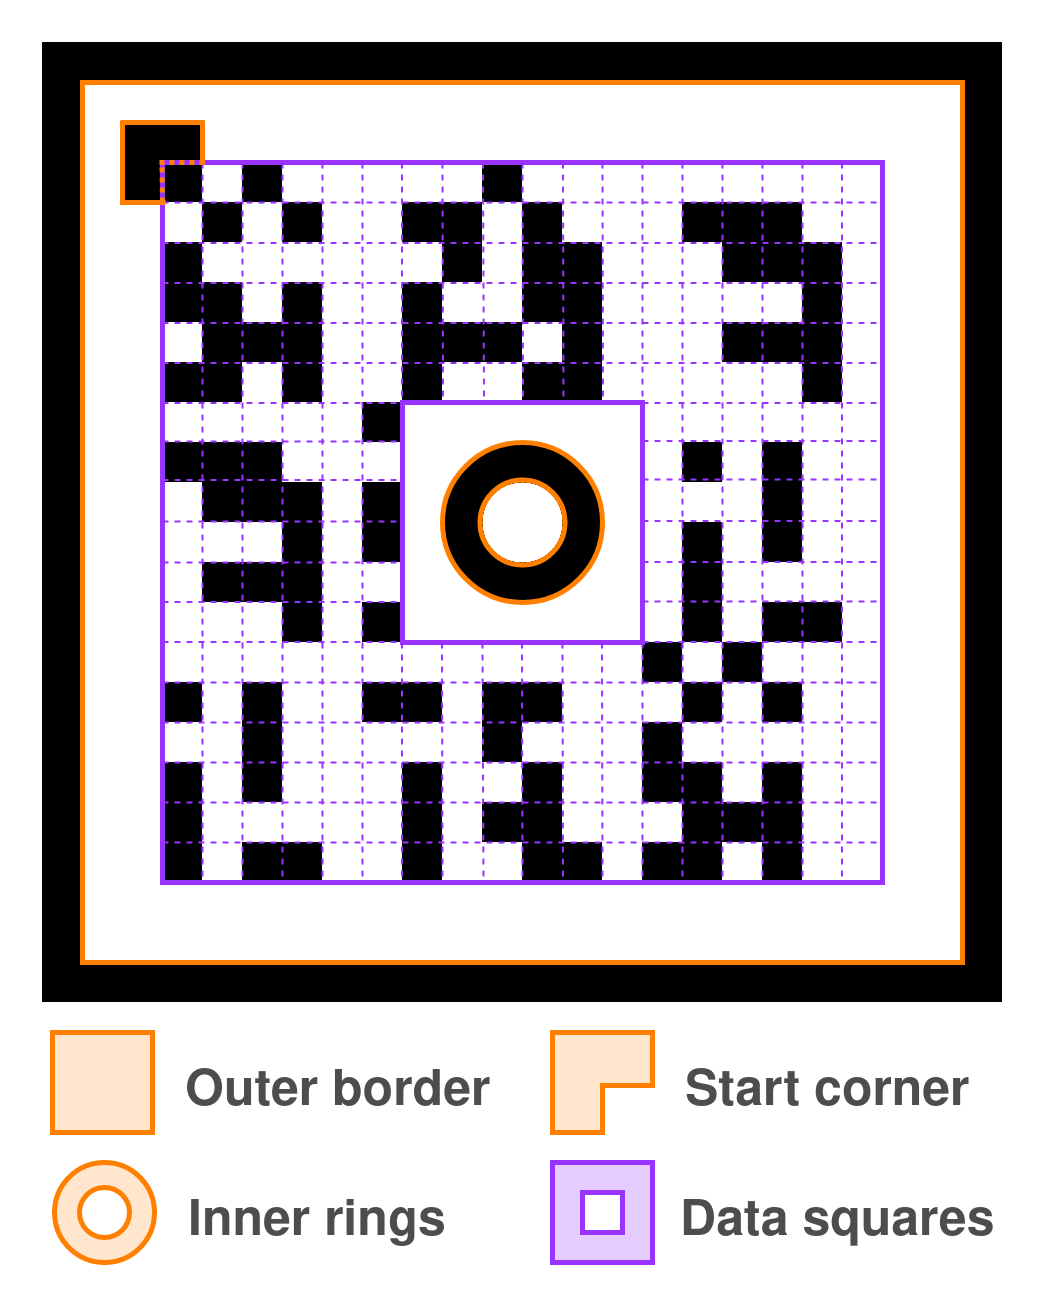
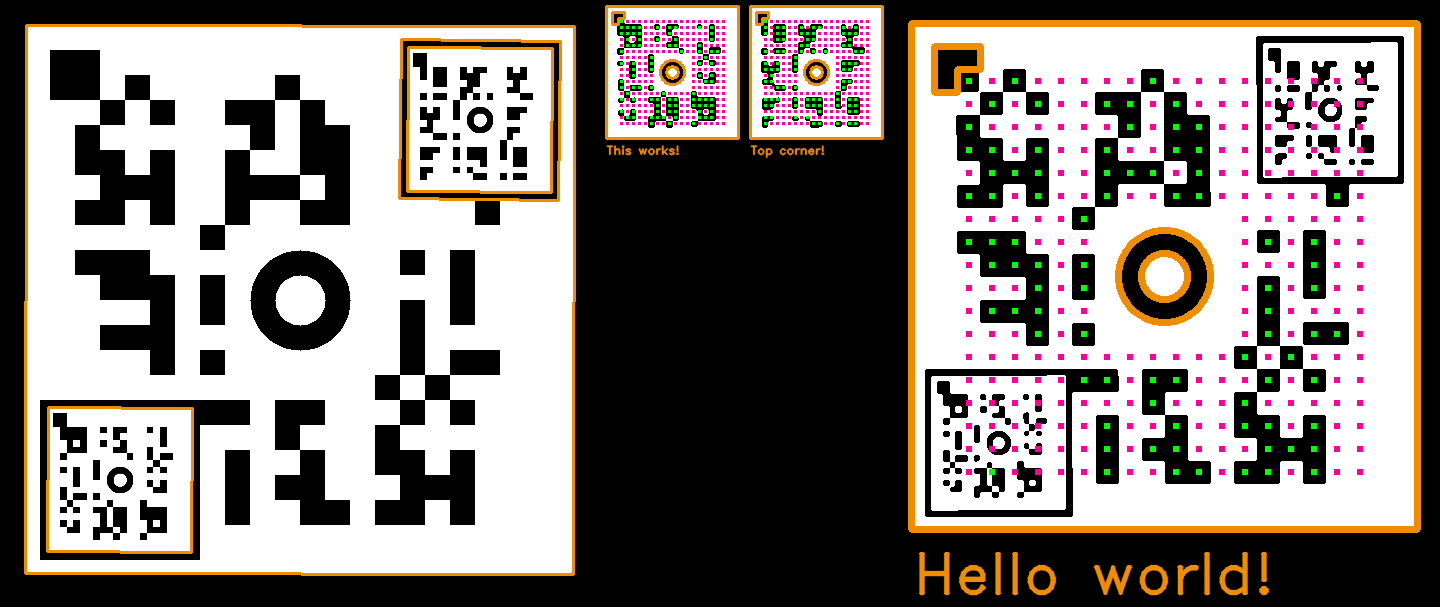
This image above shows all the main parts of the SR code. I'll refer back to this image as I explain the individual elements it is made up of (As a side note, even with the extra colored lines, this image will decode correctly. Try running sr decode assets/sr-diagram.png to see for yourself).
Let's assume we start with a standard RGB image that includes the SR code somewhere in it. Before we can try to decode it, we must first find it in the image.
We find the SR code by looking for the outer border shown in the diagram above. The border is nicely sandwiched between black and white regions, which together define a contour - basically a closed shape separating two parts of an image. OpenCV has some fancy algorithms which can find these contours. Running the contour finding algorithm, we end up with something like this:

You can see there are multiple contours (shown in orange). There are many contours which are definitely not what we're looking for which we need to filter out.
For every candidate contour, we also apply a perspective correction. We need to do that in case the image is seen under an angle (like the one above). This transformation makes it as if we were looking directly at it:

Now that we have a nice flat image, we check if in the middle of the contour there are the inner rings shown in the diagram above. This is just to make sure that we don't treat any random contour as a valid SR code, since lots of everyday objects can give us a false positive. On the other hand, if we do find the rings, it's likely that we actually have a legit SR code.
Now we just need to locate the start corner. The start corner basically tells us where to start reading the data:

The data is laid out in columns going from top to bottom and left to right, finishing in the bottom right hand corner. A black square encodes the 1 bit while white encodes the 0 bit. This bit sequence is then converted into individual characters.

This section expands a bit more on the parts I glossed over in the quick summary.
The SR code can encode up to 16 characters from a slightly modified base64 character set: !0123456789abcdefghijklmnopqrstuvwxyzABCDEFGHIJKLMNOPQRSTUVWXYZ. The difference is that instead of '+/' we have space and ! which I think are a bit more useful for encoding text messages.
I chose a 64-character set intentionally because any character from the set can be encoded with just 6 bits (since 2^6 = 64). There are 288 data squares in total in the SR code, which gives us 288/6 = 48 characters we can fit in the message. However, to have some built-in error correction, the message is duplicated 3 times. Decoding uses a majority vote to determine the correct bit. This gives correct results as long as at least two copies of each bit of the message are correct. Using this error correction, we get 48/3 == 16 as the maximum message length.
This encoding scheme is pretty inefficient, and it is definitely possible to use something more sophisticated which would allow for longer messages to fit.
The OpenCV contour-finding algorithm only works with binary black & white images. Converting a color image into black & white is a surprisingly difficult problem. Using a static threshold for the grayscale image is pretty sensitive to lighting conditions in which the image was taken. Instead, we use Otsu's Binarization which selects the threshold adaptively using the image histogram. This gives a more robust output, and it is also one parameter less to tune.
It is pretty unlikely that an image of an SR code is facing the camera without any rotation or distortion. This is a problem for decoding because the SR code grid won't properly line up along the image x and y axes. If we attempted to read the data like that we'd just get random gibberish. Before we can do the decoding, we must first undistort the image. To achieve this, we transform the image using a homography matrix estimated from the contour. The contour gives us 4 points - the corners of the contour. We choose other 4 arbitrary points which form a square (e.g. (0, 0), (0, x), (x, x), (x, 0) for some value of x) and compute a homography mapping between them. When we apply this homography to the original image, the SR code will become perfectly flat.
After the perspective correction, we check for presence of the inner rings. The rings only serve one purpose - to reject false positives. The reason for using the rings is that it is a pretty specific shape which is unlikely to appear randomly - a white ring inside a black ring, both with a given radius. The rings are also symmetrical, meaning we can check for it regardless of the image orientation.
The start corner is also fairly simple to find. There are only four possible positions where it can be. Once we have found the start corner, we rotate the image so that the start corner is in the top left position. The final step is to read and decode the data going down each column from left to right finishing in the bottom right hand corner.
Check the examples folder for more.
You can try these yourself - just clone the repo and run e.g. sr decode examples/lena.png.
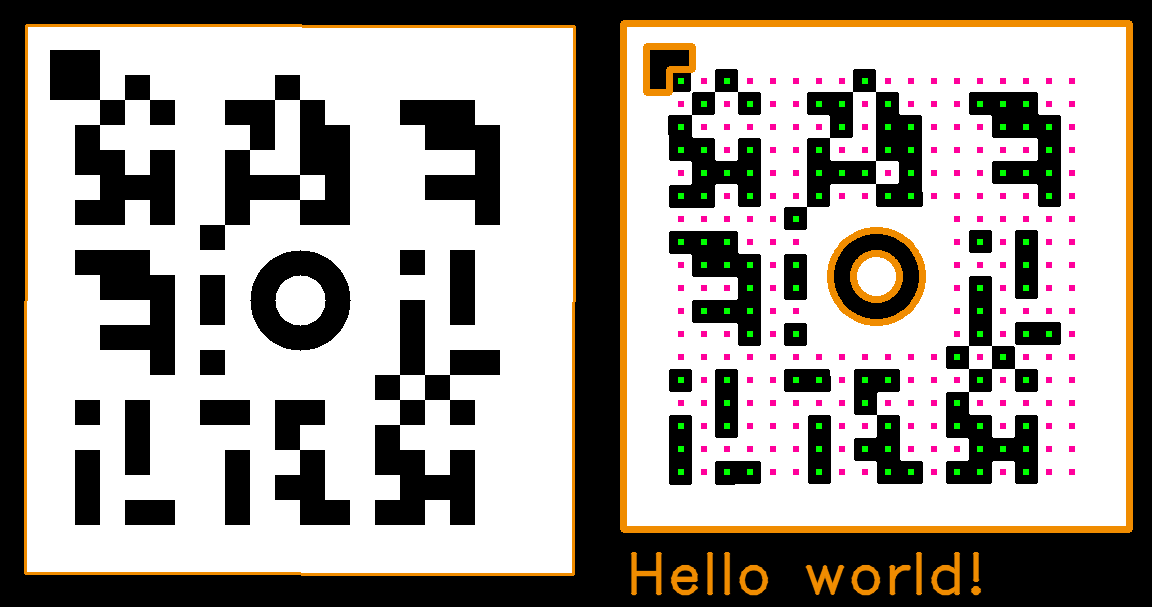
- Standard Hello world example
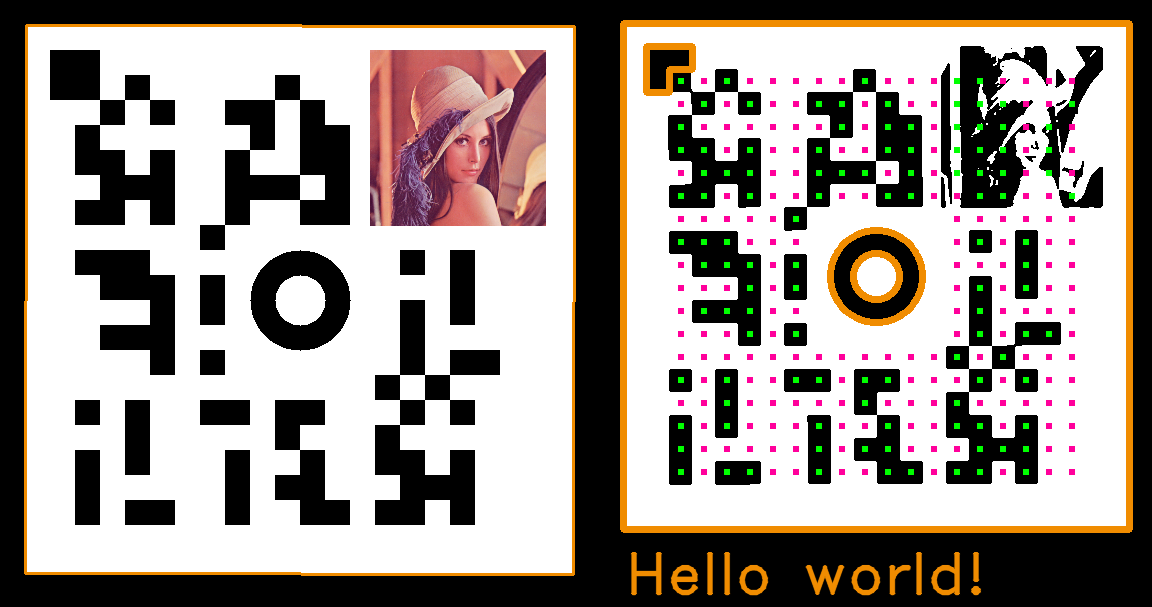
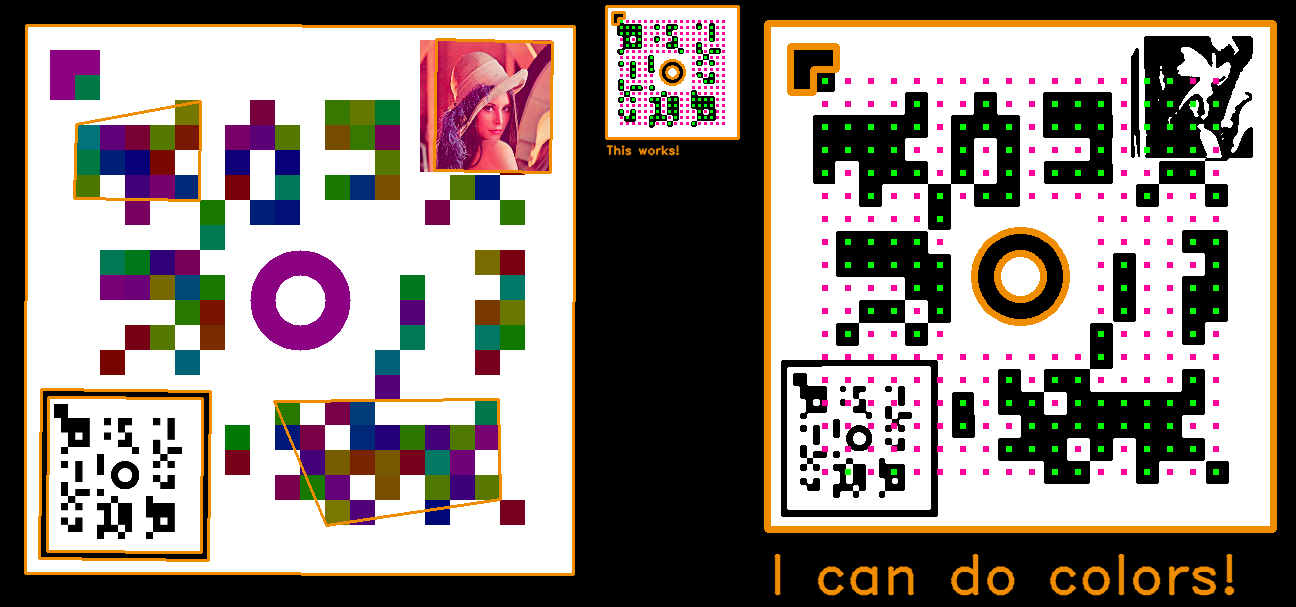
- Error correction can handle Lena
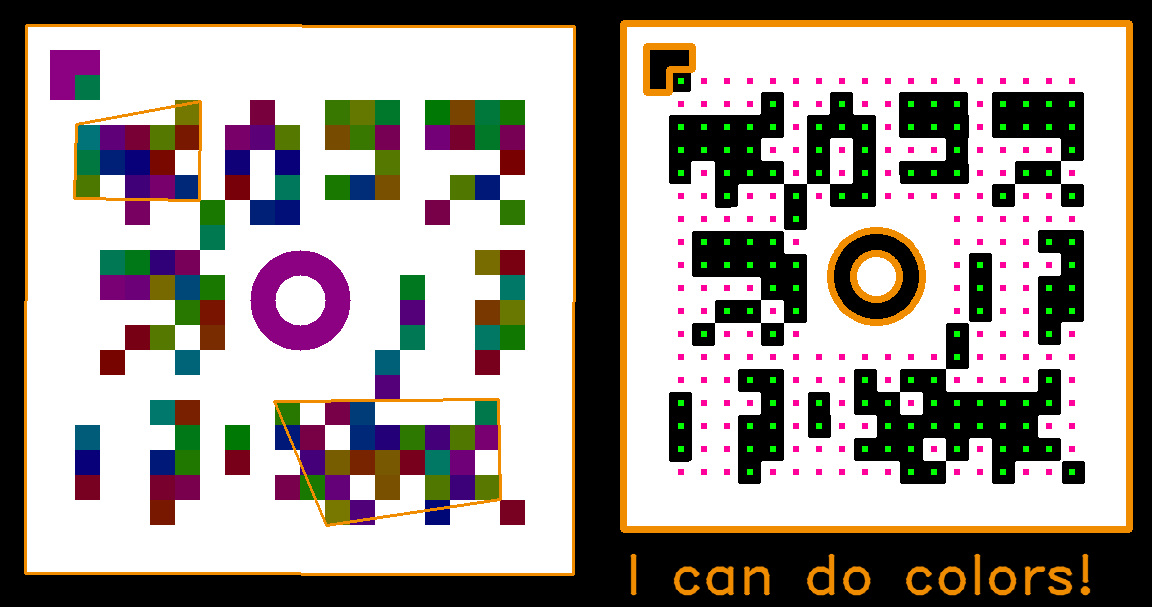
- Thresholding can even handle other (sufficiently dark) colors
- Codeception, why yes
- And now everything combined together
Click includes autocomplete capability, just run this command in your bash shell to enable it:
eval "$(_SR_COMPLETE=bash_source sr)"Or in zsh (you might need to run rehash first)
eval "$(_SR_COMPLETE=zsh_source sr)"