It's an exercise to consolidate knowledge of homogeneous coordinates and rasterization algorithms.
This project is not intended to be the fastest and the best software renderer ever. If you need one please consider using OpenSWR or WARP.

There are three ways to do that:
- Win & Linux: Download the executable from releases.
- Windows: Using a standalone command. Run
build-and-run.bat. - Windows: Using Visual Studio. To generate VS2019 solution run
gen-VS2019-x64.bat. Then compile and run the app.
Prerequisites:
- Install GCC-10. Debian-based distributions may require the unstable repository to be referenced from
/ets/apt/sources.list- add
deb https://deb.debian.org/debian sid maintosources.list sudo apt-get updatesudo apt-get install gcc-10 g++-10- add
export CC=gcc-10 CXX=g++-10to.bashrc(makes CMake use GCC10 as a default compiler)
- add
- Install CMake
- Requires
libssl-devpackage to be installed beforehand
- Requires
- Install libgtk-3-dev
sudo apt-get install libgtk-3-dev
- Build the app
mkdir buildcd buildcmake -DCMAKE_BUILD_TYPE=Release ..make
- Run the app
./x64/host-gtk
There are only two modules:
librasterizeris a static library that does most of the job.host-gdi/host-gtkis an executable that is in charge to create a window and output the result to it.
- Basic obj file support (enough to load the Stanford Bunny).
- Clipping in the homogeneous clip space (before perspective division).
- Parallel tiled rasterization.
- Perspective-correct interpolation of vertex attributes.
- Per-pixel lighting via Lambertian BRDF.
- Gamma correction.
- Screen space shadows
Clipping is a necessary step of any rasterization process. The general misconception is the clipping is an optimization, but it's not actually. The real goal of the clipping is preventing weird things from happening.
Firstly, objects behind the camera must not get projected on the screen:

Image by Scratchapixel. Source.
Secondly, objects crossing the plane w=0 must not wrap around:

Image by J.F. Blinn and M.E. Newell. Source
The clipping process works with a custom set of planes. The clipper may leave the triangle as is or chop it onto multiple triangles as follows:

The clipper is semi-parallel. It processes mesh triangles in parallel. However, when it comes to emitting a new triangle, the clipper waits for a spin-lock.
A naive rasterizer takes a bounding box of a triangle and starts testing pixel coverage inside that box. In the case of a thin but long triangle, most pixels fail the coverage test, so only a few of them perform rasterization.
Another problem is several triangles trying to cover the same pixel. A naive rasterizer cannot process these triangles in parallel due to potential data race in depth and color buffers.
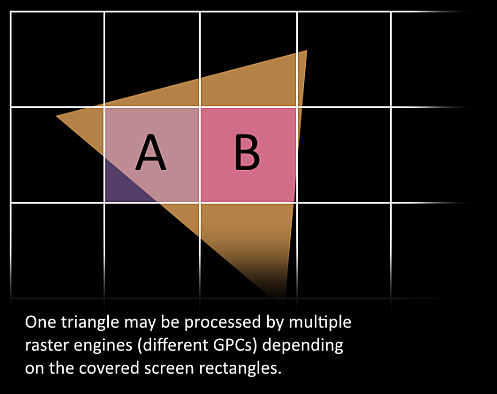
Image by Nvidia. Source.
Tiled rasterization is an optimization that increases the general level of parallelism. All triangles are scheduled to the tiles they cover. After the work assignment, these tiles start working parallel without sharing data, meaning there's no risk of a data race. Under the hood, the tiles are serial machines.
Gamma correction is essential when it comes to light computation. It gets done in linear space because the light is essentially linear. However, monitors are non-linear. The generated image must be additionally post-processed before display.

Left: gamma corrected image. Right: linear image.
If you take a closer look at the real image of the Moon, you'll see how sharp the terminator is. Check this out:

The real image of the Moon. Source.
The gamma correction process makes the resulting image lighting is more realistic.
Screen space shadows is a rendering method based on an approximation that the information stored in the framebuffer is sufficient to reconstruct shadows. To start using this technique we need to prepare a so-called G-buffer first. This is simply three textures: albedo, normals, and depth.

From left to right: albedo, normal and depth buffers
When the rasterization process is over, the post-processing stage begins. To build shadows, we take the depth buffer and start considering it as a 3D function z=f(x,y) plot. Each pixel of the buffer is tested via tracing rays to the light source. If the ray intersects other parts of the plot, this means the pixel is occluded. Thus the pixel is marked as 'in shadow'. In another case, it's marked as 'exposed'. The result of this process is just another texture. A shadow mask.

A shadow mask
Then the so-called 'deferred shading' goes in. The shadow mask is used to determine if it's even necessary to start the BRDF calculation. If so, the albedo and normal textures are used to calculate Lambertian BRDF (dot product between normal and light direction). Otherwise, the ambient intensity is applied.
And this is the result!


First: SSS + Lambertian BRDF. Second: Lambertian BRDF only.
Since the method is a rough approximation it produces quite notable artifacts sometimes. Here's a quite good example.

The artifact: the left ear must cast a thin shadow over the back, but it doesn't.
- No antialiasing.
- No mipmap levels.
- No texture filtering.
- After all, it's a simple thing.
The project uses GLM library and the Stanford Bunny model.