The Flex Preview Dialer Plugin includes the capability to upload a contacts list and programmatically generate a preview dialing task for each contact. Alongside the CSV upload, you can set default scheduling for outbound campaigns in a JSON file and generate preview tasks for your agents immediately or at a specified later time and day.
The Flex Preview Dialer plugin uses Twilio Functions and the Actions Framework StartOutboundCall action to send preview dialing tasks to available agents representing a call that needs to be made. When an agent accepts a preview task, Flex initiates an outbound call (represented as a voice task) and automatically connects it to that same agent. This plugin customizes the Flex UI to include the following components:
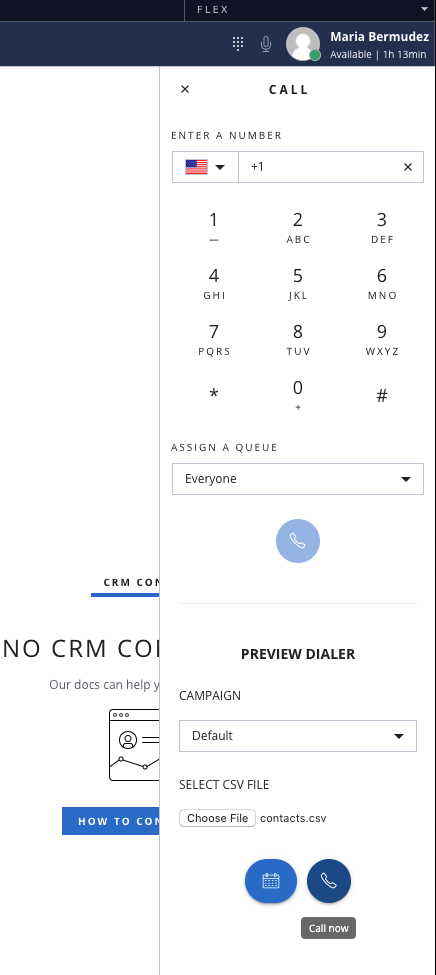
- A dropdown list for your outbound campaigns, populated from campaigns.json
- A CSV upload button, for uploading your contacts list
- Two outbound calling buttons:
- "Call Now" to generate preview dialing tasks for each contact immediately
- "Schedule" to set day and time intervals for the selected outbound campaign
To deploy this plugin, you will need:
- An active Twilio account with Flex provisioned and running v.1.18.0 or higher where you have owner, admin, or developer permissions. Refer to the Flex Quickstart to get started.
- npm version 5.0.0 or later installed (type
npm -vin your terminal to check) - Node.js version 10.12.0 or later installed (type
node -vin your terminal to check) - Twilio CLI along with the Flex CLI Plugin and Serverless Plugin. Run the following in a command shell:
# Install the Twilio CLI npm install twilio-cli -g # Install the Serverless and Flex as Plugins twilio plugins:install @twilio-labs/plugin-serverless twilio plugins:install @twilio-labs/plugin-flex - TaskRouter Queues you wish to use for outbound campaigns
- Outbound campaigns and contacts list management (the plugin includes CSV upload and scheduling components for demonstration purposes)
Before using this plugin, you must first add the following to your Flex Task Assignment workspace:
- A task channel for your preview dialing tasks
- A workflow filter to a dedicated workflow, or an additional filter to your current workflow.

There is a single function located in the serverless directory that you are expected to implement in the Twilio Functions Runtime, or to replicate in your own backend application.
This plugin uses a Twilio function to generate preview dialer tasks for each contact on your CSV file. If you use the Twilio Functions Runtime, you'll need to validate that the incoming requests to your serverless function are coming from a Flex front-end.
This plugin will send the Flex user's token along with the task information to transfer. Upon validating the token, it will initiate the preview task. This plugin expects that you've configured your Twilio Functions Runtime dependencies and added the twilio-flex-token-validator package.

Make sure you have Node.js and npm installed. Copy public/appConfig.example.js to public/appConfig.js.
Afterwards, install the dependencies by running npm install:
cd flex-preview-dialer

# If you use npm
npm installIn order to develop locally, you can use the Webpack Dev Server by running:
npm startThis will automatically start the Webpack Dev Server and open the browser for you. Your app will run on http://localhost:3000. To change the port, set the PORT environment variable:
PORT=8000 npm startWhen you make changes to your code, the browser window will be automatically refreshed.
Once you are happy with your plugin, bundle it and deploy it to Twilio Flex.
Run the following command:
npm run deployAfterwards, you'll find in your project a build folder that contains a file with the name of your plugin project. For example plugin-<plugin-name>.js. Take this file and upload it to the Assets part of your Twilio Runtime.
-
Set up all dependencies above: the TaskRouter TaskChannel, Workflow filter, and the Twilio CLI packages.
-
Clone this repository.
-
Copy
public/appConfig.example.jstopublic/appConfig.js. -
Copy
src/configs/campaigns.example.jsontosrc/configs/campaigns.jsonand set your campaigns. -
Run
npm install. -
Copy
./serverless/.env.exampleto./serverless/.envand populate the appropriate environment variables. -
Change into
./serverless/then runtwilio serverless:deploy. Optionally, you can run locally withtwilio serverless:start --ngrok="". -
Copy and save the domain returned when you deploy a function.
-
From the root directory, copy
.env.exampleto.env. -
Open the
.envfile in a text editor of your choice. Modify theREACT_APP_SERVICE_BASE_URLproperty to the Domain name you copied previously. Make sure to prefix it with "https://". -
Run
twilio flex:plugins:deploy --major --changelog "Updating to use the latest Flex plugin for the Twilio CLI" --description "Preview Dialer for Outbound Campaigns plugin"
To enable the plugin on your contact center, follow the suggested next step on the deployment confirmation. To enable it via the Flex UI, see the Plugins Dashboard documentation.
Note: If you have previously deployed this plugin using v3 of the Flex Plugin Builder, make sure your agents refresh the Flex application in their browsers to ensure they are running the latest plugin version.
- Log in to the Flex instance where you deployed the plugin.
- Change your status to "Available" on the upper right corner of the Flex UI. This enables you to receive incoming calls and messages (SMS or chat).
- With your specific campaign selected from the Campaigns dropdown list, import a CSV file of Contacts. You can have two columns: Contact Name, and Destination (Phone Number). For example:
| Full Name | Destination Number |
|---|---|
| Alice Cooper | 2065556666 |
- To generate a preview task for each contact in the list:
- Click "Call Now" to generate preview tasks for your campaign immediately.
- Click "Schedule" to set up scheduling for your selected campaign. When specifying a schedule, note that the TaskRouter API utilizes Coordinated Universal Time (UTC).
-
To see the incoming preview tasks (displayed with the Campaign name and the phrase "Call to <destination_number_for_contact_row>", navigate to the Agent Desktop in your Flex Instance.
-
Upon clicking "Accept", you should see a connecting call to the destination number (which has been added as an attribute on the subsequent "voice" task). Tip: Flex users with
adminordeveloperpermissions can review generated tasks within the Twilio Console (Tasks page on your Flex Task Assignment workspace) or by runningtwilio api:taskrouter:v1:workspaces:tasks:list --workspace-sid <flex_task-assignment_sid>adminordeveloperin a command shell.
This software is to be considered "sample code", a Type B Deliverable, and is delivered "as-is" to the user. Twilio bears no responsibility to support the use or implementation of this software.