인프런 Spring Security 강의 요약 내용
소스코드 https://github.com/umanking/spring-security-example
학습목표
- Spring Security 인증, 인가 하는 아키텍쳐를 이해한다.
- Spring Security가 제공하는 폼인증 설정, 구현 한다.
- FilterChainProxy의 15개 Filter가 하는 역할을 이해한다.
요구사항
- Spring MVC를 이용해서 구현하라
- GET
/인증된 사용자, 인증되지 않은 사용자 모두 접근할 수 있다. - GET
/info누구나 접근할 수 있다. - GET
/dashboard인가된 사용자만(로그인한) 접근할 수 있다. - GET
/admin인가된 사용자중에서ADMIN권한을 가진 사용자만 접근할 수 있다.
구현
요구사항에 맞는 Controller단 구현
@Controller
public class SampleController {

    @GetMapping("/")
    public String index(Model model, Principal principal){
        if(principal == null){
            model.addAttribute("message", "Hello Spring Security");
        }else {
            model.addAttribute("message", "Hello Spring Security: " + principal.getName());
        }
        return "index";
    }

    @GetMapping("/info")
    public String info(Model model){
        model.addAttribute("message", "Hello Info");
        return "info";
    }

    @GetMapping("/dashboard")
    public String dashboard(Model model, Principal principal){
        model.addAttribute("message", "Hello Dashboard: " + principal.getName());
        return "dashboard";
    }

    @GetMapping("/admin")
    public String admin(Model model, Principal principal){
        model.addAttribute("message", "Hello Admin: " + principal.getName());
        return "admin";
    }

}
해당 url로 들어왔을때 return은 해당 페이지로 리턴하고, Principal 정보를 파라미터로 넘겨서 User의 정보를 확인할 수 있다. 실제 index, info, dashboard, admin은 모두다 html, thymleaf엔진을 사용해서 컨트롤러단에서 넘겨준 message만을 받는 단순한 구성으로 각 페이지에 대한 설명은 생략한다. 애플리케이션을 실행해 보면 / , /info 요청을 제외한 나머지 요청들은 Spring에서 제공하는 에러페이지가 나온다.
왜 나올까? 생각해보면 Principal에 대한 정보가 설정된게 없기 때문에 principal.getName()를 호출할 때 NullPointerException이 발생한다.
SpringBoot 프로젝트인 경우에 spring-boot-starter-security 의존성을 추가 한다. WebSecurityConfigurereAdapter를 상속받아 인자가 http인 configure 메서드를 구현합니다. 내용은 요구사항에 맞게 mvcMatchers에 ant 패턴 형태로 url패턴을 매칭시키고, Role과 권한을 부여한다.
@Configuration
@EnableWebSecurity
public class SecurityConfig extends WebSecurityConfigurerAdapter {

    @Override
    protected void configure(HttpSecurity http) throws Exception {
        http.authorizeRequests()
                .mvcMatchers("/", "/info").permitAll()
                .mvcMatchers("/admin").hasRole("ADMIN")
                .anyRequest().authenticated()
                .and()
                .formLogin()
                .and()
                .httpBasic();
    }
애플리케이션을 실행하게 되면 콘솔창에 다음과 같은 password가 나온다.

localhost:8080/dashboard 를 호출하게 되면 다음과 같이 Spring Security가 제공해 주는 기본 로그인폼이 나온다.
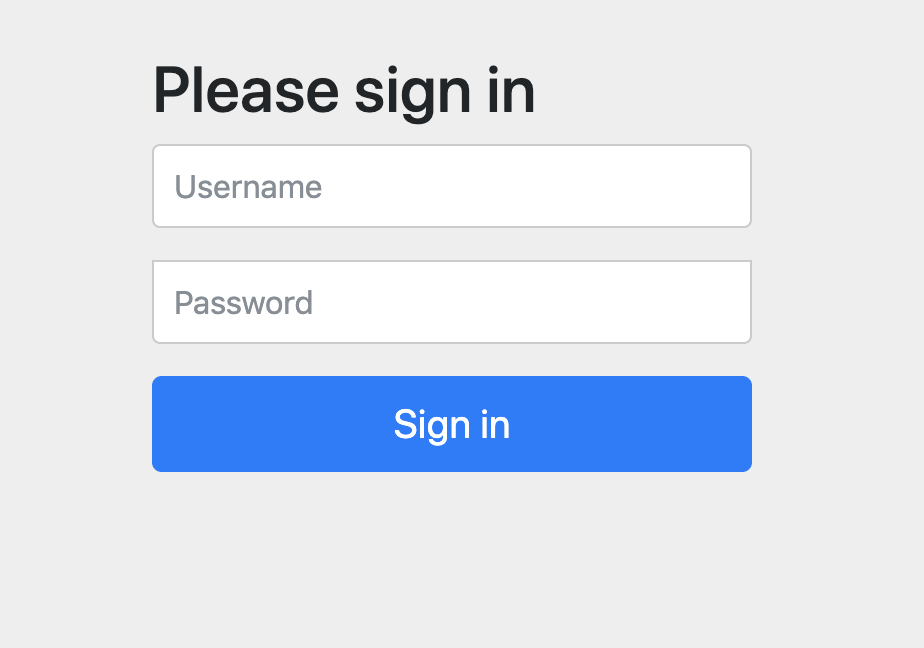
기본 default Username은 user 이고 패스워드는 위에 콘솔에 출력된 결과물이다. 조금 더 자세하게 알고 싶다면 UserDetailSErviceAutoConfiguration 클래스에서 기본 설정들이 어떻게 만들어 지는 지 확인 하면 된다.
그렇다면 지금 상황에서 문제점은 무엇일까?
- user가 한 명으로 고정되어 있다.
- 비밀번호가 애플리케이션을 실행할 때마다 console창에 변경되어 나타난다.
- 권한에 대한 설정이 없다.(Admin)
SecurityConfig에서 메서드 인자로 AuthenticationBuilder를 넘겨주는 configure메서드를 구현하자.
@Override
protected void configure(AuthenticationManagerBuilder auth) throws Exception {
  auth.inMemoryAuthentication().withUser("andrew").password("{noop}123").roles("USER")
    .and().withUser("admin").password("{noop}456").roles("ADMIN");
}
위와 같이 inMemoryAuthentication형태로 메서드 체이닝을 통해서 user, password, role들을 설정할 수 있다. 애플리케이션을 실행하고 /dashboard andrew/123 로그인 성공 /admin admin/456 로그인 성공
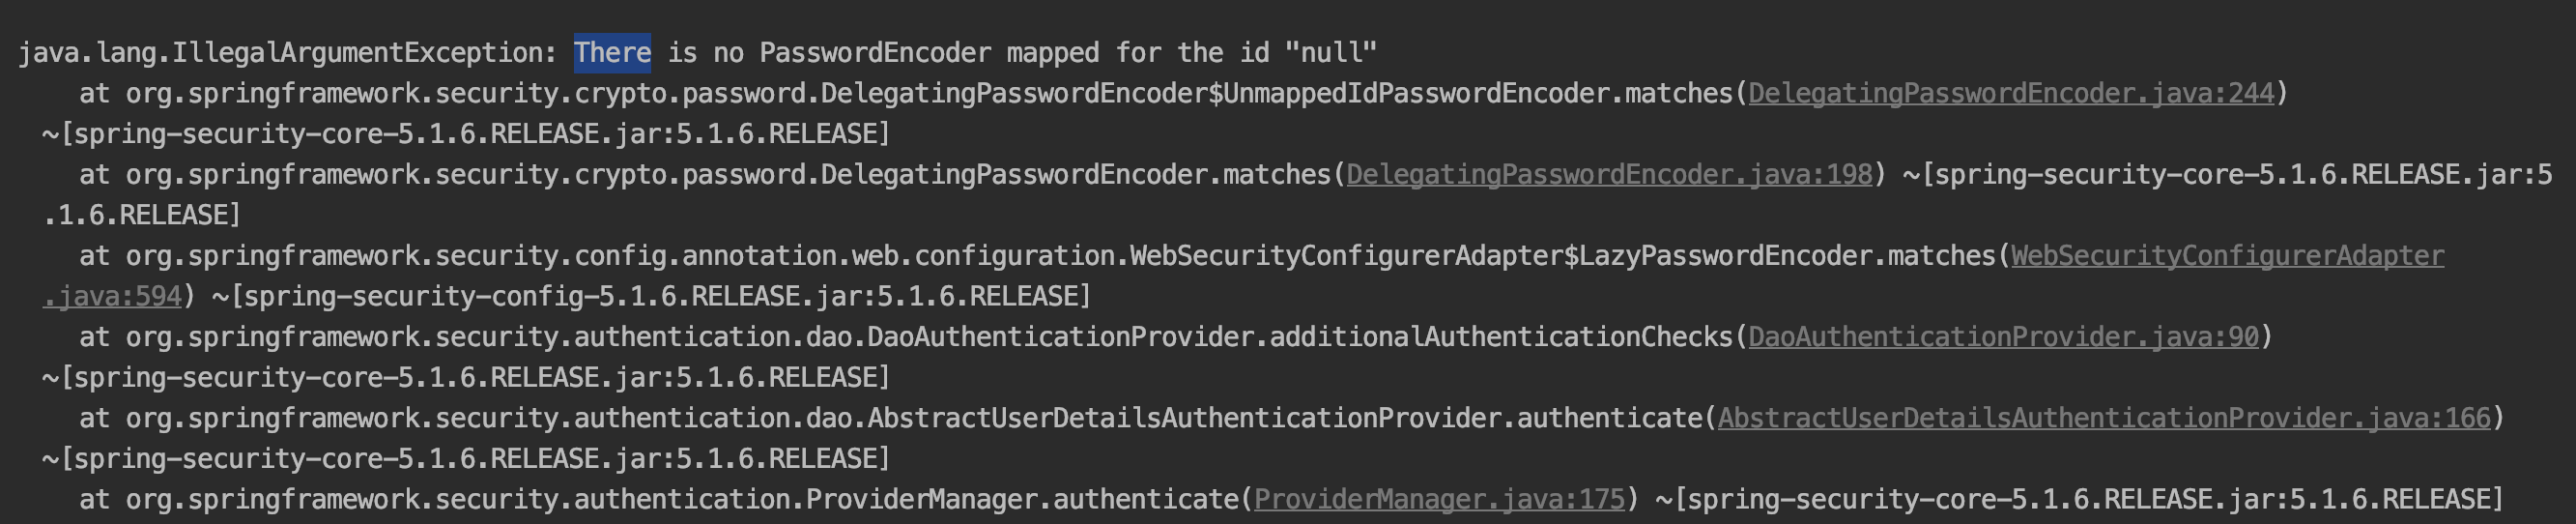
참고로 password를 PasswordEncoding 형식을 지정하지 않는
{noop}이라는 prefix를 붙여야 한다는 것. 그렇지 않으면 다음과 같은 메세지를 만나게 된다. PasswordEncoder와 일치하는 id값이 null이기 때문에IllegalArgumentException이 발생했다.
하지만 여전히 문제는 user에 대한 정보를 Source 코드 상에 하드코딩 했다는 점과 모든 유저들을 저런식으로 등록해서 사용할 수 없다.
휘발성인 Inmemory가 아닌, DB를 이용한다. (여기서는 spring-boot-starter-data-jpa, H2를 이용한다)
Account, AccountRepository, AccountService를 구현한다.
@Entity
public class Account {

    @Id @GeneratedValue
    private Long id;

    @Column(unique = true)
    private String username;
    private String password;
    private String role;

  //... getter setter
}@Service
public class AccountService implements UserDetailsService {
@Autowired
private AccountRepository accountRepository;
@Override
public UserDetails loadUserByUsername(String username) throws UsernameNotFoundException {
Account account = accountRepository.findByUsername(username);
if(account == null){
throw new UsernameNotFoundException(username);
}
return User.builder()
.username(account.getUsername())
.password(account.getPassword())
.roles(account.getRole())
.build();
}AccountService는 SrpingSecurity에 있는 UserDetailsService 인터페이스를 구현한다. 다음과 같이 loadUserByUserName()이라는 메서드를 구현해준다. 여기서는 spring-data-jpa를 사용했지만(accountRepository) 다른 DAO 형태로 구현도 가능하다. 문제는 우리가 만든 Account객체를 —> UserDetails 라는 객체로 Casting해서 리턴해야 한다. 이를 편하게 하기 위해서 Spring Security에서 User클래스의 빌더를 제공해준다. 만약에 이런 클래스가 없다면? Adapter패턴을 사용해서 구현한다.
User를 저장하는 API를 만든다.
@RestController
public class AccountController {
@Autowired
private AccountRepository accountRepository;
@GetMapping("/account/{role}/{username}/{password}")
public Account createAccount(@ModelAttribute Account account){
account.setPassword("{noop}"+ account.getPassword());
return accountRepository.save(account);
}
}편의상 Get메서드로 URL정보에서 받은 정보를 바탕으로 account만들지만, 원래는 Post메서드와 @RequestBody 어노테이션을 통해서 해야한다. 또한, Security Config 정보에서 /account/** 다음과 같은 url패턴을 허용해 주도록 추가해주고 기존에 AuthenticationBuilder를 통해서 만든 InMemoryAuthentication 정보는 삭제한다.
현재 까지 문제는 {noop}의 하드코딩, 적절한 PasswordEncorder가 없다.
@Bean
PasswordEncoder passwordEncoder(){
return PasswordEncoderFactories.createDelegatingPasswordEncoder();
}PasswordEncoder를 빈으로 등록하고, passwordEncoder의 encode()메서드를 통해서 password를 인코딩한다. createDelegatingPasswordEncoder()메서드 기본은 Bcrypt 인코딩을 사용한다. 다른 알고리즘을 바꿔서 적용가능하다.
@Autowired
private PasswordEncoder passwordEncoder;
@GetMapping("/account/{role}/{username}/{password}")
public Account createAccount(@ModelAttribute Account account){
account.setPassword(passwordEncoder.encode(account.getPassword()));
return accountRepository.save(account);
}해당 결과를 보면, {bcrypt} Prefix가 붙어있고, 123이라는 비밀번호는 encoding된 문자열로 바뀌어 있다.

spring-security-test 의존성 추가
@SpringBootTest
@RunWith(SpringRunner.class)
@AutoConfigureMockMvc
public class AccountControllerTest {
@Autowired
MockMvc mockMvc;@AutoConfigureMockMvc 를 선언하면, MockMvc를 주입받아서 사용할 수 있다.
@WithMockUser(username = "andrewMock", password="123", roles = "USER")
public void index_mockUser() throws Exception {
mockMvc.perform(get("/"))
.andDo(print())
.andExpect(status().isOk());
}@WithMockUser를 통해서 가짜 객체를 만들어서, 가짜 User가 있는 상태라면(실제 DB에 있는 데이터가 아니다) 어떻게 응답을 보여주는지 확인할 수 있다.
@Test
@Transactional
public void form_login_success_test() throws Exception {
Account account = createAccount();
mockMvc.perform(formLogin().user(account.getUsername()).password("123"))
.andExpect(authenticated());
}
private Account createAccount() {
Account account = new Account();
account.setUsername("andrew");
account.setPassword("123");
account.setRole("USER");
return accountService.createAccount(account);
}formLogin()를 통해서 실제 user, password 정보를 넣는다. 중요한 것은 기존의 accountService의 createAccount()메서드를 통해서 Account객체를 저장할때 Password를 Bcrypt Encorder를 통해서 인코딩 했기 때문에 결과값을 비교할 때, 저렇게 하드코딩으로 "123" 값을 넣어서 비교했다.
https://spring.io/guides/topicals/spring-security-architecture
스프링 시큐리티를 들어가기에 앞서 중요한 개념 2가지
- 인증(Authentication): 인증은 사용자가 입력한 id/password가 일치하는지를 판별해서 인증이 된 사용자 인지 판별
- 인가(Authorize): 인증을 거치고 나서, 자원에 접근할 때 ROLE 권한을 설정한다. 해당 사용자가 어떤 ROLE 권한을 갖고 있는지 부여하는 것을 인가라 한다.

빨간색 부분만 살펴보면SecurityContextHolder안에 SecurityContext가 있고, 그 안에 Authentication 객체가 있다. Authentication 객체는 Principal과 GrantAuthority정보가 있다. SecurityContextHolder는 SecurityContext를 제공해주는 놈이고, ThreadLocal이다. 이 말인 즉슨, 인증이된 사용자는 같은 쓰레드 내에서 죽기 전까지는 인증됨을 유지한다.
// SecurityContextHolder에서 context를 가져오고, Authentication를 가져온다.
Authentication authentication = SecurityContextHolder.getContext().getAuthentication();
// UserDetailsSerivce 인터페이스를 구현한 Principal정보를 가져온다.
User principal = (User) authentication.getPrincipal();
// Principal에서 User의 Role정보를 가져온다
Collection<? extends GrantedAuthority> authorities = authentication.getAuthorities();지금 구현되어있는 시큐리티(basic Form login)인 경우 Authentication 객체 타입은 UsernamePasswordToken 타입의 객체를 리턴하는 것을 알 수 있다. 이는 나중에 다른 token으로 변경할 수 있음을 나타낸다.

Authentication의 Principal이라는 객체는 이전 코드에서 UserDetailsService 인터페이스를 구현했을 당시에, 리턴문에서 Spring Security가 제공하는 User클래스를 만들어서 리턴했던 정보가 바로 Principal (신원정보) 이다.
@Override
public UserDetails loadUserByUsername(String username) throws UsernameNotFoundException {
Account account = accountRepository.findByUsername(username);
if(account == null){
throw new UsernameNotFoundException(username);
}
return User.builder()
.username(account.getUsername())
.password(account.getPassword())
.roles(account.getRole())
.build();
}SecurityContextHolder(Thread Local)는 인증 정보를 들고 있다. 실제 인증 처리는 AuthenticationManager가 담당한다.
AuthenticationManager인터페이스는 다음과 같다.
public interface AuthenticationManager {
Authentication authenticate(Authentication authentication) throws AuthenticationException;
}인자로 받은 Authentication: 위의 메서드의 파라미터 인자로 Authentication는 폼 인증인 경우에 아이디 / 비밀번호가 각각 Principal과 Credential의 값들로 들어간다.

인증처리: 사용자가 입력한 password(위에서 authentication() 메서드의 인자로 넘어온 credentials)와 우리가 구현한 UserDetailsService에서 읽어들인 UserDetails 객체에 들어있는 password와 일치하는 지 확인한다.
@Service
public class AccountService implements UserDetailsService {

    @Autowired
    private AccountRepository accountRepository;

    @Override
    public UserDetails loadUserByUsername(String username) throws UsernameNotFoundException {
        Account account = accountRepository.findByUsername(username);
        if(account == null){
            throw new UsernameNotFoundException(username);
        }
        return User.builder()
                .username(account.getUsername())
                .password(account.getPassword())
                .roles(account.getRole())
                .build();
}Authentication 객체 리턴: ProviderManager의 다음 코드를 실행하게 되면 인증을 통해서 result 객체에 담기게 된다.
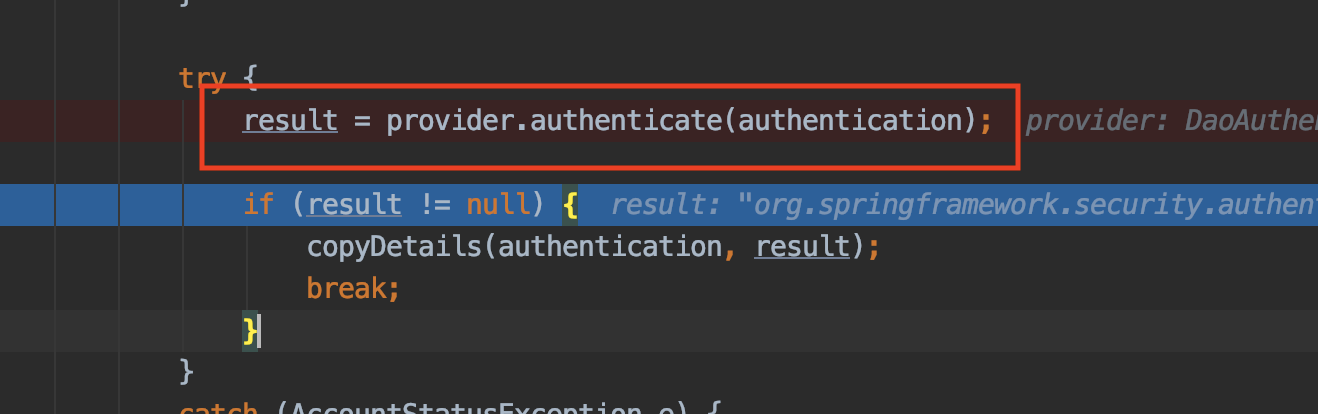
리턴하는 Authentication은 Principal에는 UserDetailsService에서 오버라이딩한 User객체가 담겨있고, Crendential에는 여전히 비밀번호가 담겨있다.

- 인증을 하고 나서 SecurityContextHolder(ThreadLocal)에 들고 있는건 OK, 그걸 넣어주는 부분은 어디 ?
- UserNamePasswordAuthenticationFilter
- 폼인증 처리하는 시큐리티 필터
- 인증된 Authentication객체를 SecurityContextHolder에 넣어줌
- SecurityContextHolder.getContext().setAuthentication(authentication)
- UserNamePasswordAuthenticationFilter
- 한 번 인증을 완료한 사용자는 그 다음 또 재차 인증을 하지 않고, 이미 인증했다라는 정보는 어디에?
- SecurityContextPersistanceFilter
- SecurityContext를 HTTP 세션에 저장해서, 다음 번 요청시에 세션을 통해서 Authentication을 가져온다.
- SecurityContextPersistanceFilter

- 브라우저의 요청을 통해서
DelegatingFilterProxy를 통해서FilterChainProxy를 호출한다.- 스프링 부트에서는
SecurityFilterAutoConfiguration설정 정보를 통해서 자동으로 DelegatingFilterProxy가 등록된다.
- 스프링 부트에서는
- FilterChainProxy는 다양한 필터들이 존재한다.
- WebAsyncManagerIntergrationFilter
- SecurityContextPersistenceFilter
- HeaderWriterFilter
- CsrfFilter
- LogoutFilter
- UsernamePasswordAuthenticationFilter
- DefaultLoginPageGeneratingFilter
- DefaultLogoutPageGeneratingFilter
- BasicAuthenticationFilter
- RequestCacheAwareFtiler
- SecurityContextHolderAwareReqeustFilter
- AnonymouseAuthenticationFilter
- SessionManagementFilter
- ExeptionTranslationFilter
- FilterSecurityInterceptor
그 동안에는 인증에 대한 인터페이스였고, 이번에는 인가에 대한 인터페이스를 다룬다.
- AffirmativeBased: 여러 Voter중 한 명이라도 허용하면 허용. 기본전략
- ConsensusBased: 다수결
- UnanimouseBased: 만장일치
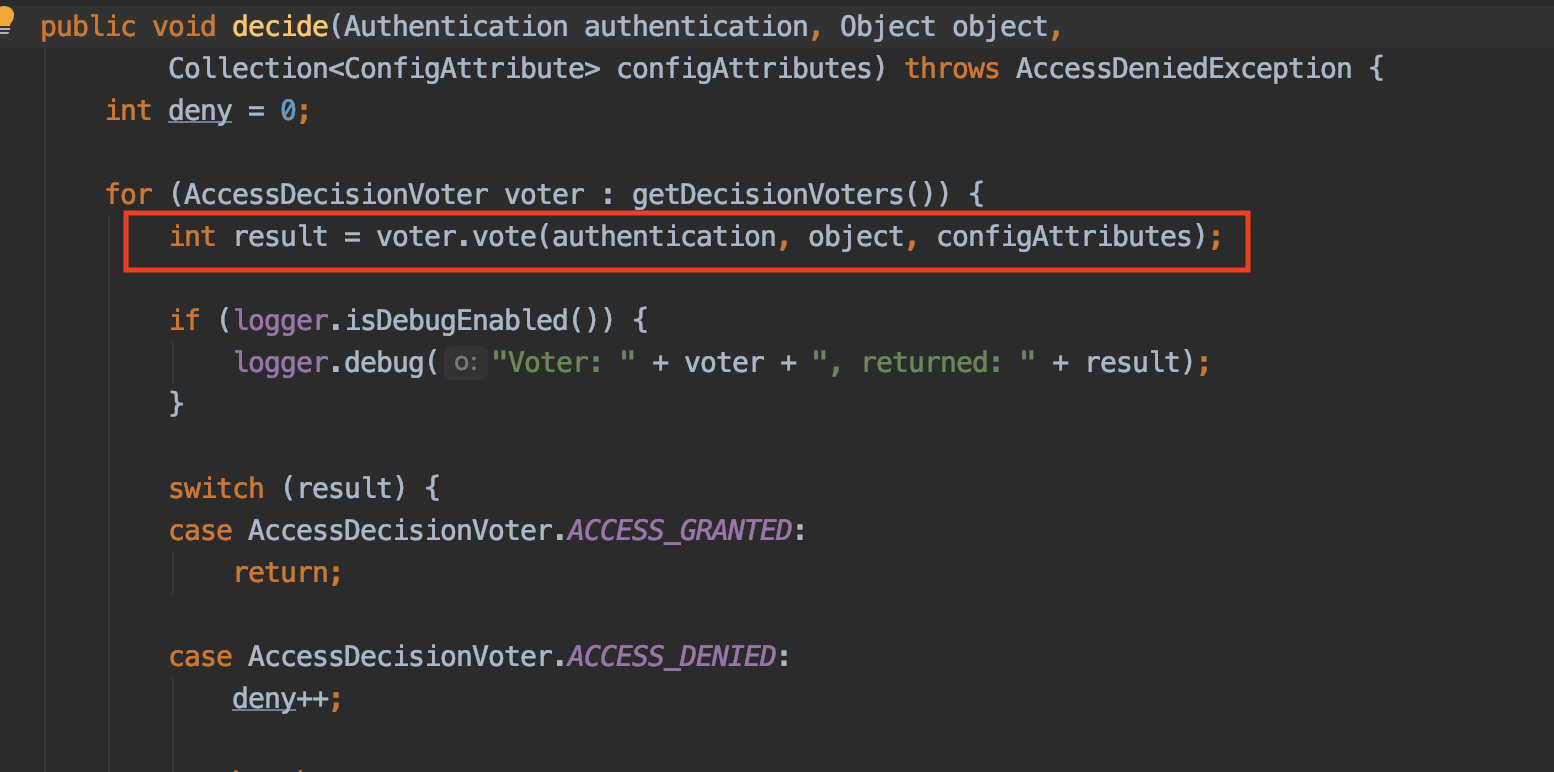
AccessDecisionVoter를 가져와서 vote()메서드를 호출한다.
	int ACCESS_GRANTED = 1; // 허용
	int ACCESS_ABSTAIN = 0; // 보류
	int ACCESS_DENIED = -1; // 거절
result값에 따라서 자원 접근에 대한 판단을 한다.
문제상황: ROLE_ADMIN > ROLE_USER 계층구조를 가져야 하는데, 지금 현재는 ADMIN 권한만을 갖은 사용자는 USER권한이 있는 페이지에 접근을 못한다.
2가지 방법 존재
- ROLE_ADMIN, ROLE_USER 등 여러개의 ROLE들로 관리 하는 것
- ROLE간의 계층구조를 선언한다. (
WebSecurityExpressionHandler를 이용)
SecurityConfig 파일에 expressionHandler를 만든다. 만든 핸들러를 등록한다.
public DefaultWebSecurityExpressionHandler expressionHandler(){
        RoleHierarchyImpl roleHierarchy = new RoleHierarchyImpl();
        roleHierarchy.setHierarchy("ROLE_ADMIN > ROLE_USER");

        DefaultWebSecurityExpressionHandler handler = new DefaultWebSecurityExpressionHandler();
        handler.setRoleHierarchy(roleHierarchy);

        return handler;
}
이제는 ADMIN권한을 갖은 사용자는 USER권한이 있는 자원에도 접근할 수 있게 됨
AccessDecisionManager를 사용하여 Access Control 또는 예외 처리 하는 필터
FilterChainProxy에서 발생하는 AuthenticationException 과 AccessDeniedException 를 처리하는 필터
AuthenticationException 발생시
- AuthenticationEntryPoint 실행
- AbstractSecurityInterceptor 하위 클래스(ex, FilterSecurityInterceptor) 에서만 발생하는 예외 처리
AccessDeniedException 발생시
- 익명 사용자라면 AuthenticationException 발생
- 익명 사용자가 아니라면 AccessDeniedHandler에게 위임
현재 애플리케이션을 띄우면 요청 외에 favicoin.ico 요청을 보내고, 이는 Spring Security의 Filter들을 거쳐서 그만큼 시간을 낭비하게 된다.
	@Override
    public void configure(WebSecurity web) throws Exception {
        web.ignoring().mvcMatchers("/favicon.ico");
    }
securityConfig에서 메서드 타입이 WebSecurity를 메서드를 오버라이딩해서 정적 자원들을 무시해주면 된다. 단점은 매번 그렇게 하드 코딩해야 한다. 그렇기 때문에 스프링 부트에서 정적 자원들에 대한 경로를 제공함.
    @Override
    public void configure(WebSecurity web) throws Exception {    			web.ignoring().requestMatchers(PathRequest.toStaticResources().atCommonLocations());
    }
그렇다면 스프링 부트에서 제공하는 정적 자원들은 어떤게 있을까?

enum 형태로 다음과 같은 경로들을 제외한다.
그렇다면 해당 정적 자원들에 대한 ignore를
configure(HttpSecurity http)메서드에서 처리해도 되지 않나? 물론 가능 하지만, 기존의 FilterChainProxy의 favicon 요청에도 모든 필터를 전부 탄다. 그 만큼 시간이 낭비된다.
스프링 MVC의 async 기능(핸들러에서 Callable을 리턴할 수 있는 기능)을 사용할 때, SecurityContextHolder를 공유할 수 있게 도와주는 필터. Async 기능을 사용하면 다른 쓰레드에서 동작한다. 같은 쓰레드 내에서 인증된 사용자 정보를 공유하는 SecurityContextHolder를 지원한다.
@Async를 사용하면, 다른 쓰레드를 생성해서 비동기로 처리하기 때문에 ThreadLocal의 ContenxtSecurityHolder를 사용하지 못한다. SecurityContextHolder.MODE_INHERITABLETHREADLOCAL 전략을 추가한다.
    @Override
    protected void configure(HttpSecurity http) throws Exception {
	// ...생략
    SecurityContextHolder.setStrategyName(SecurityContextHolder.MODE_INHERITABLETHREADLOCAL);
}SecurityContextRepository인터페이스 (기본 구현체는 HttpSessionSecurityContextRepository)를 통해서 인증이된 사용자 정보를 SecurityContext에서 읽어오거나 초기화를 담당한다. 그래서 15개의 필터에서 앞단에 위치한다.
응답헤더에 시큐리티 관련 헤더를 추가하는 필터
CSRF 공격: 공격자가 의도한 행동을 해서 특정 웹페이지를 보안에 취약하게 한다거나, 수정, 삭제등의 작업을 통해서 공격하는 것. 예를 들어 은행뱅킹업무를 볼려고 로그인을 했고 크롬 탭(다른 사이트)에서 어떤 항목을 클릭했을때 공격자가 미리 심어둔 의도한 행동을 수행하게끔 하는 공격
CORS: 타 도메인을 열어주는 것. 예를 들어 공공API 인 경우에 타 도메인에 대한 자원 접근을 허용해줘야한다. 기본적으로는 브라우저가 CORS 정책이 적용이 되서 다른 도메인에서 접근하는 것을 막아준다.
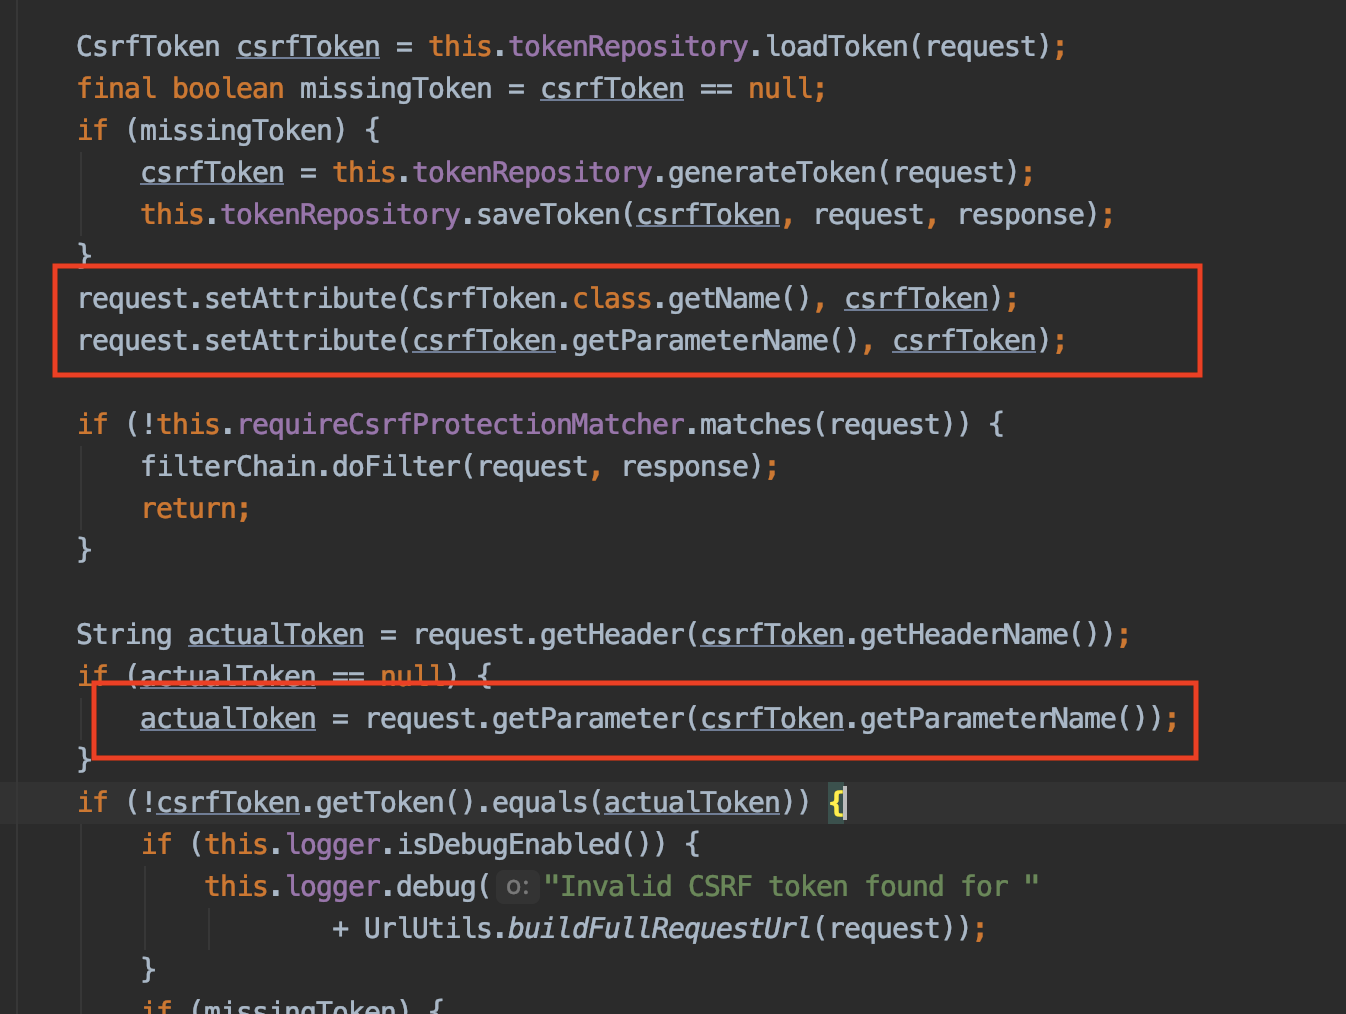
CsrfFilter는 CSRF 공격을 방어해준다.
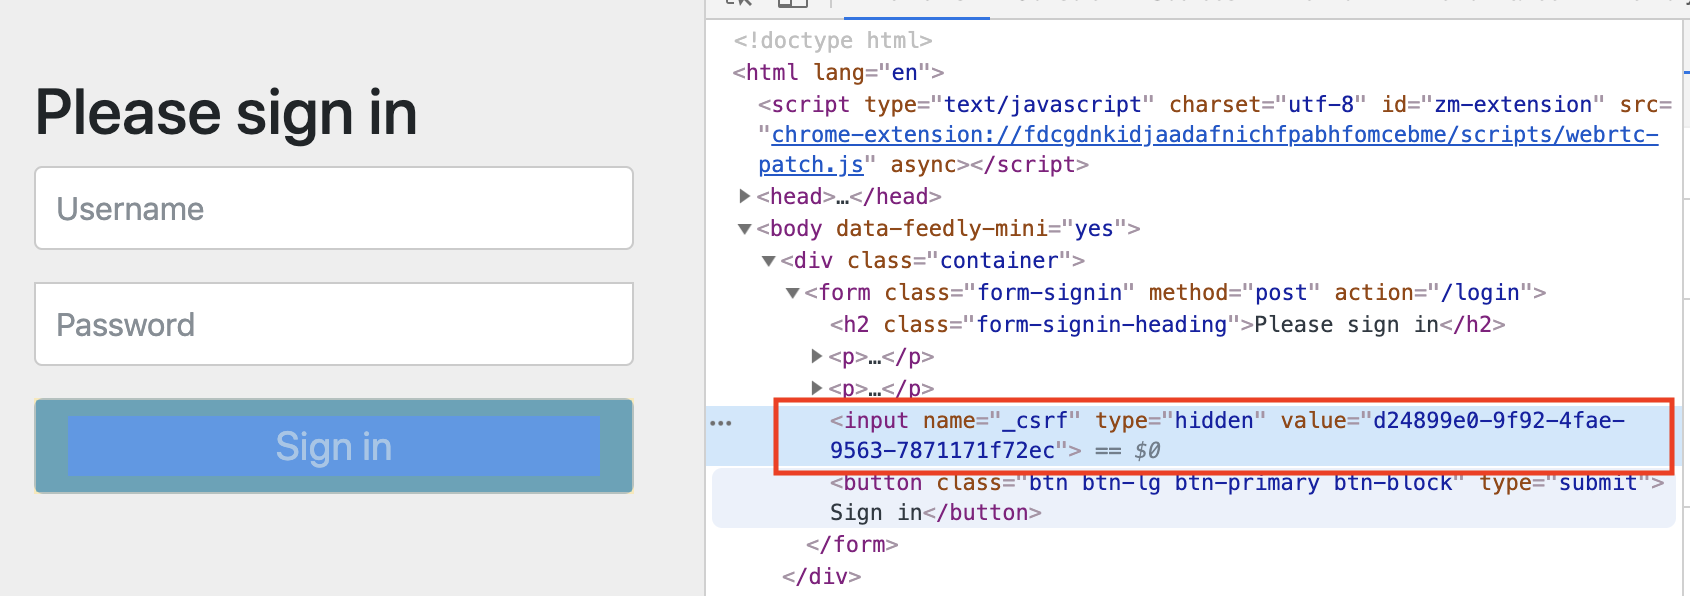
어떤 방식으로? 서버단에서 CSRF 토큰을 만들어 준다. 클라이언트가 Form의 CSRF토큰을 hidden 필드에 숨겨서 보낸다. 서버가 만들어준 CSRF토큰과 클라이언트가 보낸 CSRF토큰이 일치하는 지를 판별한다.
Thymleaf 2.1 버전 이상일때, 폼 정보에 CSRF hidde 필드에 숨겨서 보낸다.
만약에 csrf 필터를 사용하고 싶지 않다면 다음과 같이 disable()시킨다. FilterChainProxy를 살펴 보면 CsrfFilter가 빠진 것을 확인할 수 있다.
http.csrf().disable();여러개의 LogoutHandler(Composite 객체로 되어 있음)를 이용해 로그아웃 처리를 하고, 이후 LogoutSuccessHandler를 통해서 로그아웃 후처리를 한다.
- LogoutHandler
- CsrfLogoutHandler
- SecurityContextLogoutHandler
- LogoutSuccessHandler
- SimplUrlLogoutSuccessHandler
현재는 /logout 를 통해서 로그아웃을 하게되면 /login 페이지로 이동한다. 이 SuccessUrl을 변경하고 싶으면
http.logout()
        .logoutUrl("/logout")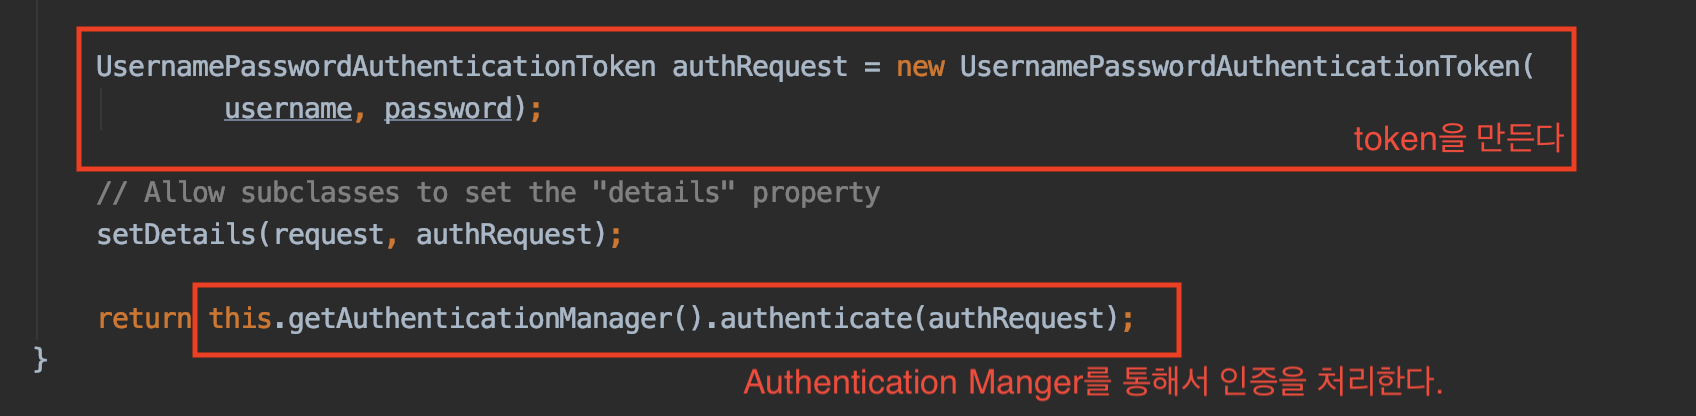
.logoutSuccessUrl("/") // 이 부분을 변경하면 된다. - 폼에서 받은 username, password 정보를 바탕으로 UsernamePasswordAuthenticationToken을 만든다.
- authenticationManger를 통해서
authenticate()를 호출한다.
- AuthenticationManger 구현체인 ProviderManager에서 여러개의 AuthenticationProvider List가 존재하고, 이중에서 DaoAuthenticationProvider를 사용한다.
- DaoAuthenticationProvider는 우리가 구현했던 UserDetailsService에서 loadUserByUsername을 통해서 DB에서 가져온 User정보와 일치하는지 판별한다.
- 기본 로그인 폼 페이지를 생성해주는 필터.
GET /login요청을 처리하는 필터
폼의 각 파라미터 속성을 커스텀하게 변경할 수 있다.
http.formLogin()
    .usernameParameter("custom-username")
    .passwordParameter("custom-password")
내가 원하는 로그인 페이지로 변경할 수 있다. 이 경우에, DefaultLoginGeneratingFilter DefaultLogoutGeneratingFilter 를 타지 않는다.
http.formLogin()
.loginPage("/custom-login")Http Basic 인증이란?
- 요청 헤더에 username password를 base64 인코딩한 값을 보내서 브라우저 또는 서버가 값을 읽어서 인증하는 방식
- 보안에 매우 취약함 HTTPS 사용할 것을 권장함
- 캐시된 요청이 있다면, 해당 캐쉬된 요청을 처리
- 캐시된 요청이 없다면, 새로운 요청을 처리 한다
예를 들면 /dashboard라는 요청을 보냈는데 인증정보가 필요하니까 /login 로그인 페이지로 보내버린다. 이때, 로그인이 성공하면 이전에 요청했던 /dashboard는 이미 캐시된 요청이므로, 로그인 후 보여지는 페이지는 dashboard페이지가 보인다.
SecurityContext에 Authentication 정보가 null이면 익명 Authentication 을 만들어 넣어주고(null object 패턴) 그게 아니면 아무런 일도 하지 않는다.
직접 익명 Authentication 를 커스텀할 수 있다.
-
세션 변조 방지 전략 설정: sessionFixation
-
유효하지 않은 세션 리다이렉트 : invalidSessionUrl
-
동시성 제어: maximumSessions
-
세션 생성 전략: sessionCreationPolicy
인증, 인가 에러 처리르 담당하는 필터
- AuthenticationEntryPoint
- AccessDeniedHandler
// 1. accessDeniedHandler 직접 구현
http.exceptionHandling().accessDeniedHandler(... 구현...);
// 2. accessDeniedPage 설정
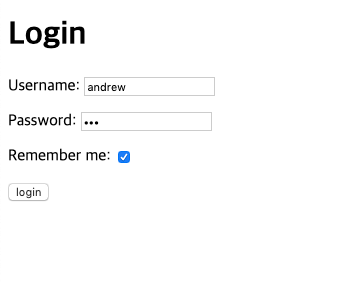
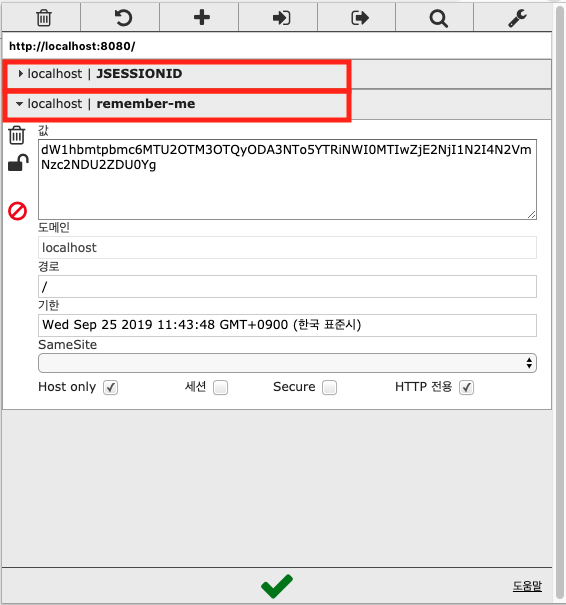
http.exceptionHandling().accessDeniedPage("/access-denied");세션이 사라지거나 만료 되더라도 쿠키또는 DB를 사용하여 저장된 토큰을 기반으로 인증을 지원함
http.rememberMe()
    .key("remember-me-sample")
    .userDetailsService(accountService);
로그인 폼에서 remember-me를 체크하고 로그인을하게되, remember-me 라는 토큰이 추가적으로 생기고, 기존의 JSESSIONID를 삭제해도 여전히 remember-me 토큰 때문에 세션을 유지한다.
-
GenericFilterBean을 상속받아서 구현
-
SecurityConfig 에 필터를 추가(어느 위치에 추가할 것인지? )
-
ex) 로깅 필터
public class LoggingFilter extends GenericFilterBean {

    private Logger logger = LoggerFactory.getLogger(this.getClass());

    @Override
    public void doFilter(ServletRequest request, ServletResponse response, FilterChain chain) throws IOException, ServletException {
        StopWatch stopWatch = new StopWatch();
        stopWatch.start(((HttpServletRequest)request).getRequestURI());
        chain.doFilter(request, response);
        stopWatch.stop();
        logger.info(stopWatch.prettyPrint());
    }
}
http.addFilterAfter(new LoggingFilter(), UsernamePasswordAuthenticationFilter.class);