Utsav Rai
Objective: An application which lets user to create topics/projects in which different users having same application can comment with real time updates.
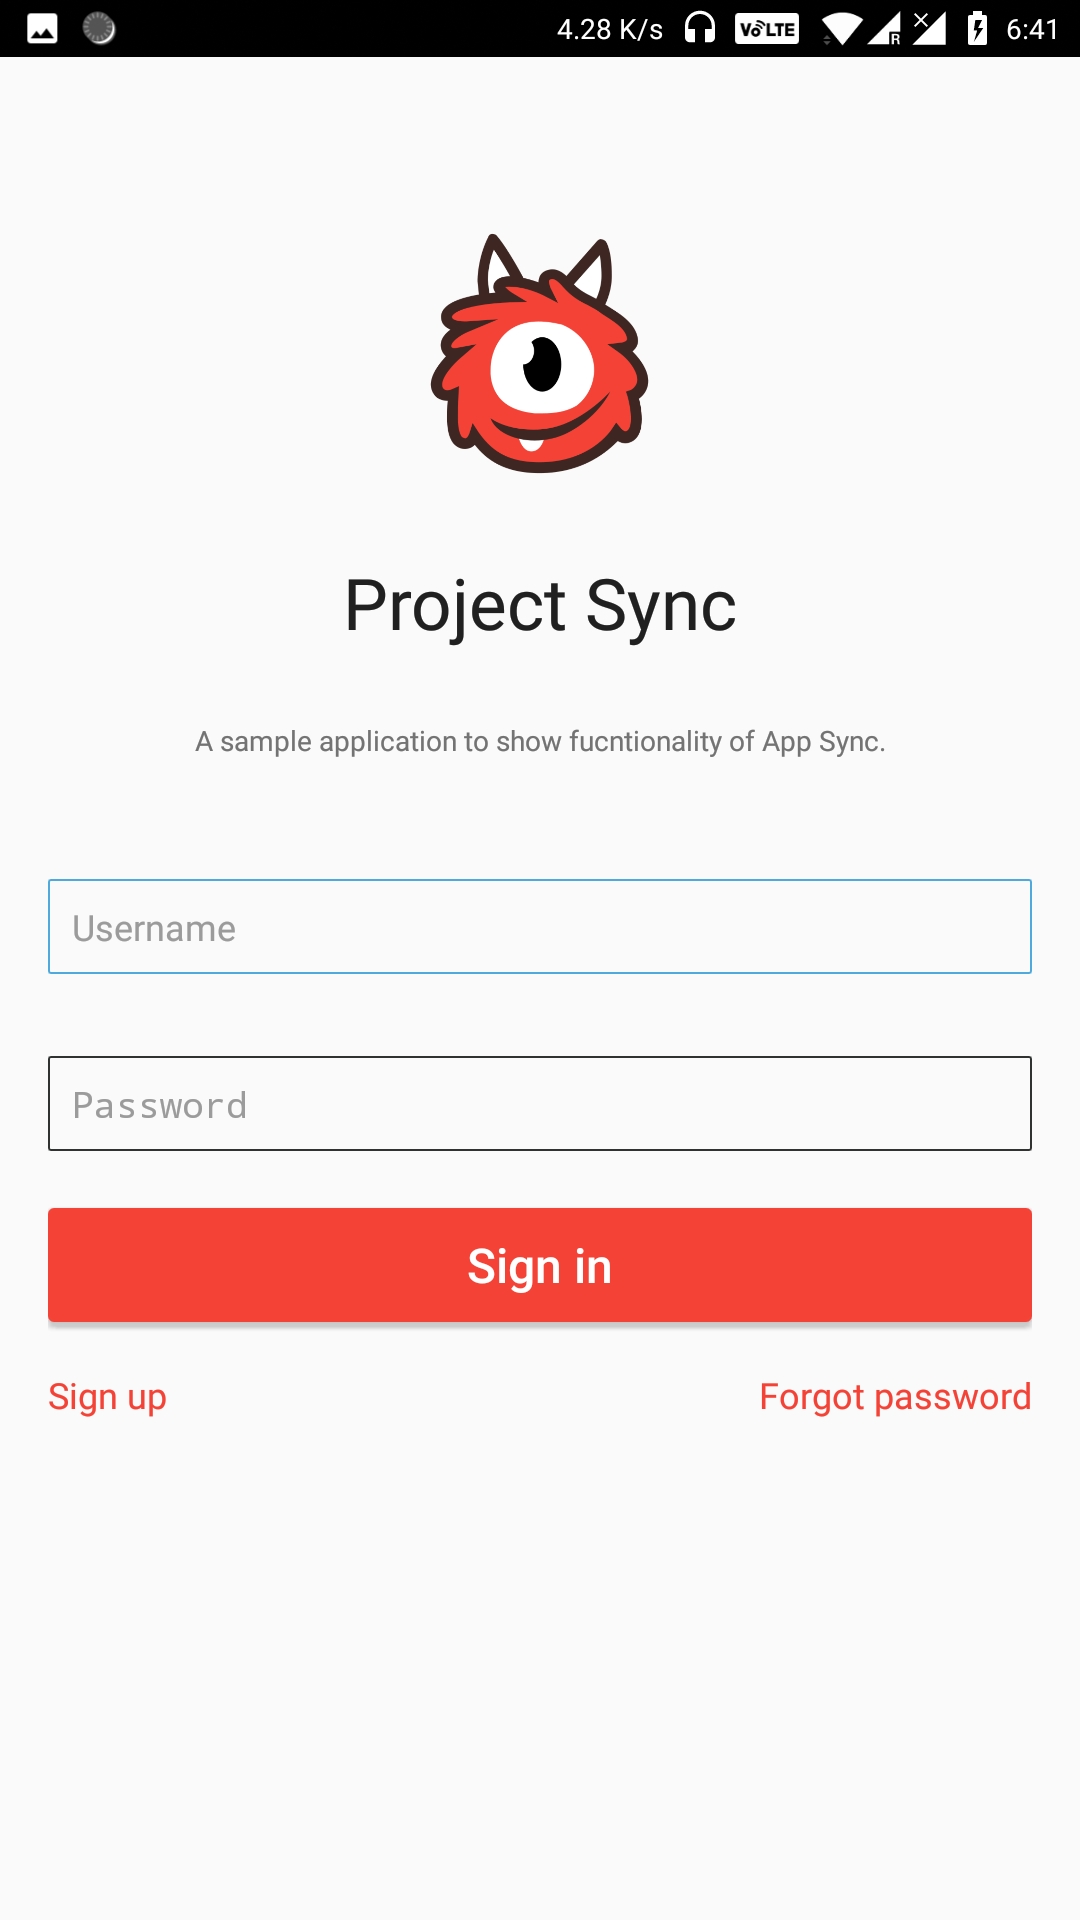
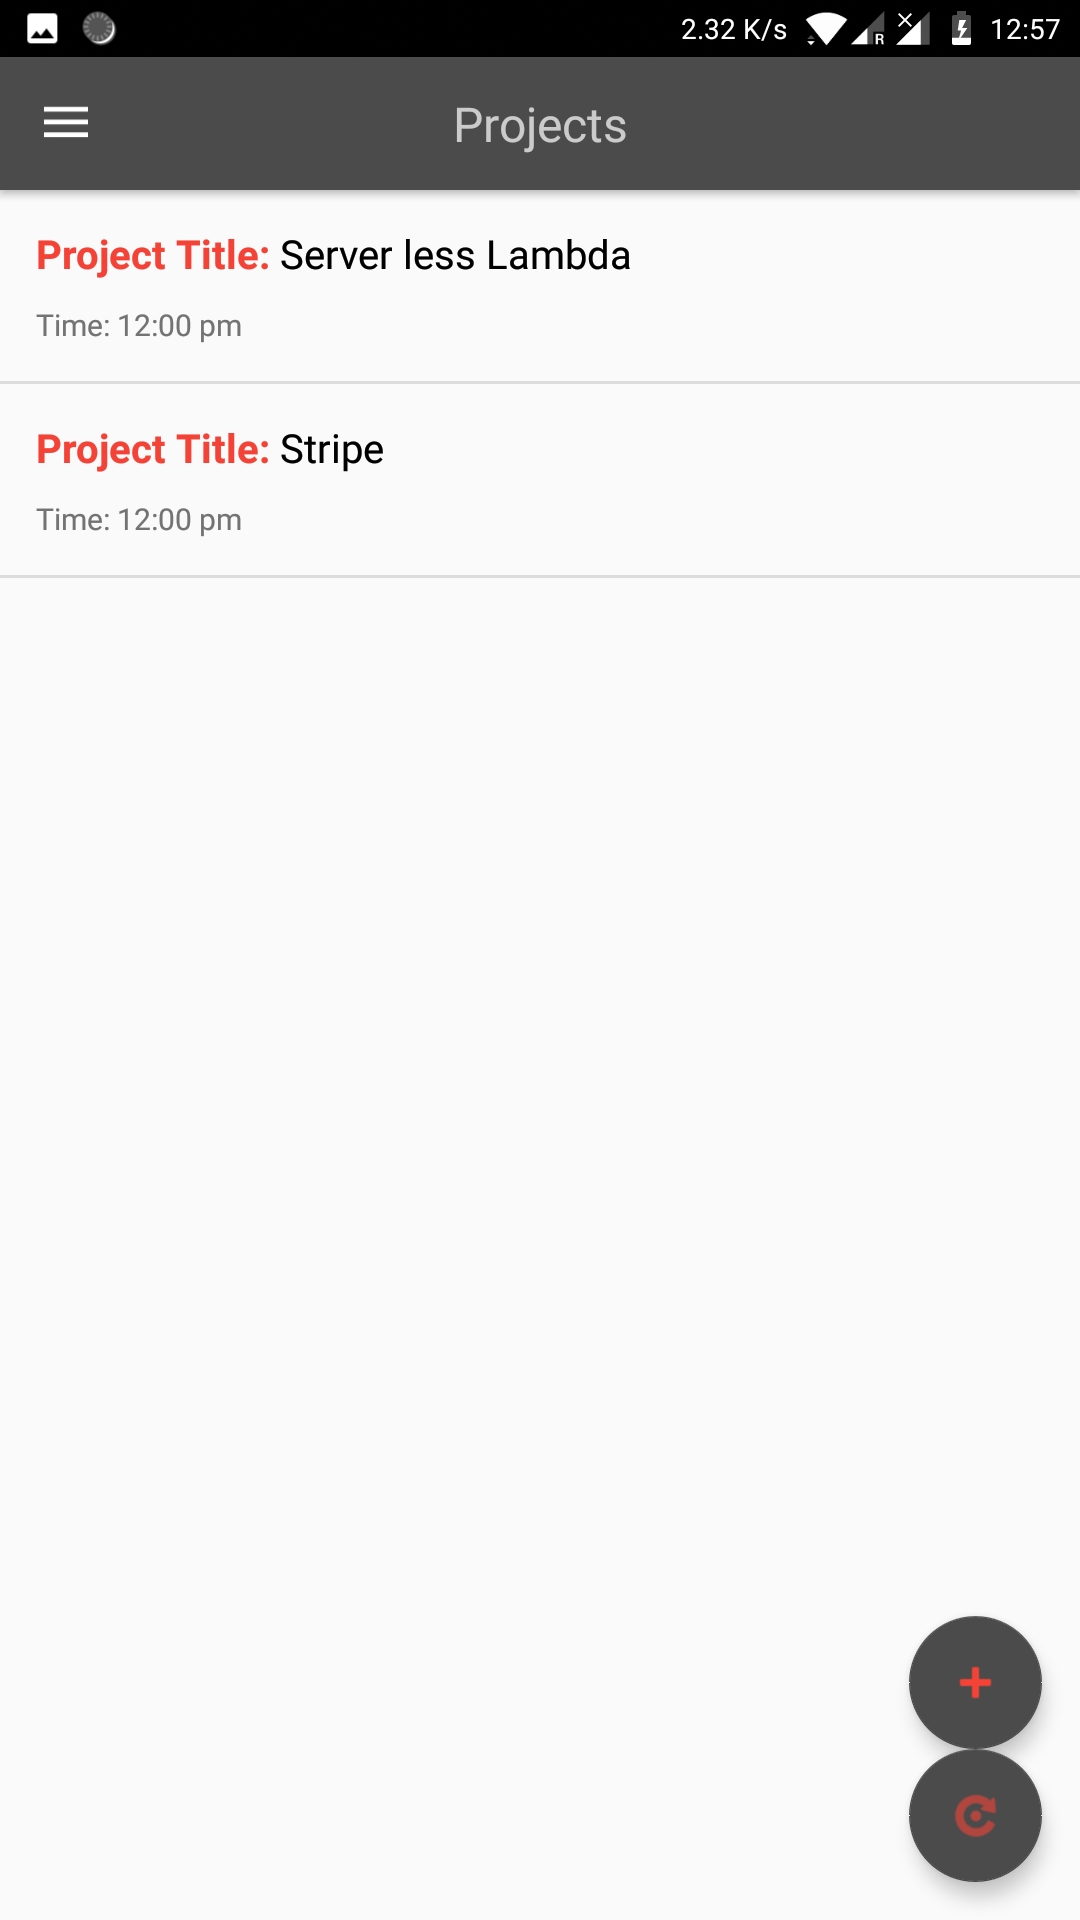
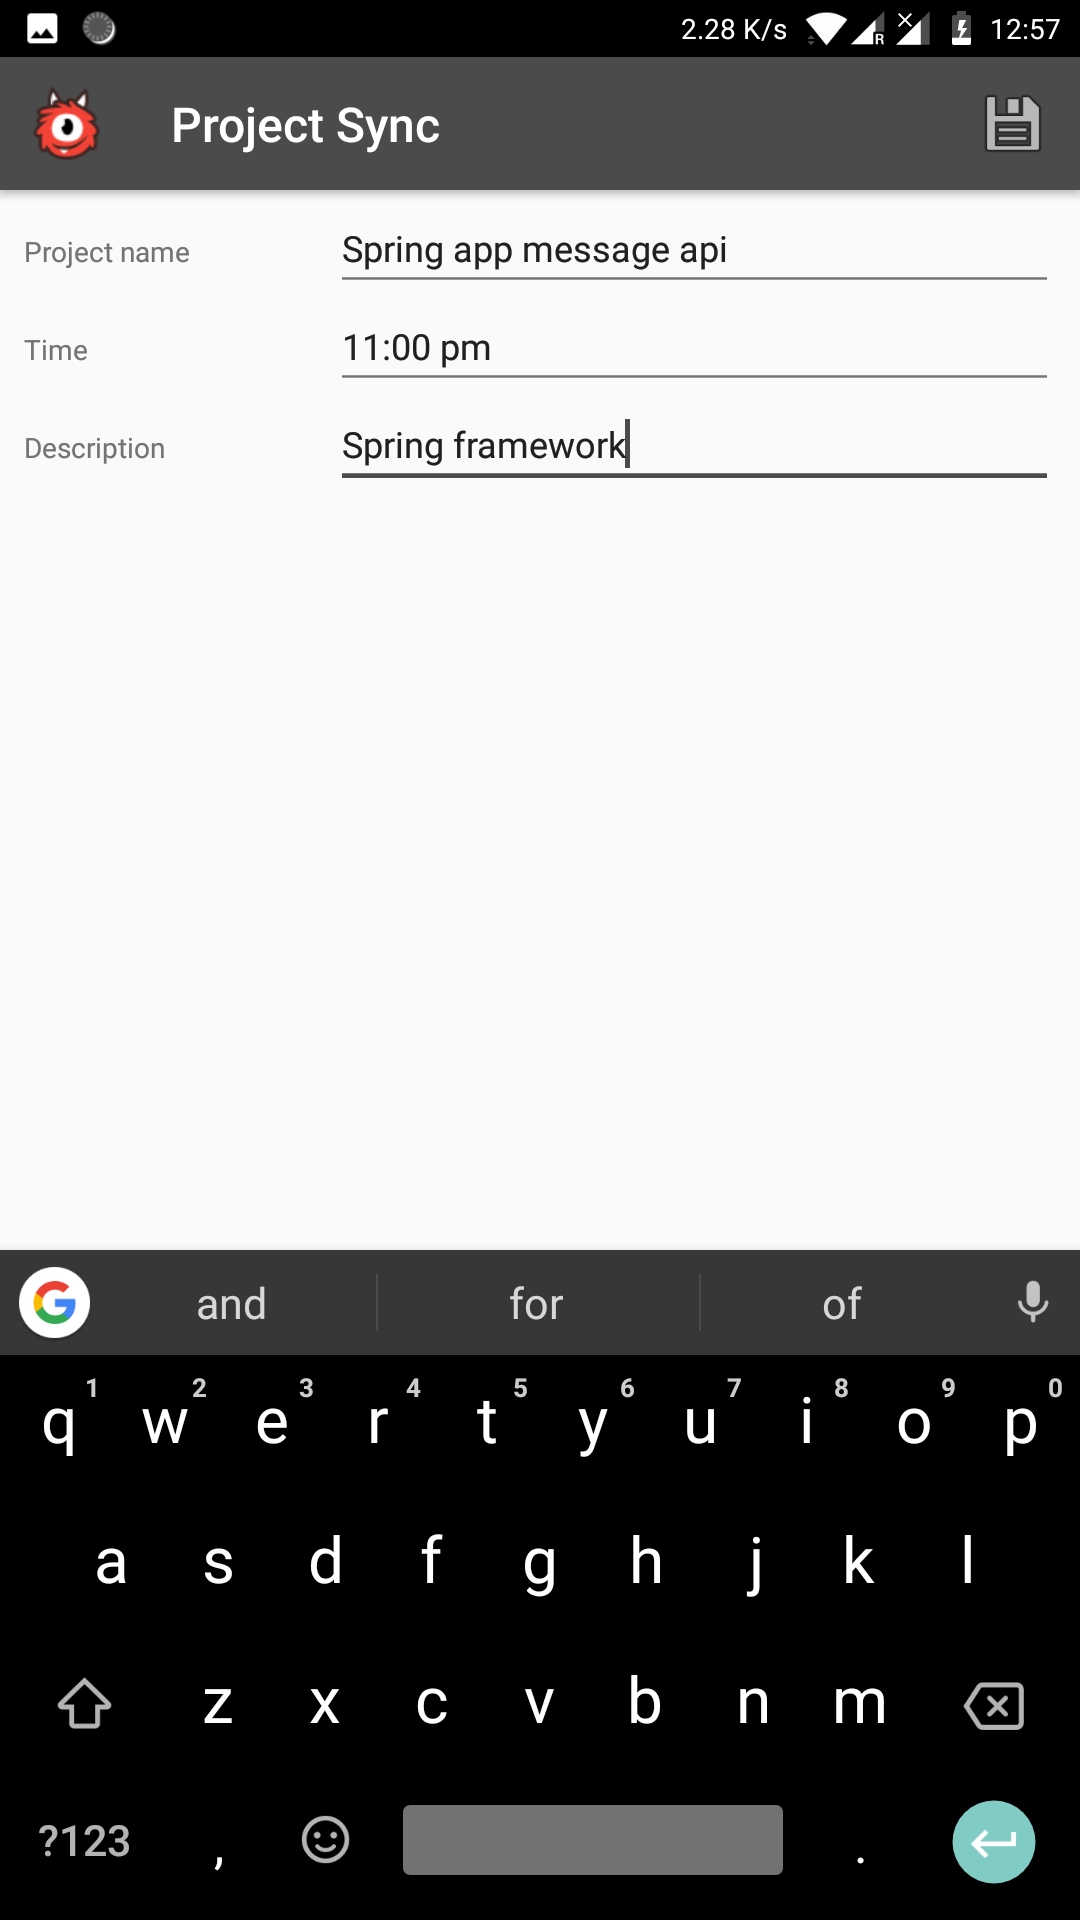
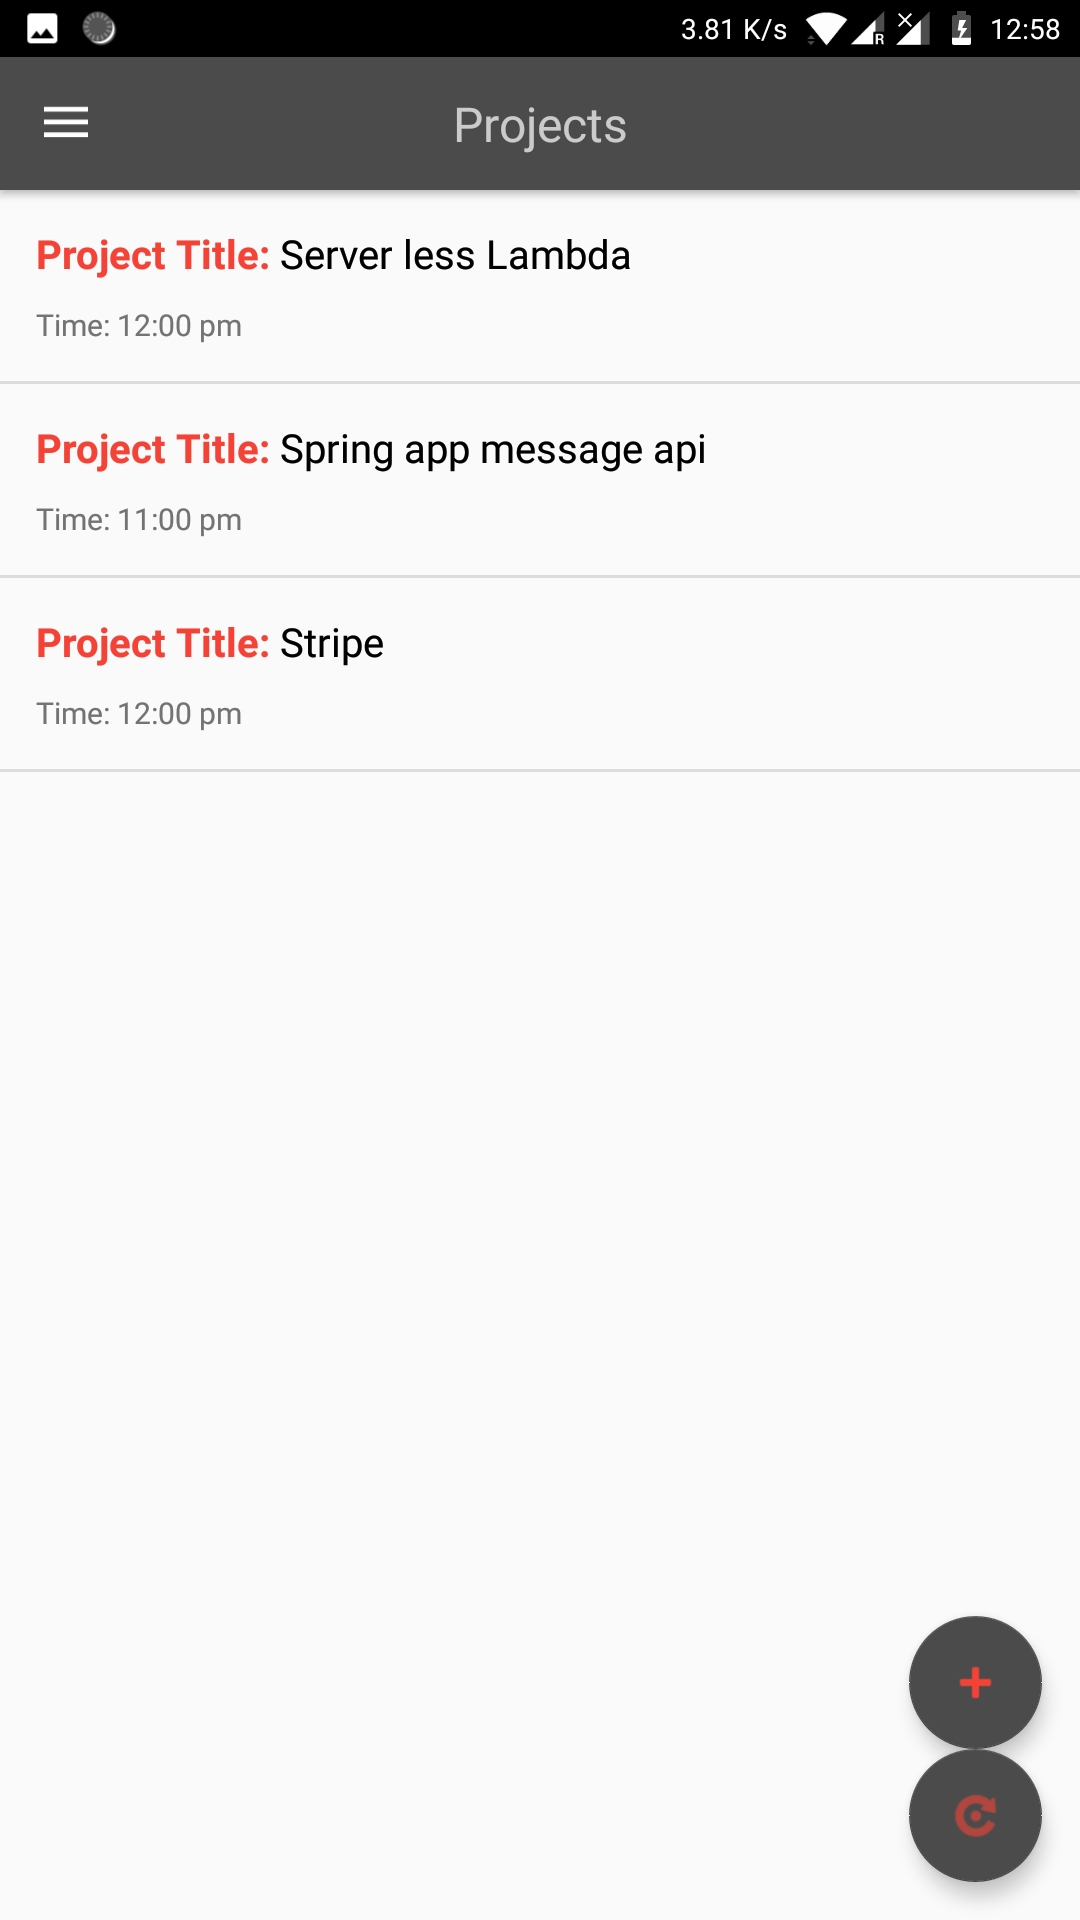
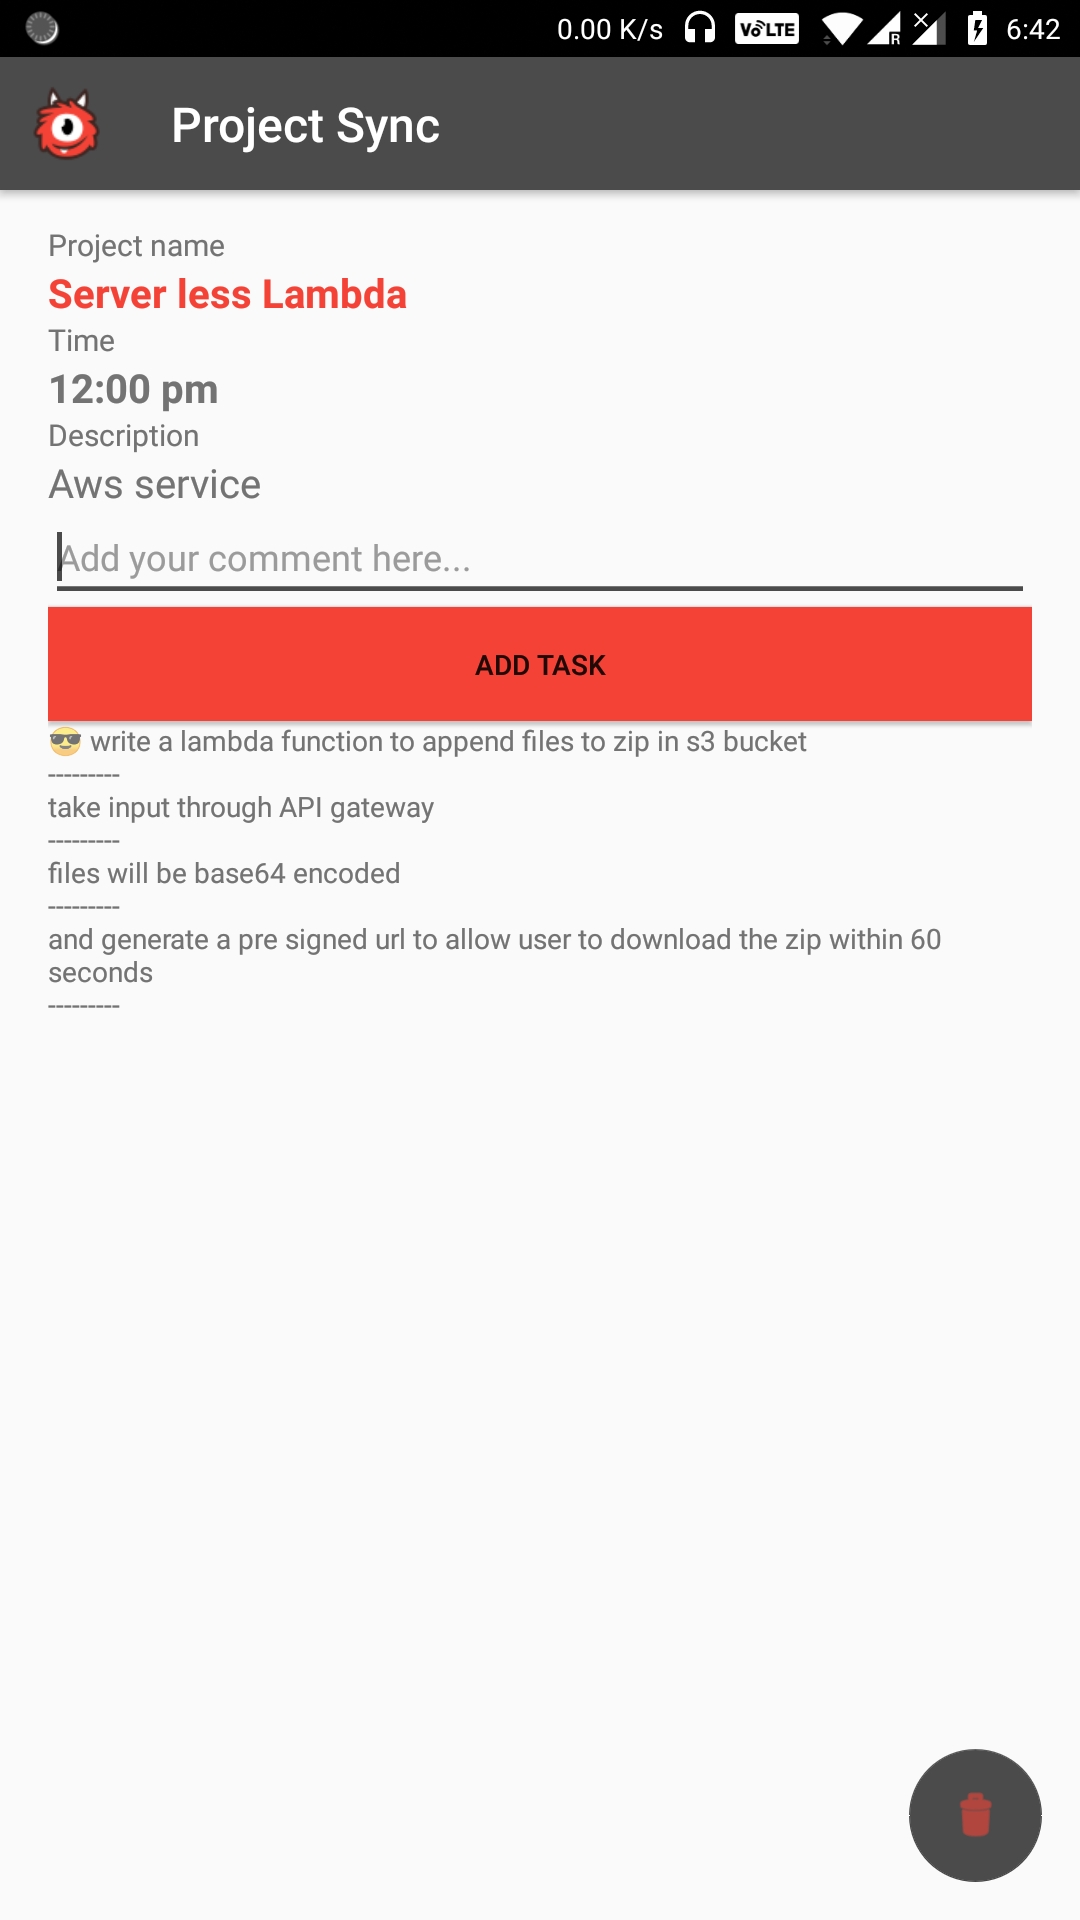
Application Screenshots:
Steps:
The first step is to design the schema:
- Navigate to the AWS AppSync console using the URL: http://console.aws.amazon.com/appsync/home
- Click on create api
- Give name
- Select custom schema
- Click on create
- Now on the left hast side, go to schema
- Here we will write our schema
In our schema we will have – query, mutation and subscription. (Every GraphQL service has a query type and may or may not have a mutation type. These types are the same as a regular object type, but they are special because they define the entry point of every GraphQL query.)
In addition to this we will have Comment type and Project type (Object types analogous to POJOs)
Firstly, we define the parameters for our object types like following:
type Comment {

 # The id of the comment's parent project.

 projectId: ID!

 commentId: String!

 content: String!

 createdAt: String!

}
And
type Project {

 id: ID!

 name: String

 when: String

 description: String

 comments: CommentConnection

}
Here CommentConnection is also an Object type having a parameter: "items" which has return type of list of comments. This was done in order to handle the response data easily in android application. (We could directly send a list of comments as return type to "comments" field like:
comments: [comment], but we are not, just for making the job for application easier)
here is our CommentConnection type
type CommentConnection {

 items: [Comment]

}
Now we define our special types- Queries
First one is to list all the projects and second to get a particular project
type Query {

 # Get a single project by id.

 getProject(id: ID!): Project

 # Get all projects

 listProjects: ProjectConnection

}
Second one is to get a particular project given that argument passed was valid project id (which will always be the case, since we would have already fetched all the projects in our application thus we will have all the valid project ids --- this was done because: in our app user first sees all the projects and then selects one, as soon as he/she selects that project the associated project id is used to query data for the project)
You would have noticed by now, we are using ProjectConnection – a custom object type similar to CommentConnection which serves the same purpose.
type ProjectConnection {

 items: [Project]

}
Now we define our Mutations (similar to CRUD operations)
type Mutation {

 # Create a single project.

 createProject (name: String!, when: String!, description: String!): Project

 # Delete a single project by id.

 deleteProject(id: ID!): Project

 # Comment on a project.

 commentOnProject(projectId: ID!, content: String!, createdAt: String!): Comment

}
• The first one takes arguments necessary for creating a project
• The second one takes arguments necessary for deleting a project
• The third one is used to comment on a particular project which takes arguments required to do so.
Now the most important one is type subscription
type Subscription {

 subscribeToProjectComments(projectId: String!): Comment

  @aws\_subscribe(mutations: ["commentOnProject"])

}
You can think of a subscription as the result of a mutation someone else did.
- Subscriptions in AWS AppSync are invoked as a response to a mutation. This means that you can make any data source in AWS AppSync real time by specifying a GraphQL schema directive on a mutation. Subscription connection management is handled automatically by the AWS AppSync client SDK using MQTT over Websockets as the network protocol between the client and service.
- Subscriptions are triggered from mutations and the mutation selection set is sent to subscribers.
- You can make mutation fields real time by adding an @aws_subscribe(mutations: ["mutation_field_1", "mutation_field_2"]) directive for each of the subscriptions you want to receive notifications for.
- Because the @aws_subscribe(mutations: ["",..,""]) takes an array of mutation inputs, you can specify multiple mutations, which trigger a subscription.
- In our case, users can subscribe to Comments when a specific projectId argument is passed through
- However, if you want to allow clients to subscribe to a single event OR all events, you can make this argument optional by removing the exclamation point (!) from the subscription prototype:
- With this change, clients that omitted this argument would get comments for all events. Additionally, if you wanted clients to explicitly subscribe to all comments for all events, you would remove the argument:
- At last we end our schema by adding,
schema {

 query: Query

 mutation: Mutation

 subscription: Subscription

}
Our full schema looks like:
type Comment {

 # The id of the comment's parent project.

 projectId: ID!

 # A unique identifier for the comment.

 commentId: String!

 # The comment's content.

 content: String!

 createdAt: String!

}

type CommentConnection {

 items: [Comment]

}

type Mutation {

 # Create a single project.

 createProject(name: String!, when: String!, description: String!): Project

 # Delete a single project by id.

 deleteProject(id: ID!): Project

 # Comment on a project.

 commentOnProject(projectId: ID!, content: String!, createdAt: String!): Comment

}

type Project {

 id: ID!

 name: String

 when: String

 description: String

 comments: CommentConnection

}

type ProjectConnection {

 items: [Project]

}

type Query {

 # Get a single project by id.

 getProject(id: ID!): Project

 listProjects: ProjectConnection

}

type Subscription {

 subscribeToProjectComments(projectId: String!): Comment

  @aws\_subscribe(mutations: ["commentOnProject"])

}

schema {

 query: Query

 mutation: Mutation

 subscription: Subscription

}
Once done with the schema, save it.
Attach Resolvers
- Now we have to attach resolver functions to the required data types, as you can see on the right-hand side of schema window.
- In order to respond to queries, a schema needs to have resolve functions for all fields. Resolve functions cannot be included in the GraphQL schema language, so they must be added separately.
- AWS AppSync lets you respond to GraphQL operations by enabling you to perform operations on your AWS resources. For each data source, a GraphQL resolver must run and be able to communicate with that data source appropriately.
- Usually, the communication is through parameters or operations that are unique to the data source. For an AWS Lambda resolver, you need to specify the payload. For an Amazon DynamoDB resolver, you need to specify a key. For an Amazon Elasticsearch Service resolver, you need to specify an index and the query operation.
- We are using Lambda Resolvers which uses it payload to send arguments to lamda function which then handles the DynamoDB and sends response.
Query
Field Resolver
getProject(...): Project OrcasoLambda
listProjects: ProjectConnection OrcasoLambda
- First resolver function is to resolve getProject query.
- To add resolver, go to required mutation in data type window which is right to schema window.
- Click on "Attach"
- You will be redirected to create new resolver page where you have to first select the data source name.
- At this point you need a lambda function. So, create a new lambda function where you will upload the code later.
- After the AWS Lambda function has been created, navigate to your AWS AppSync GraphQL API in the console and choose the Data Sources tab.
- Select New and enter a friendly name for the data source, such as "Lambda", and then select AWS Lambda for Data source type. Then choose the appropriate region. You should see your Lambda functions listed.
- After selecting your Lambda function, you can either create a new role (for which AWS AppSync assigns the appropriate permissions) or choose an existing role that has the following inline policy:
{
    "Version": "2012-10-17",
    "Statement": [
        {
            "Effect": "Allow",
            "Action": [
                "lambda:Invoke"
            ],
            "Resource": "arn:aws:lambda:REGION:ACCOUNTNUMBER:function/LAMBDA_FUNCTION"
        }
    ]
}
You'll also need to set up a trust relationship with AWS AppSync for that role:
{
    "Version": "2012-10-17",
    "Statement": [
        {
            "Effect": "Allow",
            "Principal": {
                "Service": "appsync.amazonaws.com"
            },
            "Action": "sts:AssumeRole"
        }
    ]
}
This is set automatically if you chose "create a new role".
Configuring resolvers
- Now that we have registered an AWS Lambda data source and a valid GraphQL schema, we can connect our GraphQL fields to our Lambda data source using resolvers.
- After you click on "Attach", on create new resolver page click on drop down "data source name" then Select your AWS Lambda data source. and under the request mapping template section select the dropdown menu for Invoke And Forward Arguments.
- Modify the payload object to add the field name. Your template should look like the following:
{
    "version": "2017-02-28",
    "operation": "Invoke",
    "payload": {
        "field": "getProject",
        "arguments":  $utils.toJson($context.arguments)
    }
}
The AWS AppSync Lambda resolver mapping templates enable you to shape requests from AWS AppSync to AWS Lambda functions located in your account, and responses from your Lambda functions back to AWS AppSync.
Request Mapping Template
The Lambda request mapping template is fairly simple and allows as much context information as possible to pass to your Lambda function.
{
    "version": "2017-02-28",
    "operation": "Invoke",
    "payload": {
        "field": "getProject",
        "arguments":  $utils.toJson($context.arguments)
    }
}
The entire mapping document will be passed as input to your Lambda function, so that the previous example would now look like the following:
{
    "version": "2017-02-28",
    "operation": "Invoke",
    "payload": {
        "field": "getProject",
        "arguments": {
            "id": "projId12345"
        }
    }
}
Payload
- The payload field is a container that you can use to pass any well-formed JSON to the Lambda function.
- payload is optional.
- The result of the Lambda function will be set on the context object that is available via $context.result property.
- If the shape of your Lambda function response exactly matches the shape of the GraphQL type, you can forward the response using the following response mapping template:
$utils.toJson($context.result)
Finally, our resolver looks like
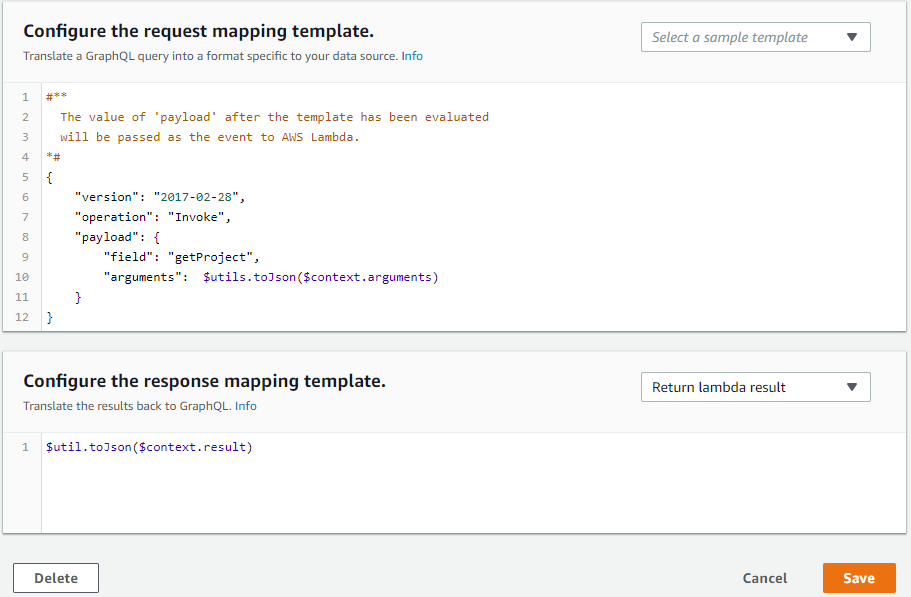
- Note that arguments contains all the fields specified as parameter to "getProject" query i.e. we are passing only "id" as parameter.
- Click on save to attach resolver.
- Similarly we attach resolver for listProjects query:
Following same steps for the rest:
request mapping template:
{
    "version": "2017-02-28",
    "operation": "Invoke",
    "payload": {
        "field": "listProjects"
    }
}
response mapping template
$util.toJson($context.result)
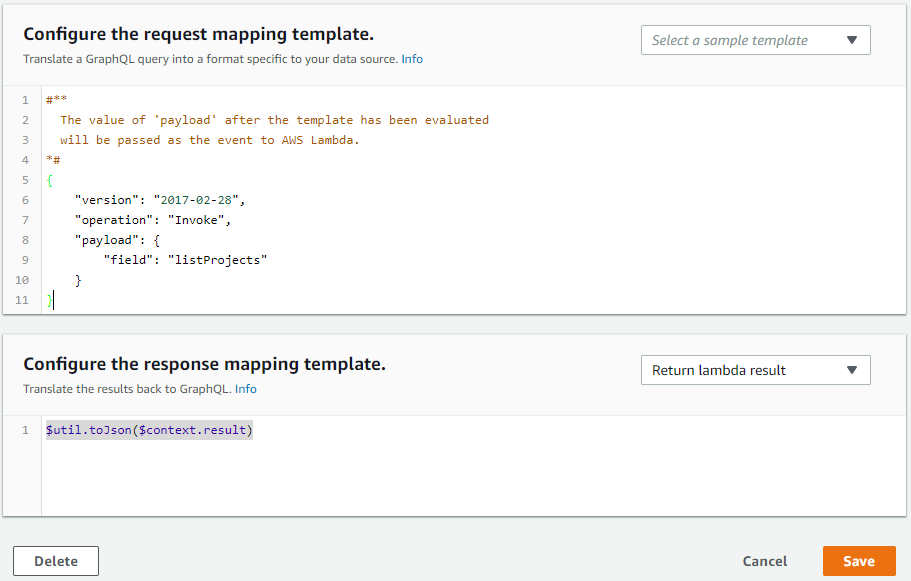
Since we are not passing any arguments so payload only contains type of query.
Save it.
Now resolvers for Mutation types:
Mutation
Field Resolver
createProject(...): Project OrcasoLambda
deleteProject(...): Project OrcasoLambda
commentOnProject(...): Comment OrcasoLambd
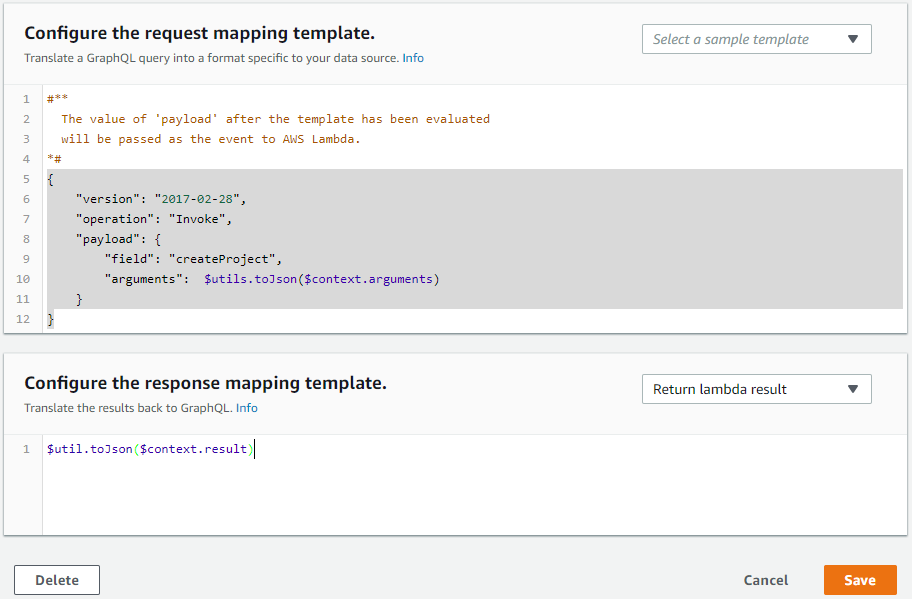
- Resolver for createProject mutation:
request mapping template
{
    "version": "2017-02-28",
    "operation": "Invoke",
    "payload": {
        "field": "createProject",
        "arguments":  $utils.toJson($context.arguments)
    }
}
response mapping template
$util.toJson($context.result)
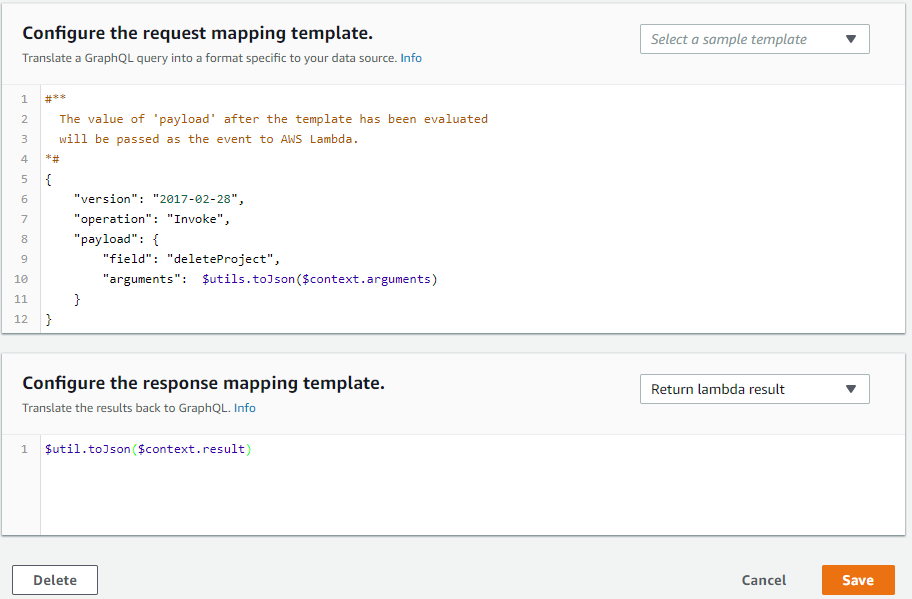
- Similarly for deleteProject mutation:
request mapping template
{
    "version": "2017-02-28",
    "operation": "Invoke",
    "payload": {
        "field": "deleteProject",
        "arguments":  $utils.toJson($context.arguments)
    }
}
response mapping template
$util.toJson($context.result)
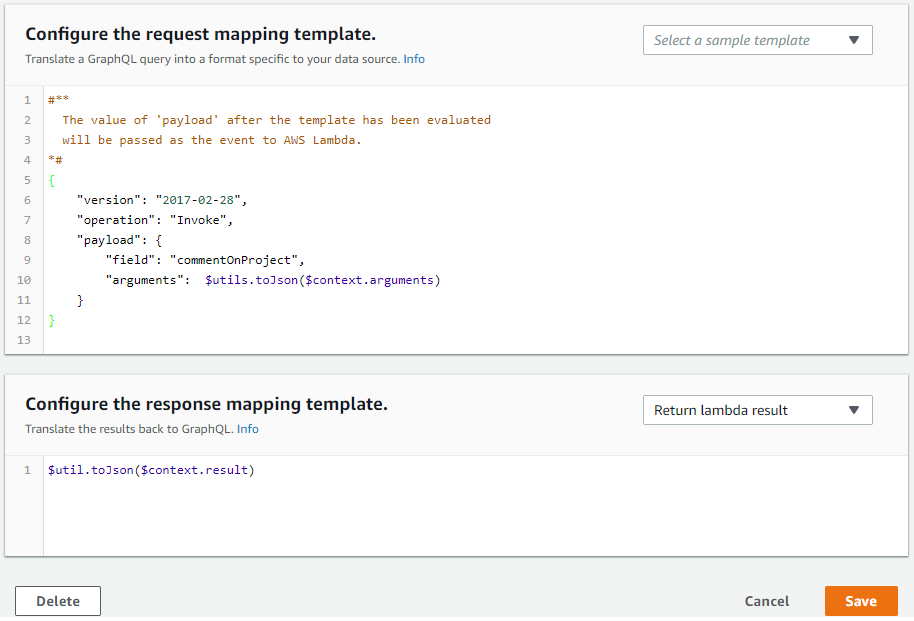
- Resolver for Mutation.commentOnProject
request mapping template
{
    "version": "2017-02-28",
    "operation": "Invoke",
    "payload": {
        "field": "commentOnProject",
        "arguments":  $utils.toJson($context.arguments)
    }
}
response mapping template
$util.toJson($context.result)
Finally:
- Resolver for Project.comments
request mapping template
{
    "version": "2017-02-28",
    "operation": "Invoke",
    "payload": {
        "field": "comments",
        "arguments":  $utils.toJson($context.source)
    }
}
response mapping template
$util.toJson($context.result)

Create a Lambda Function
Now we write our lambda function. Since we now know what data will be coming as input to our lambda function, we can easily use it to process it and send appropriate.
To create a lambda function in java, open eclipse
-
Go to help
-
Open eclipse marketplace
-
Search for aws toolkit for eclipse
-
Install it
-
After done installing, enter your details to add your aws account to eclipse.
Once done with the installation
- Go to aws explorer
-
Right click on AWS Lamda
-
Select create a lambda project

-
Give a name
-
Be sure to select input type to custom
Once done, you will land on LambdaFunctionHandler.java.
Now you have to change input and output types to:
public class LambdaFunctionHandler implements RequestHandler<Map<String,Object>, Object>since we will get the payload in form key value pairs so use map for input and output will be of type Object to be able to send multiple type of return values. You will understand why I did so.
Below is the lambda function, follow the comments for understanding how resolvers are mapped to this lambda and how this lambda function handles all the queries and mutation.
package com.rai.utsav;
import java.util.ArrayList;
import java.util.HashMap;
import java.util.Iterator;
import java.util.List;
import java.util.Map;
import java.util.Set;
import java.util.UUID;
import com.amazonaws.AmazonClientException;
import com.amazonaws.AmazonServiceException;
import com.amazonaws.regions.Region;
import com.amazonaws.regions.Regions;
import com.amazonaws.services.dynamodbv2.AmazonDynamoDB;
import com.amazonaws.services.dynamodbv2.AmazonDynamoDBClient;
import com.amazonaws.services.dynamodbv2.AmazonDynamoDBClientBuilder;
import com.amazonaws.services.dynamodbv2.document.DeleteItemOutcome;
import com.amazonaws.services.dynamodbv2.document.DynamoDB;
import com.amazonaws.services.dynamodbv2.document.Item;
import com.amazonaws.services.dynamodbv2.document.ItemCollection;
import com.amazonaws.services.dynamodbv2.document.PutItemOutcome;
import com.amazonaws.services.dynamodbv2.document.QueryOutcome;
import com.amazonaws.services.dynamodbv2.document.Table;
import com.amazonaws.services.dynamodbv2.document.spec.DeleteItemSpec;
import com.amazonaws.services.dynamodbv2.document.spec.QuerySpec;
import com.amazonaws.services.dynamodbv2.model.AttributeValue;
import com.amazonaws.services.dynamodbv2.model.GetItemRequest;
import com.amazonaws.services.dynamodbv2.model.PutItemRequest;
import com.amazonaws.services.dynamodbv2.model.PutItemResult;
import com.amazonaws.services.dynamodbv2.model.ResourceNotFoundException;
import com.amazonaws.services.dynamodbv2.model.ScanRequest;
import com.amazonaws.services.dynamodbv2.model.ScanResult;
import com.amazonaws.services.lambda.runtime.Context;
import com.amazonaws.services.lambda.runtime.RequestHandler;
public class LambdaFunctionHandler implements RequestHandler<Map<String,Object>, Object> {
/* input type is map since payload of resolver function is resolved and is sent as json data i.e. key value pairs*/
/* I have used Object as return type for this lambda function*/
private String PROJECT_TABLE = "Project";
private String COMMENT_TABLE = "Comment";
private Regions REGION = Regions.AP_SOUTH_1;
@Override
public Object handleRequest(Map<String,Object> input, Context context) {
AmazonDynamoDB ddb = AmazonDynamoDBClientBuilder.standard().withRegion(Regions.AP_SOUTH_1).build();
/* in payload method type is mentioned in 'field'*/
String method = (String) input.get("field");
switch(method) {
case "createProject":{
/* for creating a project, mutation sends name,when and description parameters*/
/* id is generated in lambda function*/
HashMap<String,Object> arg = (HashMap<String, Object>) input.get("arguments");
String name = (String) arg.get("name");
String when = (String) arg.get("when");
String description = (String) arg.get("description");
String id = UUID.randomUUID().toString();
Project p = new Project(id,description,name, when);
/* prepare map with attributes and attribute values for inserting in db*/
HashMap<String,AttributeValue> item_values =
new HashMap<String,AttributeValue>();
item_values.put("id", new AttributeValue(id));
item_values.put("name", new AttributeValue(name));
item_values.put("when", new AttributeValue(when));
item_values.put("description", new AttributeValue(description));
try {
// add the project in project table in dynamodb
ddb.putItem(PROJECT_TABLE, item_values);
//return the response of type project as mentioned by mutation
return p;
} catch (ResourceNotFoundException e) {
System.err.format("Error: The table \"%s\" can't be found.\n", PROJECT_TABLE);
System.err.println("Be sure that it exists and that you've typed its name correctly!");
return null;
} catch (AmazonServiceException e) {
System.err.println(e.getMessage());
return null;
}
}
case "commentOnProject":{
// commentOnProject mutation sends projectId,content,createdAt as arguments in payload
System.out.println("coomentOnProject");
HashMap<String,Object> arg = (HashMap<String, Object>) input.get("arguments");
for(Map.Entry<String, Object> m:arg.entrySet()) {
System.out.println(m.getKey().toString()+" "+m.getValue().toString());
}
String projectId = (String) arg.get("projectId");
//System.out.println(projectId);
String content = (String) arg.get("content");
//System.out.println(content);
String createdAt = (String) arg.get("createdAt");
// commentId is generated in lambda function
String commentId = UUID.randomUUID().toString();
Comment c = new Comment(projectId,commentId,content, createdAt);
System.out.println(c.toString());
/* prepare map with attributes and attribute values for inserting in db*/
HashMap<String,AttributeValue> item_values =
new HashMap<String,AttributeValue>();
item_values.put("projectId", new AttributeValue().withS(projectId));
item_values.put("commentId", new AttributeValue().withS(commentId));
item_values.put("createdAt", new AttributeValue().withS(createdAt));
item_values.put("content", new AttributeValue().withS(content));
System.out.println(item_values.toString());
// Make the request
try {
//add comment to comment table with its primary key and sort key.
PutItemResult s = ddb.putItem(new PutItemRequest()
.withTableName(COMMENT_TABLE)
.withItem(item_values)
.withReturnConsumedCapacity("INDEXES")
.withReturnItemCollectionMetrics("SIZE"));
System.out.println(s.toString());
//return comment object as response to this mutation
return c;
} catch (ResourceNotFoundException e) {
System.err.format("Error: The table \"%s\" can't be found.\n", COMMENT_TABLE);
System.err.println("Be sure that it exists and that you've typed its name correctly!");
return null;
} catch (AmazonServiceException e) {
System.err.println(e.getMessage());
return null;
}
}
case "deleteProject":{
DynamoDB dynamoDB = new DynamoDB(ddb);
// this mutation sends id of the project to be deleted
Table table = dynamoDB.getTable(PROJECT_TABLE);
HashMap<String,Object> arg = (HashMap<String, Object>) input.get("arguments");
String id = (String) arg.get("id");
Project p = null;
//we first need to get the project from table since we have to return
// as response to this mutation
// prepare attribute and attribute value map to fetch the project by id
HashMap<String,AttributeValue> key_to_get =
new HashMap<String,AttributeValue>();
key_to_get.put("id", new AttributeValue(id));
//prepare a request to be made to project table in db
GetItemRequest request = null;
request = new GetItemRequest()
.withKey(key_to_get)
.withTableName(PROJECT_TABLE);
try {
//get the project
Map<String,AttributeValue> returned_item =
ddb.getItem(request).getItem();
if (returned_item != null) {
String pid = returned_item.get("id").getS();
String name = returned_item.get("name").getS();
String when = returned_item.get("when").getS();
String description = returned_item.get("description").getS();
// save the project need to be send as response and to be deleted now
p = new Project(pid,description,name, when);
}else {
System.out.format("No item found with the key %s!\n",arg.get("id"));
}
} catch (AmazonServiceException e) {
System.err.println(e.getErrorMessage());
System.exit(1);
}
// we delete the project using the id from the payload
DeleteItemOutcome outcome = table.deleteItem("id",id );
//Now here is one important thing needs to be done after we delete the project
//Since in our comment table we maintain commnets using two keys
//Therefore, we need to delete all associated comments from comment table
//for given project id
Table ctable = dynamoDB.getTable(COMMENT_TABLE);
Map<String, AttributeValue> expressionAttributeValues =
new HashMap<String, AttributeValue>();
expressionAttributeValues.put(":val", new AttributeValue().withS(id));
//scan for all the comments with projecId = id
ScanRequest scanRequest = new ScanRequest()
.withTableName(COMMENT_TABLE)
.withFilterExpression("projectId = :val")
.withExpressionAttributeValues(expressionAttributeValues);
ScanResult result = ddb.scan(scanRequest);
//loop over all the comments with projectId = id and delete it
for (Map<String, AttributeValue> returned_item : result.getItems()) {
String projectId = returned_item.get("projectId").getS();
String commentId = returned_item.get("commentId").getS();
DeleteItemSpec deleteItemSpec = new DeleteItemSpec()
.withPrimaryKey("projectId",projectId, "commentId", commentId);
//comment deleted
ctable.deleteItem(deleteItemSpec);
}
//return the project that we firstly extracted from db and saved in p
return p;
}
case "comments":{
// this is a resolver that is called when a nested query is made to get comments while we get a project
// so it means that while getProject query is handled, this query is also called to get all the comments
// for that project id. The resolver for this query contains project id
//we maintain a list of comments
List<Comment> lc = new ArrayList<Comment>();
DynamoDB dynamoDB = new DynamoDB(ddb);
Table table = dynamoDB.getTable(COMMENT_TABLE);
HashMap<String,Object> arg = (HashMap<String, Object>) input.get("arguments");
String id = arg.get("id").toString();
Map<String, AttributeValue> expressionAttributeValues =
new HashMap<String, AttributeValue>();
expressionAttributeValues.put(":val", new AttributeValue().withS(id));
//get all the comments for projectId = id
ScanRequest scanRequest = new ScanRequest()
.withTableName(COMMENT_TABLE)
.withFilterExpression("projectId = :val")
.withExpressionAttributeValues(expressionAttributeValues);
ScanResult result = ddb.scan(scanRequest);
for (Map<String, AttributeValue> returned_item : result.getItems()) {
String projectId = returned_item.get("projectId").getS();
String commentId = returned_item.get("commentId").getS();
String content = returned_item.get("content").getS();
String createdAt = returned_item.get("createdAt").getS();
Comment c = new Comment(projectId,commentId,content, createdAt);
//add the comment in list
lc.add(c);
}
//Now this part was done in order to make our response (json) look like
/*
* "items":[
* {
* ....
* },
* {
* ....
* }
* ]
*
*/
ItemsC i = new ItemsC(); // since i has getters and setters for attribute -> list of comments named items
// this does this trick
i.setItems(lc);
return i;
}
case "getProject":{
// this query is for getting a project with given id in payload
HashMap<String,Object> arg = (HashMap<String, Object>) input.get("arguments");
//Post p = postsmap.get((arg.get("id")));
HashMap<String,AttributeValue> key_to_get =
new HashMap<String,AttributeValue>();
key_to_get.put("id", new AttributeValue((String)arg.get("id")));
// prepare the request
GetItemRequest request = null;
request = new GetItemRequest()
.withKey(key_to_get)
.withTableName(PROJECT_TABLE);
try {
//get the project
Map<String,AttributeValue> returned_item =
ddb.getItem(request).getItem();
if (returned_item != null) {
String id = returned_item.get("id").getS();
String name = returned_item.get("name").getS();
String when = returned_item.get("when").getS();
String description = returned_item.get("description").getS();
//return the response
Project p = new Project(id,description,name, when);
return p;
} else {
System.out.format("No item found with the key %s!\n",arg.get("id"));
}
} catch (AmazonServiceException e) {
System.err.println(e.getErrorMessage());
System.exit(1);
}
break;
}
case "listProjects":{
//this is query lists all the projects in project table
//no arguments for this resolver
List<Project> list= new ArrayList<>();
try {
//scan all the items
ScanRequest scanRequest = new ScanRequest().withTableName(PROJECT_TABLE);
ScanResult result = null;
do {
if (result != null) {
scanRequest.setExclusiveStartKey(result.getLastEvaluatedKey());
}
result = ddb.scan(scanRequest);
List<Map<String, AttributeValue>> rows = result.getItems();
// Iterate through All rows
for (Map<String, AttributeValue> returned_item : rows) {
String id = returned_item.get("id").getS();
String name = returned_item.get("name").getS();
String when = returned_item.get("when").getS();
String description = returned_item.get("description").getS();
Project p = new Project(id,description,name, when);
list.add(p);
}
} while (result.getLastEvaluatedKey() != null);
} catch (AmazonClientException ex) {
throw new RuntimeException(ex.getMessage(), ex);
}
//Similarly here we did this to make our response (json) look like
/*
* "items":[
* {
* ....
* },
* {
* ....
* }
* ]
*
*/
ItemsP i = new ItemsP();//since i has getters and setters for attribute -> list of projects named items
// this does this trick
i.setItems(list);
return i;
}
}
return null;
}
}Android Application Working
Now in the android application, we use these queries and mutation. The application use api key authorization which is the quickest way of getting started. But there are four ways you can authorize applications to interact with your AWS AppSync GraphQL API. You specify which authorization type you use by specifying one of the following authorization type values in your AWS AppSync API or CLI call:
- API_KEY
For using API keys.
- AWS_IAM
For using AWS Identity and Access Management (IAM) permissions.
- OPENID_CONNECT
For using your OpenID Connect provider.
- AMAZON_COGNITO_USER_POOLS
For using an Amazon Cognito user pool.
To get API key and API Endpoint, go to APP Sync console and select your API, click on the name of API to go to homepage where under API details you will get both API URL and API KEY. Paste these into Constants.java
We use functions from code that is generated by Apollo which requires two files for generating all the necessary code which is needed in order to make request and response to our api. These two files can be found at the bottom of home page of our api. (shown below)

Java code is generated from a schema file (./app/src/main/graphql/com/rai/utsav /schema.json) and a .graphql file (/app/src/main/graphql/ com/rai/utsav /events.graphql) based on your API. The generated source is in the ./app/build/generated/source/appsync folder of this project after a build is completed.
If you update your schema in the future, you will find updated versions of these in the AWS AppSync console under the homepage for your GraphQL API when you click the Android tab.
ListProjectsActivity.java (Query)
- The ListProjectsActivity.java file lists all the projects accessible to the user. It returns data from the offline cache first if available and later fetches it from remote to update the local cache.
- Below is the code to call a query listProjects that we defined in our Schema, since Apollo has generated all the necessary functions for us, we just need to build these queries and wait for the response in respective callback functions
mAWSAppSyncClient.query(ListProjectsQuery.builder().build())
        .responseFetcher(AppSyncResponseFetchers.CACHE_AND_NETWORK)
        .enqueue(projectsCallback);
AppSyncResponseFetchers.CACHE_AND_NETWORK Signals the appsync client to first fetch the data from the normalized cache. If it's not present in the normalized cache or if an exception occurs while trying to fetch it from the normalized cache, then the data is instead fetched from the network and the callback function gets called when GraphQL response is received and parsed successfully. Depending on the ResponseFetcher used with the call, this may be called multiple times.
private GraphQLCall.Callback<ListProjectsQuery.Data> projectsCallback = new GraphQLCall.Callback<ListProjectsQuery.Data>() {
    @Override
    public void onResponse(@Nonnull Response<ListProjectsQuery.Data> response) {
        projects = response.data().listProjects().items();
        if(projects !=null){
        adapter.setProjects(projects);
        runOnUiThread(new Runnable() {
            @Override
            public void run() {
                Log.d(TAG, "Notifying data set changed");
                adapter.notifyDataSetChanged();
            }
        });}
    }

    @Override
    public void onFailure(@Nonnull ApolloException e) {
        Log.e(TAG, "Failed to make projects api call", e);
        Log.e(TAG, e.getMessage());
    }
};
this function is responsible for populating our project list on our first activity screen. Since the callback function gets called when response is received, and if suppose you have slow internet connection then app might be stuck in main UI thread if you are not running it in separate thread. So, it is safe to use new thread for listening to callback function.
When response is arrived, we have received the list of projects as per the query which is stored in variable 'projects' which list of type 'ListProjectQuery.Item' since we are sending response like:
query{
  listProjects{
    items{
      name
    }
  }
}
Response:
{
  "data": {
    "listProjects": {
      "items": [
        {
          "name": "Orcaso"
        },
        {
          "name": "Project Name"
        }
      ]
    }
  }
}
Since the generated code by Apollo handles the data structure for the attributes send, a variable of type List<Item> is created is ListProjectQuery class where Item is private class which has attributes matching to the fields in each 'items' i.e. all the details of a project. In this way all the projects are extracted.
ViewProjectActivity.java (Mutation, Query, Subscription)
- The ViewProjectActivity.java file lists information about a project and allows new comments to be added. New comments to the project are added while the user is viewing the project via subscriptions.
As soon as we click on a project in first activity where all projects are listed, we move to this activity which onCreate calls a function refreshProjects which gets the project which was clicked through getProject query and this is followed by refreshComments which gets all the associated comments for this project
private void refreshProject(final boolean cacheOnly) {
    GetProjectQuery getProjectQuery = GetProjectQuery.builder().id(project.id()).build();

    ClientFactory.getInstance(getApplicationContext())
            .query(getProjectQuery)
            .responseFetcher(cacheOnly ? AppSyncResponseFetchers.CACHE_ONLY : AppSyncResponseFetchers.CACHE_AND_NETWORK)
            .enqueue(refreshProjectCallback);
}

private GraphQLCall.Callback<GetProjectQuery.Data> refreshProjectCallback = new GraphQLCall.Callback<GetProjectQuery.Data>() {
    @Override
    public void onResponse(@Nonnull final Response<GetProjectQuery.Data> response) {
        runOnUiThread(new Runnable() {
            @Override
            public void run() {
                if (response.errors().size() < 1) {
                    project = response.data().getProject().fragments().project();
                    refreshComments();
                } else {
                    Log.e(TAG, "Failed to get project.");
                }
            }
        });
    }

    @Override
    public void onFailure(@Nonnull ApolloException e) {
        Log.e(TAG, "Failed to get project.");
    }
};

/**
 * Reads the comments from the project object and preps it for display.
 */
private void refreshComments() {
    StringBuilder stringBuilder = new StringBuilder();
    for (Project.Item i : project.comments().items()) {
        stringBuilder.append(i.content() + "\n---------\n");
    }
    comments.setText(stringBuilder.toString());
}
After the call for refreshProjects() function, it is followed by startSubscription() function, which starts the subscription for this project. It means that now it starts looking for the mutation 'commentOnProject' for projectId = 'p'. Whenever this mutation happens, all the user (in this case each user using this same application) will get to see changes done by any user since all are subscribed to same projectId "if" all have selected the same project.
private void startSubscription() {
    NewCommentOnProjectSubscription subscription = NewCommentOnProjectSubscription.builder().projectId(project.id()).build();

    subscriptionWatcher = ClientFactory.getInstance(this.getApplicationContext()).subscribe(subscription);
    subscriptionWatcher.execute(subscriptionCallback);
}

private AppSyncSubscriptionCall.Callback<NewCommentOnProjectSubscription.Data> subscriptionCallback = new AppSyncSubscriptionCall.Callback<NewCommentOnProjectSubscription.Data>() {
    @Override
    public void onResponse(final @Nonnull Response<NewCommentOnProjectSubscription.Data> response) {
        runOnUiThread(new Runnable() {
            @Override
            public void run() {
                Toast.makeText(ViewProjectActivity.this, response.data().subscribeToProjectComments().projectId().substring(0, 5) + response.data().subscribeToProjectComments().content(), Toast.LENGTH_LONG).show();
                Log.e(TAG, "Subscription response: " + response.data().toString());
                NewCommentOnProjectSubscription.SubscribeToProjectComments comment = response.data().subscribeToProjectComments();


                // Cache write
                addCommentToCache(comment);

                // Show changes from in cache
                refreshProject(true);
            }
        });
    }

    @Override
    public void onFailure(final @Nonnull ApolloException e) {
        Log.e(TAG, "Subscription failure", e);
    }

    @Override
    public void onCompleted() {
        Log.d(TAG, "Subscription completed");
    }
};
Whenever a user triggers commentOnProject mutation, subscription watcher gets this change which is then written in cache followed by refreshing the project which is turn refreshes the list of comments visible on screen. So, if person A makes a comment on project id P then at the same time subscription watcher for person B on project id P will see this change since the result for the mutation done by person A was received by every user who is currently on project B (in short subscribed to project B).
Following are the two functions called by subscriptionCallback and one called by UI onClick button "Add Comment"
/**
 * Adds the new comment to the project in the cache.
 * @param comment
 */
private void addCommentToCache(NewCommentOnProjectSubscription.SubscribeToProjectComments comment) {
    try {
        // Read the old project data
        GetProjectQuery getProjectQuery = GetProjectQuery.builder().id(project.id()).build();
        GetProjectQuery.Data readData = ClientFactory.getInstance(ViewProjectActivity.this).getStore().read(getProjectQuery).execute();
        Project project = readData.getProject().fragments().project();

        // Create the new comment object
        Project.Item newComment = new Project.Item(
                comment.__typename(),
                comment.projectId(),
                comment.commentId(),
                comment.content(),
                comment.createdAt());

        // Create the new comment list attached to the project
        List<Project.Item> items = new LinkedList<>(project.comments().items());
        items.add(0, newComment);

        // Create the new project data
        GetProjectQuery.Data madeData = new GetProjectQuery.Data(new GetProjectQuery.GetProject(readData.getProject().__typename(), new GetProjectQuery.GetProject.Fragments(new Project(readData.getProject().fragments().project().__typename(),
                project.id(),
                project.description(),
                project.name(),
                project.when(),
                new Project.Comments(readData.getProject().fragments().project().comments().__typename(), items)))));

        // Write the new project data
        ClientFactory.getInstance(ViewProjectActivity.this).getStore().write(getProjectQuery, madeData).execute();
        Log.d(TAG, "Wrote comment to database");
    } catch (ApolloException e) {
        Log.e(TAG, "Failed to update local database", e);
    }
}

/**
 * UI triggered method to add a comment. This will read the text box and submit a new comment.
 * @param view
 */
public void addComment(View view) {
    InputMethodManager imm = (InputMethodManager)getSystemService(Context.INPUT_METHOD_SERVICE);
    imm.hideSoftInputFromWindow(newComment.getWindowToken(), 0);

    Toast.makeText(this, "Submitting comment", Toast.LENGTH_SHORT).show();

    CommentOnProjectMutation comment = CommentOnProjectMutation.builder().content(newComment.getText().toString())
            .createdAt(new Date().toString())
            .projectId(project.id())
            .build();

    ClientFactory.getInstance(view.getContext())
            .mutate(comment)
            .enqueue(addCommentCallback);
}

/**
 * Service response subscriptionCallback confirming receipt of new comment triggered by UI.
 */
private GraphQLCall.Callback<CommentOnProjectMutation.Data> addCommentCallback = new GraphQLCall.Callback<CommentOnProjectMutation.Data>() {
    @Override
    public void onResponse(@Nonnull Response<CommentOnProjectMutation.Data> response) {
        Log.d(TAG, response.toString());
        runOnUiThread(new Runnable() {
            @Override
            public void run() {
                clearComment();
            }
        });
    }

    @Override
    public void onFailure(@Nonnull ApolloException e) {
        Log.e(TAG, "Failed to make comments mutation", e);
        Log.e(TAG, e.getMessage());
    }
};
addComment itself triggers the update since subscription watcher will receive any updates on commentOnProject mutation. This results in real time update and offline capabilities of exchanging comments over a same project.
AddProjectActivity.java (Mutation)
- The AddProjectActivity.java file creates a new project using the details entered on screen.
String nameString = name.getText().toString();
String timeString = time.getText().toString();
String descriptionString = description.getText().toString();

// Get the client instance
AWSAppSyncClient awsAppSyncClient = ClientFactory.getInstance(this.getApplicationContext());

// Create the mutation request
AddProjectMutation addProjectMutation = AddProjectMutation.builder()
        .name(nameString)
        .when(timeString)
        .description(descriptionString)
        .build();

// Enqueue the request (This will execute the request)
awsAppSyncClient.mutate(addProjectMutation).refetchQueries(ListProjectsQuery.builder().build()).enqueue(addProjectsCallback);

// Add to Project list while offline or before request returns
List<Project.Item> items = new ArrayList<>();
String tempID = UUID.randomUUID().toString();
Project project = new Project("Project", tempID, descriptionString, nameString, timeString, new Project.Comments("Comment", items));

// Close the add Project when offline otherwise allow callback to close
ConnectivityManager cm =
        (ConnectivityManager) getApplicationContext().getSystemService(Context.CONNECTIVITY_SERVICE);

NetworkInfo activeNetwork = cm.getActiveNetworkInfo();
boolean isConnected = activeNetwork != null &&
        activeNetwork.isConnectedOrConnecting();

if (!isConnected) {
    finish();
}
In this activity, addProjectMutation is performed and we return back to our main activity where projects are listed. When we return back to ListProjectsActivity the state changes to onResume and again the ListProjectsQuery is triggered which updates the projects list as soon as we land in this activity.
DeleteProjectMutation
For deleting a project, we need to be in ViewProjectActivity.java which will have an option of deleting the project. Here we perform our last mutation which is delete mutation.
FloatingActionButton fab = (FloatingActionButton) findViewById(R.id.fabd);
fab.setOnClickListener(new View.OnClickListener() {
    @Override
    public void onClick(View view) {

        DeleteProjectMutation delete = DeleteProjectMutation.builder().id(project.id().toString())
                .build();

        ClientFactory.getInstance(view.getContext())
                .mutate(delete)
                .enqueue(addDeleteCallback);
    }
});

private GraphQLCall.Callback<DeleteProjectMutation.Data> addDeleteCallback = new GraphQLCall.Callback<DeleteProjectMutation.Data>() {
    @Override
    public void onResponse(@Nonnull Response<DeleteProjectMutation.Data> response) {
        Log.d(TAG, response.toString());
        runOnUiThread(new Runnable() {
            @Override
            public void run() {
                try {
                    Intent k = new Intent(ViewProjectActivity.this, ListProjectsActivity.class);
                    startActivity(k);
                } catch(Exception e) {
                    e.printStackTrace();
                }
            }
        });
    }

    @Override
    public void onFailure(@Nonnull ApolloException e) {
        Log.e(TAG, "Failed to make comments mutation", e);
        Log.e(TAG, e.getMessage());
    }
};
As soon as we have deleted the project we switch back to our main activity which refreshes the page and we get the updated results.
I have also added this app to AWS Cognito user pool for authentication. This can be used to manage the user you want to use this application.
Follow this link for more details: https://docs.aws.amazon.com/cognito/latest/developerguide/tutorial-integrating-user-pools-android.html
Step 1: Creating a User Pool for Your App by Using the Console
The following procedure describes how to create a user pool and use it in your app. This procedure creates a pool ID, an app client ID, and an app client secret using default settings. For information on customizing these settings, see User Pools Reference (Console).
To create a user pool for your app
- Sign in to the Amazon Cognito console
- Choose Manage your User Pools.
- Choose Create a User Pool.
- In Pool name, type a name for the pool and then choose Review defaults. This creates the pool with the default settings.
- From the left navigation pane, choose Attributes to specify which attributes are required and which attributes to use as aliases. After you set the following attributes and after users in the pool verify their email addresses, they can sign in with their usernames or email addresses.
- For email, choose Required and Alias.
- For phone number, choose Required and Alias.
- For given name, choose Required.
- Choose Save changes.
- From the left navigation pane, choose Policies to specify the password policy. For this tutorial, use the default settings.
- From the left navigation pane, choose Verifications. On this page, you can customize the messages that are sent to the users in your pool to deliver verification codes. For this tutorial, use the default settings.
- From the left navigation pane, choose Apps and then choose Add an app. You can create multiple app clients for a user pool and you can create one app per platform.
- For App name, type a name for your app. Keep Generate app client secret selected, and then choose Set attribute read and write permissions. Select the attributes that require write permissions. Required attributes always have write permissions.
- Choose Create app and then choose Save changes.
- From the left navigation bar, choose Review and then choose Create pool.
- Note the Pool ID, Pool ARN, App client ID, and App client secret. You can find the app client ID and app client secret under Apps on the left navigation bar. To view the client secret, choose Show details.
Step 2: Creating a User Pool Instance
To create an instance of a user pool object, you need the user pool ID, client ID, client secret, and AWS region. The following example shows how to create a CognitoUserPool instance. It is the entry point for all interactions with your user pool from your application. In the sample application the userPool is created in AppHelper.java.
The region parameter is a valid AWS region from the Mobile SDK for Android enum Regions.
/* Create a CognitoUserPool instance */
CognitoUserPool userPool = new CognitoUserPool(context, userPoolId, clientId, clientSecret, cognitoRegion);
Step 3: Signing up Users for Your App
The following steps describe how to sign up users for your app.
To sign up users for your app
- Collect the following information from the user:
- user-id: This is used by the user to log in and must be unique within the pool.
- password: This is the user's password.
- user attributes: You must specify the required attributes (email, given name, and phone number) for your pool.
- Use the pool instance to sign up the user.
// Create a CognitoUserAttributes object and add user attributes
CognitoUserAttributes userAttributes = new CognitoUserAttributes();
// Add the user attributes. Attributes are added as key-value pairs
// Adding user's given name.
// Note that the key is "given_name" which is the OIDC claim for given name
userAttributes.addAttribute("given_name", userGivenName);
// Adding user's phone number
userAttributes.addAttribute("phone_number", phoneNumber);
// Adding user's email address
userAttributes.addAttribute("email", emailAddress);- Create a callback handler for sign-up. The onSuccess method is called when the sign-up is successful.
SignUpHandler signupCallback = new SignUpHandler() {
    @Override
    public void onSuccess(CognitoUser cognitoUser, boolean userConfirmed, CognitoUserCodeDeliveryDetails cognitoUserCodeDeliveryDetails) {
    // Sign-up was successful
        // Check if this user (cognitoUser) needs to be confirmed
        if(!userConfirmed) {
        // This user must be confirmed and a confirmation code was sent to the user
        // cognitoUserCodeDeliveryDetails will indicate where the confirmation code was sent
        // Get the confirmation code from user
        }
        else {
        // The user has already been confirmed
        }
    }
    @Override
    public void onFailure(Exception exception) {
    // Sign-up failed, check exception for the cause
    }
}- Call the sign-up API.
userPool.signUpInBackground(userId, password, userAttributes, null, signupCallback);
Step 4: Confirming Users for Your App
Users may need to be confirmed after they sign up before they can sign in. Users can confirm through email or phone. After a successful sign-up, if the user needs to be confirmed, a confirmation code is sent to the user's email address or phone number. You can also automatically confirm a user after sign-up by using Lambda triggers.
If a user provides an email address or phone number during sign-up, and you selected automatic verification for your user pool, a confirmation code is sent to the user's phone number as a text message or to the user's email address. ThecognitoUserCodeDeliveryDetails object, which was delivered to the callback handler after successful sign-up, indicates where this confirmation code was sent. You can use this to let the user know how he or she will get confirmation code.
The following steps describe how to confirm user information before users can sign in to your app.
To confirm a user for your app
- Create a callback handler to confirm the user. This callback handler is used by the SDK to communicate the results of the confirmation API call.
// Callback handler for confirmSignUp API
GenericHandler confirmationCallback = new GenericHandler() {
    @Override
    public void onSuccess() {
    // User was successfully confirmed
    }
    @Override
    public void onFailure(Exception exception) {
    // User confirmation failed. Check exception for the cause.
    }
}; - When a new user is confirmed, the user's attribute through which the confirmation code was sent (email address or phone number) is marked as verified. If this attribute is also set to be used as an alias, then the user can sign in with that attribute (email address or phone number) instead of the username.
Step 5: Resolving Alias Value Conflicts
Alias values must be unique in a pool. When you confirm a new user, if that user's email address or phone number are used as an alias, and that email or phone number are already in use for an existing user in the pool, you must resolve this conflict. To ensure uniqueness, you can do either of the following:
Set the forcedAliasCreation parameter to false. This resolves the conflict by allowing the user confirmation to fail. The attribute remains verified for the existing user and continues to be an alias for the existing user. The new user remains un-confirmed, as shown in the following example.
// This will cause confirmation to fail if the user attribute has been verified for another user in the same pool
boolean forcedAliasCreation = false;
// Call API to confirm this user
cognitoUser.confirmSignUpInBackground(confirmationCode, forcedAliasCreation, confirmationCallback);
Setting the forcedAliasCreation parameter to true resolves the conflict by marking the attribute (email or phone number) as verified for the new user, and consequently marking it as not-verified for the existing user. This attribute is no longer an alias for the existing user.
All confirmed users can sign in. On successful sign-in, access and ID tokens are returned. These tokens are in a CognitoUserSession object.
Step 6: Signing Users in to Your App
To sign a user in to your app, you must first create a callback handler for authentication. The following example shows how the SDK interacts with your application through this callback handler.
// Callback handler for the sign-in process
AuthenticationHandler authenticationHandler = new AuthenticationHandler() {

    @Override
    public void onSuccess(CognitoUserSession cognitoUserSession) {
        // Sign-in was successful, cognitoUserSession will contain tokens for the user
    }

    @Override
    public void getAuthenticationDetails(AuthenticationContinuation authenticationContinuation, String userId) {
        // The API needs user sign-in credentials to continue
        AuthenticationDetails authenticationDetails = new AuthenticationDetails(userId, password, null);

        // Pass the user sign-in credentials to the continuation
        authenticationContinuation.setAuthenticationDetails(authenticationDetails);

        // Allow the sign-in to continue
        authenticationContinuation.continueTask();
    }

    @Override
    public void getMFACode(MultiFactorAuthenticationContinuation multiFactorAuthenticationContinuation) {
        // Multi-factor authentication is required; get the verification code from user
        multiFactorAuthenticationContinuation.setMfaCode(mfaVerificationCode);
        // Allow the sign-in process to continue
        multiFactorAuthenticationContinuation.continueTask();
    }

    @Override
    public void onFailure(Exception exception) {
        // Sign-in failed, check exception for the cause
    }
};

// Sign in the user
cognitoUser.getSessionInBackground(authenticationHandler);
Step 7: Getting User Details
After authenticating a user, you can retrieve other information about the user in the user pool, as shown in the following example.
// Implement callback handler for getting details
GetDetailsHandler getDetailsHandler = new GetDetailsHandler() {
    @Override
    public void onSuccess(CognitoUserDetails cognitoUserDetails) {
        // The user detail are in cognitoUserDetails
    }

    @Override
    public void onFailure(Exception exception) {
        // Fetch user details failed, check exception for the cause
    }
};

// Fetch the user details
cognitoUser.getDetailsInBackground(getDetailsHandler);