REACT JS
If you just finished JavaScript online courses or other self-taught resources going to your first JS framework can be scary. One thing I would like to encourage you is that we all have some doubts as a beginner. But pushing through the 'fear/doubt' of I don't think I am ready enough or smart enough is a great skill to have. Coding is a continuous journey that evolves all the time with new programming languages or frameworks being created. If you are presented with an opportunity to be on a project that uses a framework like react and you haven't used it, don't be quick to say no. Just say you don't know the framework but you are willing and ready to learn it. At least that's what I did. In the next three months, I will be learning React as I contribute to the project and grow. In the process of learning React JS, I have found a few things you should understand before starting it. I will brush through the features and add useful links to the documentation you can use to learn them on a deep level. These are ES6 syntax or ES7 syntax mostly used are:
- Es6/ES7 classes
- Arrow functions
- let and const
- Imports and Exports
- Spread and rest operator
- Destructuring
- Array functions especially filter and map
Before var was used to set new variables but with the ES6 updates let and const were introduced.
Scope: var variables are globally scoped or accessible. This means when they are declared outside a function they are accessible throughout your file or window. This can be dangerous because you can change it without knowing, hence getting a lot of errors. let and const have blocked scope. This means when they are declared inside a function or any block of code, they can’t be accessed outside it. Thus you can’t easily break your code by manipulating or redeclaring the same variable outside the function.
Re-assigning: Var variables can be re-assigned and updated easily, let can be updated but not re-assigned, and const can neither be re-assigned nor updated, it is constant(doesn’t change).
//Var can be re-assigned
var name = "Jane Tracy 👩💻";
var name = "Luke Wilsey 🎥";
console.log(name);
//output => Luke wilsey 🎥
//var can be updated too
var name = "Spencer 👩💻";
name = "Tom🍄";
console.log(name);
//output => Tom🍄
//let can’t be re-assigned
let name = "Jane Tracy 👩💻";
let name = "Luke Wilsey 🎥 ";
console.log(name);
//output => Syntax error: the name has already been declared
// let can be updated
let name = "Spencer 👩💻";
name = "Tom🍄";
console.log(name);
//output => Tom🍄
//const can’t be re-assigned
const name = "Jane Tracy 👩💻";
const name = "Luke Wilsey 🎥 ";
console.log(name);
//output => Syntax error: the name has already been declared
//const can’t be updated
const name = "Spencer 👩💻";
name = "Tom🍄";
console.log(name);
//output => Uncaught TypeError: Assignment to constant variable.When I started learning about arrow functions, I immediately loved them. They are short and straight to the point. Basically arrow functions are a way to write functions with shorter syntax. They were also introduced in the ES6 update. Named functions without arguments
//old function syntax
function name() {
  console.log("Tracy 🚠");
}
name();

// arrow function
const name = () => {
  console.log("Tracy 🚠");
};
name();
//or you can even make it shorter by removing writing

const name = () => console.log("Tracy 🚠");
name();
Named functions with arguments
function add(a, b) {
  return a + b;
}
console.log(add(3, 5));

//arrow function
const add = (a, b) => {
  return a + b;
};
console.log(add(3, 5));

//you can also shorten if it returns one thing
const add = (a, b) => a + b;
console.log(add(3, 5));- Not using parentheses when you have one argument
//Using template literals to avoid the old concatenation
const series = (favorite) => console.log(`I love watching ${favorite}`);
series("The office");
Note: Arrow functions are used a lot in modern frameworks, it will be better if you get comfortable with them. For a deep dive look at Arrow functions by MDN
A class is another type of function which is declared by the class keyword and can be used to create new objects. A class contains properties and methods. The constructor method is used for initializing objects that are created by the class itself and we use this keyword to refer to the current class.
class GreatMovies {
  constructor(movie) {
    this.movie = "The Lord of the Rings 🎥";
  }

  printMovie() {
    console.log(`My favorite movie is ${this.movie}`);
  }
}

//this creates an object by using new before the class name
const myMovies = new GreatMovies();
myMovies.printMovie();
//output => My favorite movie is The Lord of the Rings 🎥
Class inheritance
We use extends in classes to inherit properties from another class.
In the example below the class GreatSeries inherits the property and method from the GreatMovies class. The super method is used to call the parent constructor. In our case, it will call the constructor of the GreatMovies class.
class GreatMovies {
  constructor(movie) {
    this.movie = movie;
  }

  printMovie() {
    return `My favorite movie is ${this.movie}`;
  }
}

class GreatSeries extends GreatMovies {
  constructor(movie, series) {
    super(movie);
    this.series = series;
  }

  printList() {
    return `${this.printMovie()}, now I am watching ${
      this.series
    } series today.`;
  }
}
const watchingList = new GreatSeries("The Social dilemma", "The Society");
console.log(watchingList.printList());The best thing about the ES7 class syntax you don’t have to write the constructor or the super method. We can also use the arrow functions as class methods. This for me makes it easier and faster to write code. Let's redo the former classes we used and change it to ES7 syntax.
class GreatMovies {
  movie = "The Social dilemma";

  printMovie = () => {
    console.log(`My favorite movie is ${this.movie}`);
  };
}

const myMovies = new GreatMovies();
myMovies.printMovie();
The constructor and super method are written behind the scenes, so you don’t have to write them.
class GreatMovies {
  movie = "The Social dilemma";

  printMovie = () => {
    console.log(`My favorite movie is ${this.movie}`);
  };
}

class GreatSeries extends GreatMovies {
  movie = "The Social dilemma 🎥 ";
  series = "The Society";

  printList = () => {
    return `My favorite movie is ${this.movie} and now I am watching ${this.series} series today 🍹.`;
  };
}

const watchingList = new GreatSeries();
console.log(watchingList);
console.log(watchingList.printList());
For more about classes check out MDN mozilla docs
You can store functions in one Javascript file and later on export it to use it in another Js file by importing the file or a specific function/s.
How to export a file or some functions You can use the default when exporting one main thing from the file. This can be done only once in a file.
const movieList = (movie) => `I enjoyed watching ${movie} movie`;

export default movieList;

//If the function is more than one
const movieList = (movie) => `I enjoyed watching ${movie} movie 💕 `;

const seriesList = (series) => `I enjoyed watching ${series} series 🍹 `;

export { movieList, seriesList as default };

//You can also export function individually => named export
export const movieList = (movie) => `I enjoyed watching ${movie} movie 💕 `;

export const seriesList = (series) => `I enjoyed watching ${series} series 🍹 `;
How import files
//How to import multiple functions individually
//uses the named export
import { movieList, seriesList } from "./watching/mylist.js";

//how to import one function called movieList
//using the default export
import movieList from "./watching/mylist.js";

//importing using an alias
import { movieList as MovieList } from "./watching/mylist.js";
If you want to learn more about imports and exports you can follow the following resources import and export in Javascript by Digital Ocean import and export by Javascript info
When I first heard of this operator I was so curious to understand how only three dots can be so powerful, simple and easy to use. To me the three dots were like magic, a safe way to copy reference types without any issues. The spread and rest operator uses three dots (. . .) to initialize it. The spread operator is used for splitting up the values of an array and adding them to another array or splitting properties of an object and adding them to another object.
//In arrays
const jobs = ["teacher 👩🏫 ", "engineer 🧰", "developer 👩💻"];
const currentJobs = [
...jobs,
"actor 🎥",
"social media influencer 📴",
"musician 🎻",
];
console.log(currentJobs);
//output => ["teacher 👩🏫 ", "engineer 🧰", "developer 👩💻", "actor 🎥", "social media influencer 📴", "musician 🎻"]
//In objects
const currentJob = {
name: "Jane",
job: "developer 👩💻",
};
console.log(currentJob);
const funJob = {
...currentJob,
name: "Tracy",
PartTimejob: "musician 🎻",
};
console.log(funJob);
//output => {name: "Tracy", job: "developer 👩💻", PartTimejob: "musician 🎻"}- This operator is used to represent an infinite amount to arguments in a function.
const num = (...args) => {
  return args.map((arg) => arg / 2);
};
const result = num(40, 60, 80, 120, 200, 300);
console.log(result);

//output => [20, 30, 40, 60, 100, 150]

//example 2
const myFruits = (...fruits) => {
  return fruits.filter((fruit) => fruit !== "🍌");
};

const result = myFruits("🍎", "🥝", "🍌", "🍍", "🍉", "🍏");

console.log(result);
//output
["🍎", "🥝", "🍍", "🍉", "🍏"];At first I thought that destructuring and the spread operator do the same job, but I was wrong. The spread operator copies all the values of an array or all properties of an object while destructuring copies specific values or properties which you store in a variable. Array destructuring
const myFruits = ["🍎", "🥝", "🍌", "🍍", "🍉", "🍏"];
const [myFavorite, , , listFavorite] = myfruits;
console.log(myFavorite, listFavorite);
//output
🍎 🍍
Objects destructuring
const { name, job } = { name: "Tracy", job: "musician 🎻" };
console.log(name, job);
//output
Tracy musician 🎻- React is a JavaScript library that contains reusable UI components that are interactive and easily build single page applications.
- Components are reusable UI piece in React. Such as the Navbar, footer etc. They help to keep the Dry method on code since you avoid repeating yourself.
- I will cover a few important topics in react that you should understand as a beginner. I will also provide links to the react documentation for you do dive deeper into the topics.
- You can use different ways to style your React components. They include:
- CSS Modules 2) Styled Components 3) Conditional and dynamic styling
.form-control {
  margin: 0.5rem 0;
}

.form-control label {
  font-weight: bold;
  display: block;
  margin-bottom: 0.5rem;
}

.form-control input {
  display: block;
  width: 100%;
  border: 1px solid #ccc;
  font: inherit;
  line-height: 1.5rem;
  padding: 0 0.25rem;
}

.form-control input:focus {
  outline: none;
  background: #fad0ec;
  border-color: #8b005d;
}

.form-control.invalid input{
  border-color: #ff3636;
  background-color: #ff9898;
}

.form-control.invalid{
  color: #ff3535;
}
import React from 'react';
const CourseInput = props => {
const [enteredValue, setEnteredValue] = useState('');
const [isValid, setValid] = useState(true);
const goalInputChangeHandler = e => {
if(e.target.value.trim().length > 0) setValid(true);
setEnteredValue(e.target.value);
};
const formSubmitHandler = e => {
e.preventDefault();
if(enteredValue.trim().length === 0){
setValid(false);
return;
}
props.onAddGoal(enteredValue);
};
return (
<form onSubmit={formSubmitHandler}>
<div className={`form-control ${!isValid ? 'invalid' : ''}`}>
<label>Course Goal</label>
<input type="text" onChange={goalInputChangeHandler} />
</div>
<Button type="submit">Add Goal</Button>
</form>
);
};
export default CourseInput;import React, { useState } from 'react';
import Button from '../../UI/Button/Button';
import styled from 'styled-components'
const FormInput = styled.div`
margin: 0.5rem 0;
& label {
font-weight: bold;
display: block;
margin-bottom: 0.5rem;
color: ${props => props.invalid ? '#ff3535' : '#000'}
}
& input {
display: block;
width: 100%;
border: 1px solid ${props => props.invalid ? '#ff3636' : '#ccc'};
background-color: ${props => props.invalid ? '#ff9898' : 'transparent' };
font: inherit;
line-height: 1.5rem;
padding: 0 0.25rem;
}
& input:focus {
outline: none;
background: #fad0ec;
border-color: #8b005d;
}
`;
const CourseInput = props => {
const [enteredValue, setEnteredValue] = useState('');
const [isValid, setValid] = useState(true);
const goalInputChangeHandler = e => {
if(e.target.value.trim().length > 0) setValid(true);
setEnteredValue(e.target.value);
};
const formSubmitHandler = e => {
e.preventDefault();
if(enteredValue.trim().length === 0){
setValid(false);
return;
}
props.onAddGoal(enteredValue);
};
return (
<form onSubmit={formSubmitHandler}>
<FormInput invalid={!isValid}>
<label>Course Goal</label>
<input type="text" onChange={goalInputChangeHandler} />
</FormInput>
<Button type="submit">Add Goal</Button>
</form>
);
};
export default CourseInput;
- You can import the css file where you have written all the styles and add them to the jsx elements with the attribute
className = 'name of your class '.
import './ExpenseItem.css';
import Card from '../UI/Card';

const ExpenseItem =(props)=> {
  return (
    <Card className='expense-item'>
      <div className='expense-item__description'>
        <h2>{props.title}</h2>
      </div>
    </Card>
  );
}

export default ExpenseItem;- Props are also called properties the used to pass data from one component to another. This meaans from the parent component to the child component hence it's a
uni-directional flow.
import ExpenseDate from './ExpenseDate';
import './ExpenseItem.css';
import Card from '../UI/Card';

const ExpenseItem =(props)=> {
  return (
    <Card className='expense-item'>
      <ExpenseDate date={props.date} />
      <div className='expense-item__description'>
        <h2>{props.title}</h2>
        <div className='expense-item__price'>${props.amount}</div>
      </div>
    </Card>
  );
}

export default ExpenseItem;- Composition is the act of combining one or more components together. You can incoporate an inbuilt property from React called
props.children. This can be useful if you you want to create your own custom wrappers. For example :
import './Container.css'

const Container = (props) =>{
  const classes = ' container ' + props.className;

  return (
    <div className={classes}> {props.children}</div>
  )
}

export default Container
Behind JSX Syntax
 return (
    <div>
      <h2>Let's get started!</h2>
      <Blog blogs={blogs}/>
    </div>
  );

  //Turns to

return React.createElement(
'div',
{},
React.createElement('h2', {}, 'Let\'s get started'),
React.createElement(Blog, {blogs: blogs}) )- Handling events is similar to how you do it with vanilla Javascript to change the DOM elements.
- The main difference are:
- In React you use camelCase to handle the events.
- You should pass the function in the JSX. You can use it as an inline function or name it before then pass it to the jsx code.
- For example, we want to create a button that when clicked it will output
title!!!in the console.
const NavbarItem = () => {
	const titleHandler = () => console.log('title !!!!');
	return (
		<Card className="navbar-item">
			<button onClick={titleHandler}>Change title</button>
		</Card>
	);
};

export default NavbarItem;- Another example
const handleClick = () => console.log('hello react');
const handleAnonymously = (name) => console.log(`change this!! ${name}`);

<button onClick={handleClick}>Click Me</button>

// Event handling with dynamic values
<button onClick={()=> handleAnonymously('Tracy')
}>Click here</button>- Hooks are functions that let you “hook into” React state and lifecycle features from function components.
- To make the useState variables, you use array destructuring syntax.
const [ title, setTitle ] = useState(props.title);- The first variable is the state variable and the other one is the updating function which will update the state.
- The updating state function can be called in an event handler to change the state.
- In example, the event handler will be called
titleHandlerand this will be called when the button is clicked.
<button onClick={titleHandler}>Change title</button>- We should never call the function directly in the event handler like in vanilla JavaScript. Since it will be called when the component is rendered but not when the button is clicked.
//This is not a great  practice in react.
	<button onClick={titleHandler()}>Change title</button>

   // This is a great practice
	<button onClick={titleHandler}>Change title</button>
-In the function we want to update the state of the props.title and change it to Title changed.
- When the button is clicked react will note that the component with the state will be rendered again to change the state of the
props.title.
const titleHandler = () => {
		setTitle('Title changed');
	};
import { useState } from 'react';
const NavbarItem = (props) => {
//let title = props.title;
const [ title, setTitle ] = useState(props.title);
const titleHandler = () => {
setTitle('Title changed');
};
return (
<Card className="navbar-item">
<div className="navbar-item__description">
<h2>{title}</h2>
</div>
<button onClick={titleHandler}>Change title</button>
</Card>
);
};
export default NavbarItem;- The most important things you need to know ✍
- How to use maps
- Add the values in a dynamic format
- Add key and the value can be the data id or index in the elemet that unquiely identifies the list items in the siblings.
- Keyshelp React identify which items have changed, are added, or are removed. Keys should be given to the elements inside the array to give the elements a stable identity:
import {useState} from 'react';

const Blog = () => {
  const [blogs, setBlogs] = useState([
    { title: 'React for beginners',author: 'Tracy', bodyText: 'React was created by Facebook...', id: 1 },
    { title: 'Javascript array methods you need to know', author: 'Jane', bodyText: 'ES6 comes with modern array methods..', id: 2 },
    { title: 'How to start Open Source Contribution',author: 'Stacy', bodyText: 'lorem ipsum...', id: 3 }
  ])
  return (
    <div>

      <div className="blog">
       {blogs.map((blog) =>(
         <div key={blog.id}>
            <h1>{blog.title}</h1>
            <p>Written by {blog.author}</p>
            <p>{blog.bodyText}</p>
         </div>
       ))}
      </div>
    </div>
   );
}

export default Blog;- Writing forms in react is similar to vanilla JavaScript but the
HTML attributesuse camelCase apart from aria attributes that use the hypensaria-*.
Example of a simple react form
import './BudgetForm.css';
const BudgetForm = () => {
	const changeHandler = (e) => {
		console.log(e.target.value);
	};
	return (
		<form>
			<div className="budget-form">
				<div className="budget-form__control">
					<label>
						<p>Title</p>
						<input type="text" aria-label='expense Title' onChange={changeHandler} />
					</label>
				</div>
				<div className="budget-form__control">
					<label>
						<p>Amount</p>
						<input type="number" min="0.01" step="0.01" aria-label='amount' />
					</label>
				</div>
				<div className="budget-form__control">
					<label>
						<p>Date</p>
						<input type="date" min="01-01-2019" max="31-12-2022" aria-label='date' />
					</label>
				</div>
			</div>
			<div className="budget-form__actions">
				<button type="submit">Add Expense</button>
			</div>
		</form>
	);
};

export default BudgetForm;

{/* Also you can label your input with htmlFor atribute*/}
<label htmlFor = "username">Name:</label>
<input id = "username" type = "text" name = "name"/>- When you have more than one event handler that are udating the state, you can write them in different ways.
- For example
- Multiple state method
- Object in the state and using previous state snapshoot.
- Previous State snapshot ensure you get the latest state snapshot no matter how many times the state is upadated.
- This is passed an argument to the inner function in the state update function.
- It a great practice to use the previous state method, as an argument for the inner function in your
setState()function that returns the previous state snapshot and the updated value. - I know that's a lot to take in, let me show an exapmle to make it more clear.
import React, { useState } from 'react';
import './BudgetForm.css';
const BudgetForm = () => {


  const [userInput, setUserInput] = useState({
    userTitle (''),
    userAmount(''),
    userDate('')
  });

  const changeHandler = (e) => {
		setUserInput((prevState)=>{
      return {
        ...prevState,
        userTitle: e.target.value
      }
    })
	};
  const amountHandler =(e) =>{
    setUserInput((prevState)=>{
      return{
        ...prevState,
        userAmount: e.target.value
      }
    })
  }
  const datehandler = (e)=>{
    setUserInput((prevState)=>{
      return{
        ...prevState,
        userDate: e.target..value
      }
    })
  }

	return (
		<form>
			<div className="budget-form">
				<div className="budget-form__control">
					<label>
						<p>Title</p>
						<input type="text" aria-label='expense Title' onChange={changeHandler} />
					</label>
				</div>
				<div className="budget-form__control">
					<label>
						<p>Amount</p>
						<input type="number" min="0.01" step="0.01" aria-label='amount' onChange={amountHandler} />
					</label>
				</div>
				<div className="budget-form__control">
					<label>
						<p>Date</p>
						<input type="date" min="01-01-2019" max="31-12-2022" aria-label='date' onChange={dateHandler}/>
					</label>
				</div>
			</div>
			<div className="budget-form__actions">
				<button type="submit">Add Expense</button>
			</div>
		</form>
	);
};

export default BudgetForm;import React, { useState } from 'react';
import './BudgetForm.css';
const BudgetForm = () => {
const [userTitle, setUserTitle] = useState('');
const [userAmount, setUserAmount] = useState('');
const [userDate, setUserDate] = useState('');
const changeHandler = (e) => {
setUserTitle(e.target.value);
};
const amountHandler =(e) =>{
setUserAmount(e.target.value);
}
const datehandler = (e)=>{
setUserDate(e.target.value);
}
return (
<form>
<div className="budget-form">
<div className="budget-form__control">
<label>
<p>Title</p>
<input type="text" aria-label='expense Title' onChange={changeHandler} />
</label>
</div>
<div className="budget-form__control">
<label>
<p>Amount</p>
<input type="number" min="0.01" step="0.01" aria-label='amount' onChange={amountHandler} />
</label>
</div>
<div className="budget-form__control">
<label>
<p>Date</p>
<input type="date" min="01-01-2019" max="31-12-2022" aria-label='date' onChange={dateHandler}/>
</label>
</div>
</div>
<div className="budget-form__actions">
<button type="submit">Add Expense</button>
</div>
</form>
);
};
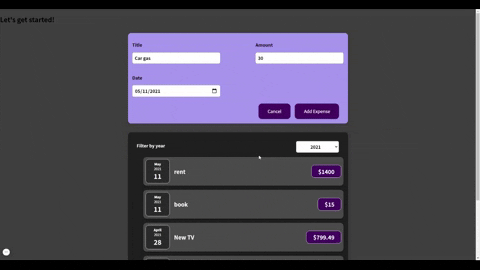
export default BudgetForm;- Create a form and ensure you remember about accessibility.
- Create the state and update state variables through destructring.
- Use handler functions to get values from the input.
- Remember to use a handler function on the form to get input values on submit.
- Always remember to add the value attribute on the inputs.
import { useState } from 'react';
import './ExpenseForm.css';
const ExpenseForm = () => {
	const [ enteredTitle, setEnteredTitle ] = useState('');
	const [ enteredAmount, setEnteredAmount ] = useState('');
	const [ enteredDate, setEnteredDate ] = useState('');

	const titleEnteredHandler = (e) => {
		setEnteredTitle(e.target.value);
	};
	const amountEnteredHandler = (e) => {
		setEnteredAmount(e.target.value);
	};
	const dateEnteredHandler = (e) => {
		setEnteredDate(e.target.value);
	};
	const submitHandler = (e) => {
		e.preventDefault();

		const expenseData = {
			title: enteredTitle,
			amount: enteredAmount,
			date: new Date(enteredDate)
		};
    //clears the input section when the form is submitted
		setEnteredTitle('');
		setEnteredAmount('');
		setEnteredDate('');
		console.log(expenseData);
	};

	return (
		<form onSubmit={submitHandler}>
			<div className="new-expense__controls">
				<div className="new-expense__control">
					<label>
						<p>Title</p>
						<input
							type="text"
							value={enteredTitle}
							aria-label="expense name"
							onChange={titleEnteredHandler}
						/>
					</label>
				</div>
				<div className="new-expense__control">
					<label>
						<p>Amount</p>
						<input
							type="number"
							value={enteredAmount}
							min="0.01"
							step="0.01"
							aria-label="amount"
							onChange={amountEnteredHandler}
						/>
					</label>
				</div>
				<div className="new-expense__control">
					<label>
						<p>Date</p>
						<input
							type="date"
							value={enteredDate}
							min="01-01-2019"
							max="31-12-2022"
							aria-label="date"
							onChange={dateEnteredHandler}
						/>
					</label>
				</div>
			</div>
			<div className="new-expense__actions">
				<button type="submit">Add Expense</button>
			</div>
		</form>
	);
};

export default ExpenseForm;-
Two way binding is a way to control your custom componenet. This is where a value in the component is passed on to the parent component through props and is received through props from the parent component.
-
The parent component controls the child component through using the state.
-
Let's at a look through an example
-
We are creating a component for the year dropdown and it's state will be managed in the parent component, which will be in another file.
-
First we need to create an event handler which will be called
dropDownHandler. This will help us get the value of the dropdown.
import React from 'react';
import './ExpensesFilter.css';

const ExpensesFilter = () => {
	const dropDownHandler = (e) => {
		console.log(e.target.value);
	};

	return (
		<div className="expenses-filter">
			<div className="expenses-filter__control">
				<label>Filter by year</label>
				<select  onChange={dropDownHandler}>
					<option value="2022">2022</option>
					<option value="2021">2021</option>
					<option value="2020">2020</option>
					<option value="2019">2019</option>
				</select>
			</div>
		</div>
	);
};

export default ExpensesFilter;- The other file will hold the ExpensesFilter component as a parent.
import React from 'react';
const Expenses = () => {
	return (
		<div className="expenses">
		 <ExpensesFilter/>
		</div>
	);
};

export default Expenses;
Now let's pass the properties of the component to the parent component.
import React from 'react';
const Expenses = () => {
	const yearDateHandler = (selectedYear)=>{
		console.log(selectedYear) // 2022 / 2220, the year you select in the drop down list
	}
	return (
		<div className="expenses">
		 <ExpensesFilter onChangeFilter={yearDateHandler}/>

		</div>
	);
};

export default Expenses;- Now we can make the
ExpensesFiltercomponent a two way binding and manage it's state in theExpensescomponent. - Inside the
dropDownHandlerfunction we need to pass theonChangeFilteras a prop to get the value passed down.
import React from 'react';
import './ExpensesFilter.css';

const ExpensesFilter = (props) => {
	const dropDownHandler = (e) => {
		prop.onChangeFilter(e.target.value);
		console.log(e.target.value);
	};

	return (
		<div className="expenses-filter">
			<div className="expenses-filter__control">
				<label>Filter by year</label>
				<select  onChange={dropDownHandler}>
					<option value="2022">2022</option>
					<option value="2021">2021</option>
					<option value="2020">2020</option>
					<option value="2019">2019</option>
				</select>
			</div>
		</div>
	);
};

export default ExpensesFilter;
import React from 'react';
const Expenses = (props) => {
const [filteredYear, setFilteredYear] = useState('2020');
const yearDateHandler = (selectedYear)=>{
setFilterYear(selectedYear);
console.log(selectedYear)
}
return (
<div className="expenses">
<ExpensesFilter onChangeFilter={yearDateHandler}/>
</div>
);
};
export default Expenses;- Let's take the value of the dropdown
year selectedand manage it in the parent component called in theExpensescomponent.
import React from 'react';
import './ExpensesFilter.css';

const ExpensesFilter = (props) => {
	const dropDownHandler = (e) => {
		prop.onChangeFilter(e.target.value);
		console.log(e.target.value);
	};

	return (
		<div className="expenses-filter">
			<div className="expenses-filter__control">
				<label>Filter by year</label>
				<select selected={selectedYear}  onChange={dropDownHandler}>
					<option value="2022">2022</option>
					<option value="2021">2021</option>
					<option value="2020">2020</option>
					<option value="2019">2019</option>
				</select>
			</div>
		</div>
	);
};

export default ExpensesFilter;
import React from 'react';
const Expenses = (props) => {
const [filteredYear, setFilteredYear] = useState('2020');
const yearDateHandler = (selectedYear)=>{
setFilterYear(selectedYear);
console.log(selectedYear)
}
return (
<div className="expenses">
<ExpensesFilter selectedYear={filteredYear}
onChangeFilter={yearDateHandler}/>
</div>
);
};
export default Expenses;- That's it, that's how you can create a custom component and make it a two way binding.
- Stateless is also called presenational or dumb component.
- Stateful component is also called smart component.
- stateful components manage internal state and stateless don't manage internal state in it's component, it outputs data only.
- Conditional rendering is similar to how it works in JavaScript. You create an If statement or a conditional operator to render the current state with the initial UI and React will update the state when needed.
- There are different was you can use conditionals in your component. For my examples we shall create functional component to showcase this.
We are storing a list of expenses in the filteredExpenses variable.
- if the list of expenses is empty hence length is 0, it will output the text
No expenses added. If the length of expenses stored infilteredExpensesvariable is greater than 0, it will output the list of expenses in the UI, which is stored in theExpenseItemcomponent.
import React, { useState } from 'react';

import ExpenseItem from './ExpenseItem';
import Card from '../UI/Card';
import ExpensesFilter from './ExpensesFilter';
import './Expenses.css';

const Expenses = (props) => {

	const filteredExpenses = props.expenses.filter((expense) => {
		return expense.date.getFullYear().toString() === filteredYear;
	});

	return (
		<div>
			<Card className="expenses">
				{filteredExpenses.length === 0 ? (
					<p>No expenses added</p>
				) : (
					filteredExpenses.map((expense) => (
						<ExpenseItem
							key={expense.id}
							title={expense.title}
							amount={expense.amount}
							date={expense.date}
						/>
					))
				)}
			</Card>
		</div>
	);
};

export default Expenses;- We shall store our default value in a variable called
expensesContent, in our case we need to output the textNo expenses addedthen update the output in the if statement when the condition is true.
import React, { useState } from 'react';

import ExpenseItem from './ExpenseItem';
import Card from '../UI/Card';
import ExpensesFilter from './ExpensesFilter';
import './Expenses.css';

const Expenses = (props) => {

	const filteredExpenses = props.expenses.filter((expense) => {
		return expense.date.getFullYear().toString() === filteredYear;
	});

	let expensesContent = <p>No expenses added</p>;

	if (filteredExpenses.length > 0) {
		expensesContent = filteredExpenses.map((expense) => (
			<ExpenseItem key={expense.id} title={expense.title} amount={expense.amount} date={expense.date} />
		));
	}

	return (
		<div>
			<Card className="expenses">
				{expensesContent}
			</Card>
		</div>
	);
};

export default Expenses;- If the first condition is true it will render the second part and return it as the value of the statement.
- if the list of expenses is empty hence length is 0, it will output the text
No expenses added. If the length of expenses stored infilteredExpensesvariable is greater than 0, it will output the list of expenses in the UI, which is stored in theExpenseItemcomponent.
import React, { useState } from 'react';

import ExpenseItem from './ExpenseItem';
import Card from '../UI/Card';
import ExpensesFilter from './ExpensesFilter';
import './Expenses.css';

const Expenses = (props) => {

	const filteredExpenses = props.expenses.filter((expense) => {
		return expense.date.getFullYear().toString() === filteredYear;
	});

	return (
		<div>
			<Card className="expenses">
				{filteredExpenses.length === 0 && <p>No expenses added</p>}

				{filteredExpenses.length > 0 &&
					filteredExpenses.map((expense) => (
						<ExpenseItem
							key={expense.id}
							title={expense.title}
							amount={expense.amount}
							date={expense.date}
						/>
					))}
			</Card>
		</div>
	);
};

export default Expenses;- In some cases you may want to show a component when you click on a button. Maybe you want to hide some parts of the UI rendered when a user clicks or submits a form.
- I will some you with an example. We want to a button on the UI first, when the user clicks it, the form to add new expenses is pops up and when the expenses are submited, the form is closed and goes back to the default state of having a button on the UI.
- We need to add an event handler on the button
<button onClick={expenseFormHandler}>Add new expenses</button>- Then add the state of the component and the initial state to be false by default. This will hide the form for us.
import { useState } from 'react';
const [ toggle, setToggle ] = useState(false);- Add the event handler on the form and update the state to be true. This means when we click on the button
Add expensewe shall see the form.
import { useState } from 'react';
const [ toggle, setToggle ] = useState(false);

const expenseFormHandler = () => {
	setToggle(true);
};- We render the button as toggle for the form. if the toggle is true then we need the form, if it's false we hide the form.
import { useState } from 'react';
const [ toggle, setToggle ] = useState(false);

const expenseFormHandler = () => {
	setToggle(true);
};

const NewExpense = (props) => {
	return(
		<div>
		 	{!toggle && <button onClick={expenseFormHandler}>Add new expenses</button>}
		</div>
	)
}

export default NewExpense;
import { useState } from 'react';
import ExpenseForm from './ExpenseForm';
import './NewExpense.css';
const NewExpense = (props) => {
const [ toggle, setToggle ] = useState(false);
const saveExpenseDataHandler = (enteredExpenseData) => {
const expenseData = {
...enteredExpenseData,
id: Math.random().toString()
};
console.log(expenseData);
props.onAddExpense(expenseData);
setToggle(false);
};
const expenseFormHandler = () => {
setToggle(true);
};
const hideExpenseFormHandler = () => {
setToggle(false);
};
return (
<div className="new-expense">
{!toggle && <button onClick={expenseFormHandler}>Add new expenses</button>}
{toggle && <ExpenseForm onSaveExpenseData={saveExpenseDataHandler} onCancelForm={hideExpenseFormHandler} />}
</div>
);
};
export default NewExpense;- React Fragments helps to wrap multiple components without having to create extra nodes to the DOM.
- For most of the time, you have been using
divwrapper since in React you can't have more than one root element. - Examle the below code will cause an error since you have multiple root elements.
const App = () ={
	return (
		<h1>Hello, world!</h1>
		<p>Learning Rect Fragments</p>
	);
}

//under the hood
return(
	React.createElement('h1', {}, 'Hello, world!')
	React.createElement('p', {}, 'Learning Rect Fragments')
)- Instead the
divelement is used to wrap the components.
const App = () ={
	return (
		<div>
			<h1>Hello, world!</h1>
	  	<p>Learning Rect Fragments</p>
		</div>
	);
}

//under the hood

return React.createElement(
'div',
{},
React.createElement('h1', {}, 'Hello, world!'),
React.createElement('p', {}, 'Learning Rect Fragments')
)- But the above method is not recommend because at the end you will have multiple div elements just for wrapping and are 'irrelevant'.
- Using React Fragments with solve this problem. As we said in the introduction section, React Fragments helps to wrap multiple components without having to create extra nodes to the DOM. For example,
import React from 'react'
const App = () ={
	return (
		<React.Fragements>
			<h1>Hello, world!</h1>
	  	<p>Learning Rect Fragments</p>
		</React.Fragements>
	);
}
-Ps: Don't forget to import React. import React from 'react'
- Instead of having a div content to add the key property, you can React.Fragments. Example if you want to map some details about the users without making it a list (using the
ul and li), you can use React Fragments.
const Details = (props) => {
	return (
		<div>
		{props.users.map(user =>(
			<div key={user.id}>
				<h1>Name: {user.name}</h1>
				<p>Username: {user.username}</p>
				<p>Email: {user.email}</p>
				<p>Steet: {user.address.street}</p>
				<p>City: {user.address.city}</p>
			</div>
		))}

		</div>
	);
};

export default Details;- Using React.Fragments with help reduce adding unnecessary nodes to the DOM.
import React from 'react';

const Details = (props) => {
	return (
		<React.Fragments>
		{props.users.map(user =>(
			<React.Fragments key={user.id}>
				<h1>Name: {user.name}</h1>
				<p>Username: {user.username}</p>
				<p>Email: {user.email}</p>
				<p>Steet: {user.address.street}</p>
				<p>City: {user.address.city}</p>
			</React.Fragments>
		))}

		</React.Fragments>
	);
};

export default Details;- Instead of using
React.Fragmentto wrap your components, you can use the empty tag<> </>that's the short syntax. Exapmle,
const App = () ={
	return (
		<>
			<h1>Hello, world!</h1>
	  	<p>Learning Rect Fragments</p>
		</>
	);
}- Portal is a first-class way to render children into a DOM node that exists outside the DOM hierarchy of the parent component.
- The most common usage is for components like hovercards, dialogs, tooltips. Where the parent components have
overflow:hiddenorz-indexwhich should be displayed on top of the main container.
- Event bubbling is when an event fired from inside a portal will propagate to ancestors in the containing React tree, even if those elements are not ancestors in the DOM tree. Example:
<div id="backdrop-root"></div>
<div id="modal-root"></div>
<div id="root"></div>  // the main div that wraps your application
Example of a react portals
- Let's turn our error modal into a portal
- Before we adjust the code this is how the modal component looks like and when a user doesn't add a task it appears as a error modal.
- The user can see the error message 'no tasks or goal was added', you can close it by clicking the button or the transparent background
BackDropdiv.
import Button from '../UI/Button';

import {
	BackDrop,
	Modal,
	ModalHeader,
	ModalTitle,
	ModalContent,
	ModalMessage,
	ModalButtonSection
} from './ErrorModalstyles';
const ErrorModal = (props) => {
	return (
		<>
			<BackDrop onClick={props.onError} />
			<Modal>
				<ModalHeader>
					<ModalTitle>{props.title}</ModalTitle>
				</ModalHeader>
				<ModalContent>
					<ModalMessage>{props.message}</ModalMessage>
				</ModalContent>
				<ModalButtonSection>
					<Button onClick={props.onError}>Okay</Button>
				</ModalButtonSection>
			</Modal>
		</>
	);
};

export default ErrorModal;- Let's store the modal and the transparent background in separate variables.
import Button from '../UI/Button';

import {
	BackDrop,
	Modal,
	ModalHeader,
	ModalTitle,
	ModalContent,
	ModalMessage,
	ModalButtonSection
} from './ErrorModalstyles';
const ErrorModal = (props) => {
	const BackDropContainer = props =>{
		return <BackDrop onClick={props.onError} />
	}
	const ModalContainer = props => {
		return(
			<Modal>
				<ModalHeader>
					<ModalTitle>{props.title}</ModalTitle>
				</ModalHeader>
				<ModalContent>
					<ModalMessage>{props.message}</ModalMessage>
				</ModalContent>
				<ModalButtonSection>
					<Button onClick={props.onError}>Okay</Button>
				</ModalButtonSection>
			</Modal>
		)
	}
	return (
		<>
		<BackDropContainer/>
		<ModalContainer/>

		</>
	);
};

export default ErrorModal;- Let's import the
ReactDOMand call the createPortal function.
- The createPortal takes in two arguments the child and the container. The child is the
React Nodeto be rendered and the container is the element in the DOM. - In our example the children will be the
<BackDropContainer/>and<ModalContainer/>. - The elements will the one we added in the index.html file in the public folder.
document.getElementById('backdrop-root')anddocument.getElementById('modal-root')
<div id="backdrop-root"></div>
<div id="modal-root"></div>
<div id="root"></div> // the main div that wraps your applicationReactDOM.createPortal(child, container);import ReactDOM from 'react-dom';
{ReactDOM.createPortal(<BackDropContainer/>, document.getElementById('backdrop-root'))}
{ReactDOM.createPortal(<ModalContainer/>, document.getElementById('modal-root'))}- For it to work let's add our props. This because we had on click event in our modal and our transparent background.
- Let's write the final code for modal portal to work.
import React from 'react';
import ReactDOM from 'react-dom'
import Button from '../UI/Button';

import {
	BackDrop,
	Modal,
	ModalHeader,
	ModalTitle,
	ModalContent,
	ModalMessage,
	ModalButtonSection
} from './ErrorModalstyles';
const ErrorModal = (props) => {
	const BackDropContainer = props =>{
		return <BackDrop onClick={props.onError} />
	}
	const ModalContainer = props => {
		return(
			<Modal>
				<ModalHeader>
					<ModalTitle>{props.title}</ModalTitle>
				</ModalHeader>
				<ModalContent>
					<ModalMessage>{props.message}</ModalMessage>
				</ModalContent>
				<ModalButtonSection>
					<Button onClick={props.onError}>Okay</Button>
				</ModalButtonSection>
			</Modal>
		)
	}
	return (
		<>
		{ReactDOM.createPortal(<BackDropContainer onError={props.onError}/>, document.getElementById('backdrop-root'))}
		{ReactDOM.createPortal(<ModalContainer onError={props.onError} title={props.title} message={props.message}/>, document.getElementById('modal-root'))}

		</>
	);
};

export default ErrorModal;- Refs helps you to access and work with the DOM or the React elements.
- A good example, is using it in the input fields where you want read the value. Instead of using the state to store and update the input value you can use the Ref prop to access value.
- Example of a regular input field that is updated through the React State:
import {useState} from 'react';

const TodoInput = props=>{
	const [ enteredGoal, setEnteredGoal ] = useState('');
	const addTodoHandler = (e) => {
		const addedTodo = e.target.value;
		setEnteredGoal(addedTodo);
		console.log(addedTodo);
	};
	const submitHandler = (e) => {
		e.preventDefault();

		props.onAddTodo(enteredGoal);
		setEnteredGoal('');
	};
	return(
		<Form onSubmit={submitHandler}>
				<InputContainer inValid={!isValid}>
					<label>
						<h2>Add Task ✍🏼</h2>
						<input
							type="text"
							onChange={addTodoHandler}
							value={enteredGoal}

						/>
					</label>

					<Button type="submit">Add</Button>
				</InputContainer>
			</Form>
	)
}

export default TodoInput;- To use the ref hook you need to import it from React.
import {useState, useRef} from 'react';- Call
useRefand store it in a variable.
- The initial value of the ref will be undefined.
const enteredGoalRef = useRef();- In our input element add the ref prop or property to connect it to the ref.
<input
	type="text"
	onChange={addTodoHandler}
	value={enteredGoal}
	ref={enteredGoalRef}
/>- But since we don't need to get the value through the state and update it, we can remove the
valueandonChangeprops. - Our input now, will have the text and ref properties.
<input
	type="text"
	ref={enteredGoalRef}
/>- Use our ref in the
submitHandlerto store our input's value when the form is submitted.
- For you to see the object been returned by the ref, you can console.log the ref variable. T
- The object has the current as the key and the value will be the DOM node or React element, which in our case will be the input element.
const submitHandler = (e) => {
	e.preventDefault();
	console.log(enteredGoalRef);

	props.onAddTodo(enteredGoal);
	setEnteredGoal('');
};
- To get the value of the input element you can use:
console.log(enteredGoalRef.current.value);
// output Get milk- Store the input value in a variable and pass it in the
onAddTodoprop
const submitHandler = (e) => {
	e.preventDefault();
	const enteredTodo = enteredGoalRef.current.value;
	console.log(enteredGoalRef);

	props.onAddTodo(enteredTodo);
};- To reset the value of the input after form is submitted you can set the ref value to have an empty string.
enteredGoalRef.current.value = '';Check the project and play with the input ref
- For more details about the Refs check out the react documentation.
- Uncontrolled and controlled components are often used when handling forms in react.
- The uncontrolled components is where the data from the form is handled by the DOM. For example when the input data is obtained by using refs.
- Controlled component is where the data from the form is controlled by the react component. Example using state to get the input values and update them (
useStateis used). - I made simple todolist with react where you can see how both controlled components and uncontrolled components are used but with the same todo project.
<iframe src="https://codesandbox.io/embed/react-controlled-component-ol7oc?fontsize=14&hidenavigation=1&theme=dark" style="width:100%; height:500px; border:0; border-radius: 4px; overflow:hidden;" title="react-controlled component" allow="accelerometer; ambient-light-sensor; camera; encrypted-media; geolocation; gyroscope; hid; microphone; midi; payment; usb; vr; xr-spatial-tracking" sandbox="allow-forms allow-modals allow-popups allow-presentation allow-same-origin allow-scripts" ></iframe>