Developer Guide
This page is intended for developers, contributors and anyone who wants to look at the source code in the development environment used for working on the tool.
We recommend using Oomph for deploying a new Massif environment, because it's awesome!
- Download the Eclipse Installer for your operating system.
- Unzip the installer into an empty folder and run oomph.exe
- Answer the questionnaire with your preferred settings
- Select the Eclipse for Committers from the list of products and click next
- NOTE: VIATRA 2.0 has a conflicting dependency with Eclipse Parsley. For this reason, select a product that does not have Parsley added by default. Unfortunately, Eclipse Modeling SDK has parsley installed.
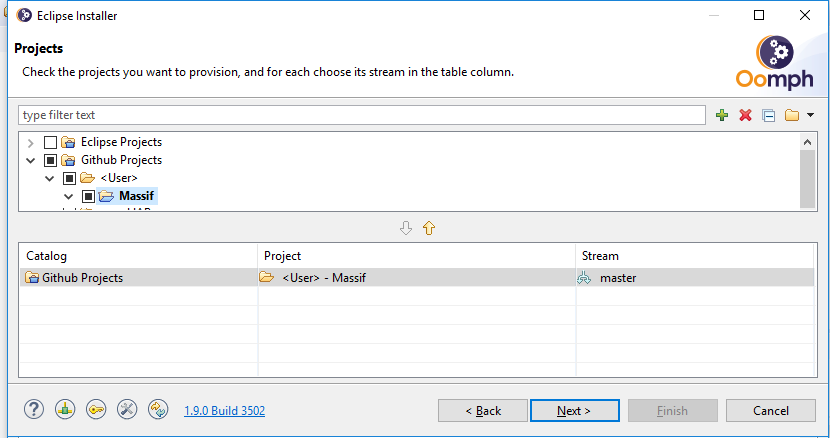
- On the projects page, select Github.com, click on the green plus (Add a project) and enter:
https://raw.githubusercontent.com/viatra/massif/master/setup/hu.bme.mit.massif.setup/Massif.setup - Double click on Massif under
Github.com/<User>, you will see the master stream selected in the bottom table, click Next.- Note that checking the checkbox will add the optional subprojects (
Mylyn and Sonar) as well.
- Note that checking the checkbox will add the optional subprojects (
- On the next page, fill out the variables. The following are recommended:
- Install in a specified absolute folder location that you can browse (e.g. /home/awesome-tools/massif/ide)
- Located in a folder named 'ws' within the installation folder
- Located in a folder named 'git/' within the installation folder
- HTTP read-only (unless you have commit rights to the repo)
- Your GitHub user ID, password and Git User name are needed for accessing the issue list and proper copyright templates. Don't worry, passwords are not stored in plain text and are not visible to others.
- The main source is Java 7 compatible, but the OSLC adapter uses Java 8, so it's best if you have both versions available. However, you may select
JRE 1.8 Locationfor Java 7 if you want. - Target platform: Oxygen
- Click next, you can see the tasks that will be executed
- Click next and wait for the downloads and preparations to finish.
- Once your new and shiny Eclipse starts, Oomph will once again pop up a wizard for completing the startup tasks.
- Just click next and you will have your workspace prepared nice and easy.
- After it completes, click Finish.
- Right click
matlab.engine.api.bundle, select Properties, and in Resource > Linked Resources > Path Variables, editMATLAB_ROOTto point to your MATLAB installation folder - Finally, if you want, do some additional optional steps:
- In the local menu of Package Explorer, set Top level elements to Working sets and click OK on the presented list.
- Open the following views (with Window/Show view):
- Mylyn: Task lists, Builds (if you added the
Mylyn and Sonarsubproject) - Git: Git repositories
- General: Properties
- Mylyn: Task lists, Builds (if you added the
- Create
~/.m2/toolchains.xmlwith this content:
<?xml version="1.0" encoding="UTF8"?>
<toolchains>
  <toolchain>
    <type>jdk</type>
    <provides>
      <version>1.8</version>
      <vendor>sun</vendor>
      <id>JavaSE-1.8</id>
    </provides>
    <configuration>
      <jdkHome>[your JDK 1.8 installation folder]</jdkHome>
    </configuration>
  </toolchain>
</toolchains>
- Run
export MATLABROOT=[your MATLAB installation folder]
cd releng/hu.bme.mit.massif.parent
mvn clean verify