A self-hosted dashboard and API to share ports with SSH tunnels
This dashboard is useful for developers without experience with SSH tunnels that want to share their services or helpful if you have a lot of experience with tunnel but you need a tool to help you to share multiple services across devices.
The goal of this tool is to save time and help a team of remote developers share their services easily with other team members, IOT devices, Kubernetes cluster or integration test environments in a secure and intuitive way.
You can see the tool in action is the next: video Another demo video: video
- The tool is self hosted and free you don't need to register or get a token.
- Share services from/to only the target devices without expose the service to the exit node.
- You can have the same port multiple times on you local machine. (super useful if you want to have the same hostname:port across the team devices or test environments).
- A GUI to control and review the state of the devices, their ports and IPs.
- A GraphQL API to query and control (everything that you see/control on the UI) for easy automation and scripting.
- Aware of multiple devices, this makes the collaboration easier. A device can be your laptop, a RaspberryPI, a Kubernetes deployment, a node, etc...
- Save and control (Start/Stop) multiple endpoints per device.
- Split connection loads between multiple sshd instances/exit nodes to avoid slowness and instability. (For example to copy big files between devices/Shared docker registry/media streams)
The tool is just a helper for something that you might be already doing to share your services: ssh -R port-forward remote + ssh -L port-forward listen.
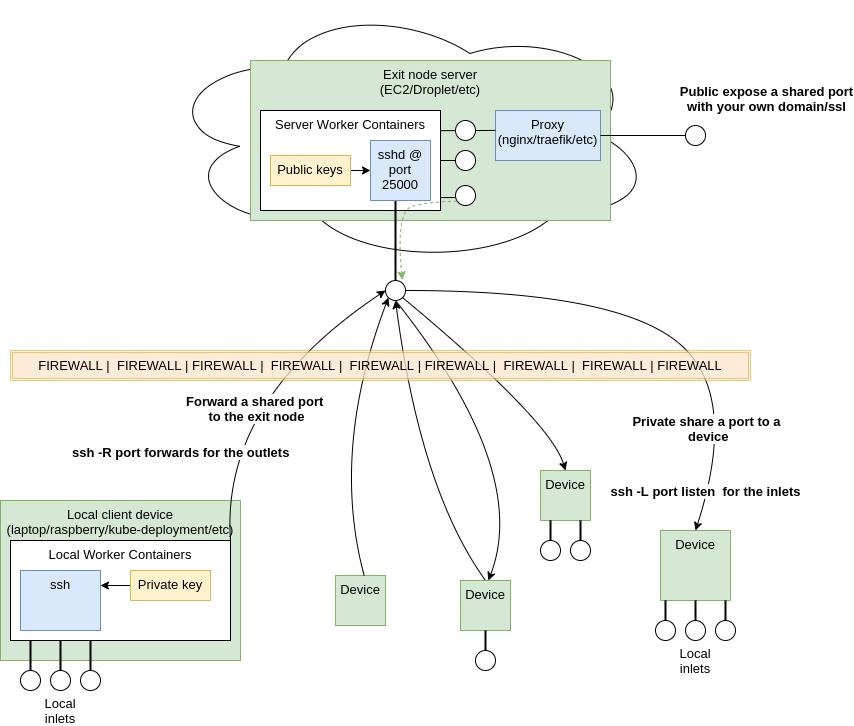
The tool consist of two parts, one for the server that is running on the exit node and and one for the client/dashboard that is executed on the target devices.
If you want to share to the public your services you might be doing something like: ssh -R port-forward remote + proxy
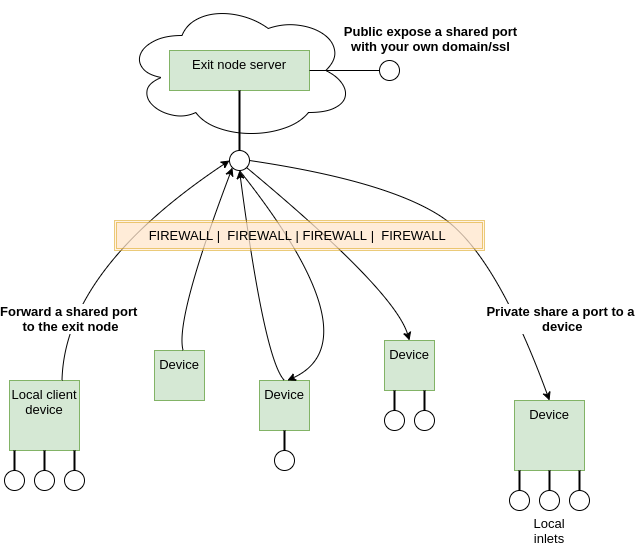
The tool manage and control multiple endpoints that follows the next steps for all the connections:
Forward a local service port to the exit node as an "outlet" using an SSH -R connection. To access the service a port-forward is done from the exit node to the target receptor as an "inlet" using a SSH -L connection. You can as well expose the service to the exit node directly using the reverse proxy of your preference (if that is what you need).
The tool will use containers to separate you current SSH configuration and ports for the server and the clients.
The containers allow us to have the same port in our client device, for example you can access www.device.local:6379 and www.another-device.local:6379 on the same device.
Some additional considerations that we have for the connections and executions are:
- Never use the root user, execute as root or privileged executions.
- Use non standard ssh port by default (25000), but you can configure any port
- Disable password auth for SSH.
- Independent SSH/SSHD services and configuration for the server and target devices.
- Disable command execution on the port forward connections
List the devices and tunnels
query List {
  viewer {
    devices {
      list {
        deviceid
        outlets {
          list {
            outletid
            src {
              host
              port
            }
            state {
              status
              worker {
                workerid
                ip
                port
              }
            }
          }
        }
        inlets {
          list {
            inletid
            dest {
              host
              port
            }
            state {
              status
            }
          }
        }
      }
    }
  }
}
Start a tunnel
mutation Start {
  viewer {
    devices {
      device(deviceid: "banana-pi") {
        inlets {
          inlet(inletid: "vicjicama-lap.local:7099") {
            state {
              start {
                deviceid
              }
            }
          }
        }
      }
    }
  }
}
You need to have nodeJs, docker-compose and docker installed for the server and client devices that have control access to the server. (For pure edge devices like a raspberry all you need is nodeJs or no additional requirements in case of a kubernetes deployment edge device)
- nodeJs v10.13
- docker v19.03
- docker-compose v1.20
For the server side you only need to execute the startup script and allow the port that you selected for the sshd service, 25000 is the default. (you can change this to 80 or 443 for example)
In our example we are going to use an E2C instance that can be reached on tunnels.repoflow.com
curl -s "https://raw.githubusercontent.com/vicjicaman/tunnel-server/master/start.sh" > start.sh
bash start.sh
After you execute the script you will see the keys folder printed on the console, in this example the folder is: /home/gn5/server/workspace/keys, we will need it to add the client devices public keys.
Once you have the server up and running you need to initializate the the client device, first get the startup script for the client:
cd ~/local #Use the path of your preference
curl -s "https://raw.githubusercontent.com/vicjicaman/tunnel-local/master/start.sh" > start.sh
To initialize the device you have to run the script just with the deviceid argument: bash start.sh DEVICEID
bash start.sh vicjicama-lap
This will create a key file that we need to copy to the keys folder on the server. For this particular example we need to copy the file /home/victor/local/workspace/keys/vicjicama-lap/vicjicama-lap.json to the folder /home/gn5/server/workspace/keys on the server.
Once you have the key file in place you need to run the start script again but now with the target server hostname or IP like this: bash start.sh DEVICEID HOSTNAME|IP
bash start.sh vicjicama-lap tunnels.repoflow.com
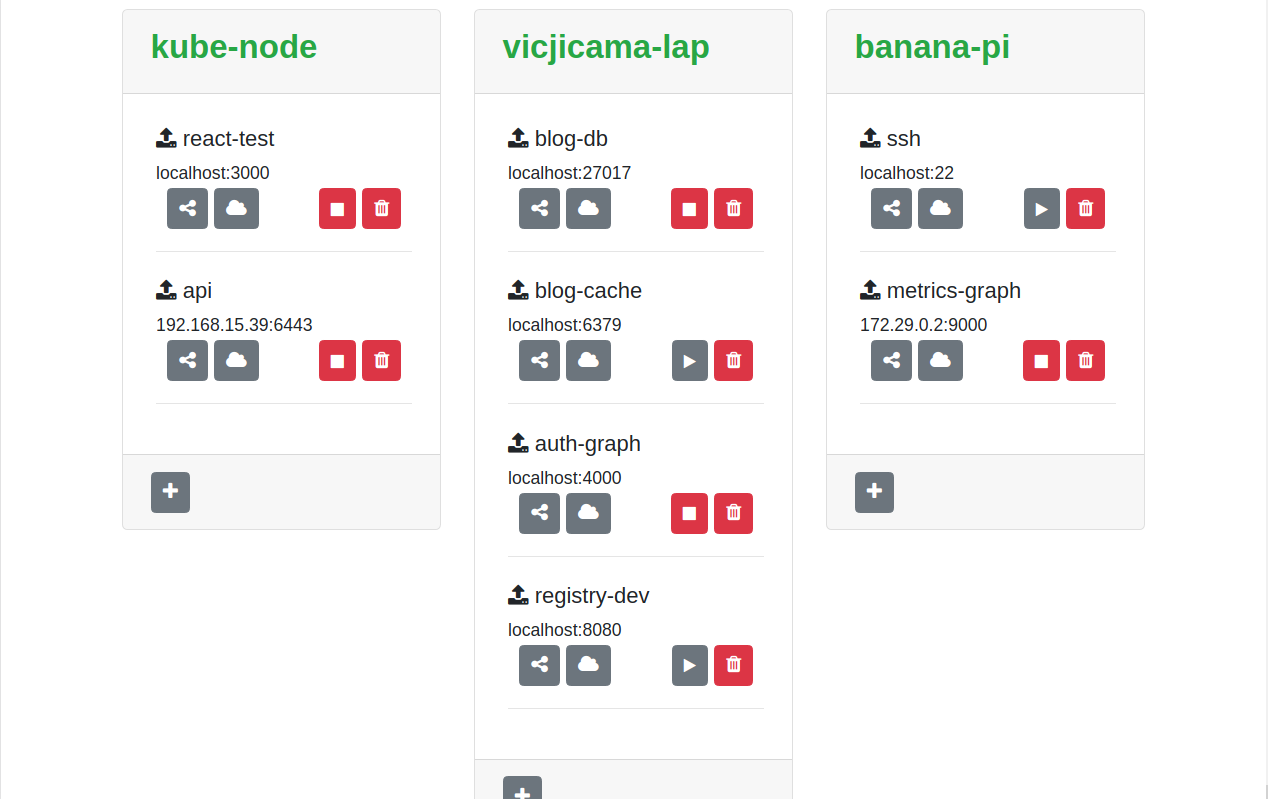
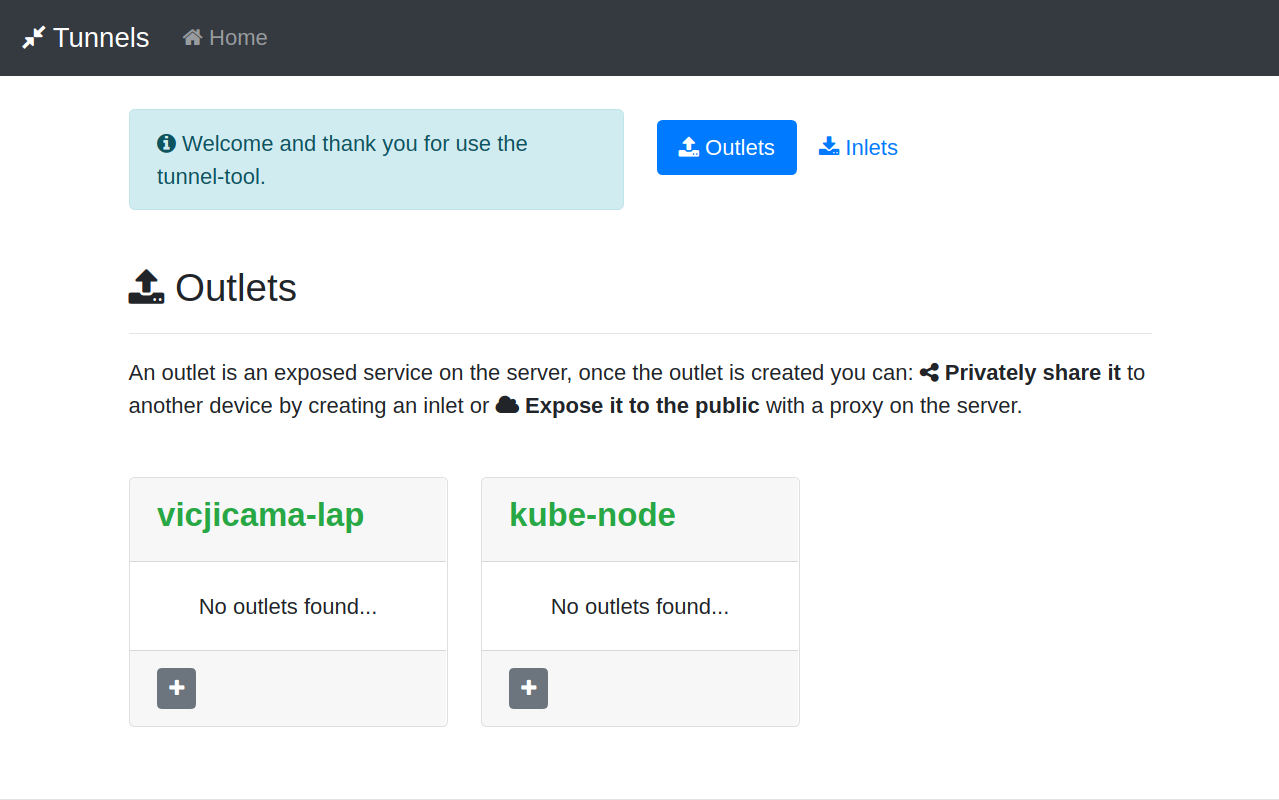
We are going to repeat the process for another client device named kube-node, the UI will look like the next screen after start the server and both client devices.
The next video shows the process to add one outlet from kube-node to vicjicama-lap, for this example we are forwarding a React app port.
If you add more device, outlet and inlets your dashboard will look like something like the next screen.A general dashboard with all this information is very useful once you start having multiple service across multiple envs and multiple developers.
Here is a list of some useful scenarios for services forward that we use:
- Easy bulk scripts for access and control IOT devices.
- Share a single env of the services from multiple team members, especially useful for integration test.
- Kubernetes development based on forward services. (more details here)
- Dedicated tunnels to sync a development docker registry across nodes and remote developers.
- Inject local diagnostic patched or debugger attached services to integration test envs.
- Sharing services with remote developers out of the office or private show case to customers
If you have any feedback, any question, any use case to discuss or if you want to reach out don't hesitate to contact me or open an issue