This project was intended to build and all in one exporting plugin for laser cutters and Inkscape 0.91. It has not been tested on lower versions of Inkscape but may work.. The plugin builds gcode that is compatible with:
- A fork of Marlin designed to run on laser cutters found at https://github.com/TurnkeyTyranny/buildlog-lasercutter-marlin .
- LinuxCNC based lasers (no support for raster images)
You can contact me via email at : 394ad2f@gmail.com, I check my email daily usually.
Find this software useful? Donations are gratefully appreciated.
- Paypal to 394ad2f@gmail.com
- Bitcoins to 16TFmnFyvDA8Q6TTakvvhargy8c89Rb3cj
Copy the files turnkeylaser.py and turnkeylaser.inx into your Inkscape extensions folder -> C:\Program Files\Inkscape\share\extensions Fire up inkscape and you will find the plugin under Extensions -> Export -> Turnkey Laser Exporter.
This script relies on a more advanced version of the PIL library than Inkscape for windows ships with. As such you need to follow these steps for windows installs of Inkscape 0.91. Note: PIL is needed only for raster images. If you cut only vectors, you won't need to update PIL.
If you want to update PIL, you have two options to follow. Choose the one you prefer.
- You can alternatively install python on your system, or use my precompiled version. To install python natively :
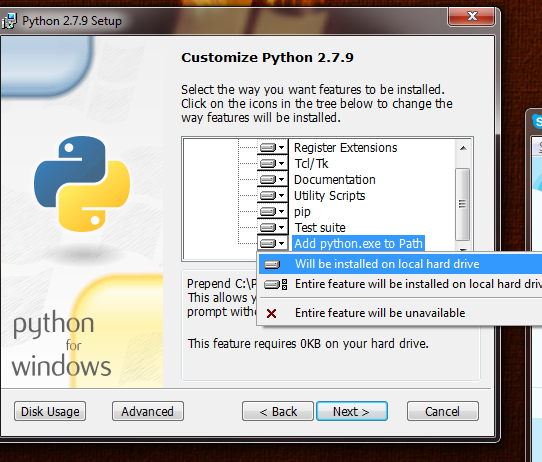
- visit https://www.python.org/downloads/ and download python 2.7.9 32 bit version (https://www.python.org/ftp/python/2.7.9/python-2.7.9.msi) and install it to C:\Python27\ . Select the option to add Python to your path during install.
- In the folder : C:\Program Files\Inkscape you will need to rename the folder "python" to "python-old" so it uses the new system install instead.
- Open up the command line by pressing windows key+r and typing in 'cmd' without the quotes then press enter.
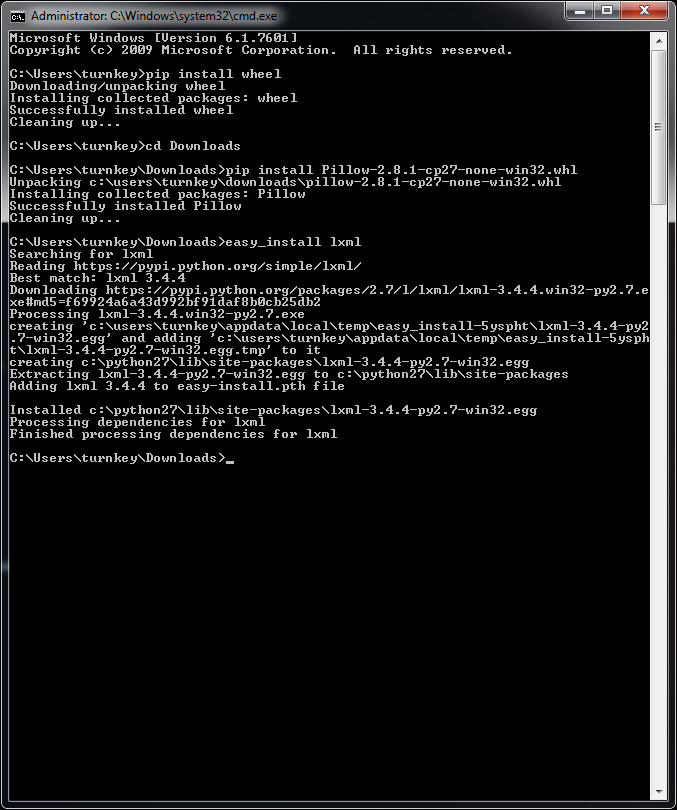
- From the command line, run this command : pip install wheel
- If you get an error message that pip cannot be found on your system, then your windows path is incorrect. Run this command, without the quotes "set PATH=%PATH%;C:\Python27;C:\Python27\Scripts" and then repeat the above step.
- Download the Python Image Library from this repo : https://github.com/TurnkeyTyranny/laser-gcode-exporter-inkscape-plugin/blob/master/PIL/Pillow-2.7.0-cp27-none-win32.whl and place it in an easy to navigate to folder, such as your C:\ folder. Alternatively you can download the latest version of PIL from http://www.lfd.uci.edu/~gohlke/pythonlibs/#pil
- Start the command line by pressing windows key+r and typing in cmd and pressing enter.
- From the command line, navigate to where you placed that file. If for example you placed it in the C drive you would type without the quotes
- "cd c:"
- "pip install Pillow-2.7.0-cp27-none-win32.whl"
- You also need to install the libxml library, from the command line run this command without the quotes.
- "easy_install lxml"
- You are done, launch inkscape and run the plugin!
- If you are using 32 bit inkscape you can potentially use my precompiled version of 32 bit python 2.7.9 with all the needed libraries follow these steps, however this works for some people and not for others. Unsure why :
- Download my updated windows version of python from : https://github.com/TurnkeyTyranny/laser-gcode-exporter-inkscape-plugin/blob/master/files/Python27.rar
- Navigate to C:\Program Files\Inkscape and rename the folder "python" to "python-old"
- Extract the folder 'Python27' from the archive you downloaded to C:\Program Files\Inkscape and rename it to 'python' (Note the lower case p)
- You are done, launch inkscape and run the plugin!
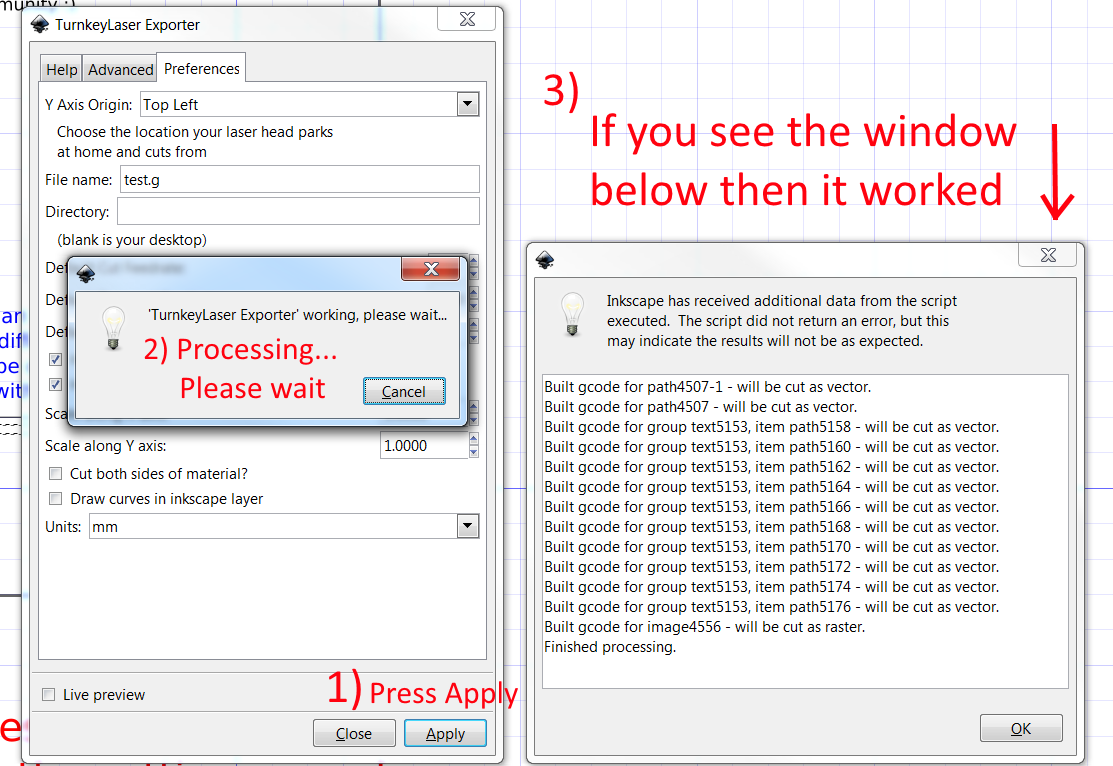
- If you run the export plugin and you don't get a popup diagnostic log telling you which items were exported successfully then unfortunately you need to install Python manually as described below in option #2
- Copy the plugin into extensions directory: cp turnkeylaser.inx turnkeylaser.py $HOME/.config/inkscape/extensions/
- Install the PIL library: sudo apt-get install python3-pil
That's it! Restart Inkscape, if it was running.
I recommend starting with this cutting surface and doing your designs in it. Its setup to match the size of the K40 Laser cutter bed : https://github.com/TurnkeyTyranny/laser-gcode-exporter-inkscape-plugin/blob/master/designs/cutting_surface.svg
Alternatively if you're setting up your own new inkscape job first press CTRL+Shift+d, choose the tab called 'page' and set your project units in the 'custom size' area to be 'px'. You can set the 'Default Units' option to be mm, inch or px. The 'Default Units' are the ones displayed on your rulers.
Name your layer in Inkscape like: 10 [feed=600,ppm=40]
This will set the power level to 10%, the feedrate to 600mm per minute and will fire at 40 pulse per millimetre in 60us duration pulses. PPM is ignored for rasters. The ppm option is optional, if you do not specify it then the laser will default to continuous wave mode. If you do not name your layer in this way then the script will use the default settings specified in the dialog box.
When you're ready to export your objects, images or paths just select the items you would like to be exported by dragging over them or holding shift to select multiple and then run the plugin under under Extensions Menu -> Export -> Turnkey Laser Exporter.
You can send the file to your laser by serial (USB cable) or SD memory card.
- Via USB cable
- Download repetier host and install it on your PC - http://www.repetier.com/download/
- Open the software and set the port of your laser in the options. It will typically be COM7 - otherwise it's the same as what your programmed your Arduino on originally. The port speed should be set to 115200
- Press the connect button, it will turn green.
- Open your gcode file you created earlier and press the print button. Your laser will now burn your instruction set.
Alternatively you can use pronterface http://www.pronterface.com/index.html#download . You must ensure you check the box for Pronterface under 'Advanced' tab in the exporter plugin. It is checked by default.
- Via SD Memory card
- Place the file onto your SD card
- Insert it into your ramps SD card reader.
- Select the file from the ramps LCD menu and print.
You may find it handy to assign the extension to a keyboard shortcut. Include something like the following line to your inkscape keys preferences file (this will bind the plugin to Ctrl+):
You can find your keyboard preferences file:
- On Linux: ~/.config/inkscape/keys/default.xml
- Windows: %UserProfile%\Application Data\Inkscape\keys\default.xml
If that file doesn't exist, create it and include the following:
The project is built on work by other people, thanks go out to the effort they put in before me. Thanks to work by https://github.com/ajfoul , Thinkhaus and Lansing Makers Network This script is released under the license GPL v2.
26-Feb-2015 - 2 hours : Forked from user ajfoul to extend functionality of smoothie laser power levels 0.0 to 1.0, generic Marlin power levels being 0 to 100.
07-March-2015 - 10 hours : Cleaned up the exporters code a lot. Added ppm and feedrate detection from the layer name. Updated the gcode that is exported to be neater and work better with pulsed mode using G01, G02 and G03 commands.
07-March-2015 - Fixed the G28 command at the end of the job. Added defaults for laser power, feedrates and ppm if defined. If ppm isn't defined in the layer options it will operate as continuous wave mode. See the help in the extension dialog for how to use.
07-March-2015 - Marlin codebase mod : You need to patch the Marlin codebase to turn on the laser before moving for G02 and G03 commands. This plugin assumes this has been done. More details to come in the future. Copy the code from the G01 above in marlin_main.cpp - This change has been put into my version of the Marlin Laser firmware found here https://github.com/TurnkeyTyranny/buildlog-lasercutter-marlin
19-March-2015 - After optimising the image to gcode 'code' I'm now working on integrating that into the python script run directly from Inkscape. Hiccups though as Inkscape for Windows ships with a shitty version of Python that is missing imaging libraries. Must install Python 2.7 and PIL for image reading. Have a proof of concept running
20-March-2015 - Added raster support for jpeg and png images. Currently they export at Inkscape's default DPI of 90, I'll have to upscale them to around 300 next. Go burn some cool shit!
27-March-2015 - Objects in inkscape which are not paths are now exported to be rastered. They are exported at 270dpi. Images are now also upscaled or downscaled and exported at 270dpi.
28-March-2015 - Fixed many many bugs with default power levels and other defaults, completed the work on exporting objects and images as rasters. Fixed up as many situations I could find that threw python error messages and replaced them with meaningful notices for the user.
30-March-2015 - Modified the way that X-Y coordinates are determined for a node. This allows objects that are on a layer that has been transposed or transformed or if the objects themselves have to be correctly positioned in the gcode exported data. It's a little bit slower but much more reliable. This change only applies to the export of rasters.
01-April-2015 - Need to get the 'positioning for all' functionality working as exporting many raster objects is painfully slow. Updated script to export rasters with top left as the origin or bottom left.
09-April-2015 - Updated the readme with better install instructions. Updated the expoter to use a faster method of finding the X-Y coordinates to many rasters however it's only compatible with Inkscape 0.91 now using that command as far as I have been told.
10-April-2015 - Fixed a bug with exporting paths when the origin was the top left. Disabled raster horizintal movement optimisation as it has a bug. Rasters will be a little slower but will come out oriented correctly. Search for line : row2 = rowData
11-April-2015 - Added back in raster optimising, it's not perfect but it's mostly there. Only a little slow parsing white vertical space now. Found that raster optimisation code seems to be changing the pixel data at the end of the line somewhere. I'm not sure how since it's meant to just be cutting part of the data line out not changing it. will need to investigate further. Added option to the menu for users to disable raster optimisations.
05-February-2016 - Added support for LinuxCNC based lasers and Air Assist option.
8-February-2016 - Changed the way how laser parameters are acquired from the layer name. You can use descriptive names for layers with the params (power or p, ppm, feed or f). If some parameter is missing, a default value is used. Spaces are allowed in the args list. The following 5 formats (without quotes) are recognized: "LayerName" -- just a descriptive name, get all default values from dialog box. "42" -- just a power setting, rest using defaults. "42 [feed=123]" -- power and feed. "[power=42, f=123]" -- power and feed. "LayerName [p=42, f=123]" -- descriptive name, power and feed.