Documentation
The addon imports digital elevation model (DEM) data from files in the SRTM format (.hgt). The open terrain data set used by the addon provides global coverage. The data are prepared by Mapzen company and hosted at Amazon Web Services. Sample spacing for individual data points is 1 arc-second (roughly 30 meter) in latitude and longitude. Further information about the terrain data can found here.
Please note, that the data license requires attribution as described here.
Take look at the addon blender-osm. It provides one click download and import of OpenStreetMap and terrain for Blender. Buildings from OpenStreetMap are placed on the terrain automatically.
Download the latest version of the addon and install it via the usual Blender way (do not unpack the downloaded zip archive!):
- File → User Preferences... → Addons → Install from File...
- Find the file in your file system and press Install from File... button
- Enable the addon by checking the Enable an addon
- Create a directory in your file system to store the downloaded terrain files.
- It makes sense to increase far clipping distance of the 3D View camera and the camera used for rendering.
If you find the addon useful, please consider making a donation:

- File → Import → Terrain (.hgt)
- Find the directory with the .hgt files in your file system
- Set extent for your area of interest on the right side panel (left side panel in Blender 2.79). The extent is defined by the minimum and maximum longitude and by the minimum and maximum latitude. Use Operator Presets to save import settings to load them later.
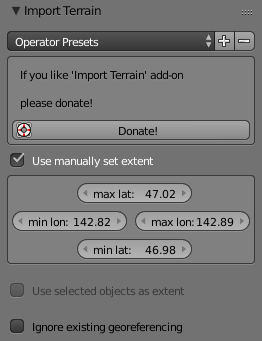
You can use the main OpenStreetMap website to find the coordinates for the extent. Zoom the map on to your area of interest. Press Manually select a different area to select the area of interest interactively. Copy the coordinates of your area to the related fields in the Blender panel.
- Press Import Terrain button. Note, that you don't need to select a specific .hgt file. If the specific .hgt file is still specified, it will be ignored. Only the directory where all required .hgt files are located must be specified.
- Required terrain data will be downloaded automatically.
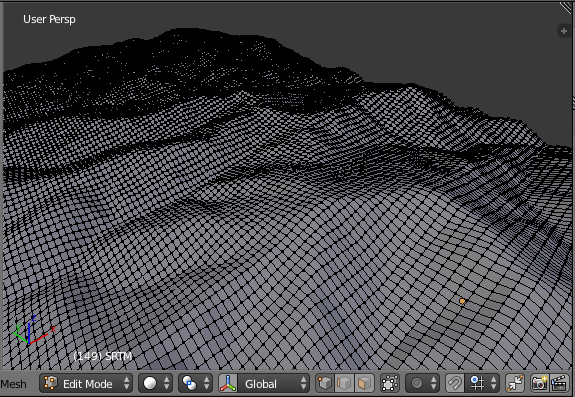
- Enjoy the imported terrain. You may want to activate the top view and ortho mode to find the imported terrain mesh.
- To use a custom map projection defined by a SRID (e.g. EPSG:3857) or by PROJ.4 parameters (e.g. +proj=tmerc +a=6378137 +b=6378137 +lat_0=55.752 +lon_0=37.618 +k_0=1 +x_0=0 +y_0=0 +units=m) install and activate the bpyproj addon. Extra GUI fields will appear in the directory selection dialog. To return the default projection simply deactivate the bpyproj addon. See the bpyproj documentation for additional details.
If the active scene does not have custom properties lat and lon or if Ignore existing georeferencing checkbox is checked, custom properties lat and lon are set for the active scene. They correspond to the center of the imported terrain area.
If the active scene does have custom properties lat and lon and Ignore existing georeferencing checkbox is unchecked, the custom properties lat and lon are used as the center for the import. In other words, the newly imported terrain area will be placed correctly with respect to previously imported terrain areas.
If the active scene does have custom properties lat and lon and Use selected objects as extent checkbox is checked, the bounding box of the selected Blender objects is calculated. The coordinates of the bounding box are converted from the Blender global coordinate system to the geographical coordinates. The resulting extent is used for the import. A specific .hgt file can be omitted for this option. If the specific file is still specified, it will be ignored. Only the directory where all required .hgt files are located must be specified.
The transverse Mercator projection with the central meridian coming through the center of the imported area is used for the import. The projection choice is explained by the negligible size of distortion in the vicinity of the central meridian.