gsm extender home
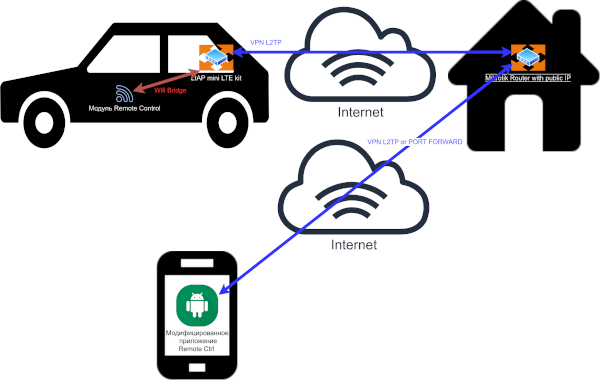
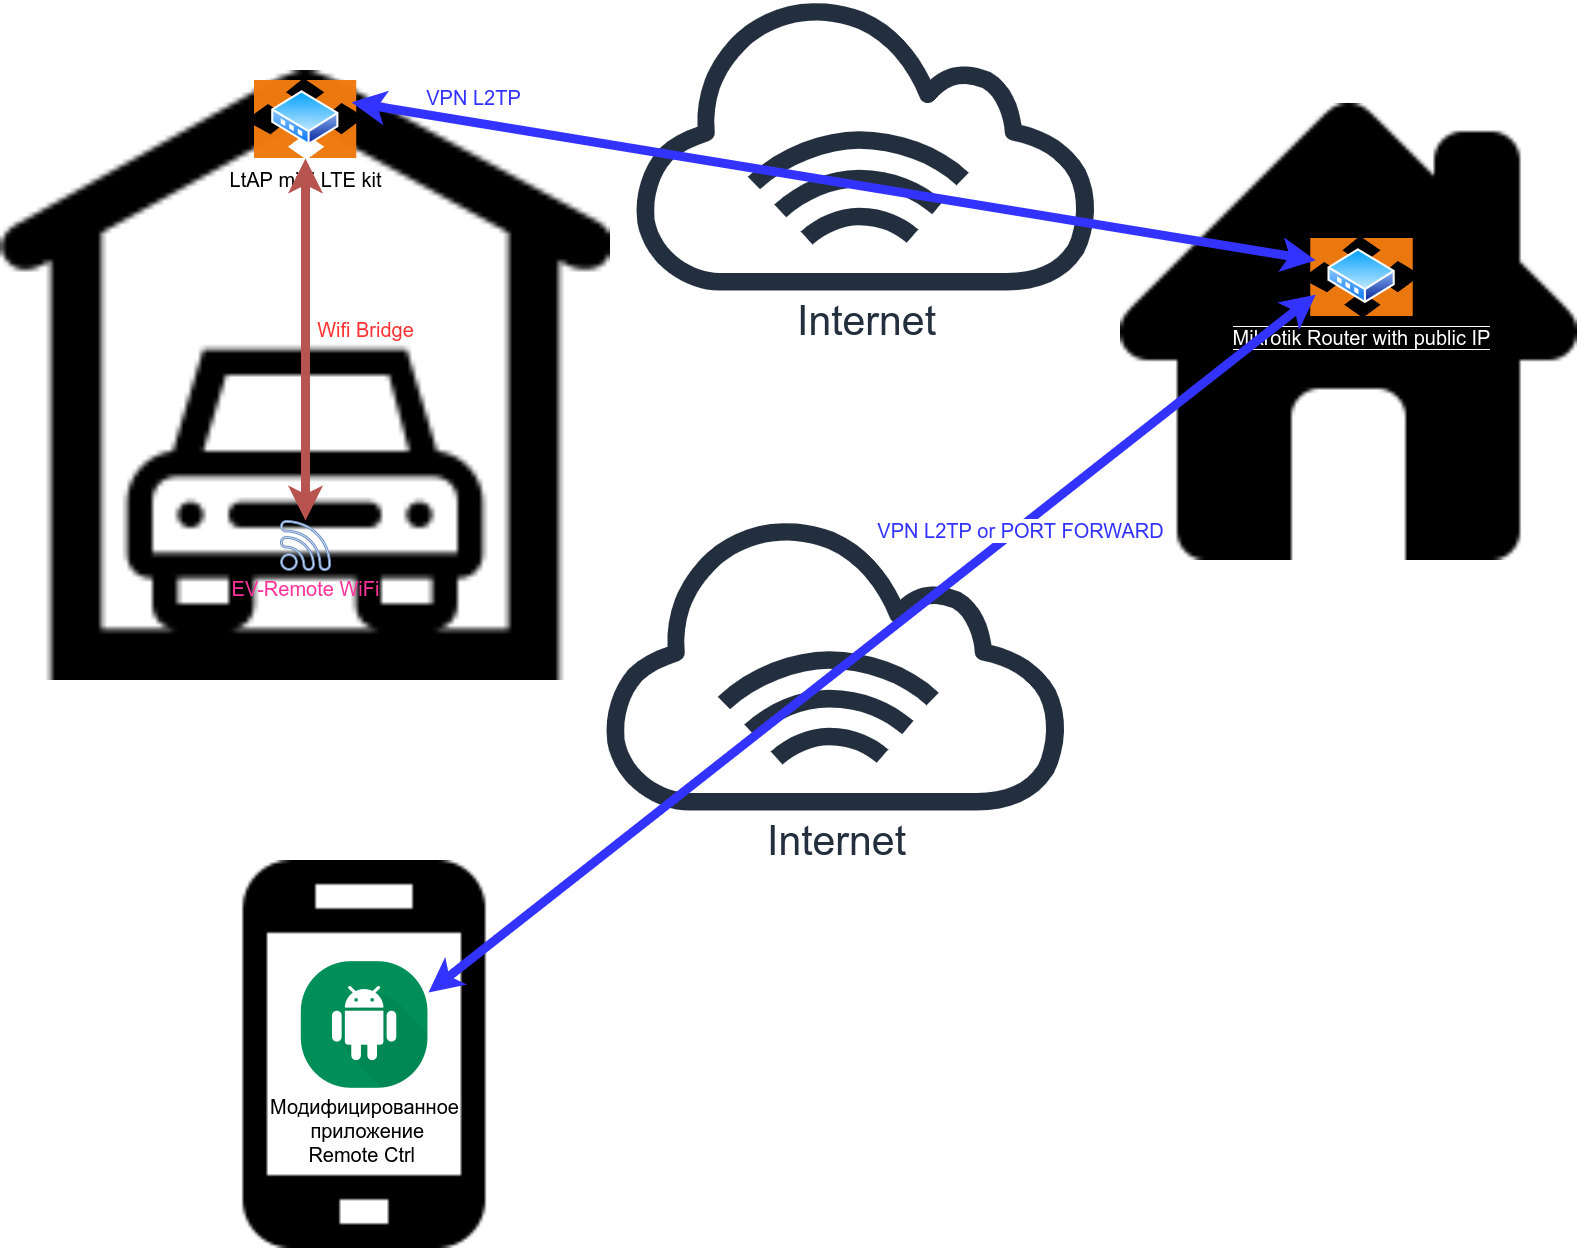
Mitsubishi Outlander PHEV remote control over GSM(3g, 4g, LTE) using Another mikrotik with public access
- Mikrotik ltap mini lte kit $129.00
- Setup Mikrotik Hap AC2 (or analog) at home with public IP.
- A convenient way, but not a secure way of port forwarding
- Fully secure VPN tunnel. To gain access, you need to raise a tunnel
 or
or
- A convenient way, but not a secure way of port forwarding
- Fully secure VPN tunnel. To gain access, you need to raise a tunnel
add action=accept chain=input comment="L2TP Rule" protocol=ipsec-esp
add action=accept chain=input comment="L2TP Rule" dst-port=1701 protocol=udp
add action=accept chain=input comment="L2TP Rule" dst-port=500 protocol=udp
add action=accept chain=input comment="L2TP Rule" dst-port=4500 protocol=udp
add action=accept chain=input comment="access router from VPN" in-interface=all-ppp
add action=accept chain=forward comment="defconf: accept in ipsec policy" ipsec-policy=in,ipsec
add action=accept chain=forward comment="defconf: accept out ipsec policy" ipsec-policy=out,ipsec

/ip firewall mangle
add action=mark-routing chain=prerouting disabled=yes dst-address=192.168.8.0/24 new-routing-mark=CAR_ROUTE passthrough=yes
add action=change-mss chain=postrouting new-mss=clamp-to-pmtu out-interface=all-ppp passthrough=yes protocol=tcp tcp-flags=syn


/ppp profile
add change-tcp-mss=yes local-address=VPN-L2TP name=Car_Profile remote-address=VPN_LOCAL use-compression=yes use-encryption=required

/ppp secret
add name=carUser password=carUser profile=Car_Profile remote-address=192.168.188.99 service=l2tp
add name=vpnUser password=vpnUser profile=Car_Profile remote-address=192.168.188.98 service=l2tp

ip pool
add name=VPN_LOCAL ranges=192.100.201.6-192.100.201.99
add name=VPN-L2TP ranges=192.168.4.49-192.168.4.98

/interface l2tp-server server

set allow-fast-path=yes authentication=pap default-profile=Car_Profile enabled=yes ipsec-secret=5TpfVoyORsfy72i3p2Cvmg8 max-mru=1500 max-mtu=1500 use-ipsec=required

/ip route
add distance=1 dst-address=192.168.8.0/24 gateway=192.168.188.99
add distance=1 dst-address=192.168.188.0/24 gateway=192.168.188.99
Setup Mikrotik in the car ltap mini lte kit
TODO: need to create script to automatically generate configuration
/interface lte
set [ find ] name=lte1
/interface bridge
add admin-mac=74:4D:28:5C:F5:7C auto-mac=no comment=defconf name=bridge
add dhcp-snooping=yes fast-forward=no igmp-snooping=yes name=bridge2
/interface wireless
set [ find default-name=wlan1 ] band=2ghz-b/g/n country=canada disabled=no frequency=2422 mode=ap-bridge name=WiFi_Router ssid=<WIFI_SSID> wireless-protocol=802.11
/interface l2tp-client
add allow=pap connect-to=<YOUR_IP> dial-on-demand=yes disabled=no ipsec-secret=5TpfVoyORsfy72i3p2Cvmg8 keepalive-timeout=disabled name=CAR_VPN_CONNECTION password=carUser use-ipsec=yes user=carUser
/interface list
add name=WAN
add name=LAN
/interface wireless security-profiles
set [ find default=yes ] authentication-types=wpa-psk,wpa2-psk mode=dynamic-keys supplicant-identity=MikroTik wpa-pre-shared-key=<WIFI_PASSWORD> wpa2-pre-shared-key=<WIFI_PASSWORD>
add authentication-types=wpa-psk,wpa2-psk eap-methods="" management-protection=allowed mode=dynamic-keys name=Mitsubishi supplicant-identity="" wpa-pre-shared-key=<MITSUBISHI_PASSWORD> wpa2-pre-shared-key=<MITSUBISHI_PASSWORD>
/interface wireless
add disabled=no mac-address=6C:C7:EC:2B:00:00 master-interface=WiFi_Router mode=station-pseudobridge-clone name=MitsubihiWiFI security-profile=Mitsubishi ssid=<MITSUBISHI_SSID> station-bridge-clone-mac=6C:C7:EC:2B:00:00 wds-default-bridge=bridge
/ip hotspot profile
set [ find default=yes ] html-directory=flash/hotspot
/ip pool
add name=dhcp ranges=192.168.188.100-192.168.188.254
/ip dhcp-server
add address-pool=dhcp disabled=no interface=bridge name=dhcp1
/interface bridge port
add bridge=bridge comment=defconf interface=ether1
add bridge=bridge comment=defconf interface=WiFi_Router
add bridge=bridge2 interface=MitsubihiWiFI trusted=yes
add bridge=bridge2 comment=defconf disabled=yes interface=LAN
/interface bridge settings
set allow-fast-path=no
/ip neighbor discovery-settings
set discover-interface-list=LAN
/interface list member
add interface=lte1 list=WAN
add interface=bridge list=LAN
/ip address
add address=192.168.188.1/24 interface=ether1 network=192.168.188.0
/ip dhcp-client
add comment=defconf disabled=no
add add-default-route=no disabled=no interface=bridge2 use-peer-dns=no use-peer-ntp=no
/ip dhcp-server network
add address=192.168.188.0/24 gateway=192.168.188.1 netmask=24
/ip firewall filter
add action=accept chain=input protocol=icmp
add action=accept chain=input connection-state=established
add action=accept chain=input connection-state=related
add action=accept chain=input in-interface=all-ppp
add action=accept chain=input
add action=accept chain=forward dst-address=192.168.8.0/24
add action=drop chain=input in-interface-list=WAN
/ip firewall nat
add action=masquerade chain=srcnat out-interface-list=WAN
add action=masquerade chain=srcnat out-interface=bridge2
add action=masquerade chain=srcnat out-interface=all-ppp
add action=accept chain=srcnat src-address=192.168.8.0/24
add action=accept chain=srcnat dst-address=192.168.8.0/24
/ip route
add distance=1 dst-address=192.168.88.0/24 gateway=CAR_VPN_CONNECTION
add disabled=yes distance=1 dst-address=192.168.8.0/24 gateway=bridge2
/system clock
set time-zone-name=Europe/Kiev
/system gps
set port=serial0
/system identity
set name=CarWiFi
/system scheduler
add interval=30s name=schedule1 on-event="/system script run carTunnel" policy=ftp,reboot,read,write,policy,test,password,sniff,sensitive,romon start-date=sep/11/2020 start-time=10:21:09
add interval=5m name=schedule2 on-event="/system script run carConnectionCheck" policy=ftp,reboot,read,write,policy,test,password,sniff,sensitive,romon start-date=sep/14/2020 start-time=10:37:49
/system script
add dont-require-permissions=no name=carTunnel owner=admin policy=ftp,reboot,read,write,policy,test,password,sniff,sensitive,romon source="\r\
    \n:local HOST \"192.168.88.99\"\r\
    \n:local PINGCOUNT 3\r\
    \n:local INT \"CAR_VPN_CONNECTION\" \r\
    \n:if ([/ping address=\$HOST interface=\$INT count=\$PINGCOUNT]=0) do={\r\
    \n:global name=\"tunnelVpn\" 0\r\
    \n/log error \"\$INT is down\"\r\
    \n} else={\r\
    \n:global name=\"tunnelVpn\" 1\r\
    \n}\r\
    \n"
add dont-require-permissions=no name=carConnectionCheck owner=admin policy=ftp,reboot,read,write,policy,test,password,sniff,sensitive,romon source="\
    \n:local HOST \"192.168.8.46\"\
    \n:local PINGCOUNT 3\
    \n:local INT \"bridge2\" \
    \n:if ([/ping address=\$HOST interface=\$INT count=\$PINGCOUNT]=0) do={\
    \n:global name=\"tunnel_car\" 0\
    \n/log error \"\$INT is down\"\
    \n\
    \n/interface wireless disable MitsubihiWiFI\
    \n/log error \"MitsubihiWiFI DISABLED\"\
    \n/delay delay-time=6\
    \n/interface wireless enable MitsubihiWiFI\
    \n/log error \"MitsubihiWiFI ENABLED\"\
    \n# /delay delay-time=15\
    \n} else={\
    \n:global name=\"tunnel_car\" 1\
    \n}\
    \n"
/tool mac-server
set allowed-interface-list=LAN
/tool mac-server mac-winbox
set allowed-interface-list=LAN
Where
YOUR_IP - public ip of home router
WIFI_SSID - Network name with access to the Internet and the Car network
WIFI_PASSWORD - password from network
MITSUBISHI_SSID - Name of network in OUTLANDER PHEV (REMOTE55peee)
MITSUBISHI_PASSWORD - password from network
- Mikrotik with Public Ip:
add action=dst-nat chain=dstnat dst-port=8080 protocol=tcp to-addresses=192.168.8.46 to-ports=8080 - set public ip on Phone storage
/storage/emulated/0/phev/ip.txt - set port on Phone storage
/storage/emulated/0/phev/port.txt
- Create Vpn connection on smartphone
Connection paramters:
Type: L2TP/IPSec PSK
Server Address: <YOUR_IP>
Shared IPSec Key: 5TpfVoyORsfy72i3p2Cvmg8
username: vpnUser
password: vpnUser - Open and use application GSM Remote Ctrl