
This project is comprised of a shell script that runs once per minute collecting data from DSM and placing it into InfluxDB version 2.
Explore the docs »
Report Bug
·
Request Feature
Table of Contents
The script gathers different SNMP based details from a Synology NAS using SNMP version 3 (much more secure than version 2) such as the following and saves them to InfluxDb version 2:
-
System: System Uptime, System Status, System Fan Status, Model Name, Serial Number, Upgrade Available, DSM Version, System Temp. If an Expansion unit (DX517 etc) is installed, it will gather Expansion Model, Expansion Status
-
Memory: Total Memory, Real Memory Available, Buffer Memory Used, Cached Memory Used, Memory Free
-
CPU: usage_idle, ssCpuUser, ssCpuSystem, cpu_usage
-
Volume: Volume Name, Volume Total Size, Volume Used Size, Volume Reads (bytes/sec), Volume Writes (bytes/sec), volume load (percent)
-
RAID: RAID Name, RAID Status, RAID Free Size, RAID Total Size, Hot Spare Count
-
Disk: Disk Name, Disk Model, Disk Type, Disk Status, Disk Role, Disk Retry, Disk Bad Sectors, Disk Identify Fail, Disk Remaining Life, Disk Reads (bytes/sec) Disk Writes (bytes/sec), Disk load (pecent), Disk Serial Number
-
UPS: UPS Battery Charge, UPS Load, UPS Status, UPS Battery Runtime
-
Network: Interface Name, Bytes Received, Bytes Sent
-
GPU - If this is a DVA (Deep Video Analysis) system like the DVA3219 or DVA3221: GPU usage, GPU Temperature, GPU Memory Usage, GPU Fan Speed
-
for DVA untis with Graphics Cards, the script can monitor GPU usage and temperature. If the Usage AND Temperature both drop below configurable set-points then Synology Surveillance will be auto-restarted and an email notification sent. This was added as sometimes the Deep Video Analysis (DVA) processes stop, causing GPU usage and temperature to drop. Restarting the Surveillance station package easilly fixes this issue.
NOTE: this script can gather two parameters that are NOT AVILABLE through SNMP, those are GPU Temperature and GPU Fan speed. This script collects it from the nvidia-smi driver commands.
-
synology_services: Number of connections for CIFS, AFP, NFS, FTP, SFTP, HTTP/HTTPS, TELNET, SSH, OTHER=0
-
FlashCache: disk_reads, disk_writes, ReadHits, WriteHits, TotalRead, TotalWrite, ReadHitRate, WriteHitRate, ReadSeqSkip, WriteSeqSkip
-
iSCSI_LUN: ThroughputReadHigh, ThroughputReadLow, ThroughputWriteHigh, ThroughputWriteLow, IopsRead, IopsWrite, DiskLatencyRead, DiskLatencyWrite, NetworkLatencyTx, NetworkLatencyRx, IoSizeRead, IoSizeWrite, QueueDepth, Type, DiskLatencyAvg, ThinProvisionVolFreeMBs
-
SHA (Synology High Availability): activeNodeName, passiveNodeName, clusterAutoFailover, clusterName, clusterStatus, heartbeatStatus, heartbeatTxRate, heartbeatLatency
-
NFS: TotalMaxLatency, ReadMaxLatency, WriteMaxLatency, TotalOPS, ReadOPS, WriteOPS
Some items like system, GPU, CPU, and disk temperatures can send alert email notifications based on configurable set-points.
This project is written around a Synology NAS and their DSM specific SNMP OIDs and MIBs.
- this script is designed to be executed every 60 seconds
- this script recommends the installation of Synology MailPlus server package in package center in order to send emails. If Synology MailPlus server package is not installed, or configured, the script can be configured to use the same email server as found in Control Panel --> Notifications. However Synology MailPlus server package is able to send emails approximately 17x times faster, allows for queueing of messages if required, and allows for historical logs.
the mail plus server must be properly configured to relay received messages to another email account. NOTE: this read-me DOES NOT explain how to properly configure mail plus server.
-
this script only supports SNMP V3. This is because lower versions are less secure
SNMP must be enabled on the host NAS for the script to gather the NAS NAME the SNMP settings for the NAS can all be entered into the web administration page -
This script can be run through Synology Task Scheduler. However it has been observed that running large scripts like this as frequently as every 60 seconds causes the synoschedtask system application to use large amounts of resources and causes the script to execute slowly
details of this issue can be seen here: https://www.reddit.com/r/synology/comments/kv7ufq/high_disk_usage_on_disk_1_caused_by_syno_task/ to fix this it is recommend to directly edit the crontab at /etc/crontab ONLY AFTER THE SCRIPT HAS BEEN TESTED AND CONFIRMED TO WORK. updating crontab is also detailed at the end of this readme details on crontab can be found here: https://man7.org/linux/man-pages/man5/crontab.5.html -
This project requires a PHP server to be installed and configured to allow the web-administrative page to be available. This read-me does explain how to configure the needed read/write permissions, but does not otherwise explain how to setup a website on a Synology NAS through web-station
Note: this assumes InfluxDB version 2 and Grafana are already installed and properly configured. This read-me does NOT explain how to install and configure InfluxDB nor Grafana.
- Create the following directories on the NAS
1. %PHP_Server_Root%/config
2. %PHP_Server_Root%/logging
3. %PHP_Server_Root%/logging/notifications
note: %PHP_Server_Root% is what ever shared folder location the PHP web server root directory is configured to be.
-
Place the
functions.phpfile in the root of the PHP web server running on the NAS -
Place the
synology_snmp.shfile in the/loggingdirectory -
Place the
server2_config.phpfile in the/configdirectory -
Create a scheduled task on boot up in Synology Task Scheduler to add the following line
 mount -t tmpfs -o size=1% ramdisk $notification_file_location

 where "$notification_file_location" is the location created above "%PHP_Server_Root%/logging/notifications"
- Open the
synology_snmp.shfile in a text editor. - the script contains the following configuration variables that will need to be un-commented
log_file_location="/volume1/web/logging/notifications"
email_last_sent="$log_file_location/synology_snmp_last_email_sent.txt"
lock_file_location="$log_file_location/synology_snmp_debug.lock"
config_file_location="/volume1/web/config/config_files/config_files_local/system_config2.txt"
SS_Station_restart_tracking="$log_file_location/SS_Station_restart_tracking.txt"
use_mail_plus_server=0 #Note, while mail plus server is not required to send emails if desired, the email process is 17x times slower if NOT using mail plus server. In addition mailplus server queues the messages so if they fail to send, it will try again later, and it keeps a log of all messages sent. because of this it is recommended to use Mail Plus server

#NOTE THIS IS NOT THE NAME UNDER "CONTROL PANEL --> INFO CENTER"
#THIS VALUE IS DRAWN FROM "CONTROL PANEL --> TERMINAL & SNMP --> SNMP DEVICE INFORMATION --> DEVICE NAME
nas_name="Your_NAS_Name" #this is only needed if the script cannot access the server name over SNMP, or if the config file is unavailable and will be used in any error messages

#depending on the number of drives, if the system has SSD's or regular HDD disks, the time required to execute the entire script takes time and may not be the same on all systems.
#this value can be adjusted to ensure the script executes all of its capture intervals within 60 seconds.
#otherwise the script will not allow the next script to execute and a ~60 second period of time will NOT have data collected.
#
#run the script with "time" before it such as "bash time synology_snmp.sh" and ensure the time required is less than 59 seconds, adjust the number to be below 59 seconds
capture_interval_adjustment=6
for the variables above, ensure the "/volume1/web" is the correct location for the root of the PHP web server, correct as required
-
delete the lines 118 through 155 which is between
#for my personal use as i have multiple Synology systems, these lines can be deleted by other usersandEMAIL SETTINGS USED IF CONFIGURATION FILE IS UNAVAILas those are for my personal use as i use this script for several units that have slightly different configurations -
edit the following lines so if the script cannot load the configuration file it can still send an email
#########################################################
#EMAIL SETTINGS USED IF CONFIGURATION FILE IS UNAVAILABLE
#These variables will be overwritten with new corrected data if the configuration file loads properly.
email_address="email@email.com"
from_email_address="email@email.com"
########################################################
- Open the
server2_config.phpfile in a text editor - the script contains the following configuration variables
$form_submit_location="index.php?page=6&config_page=server2_snmp";
$config_file="/volume1/web/config/config_files/config_files_local/system_config2.txt";
$page_title="Server2 Logging Configuration Settings";
ENSURE THE VALUES FOR $config_file ARE THE SAME AS THAT CONFIGURED IN [Configuration "synology_snmp.sh"] FOR THE VARIABLE config_file_location
the form_submit_location can either be set to the name of the "server2_config.php" file itself, or if the "server2_config.php" file is embedded in another PHP file using an "include_once" then the location should be to that php file
the variable page_title controls the title of the page when viewing it in a browser.
the server2_config.php file by default automatically redirects from HTTP to HTTPS. if this behavior is not required or desired, delete the following lines from the beginning of the file
if($_SERVER['HTTPS']!="on") {

$redirect= "https://".$_SERVER['HTTP_HOST'].$_SERVER['REQUEST_URI'];

header("Location:$redirect"); }
the server2_config.php file by default requires a user to be logged in with a valid session otherwise will forward to a file "login.php". This is done for added security. The login.php file is not available in this repo, and if sessions are desired, they will need to be self generated. However if your server environment does not use active users and or sessions, delete the following lines from the code
// Initialize the session
if(session_status() !== PHP_SESSION_ACTIVE) session_start();

// Check if the user is logged in, if not then redirect him to login page
if(!isset($_SESSION["loggedin"]) || $_SESSION["loggedin"] !== true){
    header("location: login.php");
    exit;
}
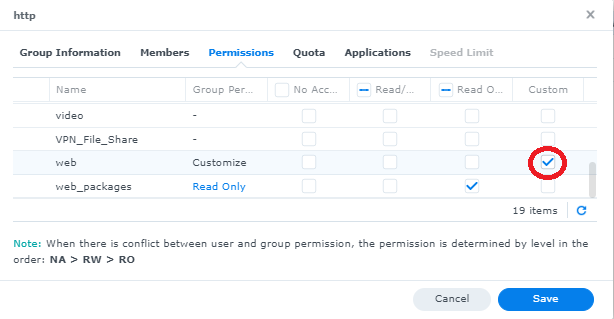
by default the synology user "http" that web station uses does not have write permissions to the "web" file share.
- go to Control Panel -> User & Group -> "Group" tab
- click on the "http" user and press the "edit" button
- go to the "permissions" tab
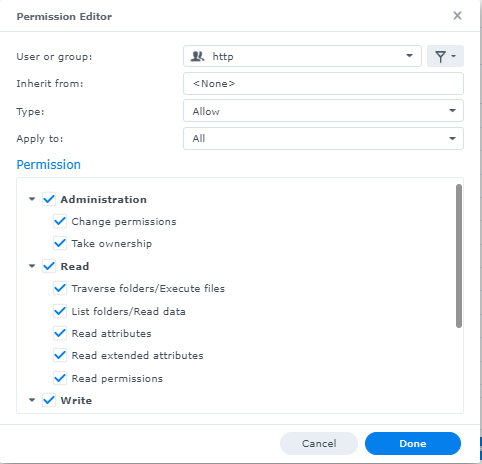
- scroll down the list of shared folders to find "web" and click on the right checkbox under "customize"
- check ALL boxes and click "done"
- Verify the window indicates the "http" user group has "Full Control" and click the checkbox at the bottom "Apply to this folder, sub folders and files" and click "Save"

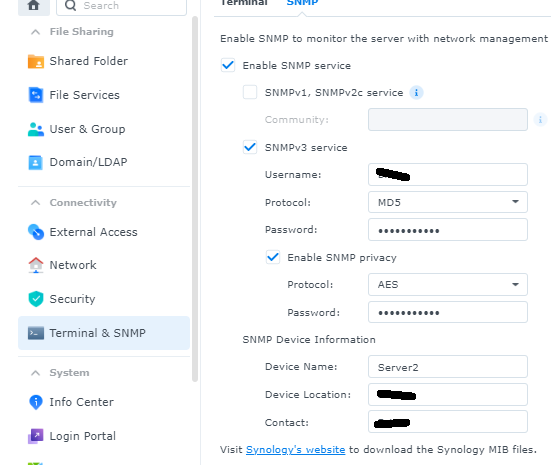
by default synology DSM does not have SNMP settings enabled. This script requires them to be enabled.
- Control Panel -> Terminal & SNMP -> "SNMP" tab
- check the box "Enable SNMP Service"
- Leave the following box UNCHECKED "SNMPv1, SNMPv2c service" as we only want SNMP version 3
- check the box "SNMPv3 service"
- enter a "Username" without spaces, choose a "protocol" and "password"
- ensure the "Enable SNMP privacy" is checked and enter a desired protocol and a password. it may be the same password used above or can be a different password
- click apply to save the settings
document all of the protocols, passwords and user information entered in Synology Control panel as this same information will need to entered into the configuration web page in the next steps
NOTE: if firewall rules are enabled on the synology system, the SNMP service port may need to be opened if this script is not running on this particular physical server. This set of instructions will not detail how to configure firewall rules.
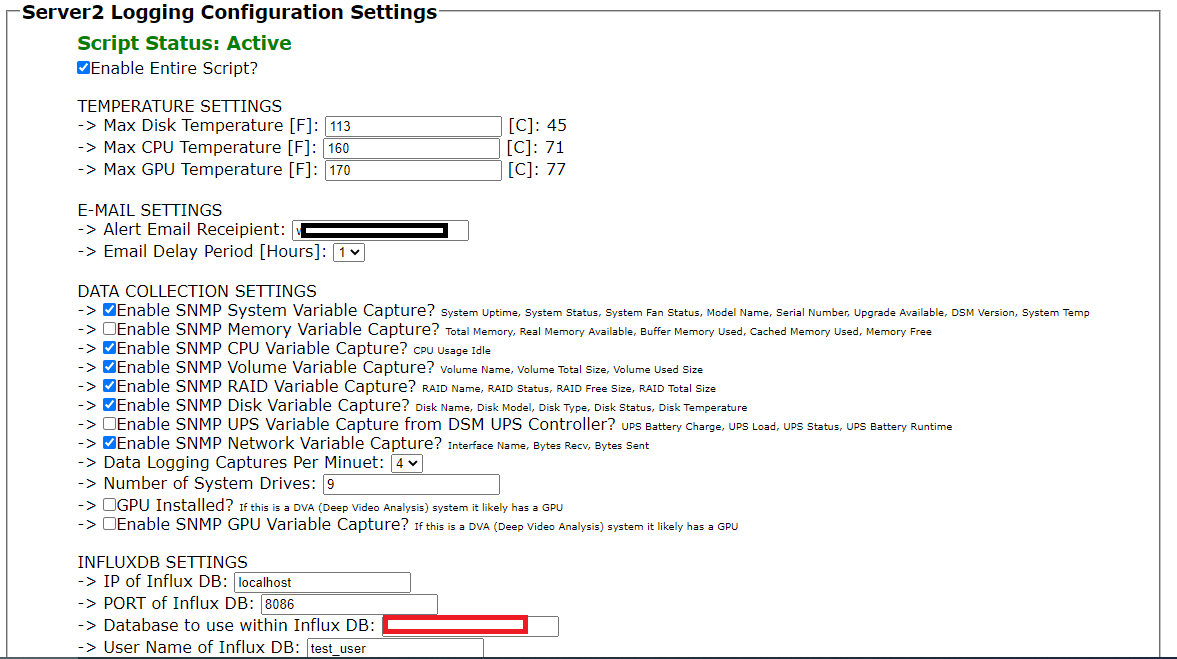
- now that the files are where they need to be, using a browser go to the "server2_config.php" page. when the page loads for the first time, it will automatically create a "system_config2.txt" in the config directory. the values will all be default values and must be configured.
- ensure the script is enabled
- configure maximum CPU, disk, and GPU temperatures (In F, not C)
- configure email settings, the destination email address, the from email address, and the frequency in which notification emails will be re-sent if the issue still persists
- check what types of data is to be collected from the NAS
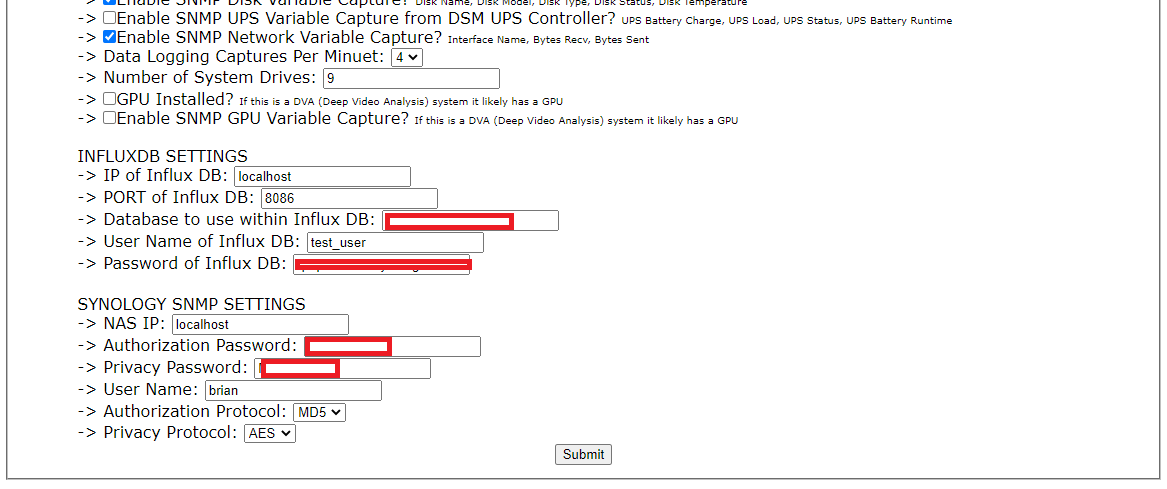
- enter the details for influxDB. --> for InfluxDB 2, the "database" will be the randomly generated string identifying the data bucket, for example "a6878dc5c298c712" --> for InfluxDB 2, the "User Name of Influx DB" can be left as the default value as this is NOT required for InfluxDB version 2 and higher. --> for InfluxDB 2, the "Password" is the API access key / Authorization Token.
- configure the SNMP settings. these settings must match the settings the NAS has been configured to use as configured previously.
Now that the required configuration files are made using the web-interface, we can ensure the bash script operates correctly.
- open the
synology_snmp.shfile for editing. find the linedebug=0and change the zero to a onedebug=1to enable verbose output to assist with debugging - open SSH and naviagte to where the
synology_snmp.shfile is located. type the following commandbash synology_snmp.shand press enter - the script will run and load all of the configuration settings. in debug mode it will print out all of the configuration parameters. verify they are correct
max_disk_temp_f is 113
max_CPU0_f is 160
email_address is REDACTED
email_interval is 60
capture_system is 1
capture_memory is 1
capture_cpu is 1
capture_volume is 1
capture_raid is 1
capture_disk is 1
capture_ups is 0
capture_network is 1
capture_interval is 15
nas_url is localhost
influxdb_host is REDACTED
influxdb_port is 8086
influxdb_name is REDACTED
influxdb_user is test_user
influxdb_pass is REDACTED
script_enable is 1
max_disk_temp is 45
max_CPU0 is 71
snmp_authPass1 is REDACTED
snmp_privPass2 is REDACTED
number_drives_in_system is 5
GPU_installed is 0
nas_snmp_user is brian
snmp_auth_protocol is MD5
snmp_privacy_protocol is AES
capture_GPU is 0
max_GPU_f is 67
max_GPU is 19
from_email_address is REDACTED
influx_http_type is http
influxdb_org is home
enable_SS_restart is 0
SS_restart_GPU_usage_threshold is 10
SS_restart_GPU_temp_threshold is 50
capture_synology_services is 1
capture_FlashCache is 1
capture_iSCSI_LUN is 1
capture_SHA is 1
capture_NFS is 1
capture_iSCSI_Target is 1
NVidia Drivers are not installed
/volume1/web/logging/notifications/synology_snmp_last_email_sent.txt is not available, writing default values
current time is 1682699891
disk_temp_messge_tracker[0] is equal to 1682699891
disk_temp_messge_tracker[1] is equal to 1682699891
disk_temp_messge_tracker[2] is equal to 1682699891
disk_temp_messge_tracker[3] is equal to 1682699891
disk_temp_messge_tracker[4] is equal to 1682699891
CPU_message_tracker is equal to 1682699891
raid_messge_tracker[0] is equal to 1682699891
raid_messge_tracker[1] is equal to 1682699891
raid_messge_tracker[2] is equal to 1682699891
disk_status_messge_tracker[0] is equal to 1682699891
disk_status_messge_tracker[1] is equal to 1682699891
disk_status_messge_tracker[2] is equal to 1682699891
disk_status_messge_tracker[3] is equal to 1682699891
disk_status_messge_tracker[4] is equal to 1682699891
/volume1/web/logging/notifications/synology_snmp_last_email_sent.txt created with default values.
NOTE: if this is a regular Synology NAS and not a DVA unit like the DVA3219, DVA3221 etc, then no GPU will be available and the warning NVidia Drivers are not installed can be ignored
5. while debug mode is enabled, each time the script runs it will output the tracking information for "disk_temp_messge_tracker", "CPU_message_tracker", "raid_messge_tracker", and "disk_status_messge_tracker"
these values store the unit time stamp when emails were last sent to track the amount of time that has passed since an email notification was last sent. This prevents a flood of notification emails being sent out.
disk_temp_messge_tracker[0] is equal to 1682699891
disk_temp_messge_tracker[1] is equal to 1682699891
disk_temp_messge_tracker[2] is equal to 1682699891
disk_temp_messge_tracker[3] is equal to 1682699891
disk_temp_messge_tracker[4] is equal to 1682699891
CPU_message_tracker is equal to 1682699891
raid_messge_tracker[0] is equal to 1682699891
raid_messge_tracker[1] is equal to 1682699891
raid_messge_tracker[2] is equal to 1682699891
disk_status_messge_tracker[0] is equal to 1682699891
disk_status_messge_tracker[1] is equal to 1682699891
disk_status_messge_tracker[2] is equal to 1682699891
disk_status_messge_tracker[3] is equal to 1682699891
disk_status_messge_tracker[4] is equal to 1682699891
- at the end of the script, it will output the results from InfluxDB. ensure you do NOT see any instances of the following
{"code":"invalid","message":"unable to parse
or
No Such Instance currently exists at this OID
or
invalid number
these errors indicate that InfluxDB cannot intake the data properly and debugging is needed. ensure no other errors were listed in the script output and ensure all values of the configuration paramters displayed in debug mode were correct.
7.) after it is confirmed the script is working without errors and that it is confirmed that InfluxDB is receiving the data correctly, change the debug=1 back to a debug=0
8.) now proceed with editing the crontab file to start the automatic execution of the script every 60 seconds.
NOTE: ONLY EDIT THE CRONTAB FILE AFTER IT IS CONFIRMED THE SCRIP AND PHP FILES ARE INSTALLED AND WORKING PER INSTRUCTIONS ABOVE
This script can be run through Synology Task Scheduler. However it has been observed that running large scripts like this as frequently as every 60 seconds causes the synoschedtask system application to use large amounts of resources and causes the script to execute slowly details of this issue can be seen here: https://www.reddit.com/r/synology/comments/kv7ufq/high_disk_usage_on_disk_1_caused_by_syno_task/
to fix this it is recommend to directly edit the crontab at /etc/crontab using vi /etc/crontab
add the following line:
* * * * * root $path_to_file/$filename
details on crontab can be found here: https://man7.org/linux/man-pages/man5/crontab.5.html
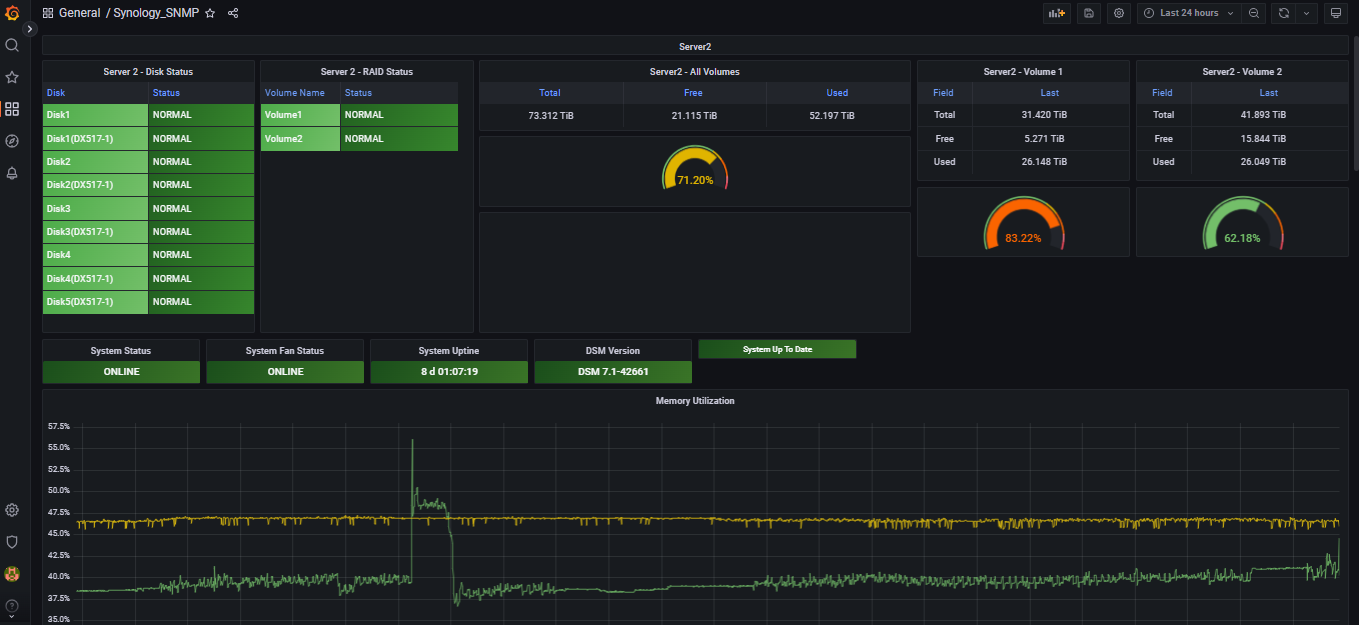
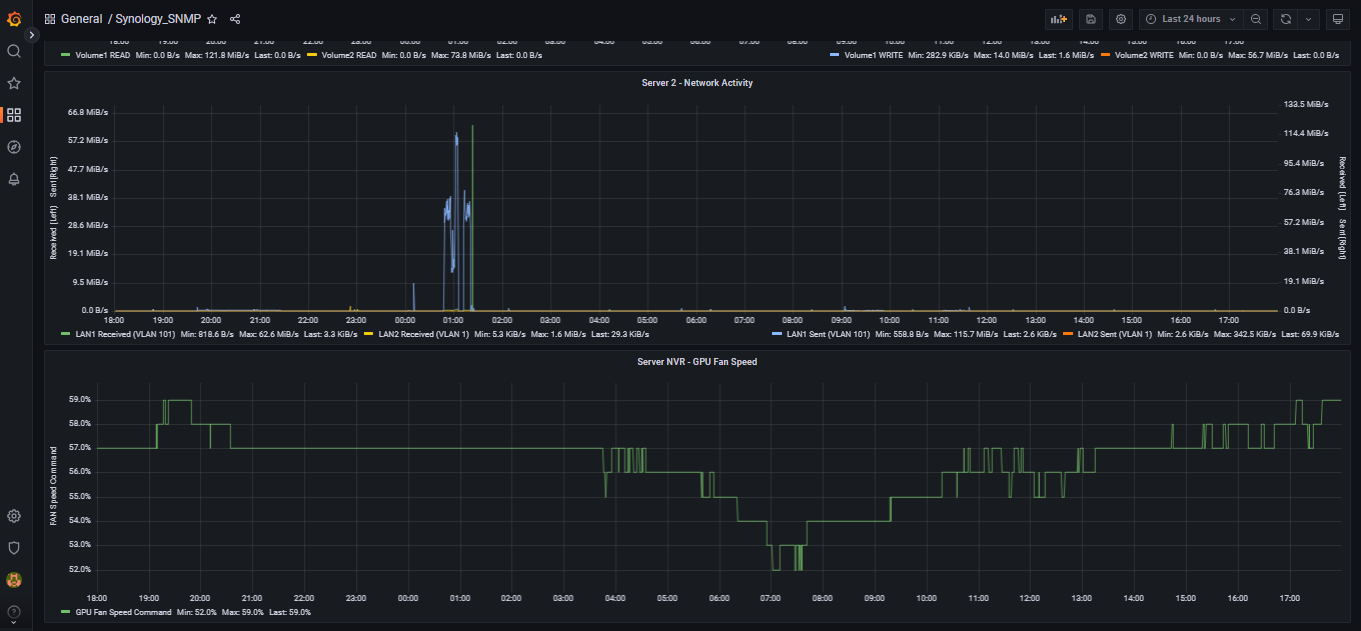
Two dashboard JSON files are available. The entire dashboard is written around the new FLUX language which is more powerful and simpler to use. One used when monitoring a single Synology Unit. The other is for monitoring multiple Synology Units on a single dashboard. The current version supplied here shows the data for three different Synology units
the Dashboard requires the use of an add-on plug in from https://grafana.com/grafana/plugins/mxswat-separator-panel/
there are five different items in the JSON that will need to be adjusted to match your installation. the first the bucket it is drawing data from. edit this to match your bucket name as shown in InfluxDB
from(bucket: \"Test/autogen\")
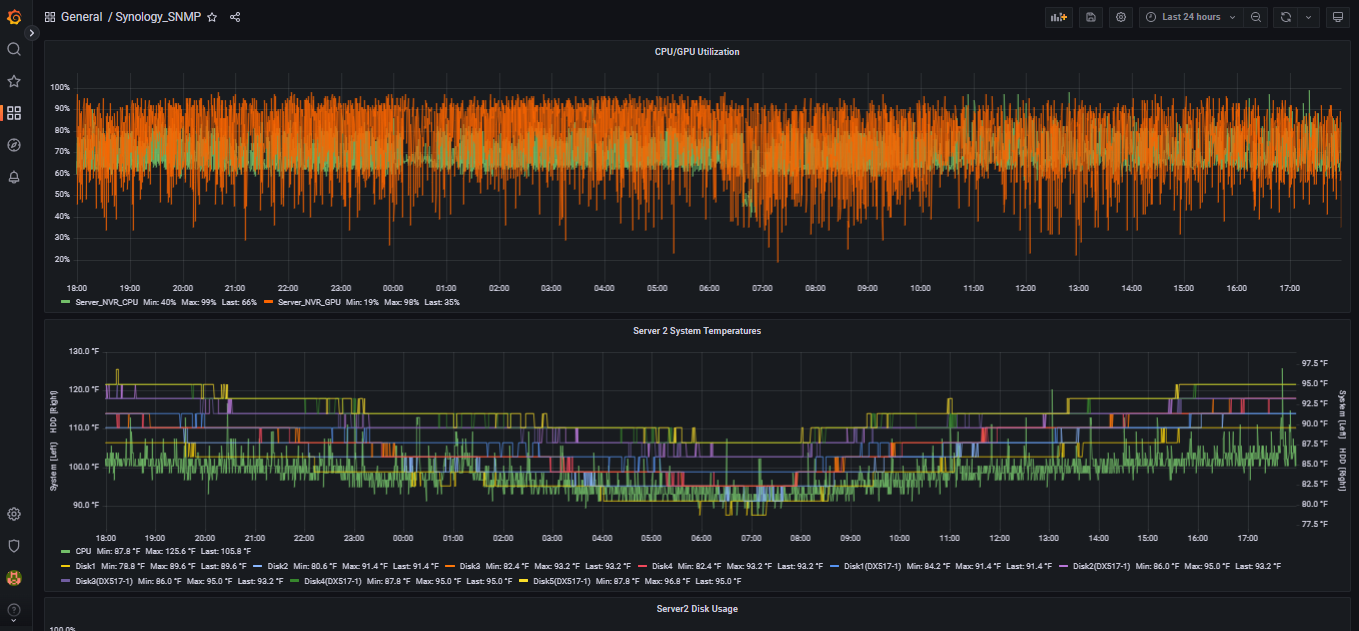
next, edit the name of the Synology NAS as reported by the script. the "Server_NVR" items are included "mixed into" the "Server2" items to demonstrate things like GPU usage, GPU VRAM usage, and GPU fan speed. if theSynology system is not a DVA unit with a graphics card, these "Server_NVR" items can be deleted.
r[\"nas_name\"] == \"Server2\")
r[\"nas_name\"] == \"Server_NVR\")
next we need to update the title of the dashboard, search for the following line and edit as desired
"title": "Server2 SMART",
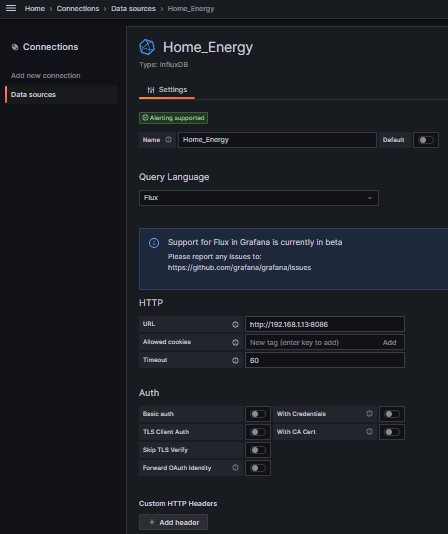
next we need to update the UID of the datasource from InfluxDB. we need to determine the UID of your installation. follow these steps to do so:
1.) create a InfluxDB data source configured as using the "FLUX" language, name it as you wish. Ensure the "Test" button at the bottom reports the data source works.
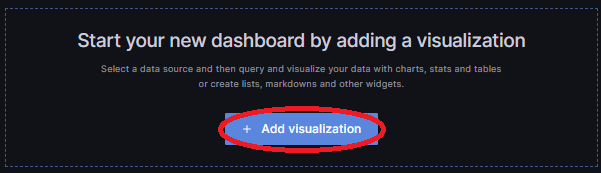
2.) once the data source is made and working click on "Build a Dashboard"

3.) Click on "Add Visualization"
4.) Choose the data source you have previously created

5.) do not worry about adjusting settings within the visualization and just click "Apply"
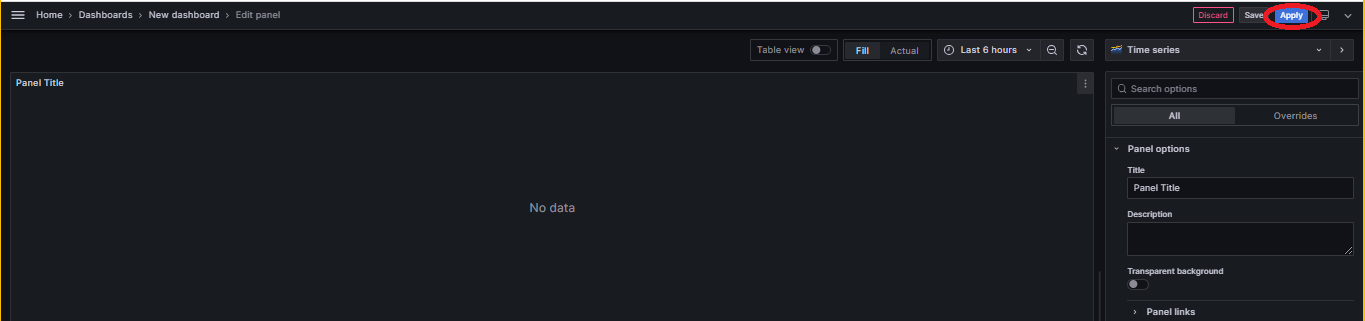
6.) Click on "Dashboard Settings" at the top

7.) on the settings screen go to "JSON Model" and find the "datasource" and copy the value for the "uid" for your data source.
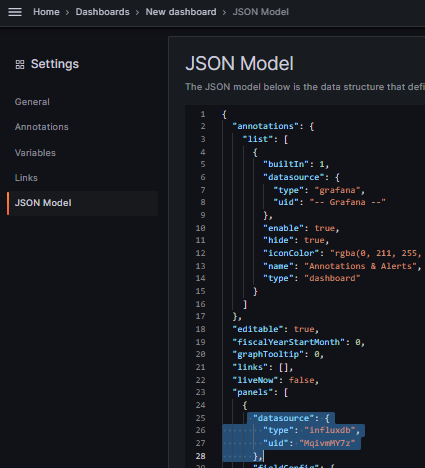
within the JSON dashboard file for this project you can now perform a find/replace for all of the instances of the uid in the supplied dashboards which are currently set to "3I0W7vY7k".
"datasource": {
        "type": "influxdb",
        "uid": "3I0W7vY7k"
      },
do NOT change the value of this line
"uid": "8jEBJg77z",
that uid will be part of the URL used to access the dashboard and can remain as is
now the dashboard can be imported into Grafana.
	NOTE: to reduce disk IOPS activity as the script accesses various temp files every 60 seconds, a RAMDISK may be created for the script to use

	Create a scheduled task on boot up in Synology Task Scheduler to add the following line

	mount -t tmpfs -o size=1% ramdisk $notification_file_location

	where "$notification_file_location" is the "notification_file_location" created in the beginning of this guide.
based on the script found here by user kernelkaribou https://github.com/kernelkaribou/synology-monitoring
This is free to use code, use as you wish
Your Name - Brian Wallace - wallacebrf@hotmail.com
Project Link: [https://github.com/wallacebrf/synology_snmp)