使用Vue进行项目开发,碰到的比较多的问题就是如何进行组件之间的参数传递。为了能够更优雅的解决此类问题,笔者在这里总结了开发中经常用到的一些组件通信方式,并配合一些例子方便理解。

每一小节的例子都在src/views目录中,小伙伴可以结合对应的代码来阅读文章。
码字不易,如果文章内容对你有帮助的话,希望能点赞鼓励一下作者。
注:有些例子刻意为之,只是为了学习对应的知识点,对于实际使用场景刻意不必深究
在Vue中,我们可以通过为子组件传入props,然后在子组件中接收,并通过this来直接访问
<!--demo-props-->
<template>
  <div class="demo-props">
    <h2>{{ count }}</h2>
    <demo-child
      :count="count"
      :add-count="addCount"
    >
    </demo-child>
    <button @click="addCount">parent click</button>
  </div>
</template><!--demo-child-->
<template>
<div class="demo-child">
<demo-grandson :add-count="addCount"></demo-grandson>
<button @click="addCount">child click</button>
</div>
</template>这里我们为demo-children传入了count和add-count属性,然后又将add-count传入到demo-grandson组件中。这样当我们分别点击父组件(demo-props)、子组件(demo-child)和孙子组件(demo-grandson)中的按钮时,都会更新count属性
当然我们也可以使用v-bind来直接绑定一个对象,Vue会帮我们将组件属性进行分发,类似于react中的{...props}:
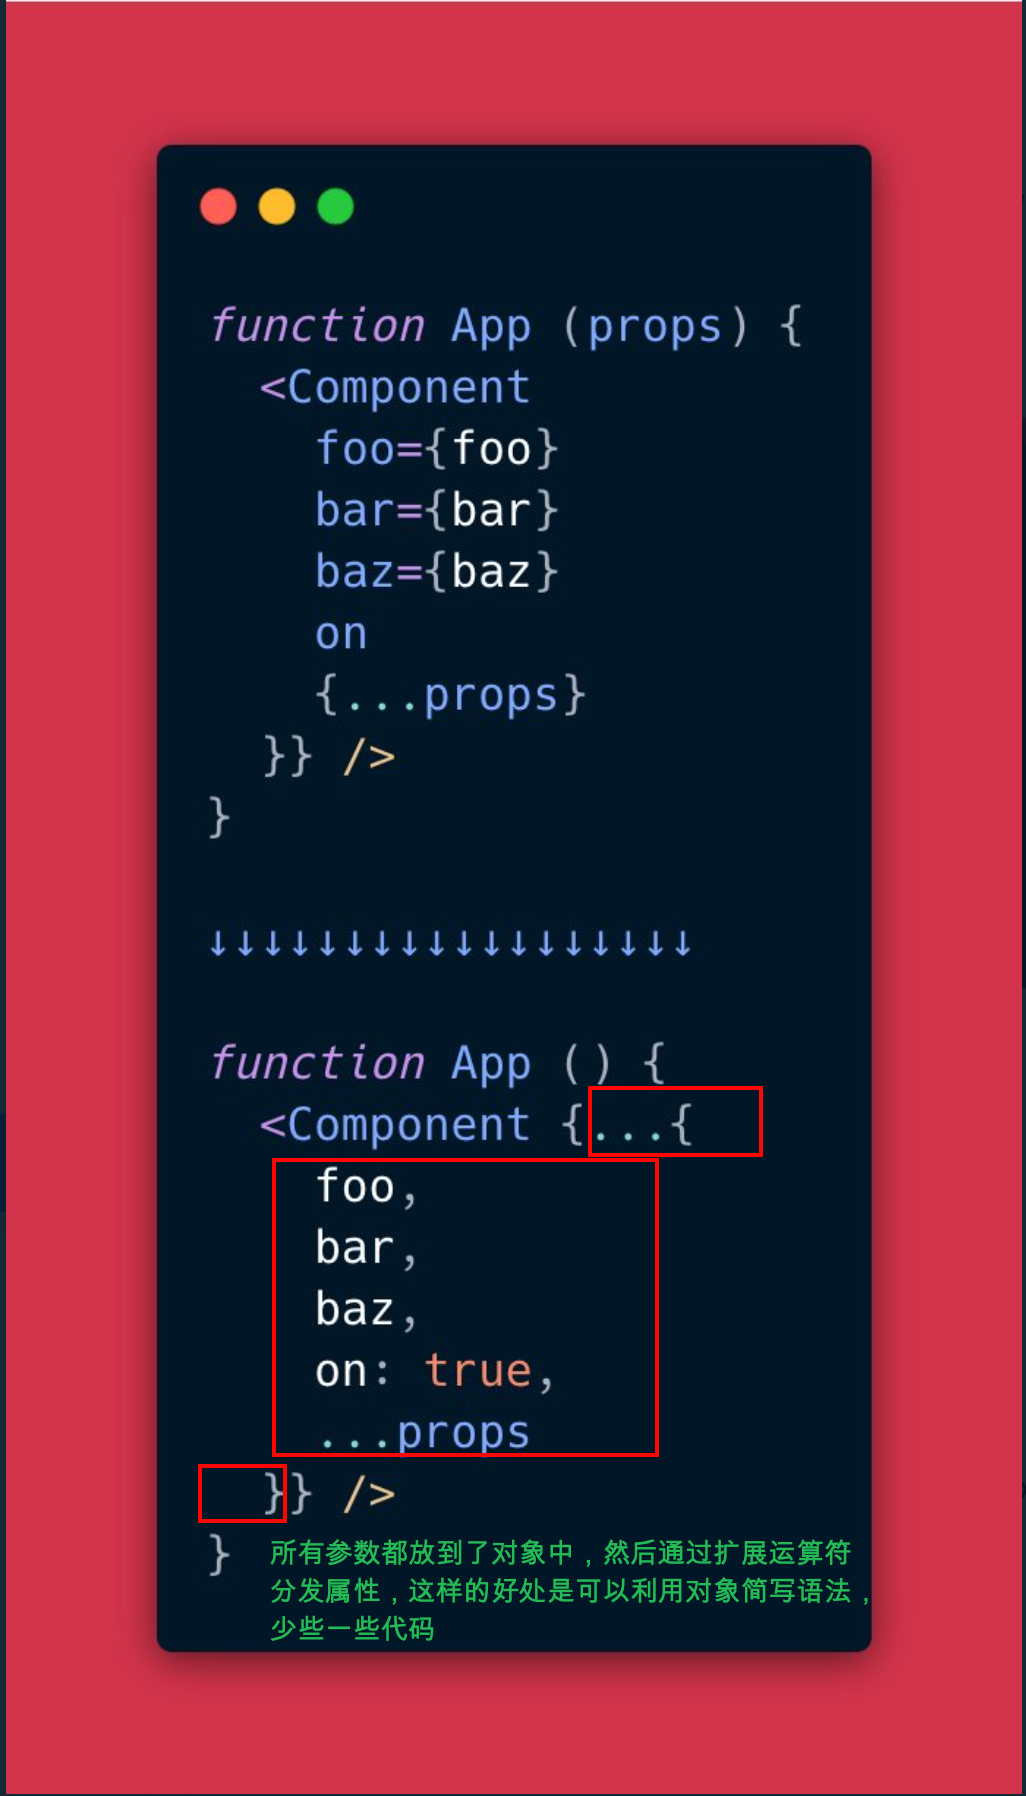
这张图的出处在这里,有兴趣的小伙伴可以去围观😜:https://twitter.com/tannerlinsley/status/1300847251846176768
在Vue中我们也可以利用这个对象简写的特性来少敲几下键盘:
<!--demo-props-->
<template>
  <div class="demo-props">
    <h2>{{ count }}</h2>
    <demo-child v-bind="{count,addCount}" >
    </demo-child>
    <button @click="addCount">parent click</button>
  </div>
</template>Vue中可以通过@符号来监听自定义事件,并在子组件中通过$emit方法来触发监听的事件。我们将上面的例子用自定义事件来进行改写:
<!-- 父组件 -->
<template>
  <div class="demo-custom-event">
    <h2>{{ count }}</h2>
    <demo-child
      :count="count"
      @add-count="addCount"
    >
    </demo-child>
    <button @click="addCount">parent click</button>
  </div>
</template>
<!-- 子组件 -->
<template>
<div class="demo-child">
<demo-grandson @add-count="addCount"></demo-grandson>
<button @click="addCount">child click</button>
</div>
</template>
<script>
export default {
// ...
methods: {
addCount () {
// 通知父组件执行'add-count'对应的事件
this.$emit('add-count');
}
}
};
</script>完成上述代码后,我们依旧可以通过点击各个组件内的按钮来更新count属性
Vue为了方便用户,提供了俩个可以实现双向绑定数据的语法糖。用户不再需要在父组件进行事件监听,便可以实现属性的自动更新。
<!-- 父组件 -->
<template>
  <div class="demo-two-way">
    <h2>count: {{ count }}</h2>
    <h2>count1: {{ count1 }}</h2>
    <h2>count2: {{ count2 }}</h2>
    <demo-child
      v-model="count"
      :count1.sync="count1"
    >
    </demo-child>
    <button @click="count++">parent click</button>
  </div>
</template>
<!-- 子组件 -->
<template>
<div class="demo-child">
<demo-grandson :add-count="addCount"></demo-grandson>
<button @click="addCount">child click</button>
<button @click="$emit('update:count1',count1+1)">child:update .sync count1</button>
</div>
</template>
<script>
export default {
name: 'DemoChild',
props: {
value: {
type: Number,
default: 0
},
count1: {}
},
components: {
DemoGrandson
},
data () {
return {};
},
methods: {
addCount () {
this.$emit('input', this.value + 1);
}
}
};
</script>相比于之前的传参方式,我们不再需要在父组件中监听addCount事件来更新父组件中的count。Vue会帮我们自动监听对应的事件,并更新属性值。
这俩个语法糖的本质如下:
v-model: 自动绑定value属性 +input事件xxx.sync: 自动绑定update:xxx事件
下面我们模拟实现下这俩个语法为我们简化的一些事情:
<!-- 父组件 -->
<template>
  <div class="demo-model">
    <h2>模拟实现v-model的count: {{ count }}</h2>
    <h2>模拟实现.sync指令的count: {{ count1 }}</h2>
    <demo-child
      :value="count"
      @input="count = $event"
      :count1="count1"
      @update:count1="count1 = $event"
    >
    </demo-child>
  </div>
</template><!--子组件-->
<template>
<div class="demo-model-child">
<button @click="addCount">child click</button>
<button @click="$emit('update:count1',count1+1)">child: update .sync count1</button>
</div>
</template>
<script>
export default {
name: 'DemoModelChild',
props: {
value: {
type: Number,
default: 0
},
count1: {}
},
data () {
return {};
},
methods: {
addCount () {
this.$emit('input', this.value + 1);
}
}
};
</script>上例中的count属性,我们通过value来接收,并将其传到子组件。然后子组件中通过调用this.$emit('input',this.value+1)通知父组件调用@input指令监听的事件,并将最新值作为参数传入。
父组件收到通知后调用@input指令监听的事件,并通过传入的参数来更新count属性。
而对于使用.sync修饰符的count1,我们可以随意指定其要传递给子组件的属性名,而不只能是value(v-model中的value也可以更改),并且会通过监听@update:count1,在count1发生变化后通过调用@update:count1对应的内容来更新count1。(注意:这里@update:count1中的count1与子组件中props接收的属性相同)
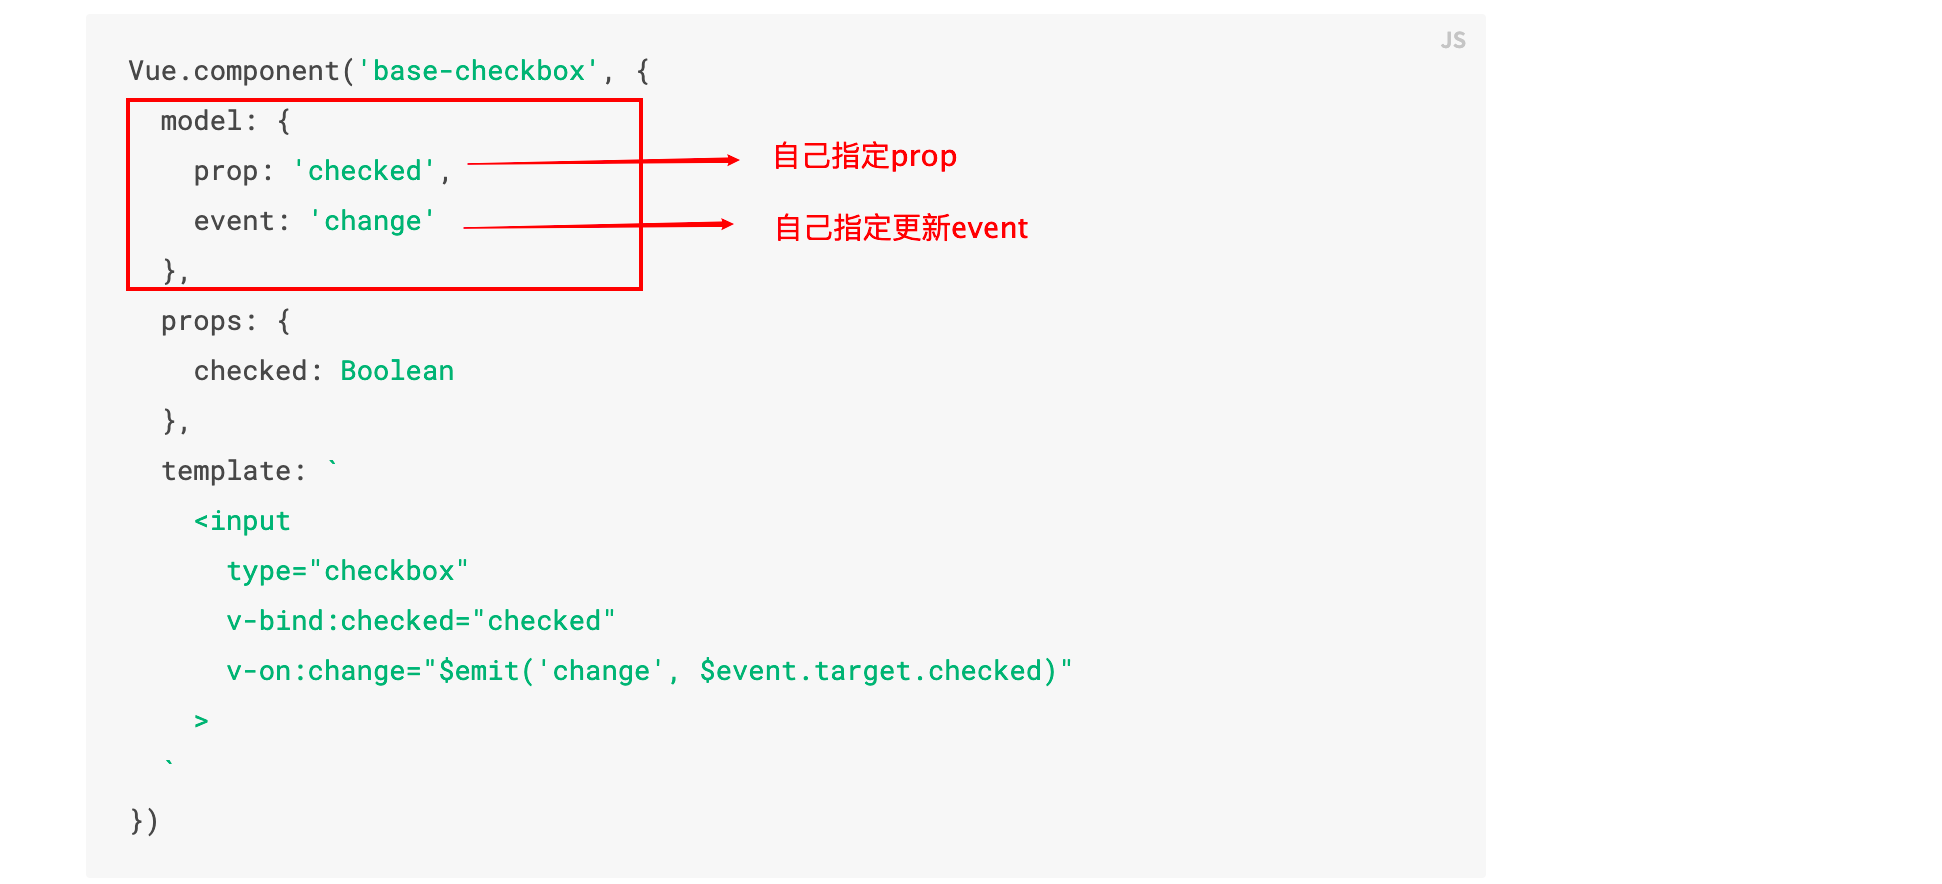
当然,v-model也并不是一定只能监听value属性和input事件,Vue为我们提供了自定义属性及更新事件的功能:
自定义组件的v-model
到这里,我们使用v-model/.sync更简单的实现了功能。
Vue可以让我们通过$parent/$children来直接访问到父组件或子组件实例,这样就可以直接使用组件实例中的任意属性和方法。
<template>
  <div class="demo-access-instance">
    <h2>parent:{{ count }}</h2>
    <h2>child:{{ child.count }}</h2>
    <demo-child>
    </demo-child>
    <button @click="addCount">parent click</button>
  </div>
</template>

<script>
import DemoChild from './demo-child';

export default {
  name: 'DemoAccessInstance',
  components: {
    DemoChild
  },
  data () {
    return {
      count: 0,
      child: {}
    };
  },
  computed: {},
  mounted () {
    this.child = this.$children[0];
  },
  methods: {
    addCount () {
      this.count++;
    }
  }
};
</script>在父组件挂载完成后,通过this.$chilren[0]获取到了子组件实例,之后直接通过子组件实例来访问子组件的count属性。
<template>
  <div class="demo-child">
    <button @click="addCount">child click</button>
    <button @click="addParentCount">child:update parent count</button>
  </div>
</template>

<script>
export default {
  name: 'DemoChild',
  props: {},
  data () {
    return {
      count: 0
    };
  },
  methods: {
    addCount () {
      this.count++;
    },
    addParentCount () {
      this.$parent.count++;
    }
  }
};
</script>在子组件中,也可以通过this.$parent来直接获取到父组件的count属性进行更新。
在很多情况下,我们并不需要重新封装一个组件,而是只需要在旧有组件的基础上再添加一些功能。这里我们就用到了$attrs和$listenners属性,而$attrs又会与inheritAttrs属性一起使用。
先看一下这些属性的用途:
$attrs: 包含父作用域中绑定的没有被识别或提取为props的属性(class和style除外)inheritAttrs: 默认的,父作用域中没有被作为props识别的属性将会"回退",并且作为正常的HTML属性应用到子组件的根元素。设置inheritAttrs为false,将会禁用这个默认行为。$listenners: 包含父作用域中v-on绑定的监听器(不包括.native修饰符绑定的监听器)
假设我们有demo-grandson组件,可以接收count进行展示,并且接受addCount方法来更新count。
而现在我们想要在不改变demo-grandson的基础上,再实现一个组件,它具有demo-grandson的所有功能,并且还可以展示标题。代码如下:
<!-- 父组件 -->
<template>
  <div class="demo-all-props">
    <demo-child
      :count="count"
      @add-count="addCount"
      title="访问所有属性"
    >
    </demo-child>
    <button @click="addCount">parent click</button>
  </div>
</template>
<!-- 子组件 -->
<template>
<div class="demo-child">
<h1>{{ title }}</h1>
<demo-grandson
v-bind="$attrs"
v-on="$listeners"
>
</demo-grandson>
</div>
</template>
<script>
import DemoGrandson from './demo-grandson';
export default {
name: 'DemoChild',
inheritAttrs: false,
props: {
title: {
type: String,
required: true
}
},
components: {
DemoGrandson
},
};
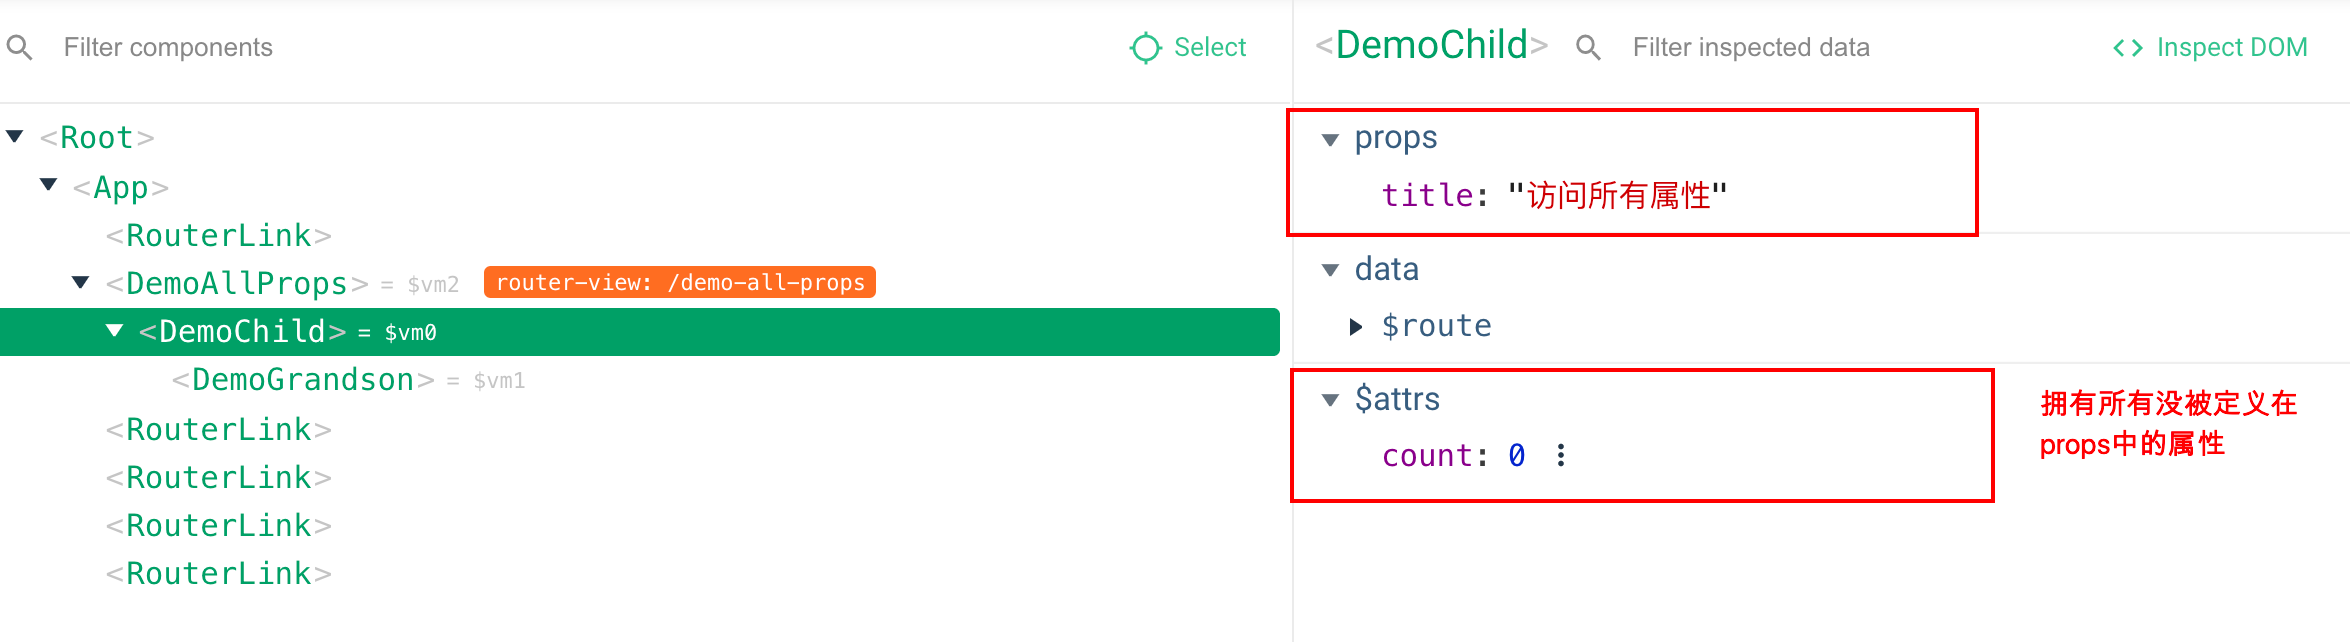
</script>子组件中的$attrs为除title外的所有根元素中传入的属性组成的对象,配合inheritAttrs: false,并不会让其作为正常的HTML属性在element中展示。之后再配合v-bind将属性分发到demo-grandson上:
$listeners中包含v-on(即@)中绑定的所有事件监听函数,同理通过v-on分发到demo-grandson上:

这样demo-grandson中有再多的属性和事件,我们都可以通过v-bind=$attrs和v-on=$linstenners进行传入。而不用每次都在props中定义,然后再单独在子组件标签上通过:和@来进行绑定。
这俩个属性在对项目中用到的ui组件库进行二次封装时尤其好用,既可以保证使用原有组件所有的api,还可以额外封装一些项目中复用度高的功能。
provide/inject通常用于跨层级传参,不管组件的层级有多深,都可以通过inject来获得父组件provide提供的内容。
provide/inject的数据传递思路如下:
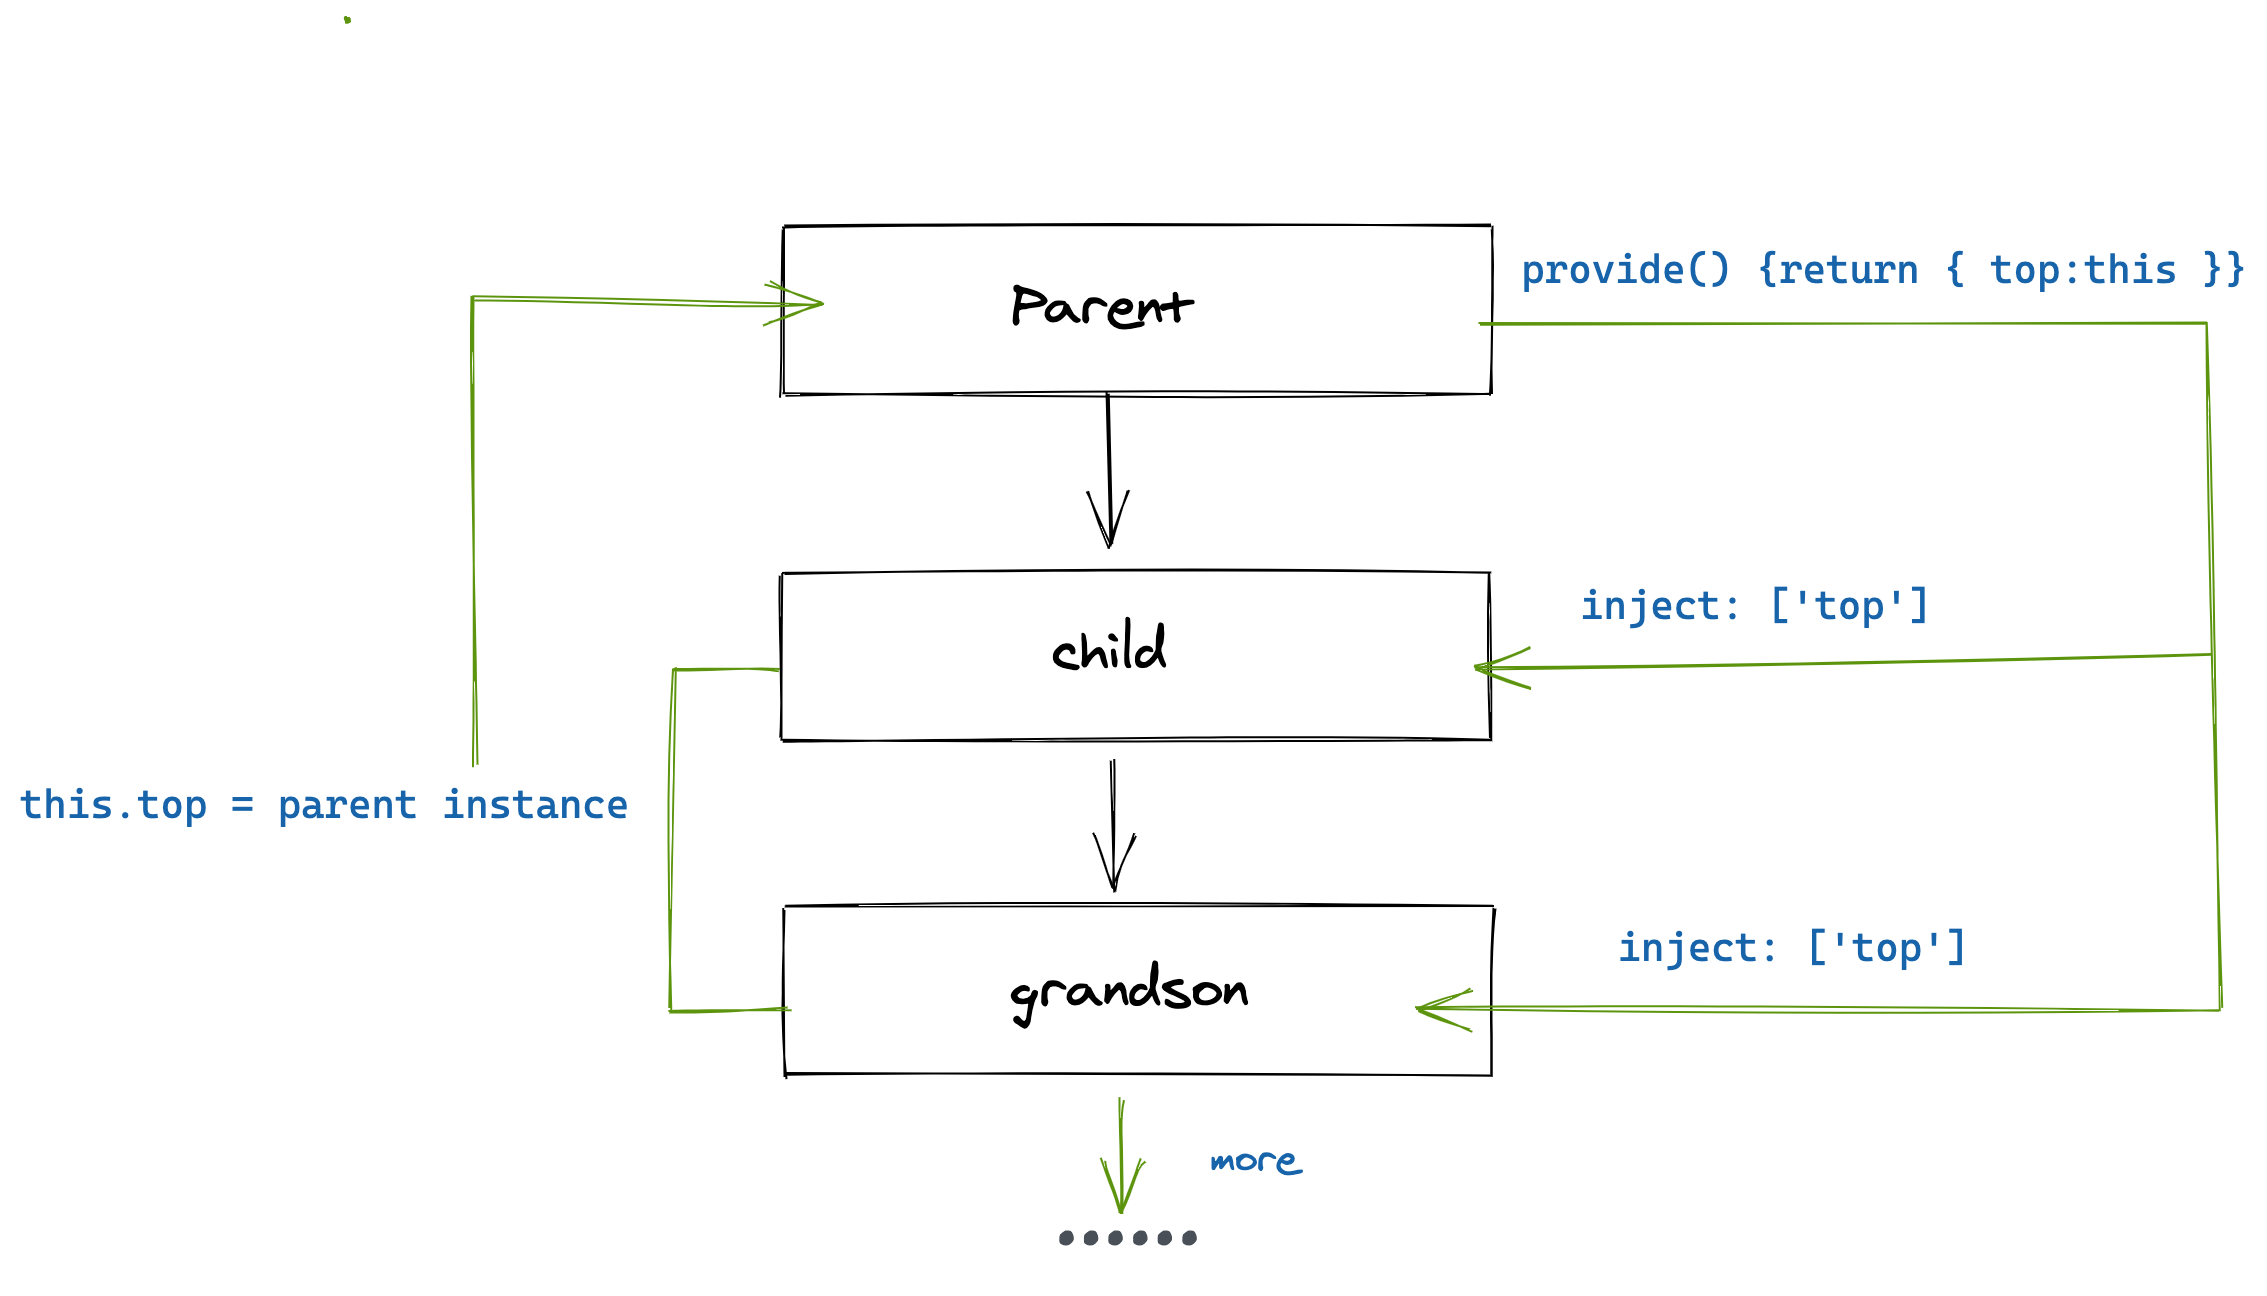
通常情况下,我们会将父组件的实例通过provide传入,这样子组件通过inject就可以直接获取到父组件的实例,从而可以使用到父组件实例中定义的任意属性和方法,我们把之前的例子通过provide/inject来进行实现:
<!--parent-->
<template>
  <div class="demo-provide-inject">
    <demo-child></demo-child>
  </div>
</template>

<script>
import DemoChild from './demo-child';

export default {
  name: 'DemoProvideInject',
  provide () {
    return { top: this };
  },
  components: { DemoChild },
  data () {
    return { count: 0 };
  },
  methods: {
    addCount () {
      this.count++;
    }
  }
};
</script>在子组件中调用addCount方法
<template>
  <div class="demo-child">
    <demo-grandson></demo-grandson>
    <button @click="top.addCount">child click</button>
  </div>
</template>

<script>
import DemoGrandson from './demo-grandson';

export default {
  name: 'DemoChild',
  inject: ['top'],
  components: {
    DemoGrandson
  },
};
</script>在孙子组件中渲染count到页面中,并且通过按钮来更新count:
<template>
  <div class="demo-grandson">
    <h2>child: {{ top.count }}</h2>
    <button @click="top.addCount">grandson click</button>
  </div>
</template>

<script>
export default {
  name: 'DemoGrandson',
  inject: ['top'],
};
</script>当我们的组件层级比较深的时候,我们需要一层一层向下传递事件,而当更新父组件中的某个属性时,又需要一层一层的将更新向上通知,大概的逻辑如下:
.png)
为了可以直接通过子组件更新父组件,而不再用经历中间的事件监听步骤,我们可以递归遍历找到父组件的子组件(demo-child),然后调用它的$emit('event-name')来更新父组件中的属性。这便是$dispatch方法的核心思路,代码如下:
Vue.prototype.$dispatch = function (ComponentName, event, ...args) {
  let parent = this.$parent;
  while (parent) { //
    const { name } = parent.$options;
    // 递归查找父组件,如果组件名满足要求的话,调用组件实例的$emit方法
    if (name === ComponentName) {
      parent.$emit(event, ...args);
      break;
    }
    parent = parent.$parent;
  }
};而$broadcast方法可以帮我们在父组件中直接调用较深层的子组件的$emit('eventName')方法,从而通过子组件的父组件更改传入到子组件的值(在本例中为grandson传入到great-grandson中的name属性),代码如下:
Vue.prototype.$broadcast = function (ComponentName, event, ...args) {
  for (let i = 0; i < this.$children.length; i++) {
    const child = this.$children[i];
    const { name } = child.$options;
    // 如果找到满足的子组件,调用$emit方法
    if (name === ComponentName) {
      child.$emit(event, ...args);
    } else {
      if (child.$children) {
        // 继续递归查找符合要求的子组件
        child.$broadcast(ComponentName, event, ...args);
      }
    }
  }
};
在原型上添加了对应的方法后,我们便可以在组件中通过组件实例来直接调用:
<!-- 父组件 -->
<template>
  <div class="demo-extend-proto">
    <h2>parent: {{ count }}</h2>
    <demo-child
      :count="count"
      @add-count="addCount"
    >
    </demo-child>
    <button @click="changeName">parent:change name</button>
  </div>
</template>

<script>
import DemoChild from './demo-child';

export default {
  name: 'DemoExtendProto',
  components: { DemoChild },
  data () {
    return {
      count: 0
    };
  },
  methods: {
    addCount (params) {
      this.count++;
    },
    changeName () {
      // 更新直接name属性
      this.$broadcast('DemoGreatGrandson', 'change-name', 'xxx');
    }
  }
};
</script>
<!-- 子组件 -->
<template>
<div class="demo-child">
<demo-grandson></demo-grandson>
<button @click="$emit('add-count')">child click</button>
</div>
</template><!-- grandson -->
<template>
<div class="demo-grandson">
<great-grandson :name="name" @change-name="changeName"></great-grandson>
<button @click="addCount">grandson click</button>
</div>
</template>
<script>
export default {
name: 'DemoGrandson',
// ... some code
data () {
return {
name: '张三'
};
},
methods: {
addCount () {
// 直接通知父组件更新count
this.$dispatch('DemoChild', 'add-count', 'xxx');
},
changeName () {
this.name = this.name + 1;
}
}
};
</script><template>
<div class="demo-great-grandson">
<h2>great grandson:{{ name }}</h2>
<button @click="addCount">great-grandson: click</button>
</div>
</template>
<script>
export default {
// ... some code
props: {
name: {
type: String,
}
},
methods: {
addCount () {
// 直接通知父组件更新count
this.$dispatch('DemoChild', 'add-count', 'xxx');
},
}
};
</script>上边代码的逻辑大概如下:
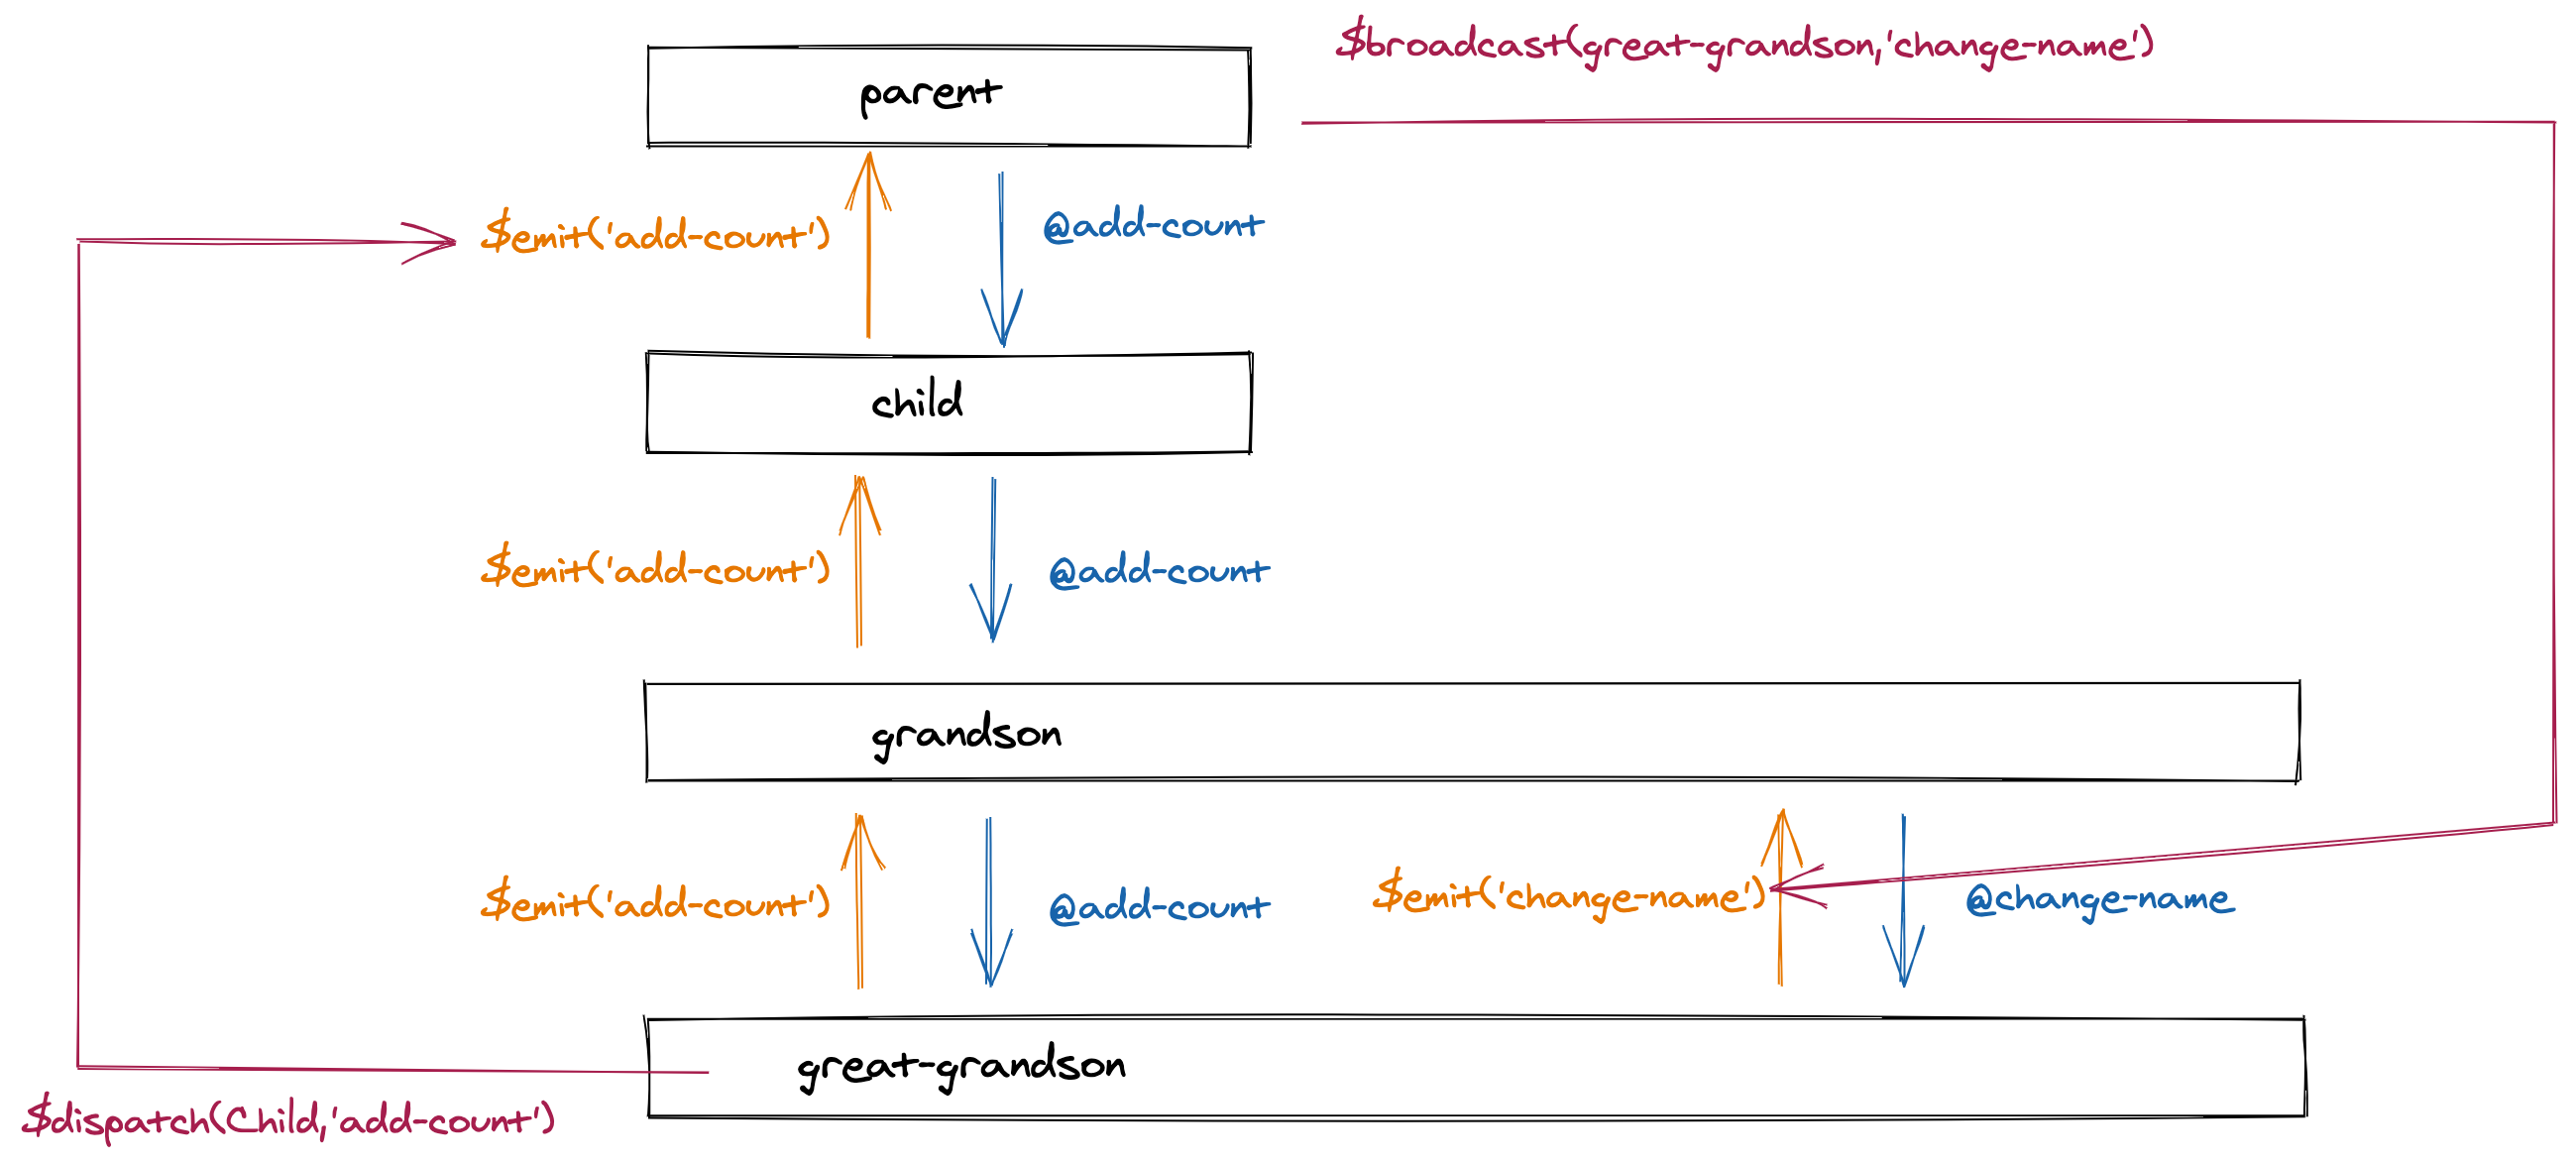
现在我们便可以通过$dispatch/$broadcast来实现跨层级调用$emit方法,少写一些进行事件监听的@和$emit代码。
上述代码参考element ui源码中$dispatch/$broadcast的相应实现:
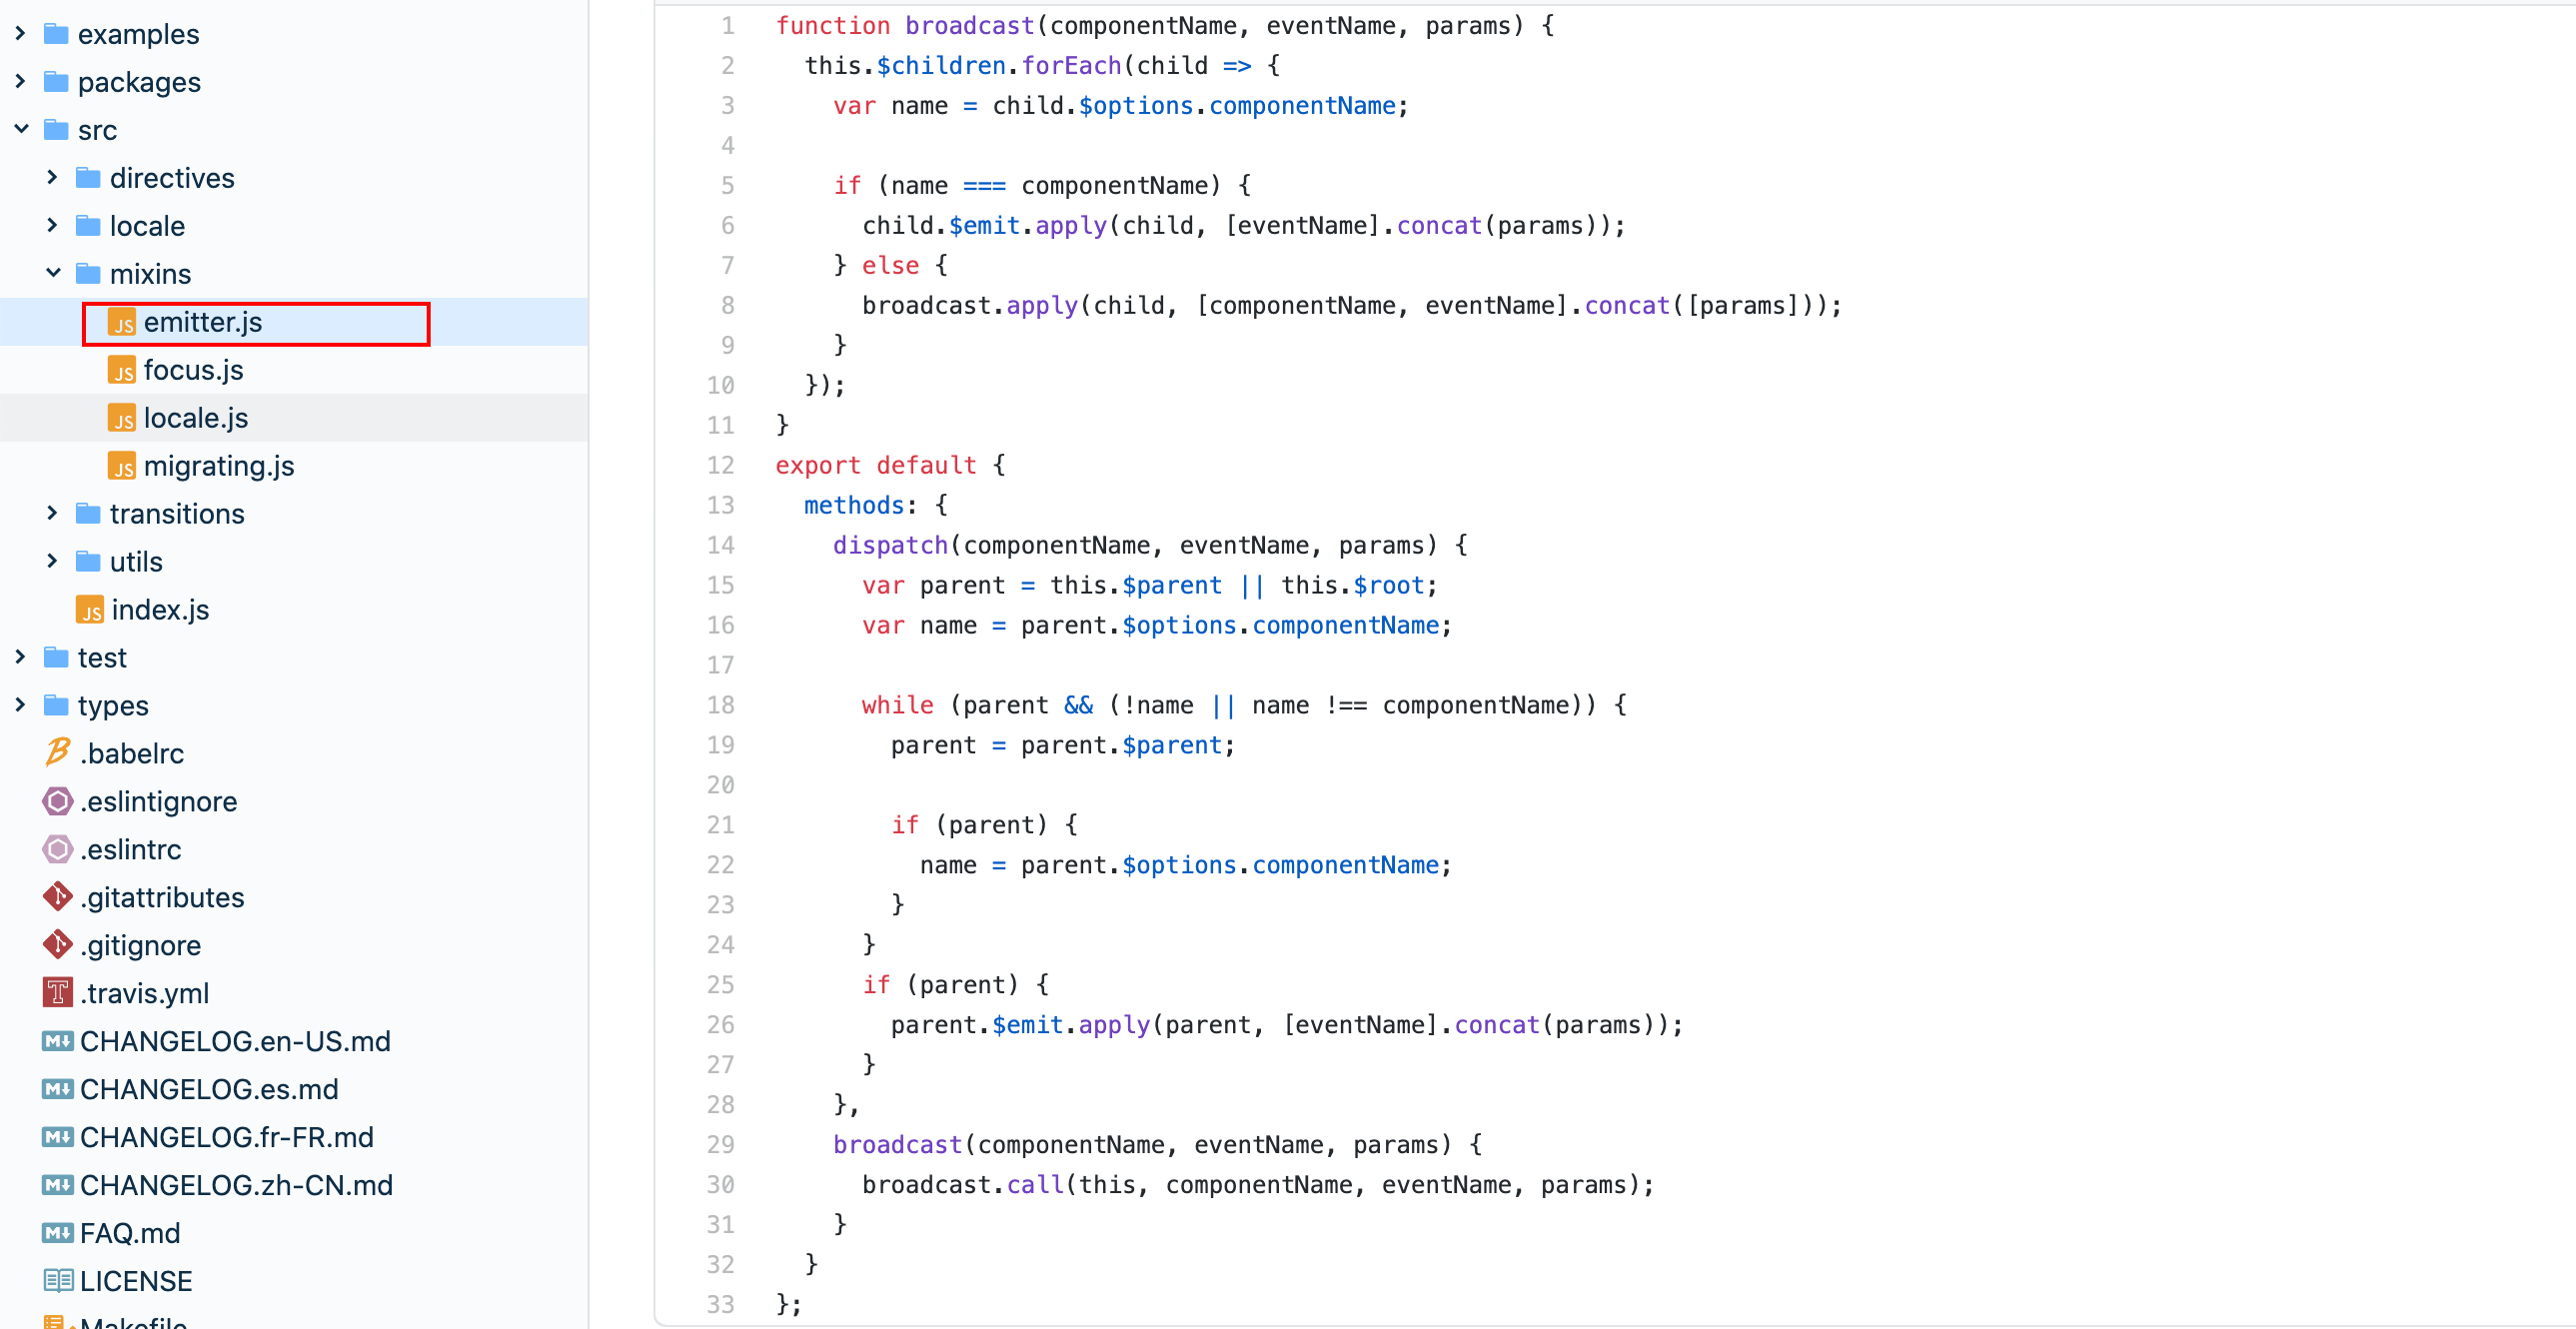
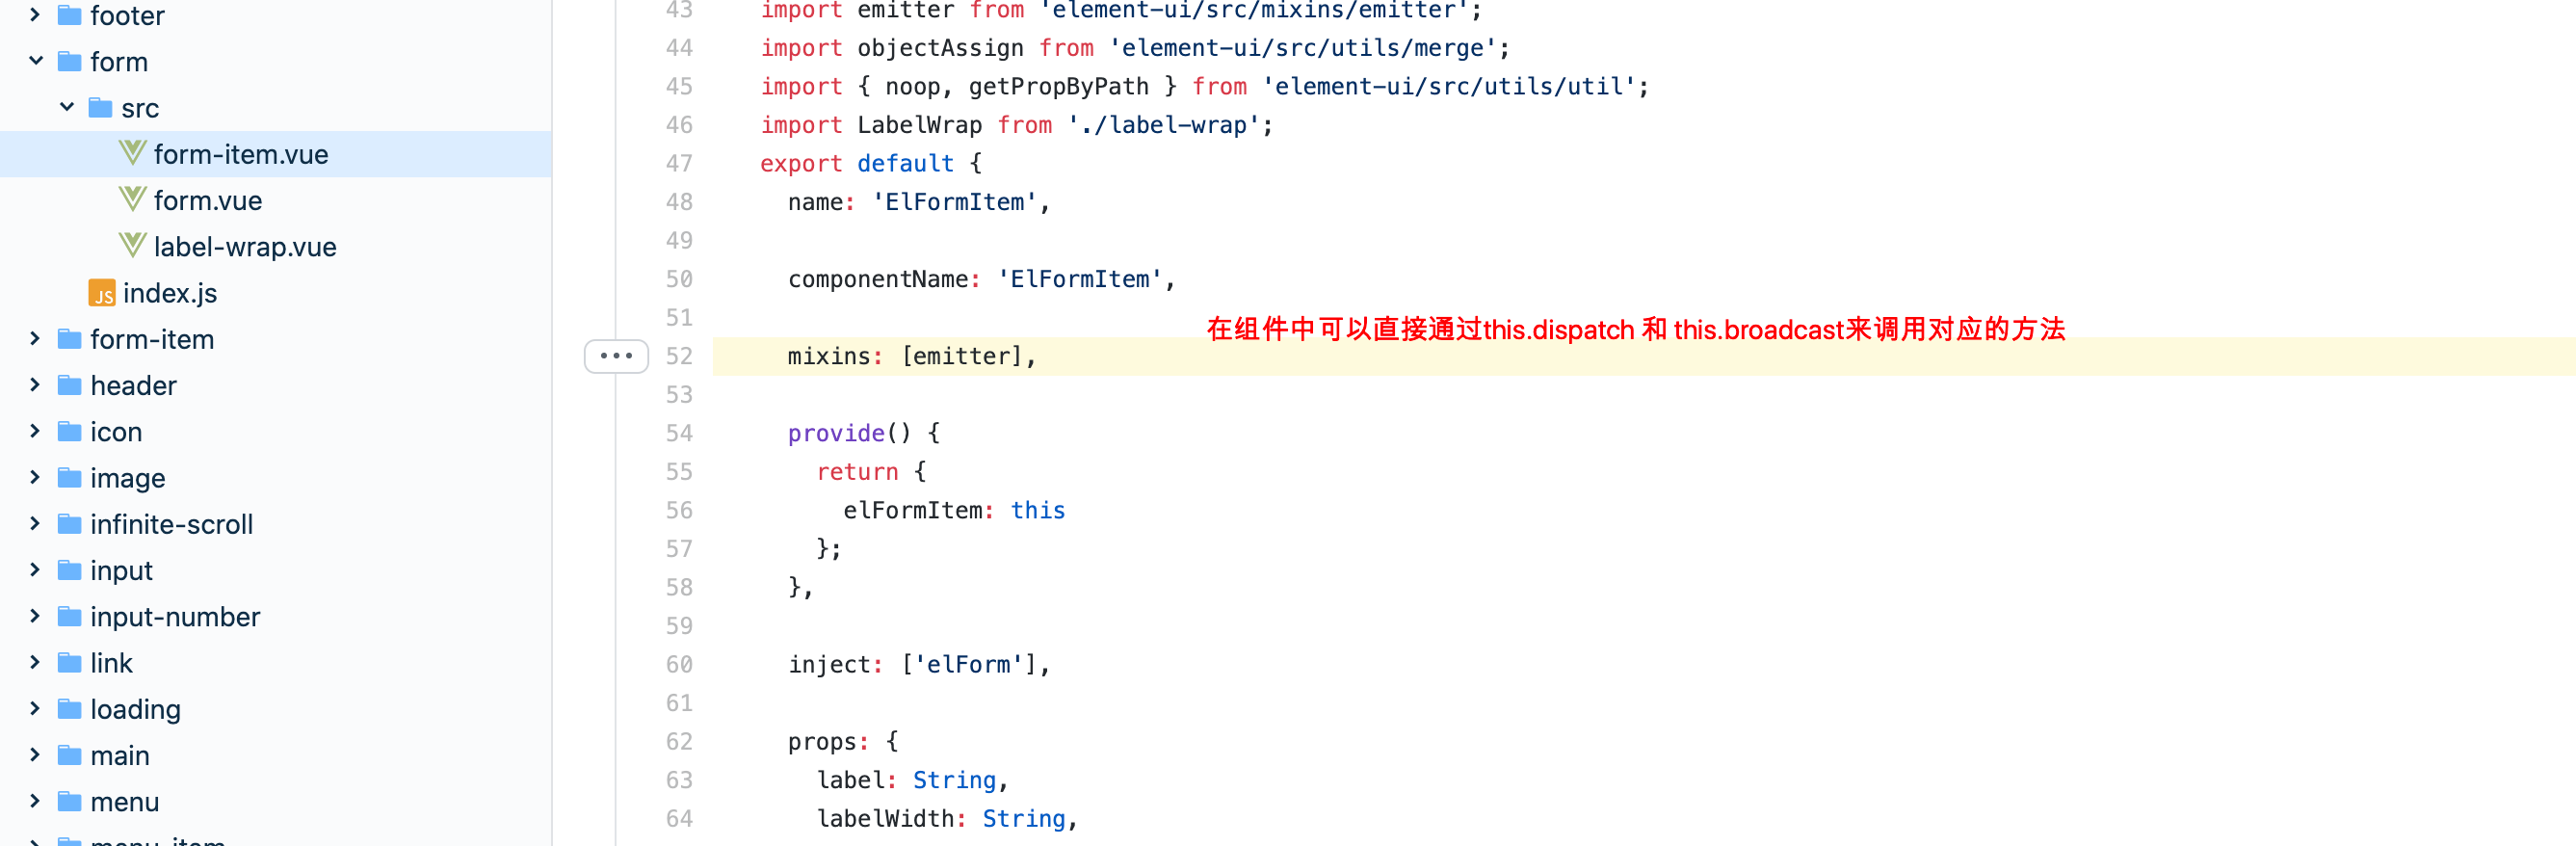
elememnt ui并没有将方法挂载到Vue的原型上,而是定义了mixins中,最终可以通过mixins属性来混入到组件中进行使用:
截图中的代码地址,有兴趣的小伙伴可以点击链接直接查看:
Vue通过$emit/$on实现了事件的发布订阅机制,通过$on来订阅事件,通过$emit来触发$on订阅的事件,并将需要的参数传入。我们也可以借助Vue的$emit和$on属性,来进行组件之间的函数调用以及参数传递。
首先我们需要在Vue的原型上扩展$bus属性,方便直接在组件中通过this.$bus来进行调用:
Vue.prototype.$bus = new Vue();$bus的值是一个新的Vue实例,所以它可以调用Vue实例的$emit和$on方法。
在父组件挂载完毕后,我们通过$bus.$on来订阅事件:
<template>
  <div class="demo-bus">
    <demo-child :count="count"></demo-child>
  </div>
</template>
<script>
import DemoChild from './demo-child';

export default {
  name: 'DemoBus',
  components: {
    DemoChild
  },
  data () {
    return {
      count: 0
    };
  },
  mounted () {
    this.initListeners();
  },
  methods: {
    initListeners () {
      this.$bus.on('add-count');
    },
    addCount () {
      this.count++;
    }
  }
};
</script>在子组件和孙子组件中,可以通过$bus.$emit来通知执行对应的订阅事件来更新count属性:
<!-- 子组件 -->
<template>
  <div class="demo-child">
    <h2>child: {{ count }}</h2>
    <demo-grandson></demo-grandson>
    <button @click="$bus.$emit('add-count')">child click</button>
  </div>
</template>
<!-- 孙子组件 -->
<template>
<div class="demo-grandson">
<button @click="$bus.$emit('add-count')">grandson click</button>
</div>
</template>不管组件层级有多深,我们都可以通过约定好的名字(例子中是add-count)来直接调用父组件中的订阅函数。
对于稍大规模一点的项目来说,通过Vuex来管理全局状态是比较好的选择。我们可以在任意组件使用Vuex中的state,并且可以通过commit一个mutation来更新状态。
下面我们用Vuex来再次实现count累加的例子。
首先在store中定义state和mutation:
export default new Vuex.Store({
  state: {
    count: 0
  },
  mutations: {
    addCount (state, count) {
      state.count++;
    }
  },
});可以在任意组件中引入,并且更改state。
每个文件中引入Vuex辅助函数的代码如下:
import { mapMutations, mapState } from 'vuex';

export default {
  // ... some code
  computed: {
    ...mapState(['count'])
  },
  methods: {
    ...mapMutations(['addCount'])
  }
};HTML模板代码:
<!-- 父组件 -->
<template>
  <div class="demo-props">
    <h2>{{ count }}</h2>
    <demo-child>
    </demo-child>
    <button @click="addCount">parent click</button>
  </div>
</template>

<!-- 子组件 -->
<template>
  <div class="demo-child">
    <h2>child: {{ count }}</h2>
    <demo-grandson></demo-grandson>
    <button @click="addCount">child click</button>
  </div>
</template>

<!-- 孙子组件 -->
<template>
  <div class="demo-grandson">
    <h2>grandson count: {{ count }}</h2>
    <button @click="addCount">grandson click</button>
  </div>
</template>现在我们可以通过Vuex辅助函数在实例上提供的count属性和addCount方法,就可以在任意组件使用和更新count。
当我们能够熟练掌握组件之间的各种传参技巧后,在实际的工作以及面试中便能够更加的游刃有余、从容不迫。
我们面临一个实际问题之后,所思考的不再是如何进行组件传参,而是如何能更好的选择和设计一种比较灵活优雅的传参方法,提高程序的可读性和可扩展性。