ESP32 or ESP8266 and MAX7219 dot matrix display management
![]()
The latest firmware version can be found in Releases
- Home Assistant client [display sensor values]
- OpenWeatherMap client [display: temperature (C/F), humidity, pressure, wind speed, weather icon]
- MQTT client [each display zone support own topic]
- Display controll through MQTT
- Wall NTP clock [NTP sync clock]
- Manual input
- Full controll through web UI
- Home Assistant MQTT discovery [When MQTT settings specified, device will be automatically send discovery message to HA]
- Control display as light in Home Assistant [MQTT setup required]
- Initial setup through wifi AP and web UI
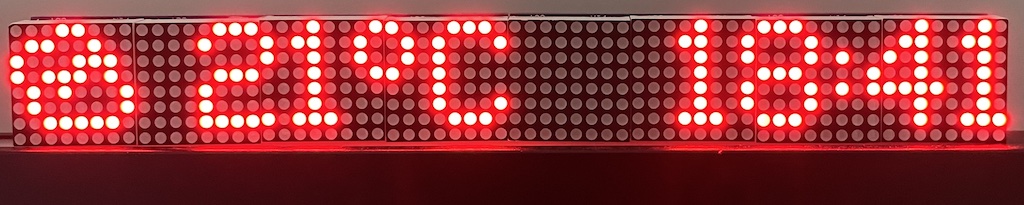
- Support 3 independent display zones
- Support up to 12 display segments at the same time [configured in web UI]
- Included 3 different fonts
- Plus symbols font
- Dot matrix display MAX7219, something like this: https://aliexpress.com/item/32618155357.html
- ESP32 or WeMos D1 Mini (ESP8266), something like this: https://aliexpress.com/item/32651747570.html
ESP32
// Display pinout
#define DATA_PIN  23         // ESP32 GPIO23
#define CS_PIN    5          // ESP32 GPIO5
#define CLK_PIN   18         // ESP32 GPIO18

// Ds18b20 pinout
const int oneWireBus = 4;    // ESP32 GPIO04
ESP8266
// Display pinout
#define DATA_PIN  D7         // WeMos D1 mini or ESP8266 -> GPIO13
#define CS_PIN    D6         // WeMos D1 mini or ESP8266 -> GPIO12
#define CLK_PIN   D5         // WeMos D1 mini or ESP8266 -> GPIO14

// Ds18b20 pinout
const int oneWireBus = D4;   // WeMos D1 mini or ESP8266 -> GPIO02
![]()
- Device will boot in wifi access point mode and write the wifi name and password on the display.
- AP wifi name: wledPixel-[short MAC address]
- AP wifi password: 12345678
- Connect to this AP and configure your wifi settings (connect to your wifi network)
- When the device connects to the WIFI network, the device's IP address will be displayed on the zone0
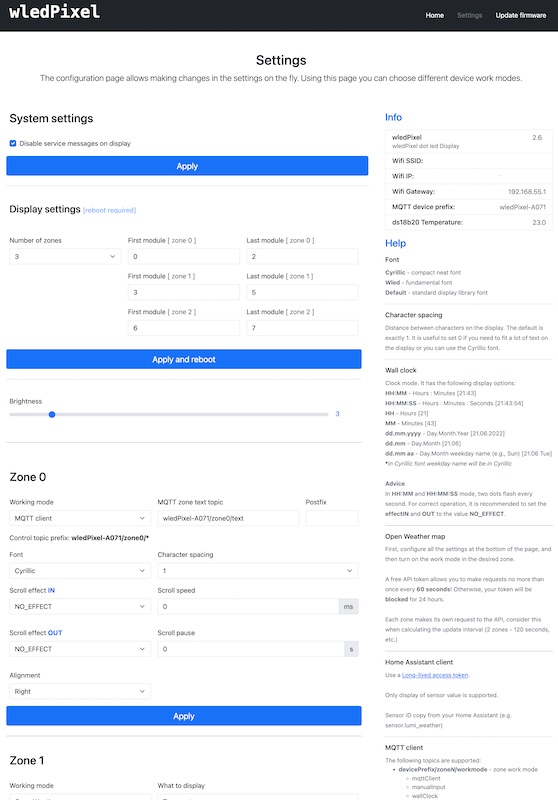
- Open the browser and go to the device IP address
/api/temperature - get measured temperature from connected ds18b20 sensor

1 - "X"
2 - "stop"
3 - "rain"
4 - "ip:"
8 - "full light segment"
A - "calendar"
B - "windows"
C - "clouds"
D - "door"
E - "female"
F - "snowflake"
G - "key"
H - "male"
I - "alarm"
J - "clock"
K - "garbage"
L - "info"
M - "moon"
N - "message"
O - "reminder"
P - "wifi"
R - "huge rain"
S - "sun"
T - "thunderstorm"
c - "cloud"
f - "fog"
m - "cloud and moon"
r - "rain"
s - "sun and cloud"
° - "degree symbol"
devicePrefix/zoneN/workMode- zone work modedevicePrefix/zoneN/scrolleffectIn- scroll effect INdevicePrefix/zoneN/scrolleffectOut- scroll effect OutdevicePrefix/zoneN/scrollspeed- scroll speeddevicePrefix/zoneN/scrollpause- scroll pausedevicePrefix/zoneN/scrollalign- scroll alignmentdevicePrefix/zoneN/charspacing- character spacingdevicePrefix/intensity- brightnessdevicePrefix/zoneN/workMode- zone work modedevicePrefix/power- display power control, support on / off values
where devicePrefix = wledPixel-A071 zoneN = zone number (e.g. Zone0)
workMode supported values:
mqttClient- MQTT clientmanualInput- Manual static text inputed in UIwallClock- NTP sync clockowmWeather- Open Weather Map clienthaClient- Home Assistant client
Wall clock mode support next following display options:
HH:MM- Hours : Minutes [21:43]HH:MM:SS- Hours : Minutes : Seconds [21:43:54]HH- Hours [21]MM- Minutes [43]dd.mm.yyyy- Day.Month.Year [21.06.2022]dd.mm- Day.Month [21.06]dd.mm aa- Day.Month weekday name (e.g., Sun) [21.06 Tue] *in Cyrillic font weekday name will be in Cyrillicaa- Weekday name (e.g. Sun) *in Cyrillic font weekday name will be in Cyrillic
Default effects:
PA_RANDOMPA_PRINTPA_SCAN_HORIZPA_SCROLL_LEFTPA_WIPEPA_SCAN_VERTXPA_SCROLL_UP_LEFTPA_SCROLL_UPPA_FADEPA_OPENING_CURSORPA_GROW_UPPA_SCROLL_UP_RIGHTPA_BLINDSPA_CLOSINGPA_GROW_DOWNPA_SCAN_VERTPA_SCROLL_DOWN_LEFTPA_WIPE_CURSORPA_SCAN_HORIZXPA_DISSOLVEPA_MESHPA_OPENINGPA_CLOSING_CURSORPA_SCROLL_DOWN_RIGHTPA_SCROLL_RIGHTPA_SLICEPA_SCROLL_DOWN
Send sensor value each time when a value has been changed
---
- alias: Outside temp change - send new temp to wled panel mqtt
  initial_state: 'on'
  trigger:
    platform: state
    entity_id: sensor.outside_thp_sensor_3
  action:
    - service: mqtt.publish
      data:
        topic: wledPixel-A071/zone0/text
        payload_template: "{{ states('sensor.outside_thp_sensor_3') }} C"
Change wledPixel-A071 to device name with your prefix