This is the source repository for the paper Latent-space Physics.
- Steffen Wiewel, Technical University of Munich
- Moritz Becher, Technical University of Munich
- Nils Thuerey, Technical University of Munich
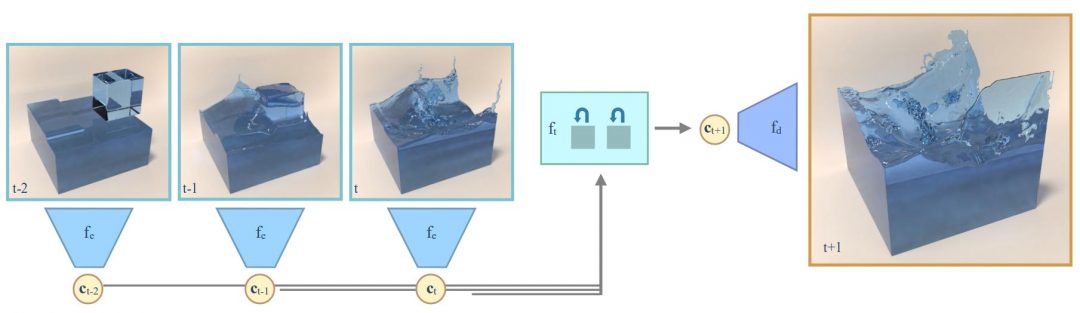
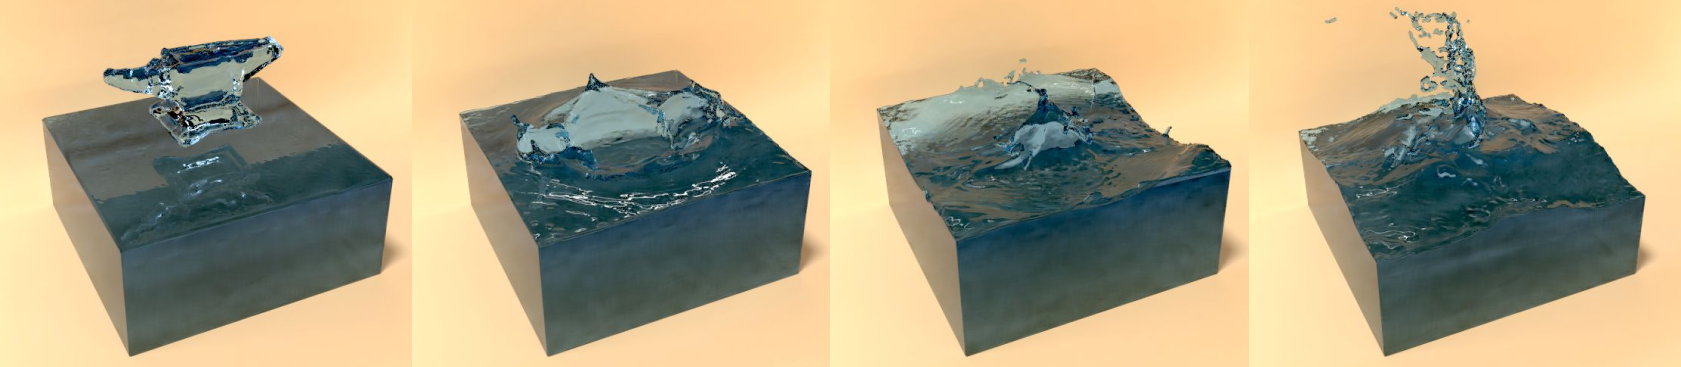
Our work explores methods for the data-driven inference of temporal evolutions of physical functions with deep learning techniques. More specifically, we target fluid flow problems, and we propose a novel network architecture to predict the changes of the pressure field over time. The central challenge in this context is the high dimensionality of Eulerian space-time data sets. Key for arriving at a feasible algorithm is a technique for dimensionality reduction based on convolutional neural networks, as well as a special architecture for temporal prediction. We demonstrate that dense 3D+time functions of physics system can be predicted with neural networks, and we arrive at a neural-network based simulation algorithm with practical speed-ups. We demonstrate the capabilities of our method with a series of complex liquid simulations, and with a set of single-phase simulations. Our method predicts pressure fields very efficiently. It is more than two orders of magnitudes faster than a regular solver. Additionally, we present and discuss a series of detailed evaluations for the different components of our algorithm.
This installation guide focusses on Ubuntu 14.04 as a distribution. The process will however look very similar with other distributions, the main differences being the package manager and library package names.
First, install a few pre-requisites:
sudo apt-get install cmake g++ git python3-dev qt5-qmake qt5-default
Then, change to the directory to install the source code in, and obtain the current sources from the repository (or alternatively download and extract a source code package)
cd <gitdir>
To build the project using CMake, set up a build directory and choose the build options (explanation)
mkdir mantaflow/build
cd mantaflow/build
cmake .. -DGUI=ON -DOPENMP=ON -DNUMPY=ON -DPYTHON_VERSION=3.6
make -j4
That's it! You can now test mantaflow using an example scene
./manta ../scenes/examples/simpleplume.py
Common Linux problems:
- In conjunction with tensorflow, it can easily happen these days that you have multiple version of python installed. If cmake for mantaflow finds a different one than you're using for tensorflow, you will get errors such as ''ImportError: no module named XXX''. To fix this problem, manually select a python version in cmake with -DPYTHON_VERSION=X.Y
- It is also possible to directly specify the directory in which the python installation resides as follows:
DPYTHON_INCLUDE_DIR=/PATH/TO/PYTHONENV/include/python3.6mDPYTHON_LIBRARY=/PATH/TO/PYTHONENV/lib/libpython3.6m.so
Further information on the installation process can be found on the project website http://mantaflow.com/.
The code was created and tested with TensorFlow 1.7.0, CUDA V9.0.176, CUDNN 7.0.5 and Keras 2.1.6. If errors arise make sure your installation is correct.
After checking your installation install the following packages:
pip install tensorflow-gpu keras numpy sklearn imageio scipy matplotlib h5py
In this example we generate a simple 2D dataset in the resolution 64. To make things more interesting we actually generate a 128 simulation and downsample the fields accordingly. In the following we present the commands needed to train the total_pressure model that predicts future pressure fields.
Make sure you are in the <gitdir>/mantaflow/ directory.
cd <gitdir>/mantaflow/
./build/manta scenes/dpfn_dataset.py --name=2D_liquid64 --dimension 2 --type liquid -n 1000 -s 100 -w 50 --seed 10 --resolution 128 --zoom 0.5
The resulting dataset is stored in the <gitdir>/datasets/2D_liquid64/ directory. You can even supervise the simulation process by adding --gui to the command. This only works when Mantaflow is installed with QT support.
After the generation process finished the dataset properties should be evaluated using the following commands:
cd ../src
python -m dataset.dataset_properties --dataset ../datasets/2D_liquid64/ --chunk_size 20
Depending on the available RAM the chunk_size setting should be adjusted.
Afterwards a properties.json should be placed in the <gitdir>/datasets/2D_liquid64/ directory containing a large listing of different properties of the data.
For the total pressure prediction approach, the value in ["pressure"]["Percentile99_9"]["Total"] is the most important one.
Write this value down since it is later used to normalize your input data. In our example case the value is ~3.8.
Now the training data was generated successfully and we already have the normalization value for the quantity in question, the total pressure field.
cd <gitdir>/src
Adjust the settings.json if your pressure percentile value is different from 3.8.
To do so edit the value in ["dataset"]["pressure_normalization_factor"].
If needed also adjust the batch size of the autoencoder training by changing ["ae"]["batch_size"] accordingly.
To train only the autoencoder model execute the following command in the <gitdir>/src/ directory:
python train_total.py --name total_2D_liquid64 --dataset 2D_liquid64 --ae_epochs 40 --ae_pretrainepochs 0 --lstm_epochs 0 --chunk_size 20 --ae_evaluate --ae_loss mse
Note that train_total.py is the python script needed to train the total_pressure model. If the model should predict velocity fields instead, train_vel.py needs to be called accordingly.
After the training process the final autoencoder model should reside under the given name total_2D_liquid64 in the projects directory <gitdir>/projects/. The images with name scheme AE_EncDec_{Number}.png display a direct comparison of the Ground Truth to the encoded and then directly decoded autoencoder version. The images starting with Pressure_Eval_Plot_{Number}.png all show the same Ground Truth but evaluated after each epoch to track the training progress.
If the results look good enough we can now move on to training the prediction network.
To train the prediction network we specify to load the previously generated autoencoder model in project total_2D_liquid64 without training it ae_epochs = 0. At first we specify to train only one lstm epoch. This is done due to the sequence training data generation taking place before the actual training process. The results are stored in the specified dataset directory <gitdir>/datasets/2D_liquid64/encoded_total_pressure.npz and <gitdir>/datasets/2D_liquid64/enc_scene_list_encoded_total_pressure{_normalized}.png.
python train_total.py --name total_2D_liquid64 --dataset 2D_liquid64 --ae_epochs 0 --ae_pretrainepochs 0 --lstm_epochs 1 --chunk_size 20 --ae_loss mse --ae_load total_2D_liquid64
Before training the prediction network make sure to select a good normalization factor so that the enc_scene_list_encoded_total_pressure_normalized.png is in the range [-1,1] by adjusting the ["dataset"]["pressure_encoded_total_normalization_factor"] in the settings.json to a more fitting value.
The enc_scene_list_encoded_total_pressure_normalized.png is re-created on every execution of the following call:
python train_total.py --name total_2D_liquid64 --dataset 2D_liquid64 --ae_epochs 0 --ae_pretrainepochs 0 --lstm_epochs 50 --chunk_size 20 --lstm_evaluate 5 --ae_loss mse --ae_load total_2D_liquid64 --lstm_load_dataset
After the training is finished the lstm.h5 model is placed in the projects directory <gitdir>/projects/total_2D_liquid64/.
To use the prediction network in a simulation environment the dpfn_prediction.py script is used. It is implemented as a Mantaflow scene and therefore it is necessary to switch to the mantaflow directory.
cd <gitdir>/mantaflow
To finally execute one of the benchmark scenes with the trained models the following command is used:
./build/manta scenes/dpfn_prediction.py --name="total_2D_liquid64" --project="total_2D_liquid64" -w 50 -s 100 -i 5 -pt total_pressure --benchmark 1
The parameter name stands for the name of the output directory in the <gitdir>/predictions/ folder. Resulting in a final path of <gitdir>/predictions/total_2D_liquid64_Bench1/. The parameters w, s, i stand for the warmup steps, the simulation steps that are executed after the warmup phase and the prediction interval as described in the paper, respectively. -pt total_pressure sets the prediction mode to the total pressure approach. This needs to match the mode of the trained model.
The following links lead to a trained version of the Total Pressure Autoencoder as well as the trained LSTM Prediction network and two liquid datasets (small/large). The large dataset was used to train the networks.
After unpacking, the datasets must be copied to the <gitdir>/datasets directory whereas the network models must be copied to the <gitdir>/projects directory.
- Total Pressure Model
- Small Simulation Dataset (10 scenes with 100 frames each)
- Large Simulation Dataset (1000 scenes with 100 frames each)
- Total Pressure Model:
<gitdir>/projects/total_2D_liquid64/ - Small Simulation Dataset:
<gitdir>/datasets/2D_liquid64_10/ - Large Simulation Dataset:
<gitdir>/datasets/2D_liquid64/