Skip to content
New issue

Have a question about this project? Sign up for a free GitHub account to open an issue and contact its maintainers and the community.

By clicking “Sign up for GitHub”, you agree to our terms of service and privacy statement. We’ll occasionally send you account related emails.

Already on GitHub? Sign in to your account

【libuv 源码学习笔记】子进程与ipc #3

Open
xiaoxiaojx opened this issue May 28, 2021 · 0 comments
Open

【libuv 源码学习笔记】子进程与ipc #3

xiaoxiaojx opened this issue May 28, 2021 · 0 comments
Labels
libuv libuv is a multi-platform support library with a focus on asynchronous I/O. It was primarily develop

Comments

@xiaoxiaojx
Copy link
Owner

xiaoxiaojx commented May 28, 2021

image

Table of Contents

1. 前言

开始写一些博客主要是在看完代码后再温故总结一遍, 也是为了后面回头也能查阅。本系列会从官网的例子出发, 尽可能以链路追踪的方式记录其中源码核心模块的实现, 本篇例子来源

涉及的知识点

2. 例子 spawn/main.c

创建一个子进程的例子。

uv_loop_t *loop;
uv_process_t child_req;
uv_process_options_t options;
int main() {
    loop = uv_default_loop();

    char* args[3];
    args[0] = "mkdir";
    args[1] = "test-dir";
    args[2] = NULL;

    options.exit_cb = on_exit;
    options.file = "mkdir";
    options.args = args;

    int r;
    // 🔥 开始创建子进程
    if ((r = uv_spawn(loop, &child_req, &options))) {
        fprintf(stderr, "%s\n", uv_strerror(r));
        return 1;
    } else {
        fprintf(stderr, "Launched process with ID %d\n", child_req.pid);
    }

    return uv_run(loop, UV_RUN_DEFAULT);
}

3. 例子 thread-loader

这里还想记录一下以前看 thread-loader 的代码, 当时困惑的一个点本篇文章看完也能得到解释

// WorkerPool.js 主进程

this.worker = childProcess.spawn(process.execPath, [].concat(sanitizedNodeArgs).concat(workerPath, options.parallelJobs), {
	detached: true,
	stdio: ['ignore', 'pipe', 'pipe', 'pipe', 'pipe'],
});
    
const [, , , readPipe, writePipe] = this.worker.stdio;
this.readPipe = readPipe;
this.writePipe = writePipe;
// worker.js 子进程

const writePipe = fs.createWriteStream(null, { fd: 3 });
const readPipe = fs.createReadStream(null, { fd: 4 });

thread-loader 经常会从主进程拷贝大量的文件数据到子进程去交给 loader 处理, 结果又会传给主进程。

  1. 如果使用标准输入输出的管道通信的话, 会有其他干扰的日志打印影响结果
  2. 如果使用 ipc 通信的话, 效率又会显得低下

那么开阔额外的管道, 通过 pipe 的形式通信, 不但可以减小内存消耗又能提高效率。

// ipc 可以类比一次全部返回数据, pipe 类比于流的形式返回数据

ipc: fs.readFileSync('./big.file');
pipe: fs.createReadStream('./big.file');

3.1. uv_spawn

main > uv_spawn

uv_spawn 创建一个子进程, 主要包括以下几步

  1. 调用 uv__process_init_stdio 根据 options.stdio 设置进程间通信的 fd
  2. 调用 uv__make_socketpair 创建进程间通信的管道
  3. 调用 uv__process_child_init 逐个把子进程的 files文件指针数组 重定向到第2步进程通信的管道
  4. 调用 uv__process_open_stream 主进程流的i/o观察者
// deps/uv/src/unix/process.c

int uv_spawn(uv_loop_t* loop,
             uv_process_t* process,
             const uv_process_options_t* options) {
#if defined(__APPLE__) && (TARGET_OS_TV || TARGET_OS_WATCH)
  /* fork is marked __WATCHOS_PROHIBITED __TVOS_PROHIBITED. */
  return UV_ENOSYS;
#else
  int signal_pipe[2] = { -1, -1 };
  int pipes_storage[8][2];
  int (*pipes)[2];
  int stdio_count;
  ssize_t r;
  pid_t pid;
  int err;
  int exec_errorno;
  int i;
  int status;
  ...
  // 简单的数据初始化
  uv__handle_init(loop, (uv_handle_t*)process, UV_PROCESS);
  QUEUE_INIT(&process->queue);

  // 确保标准输入,输出,错误
  stdio_count = options->stdio_count;
  if (stdio_count < 3)
    stdio_count = 3;

  err = UV_ENOMEM;
  pipes = pipes_storage;
  if (stdio_count > (int) ARRAY_SIZE(pipes_storage))
    pipes = uv__malloc(stdio_count * sizeof(*pipes));

  if (pipes == NULL)
    goto error;

  for (i = 0; i < stdio_count; i++) {
    pipes[i][0] = -1;
    pipes[i][1] = -1;
  }

  for (i = 0; i < options->stdio_count; i++) {
    // 🔥 uv__process_init_stdio
    err = uv__process_init_stdio(options->stdio + i, pipes[i]);
    if (err)
      goto error;
  }

  err = uv__make_pipe(signal_pipe, 0);
  if (err)
    goto error;

  uv_signal_start(&loop->child_watcher, uv__chld, SIGCHLD);

  /* Acquire write lock to prevent opening new fds in worker threads */
  uv_rwlock_wrlock(&loop->cloexec_lock);
  pid = fork();

  if (pid == -1) {
    err = UV__ERR(errno);
    uv_rwlock_wrunlock(&loop->cloexec_lock);
    uv__close(signal_pipe[0]);
    uv__close(signal_pipe[1]);
    goto error;
  }

  if (pid == 0) {
    // 这段逻辑只有子进程才会被运行 !!!
    uv__process_child_init(options, stdio_count, pipes, signal_pipe[1]);
    // 上面的运行正常, abort 不会被调用 
    abort();
  }

  /* Release lock in parent process */
  uv_rwlock_wrunlock(&loop->cloexec_lock);
  uv__close(signal_pipe[1]);

  process->status = 0;
  exec_errorno = 0;
  do
    r = read(signal_pipe[0], &exec_errorno, sizeof(exec_errorno));
  while (r == -1 && errno == EINTR);

  if (r == 0)
    ; /* okay, EOF */
  else if (r == sizeof(exec_errorno)) {
    do
      err = waitpid(pid, &status, 0); /* okay, read errorno */
    while (err == -1 && errno == EINTR);
    assert(err == pid);
  } else if (r == -1 && errno == EPIPE) {
    do
      err = waitpid(pid, &status, 0); /* okay, got EPIPE */
    while (err == -1 && errno == EINTR);
    assert(err == pid);
  } else
    abort();

  uv__close_nocheckstdio(signal_pipe[0]);

  for (i = 0; i < options->stdio_count; i++) {
    err = uv__process_open_stream(options->stdio + i, pipes[i]);
    if (err == 0)
      continue;

    while (i--)
      uv__process_close_stream(options->stdio + i);

    goto error;
  }

  /* Only activate this handle if exec() happened successfully */
  if (exec_errorno == 0) {
    QUEUE_INSERT_TAIL(&loop->process_handles, &process->queue);
    uv__handle_start(process);
  }

  process->pid = pid;
  process->exit_cb = options->exit_cb;

  if (pipes != pipes_storage)
    uv__free(pipes);

  return exec_errorno;
  ...
}

3.2. uv__process_init_stdio

main > uv_spawn > uv__process_init_stdio

通过 options.stdio 参数的设置, 决定进程间通信使用的 fd

  1. 如果通过 UV_CREATE_PIPE 的话, 会调用 uv__make_socketpair 方法, 该函数调用 socketpair 方法获取进程间的匿名管道用于通信
  2. 如果通过 UV_INHERIT_FD 或者 UV_INHERIT_STREAM, 会直接使用父进程的 fd。
static int uv__process_init_stdio(uv_stdio_container_t* container, int fds[2]) {
  int mask;
  int fd;

  mask = UV_IGNORE | UV_CREATE_PIPE | UV_INHERIT_FD | UV_INHERIT_STREAM;

  switch (container->flags & mask) {
  case UV_IGNORE:
    return 0;

  case UV_CREATE_PIPE:
    assert(container->data.stream != NULL);
    if (container->data.stream->type != UV_NAMED_PIPE)
      return UV_EINVAL;
    else
      return uv__make_socketpair(fds);

  case UV_INHERIT_FD:
  case UV_INHERIT_STREAM:
    if (container->flags & UV_INHERIT_FD)
      fd = container->data.fd;
    else
      fd = uv__stream_fd(container->data.stream);

    if (fd == -1)
      return UV_EINVAL;

    fds[1] = fd;
    return 0;

  default:
    assert(0 && "Unexpected flags");
    return UV_EINVAL;
  }
}

3.3. uv__make_socketpair

main > uv_spawn > uv__process_init_stdio > uv__make_socketpair

主要是调用 socketpair 函数, 创建进程间通信的管道

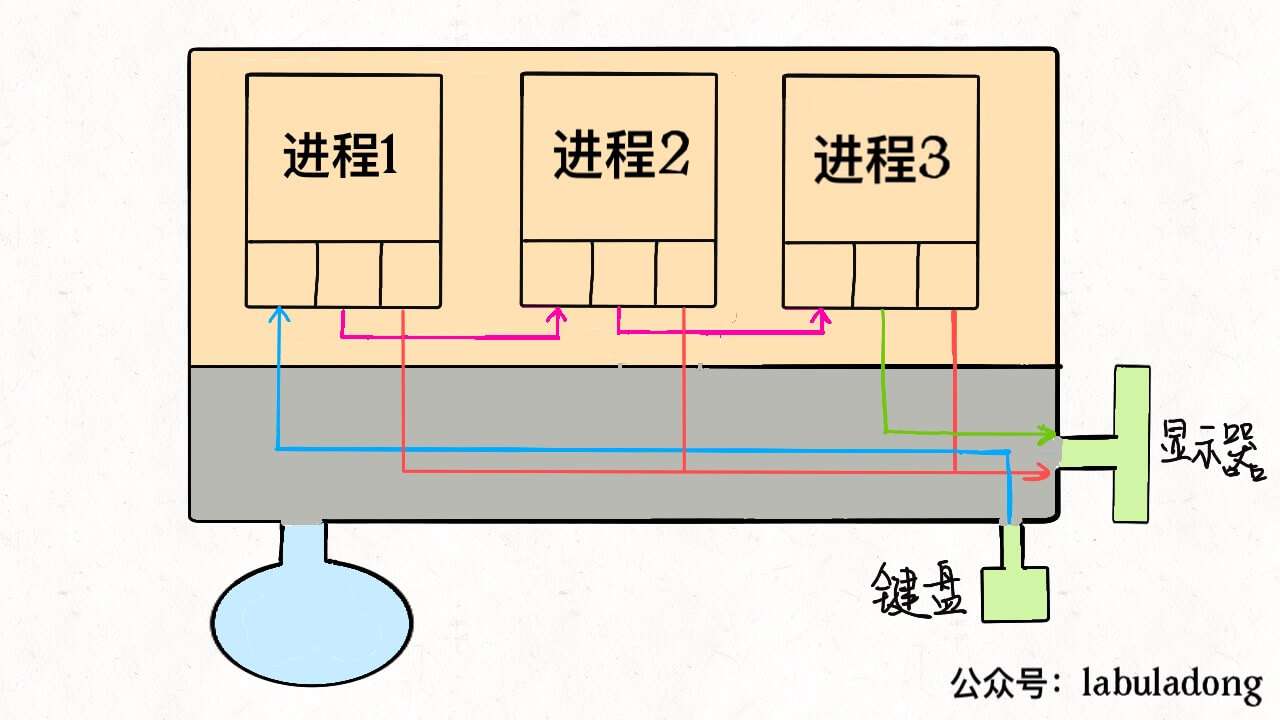
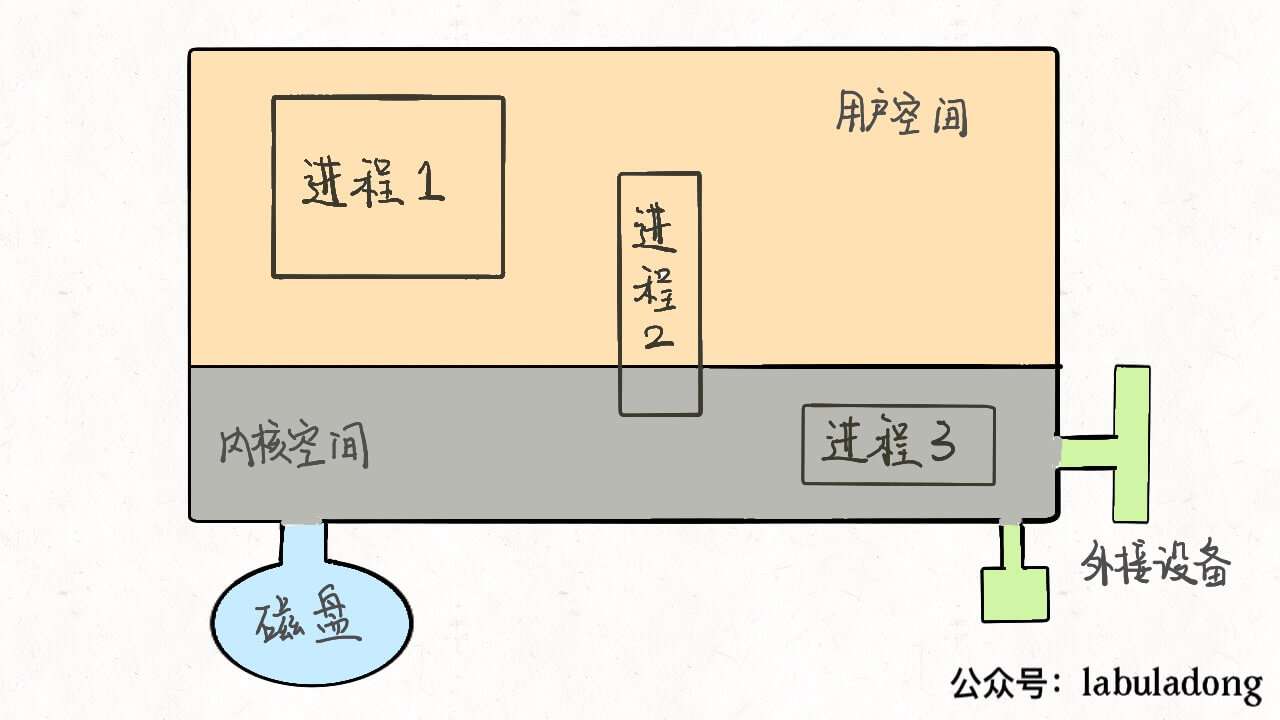
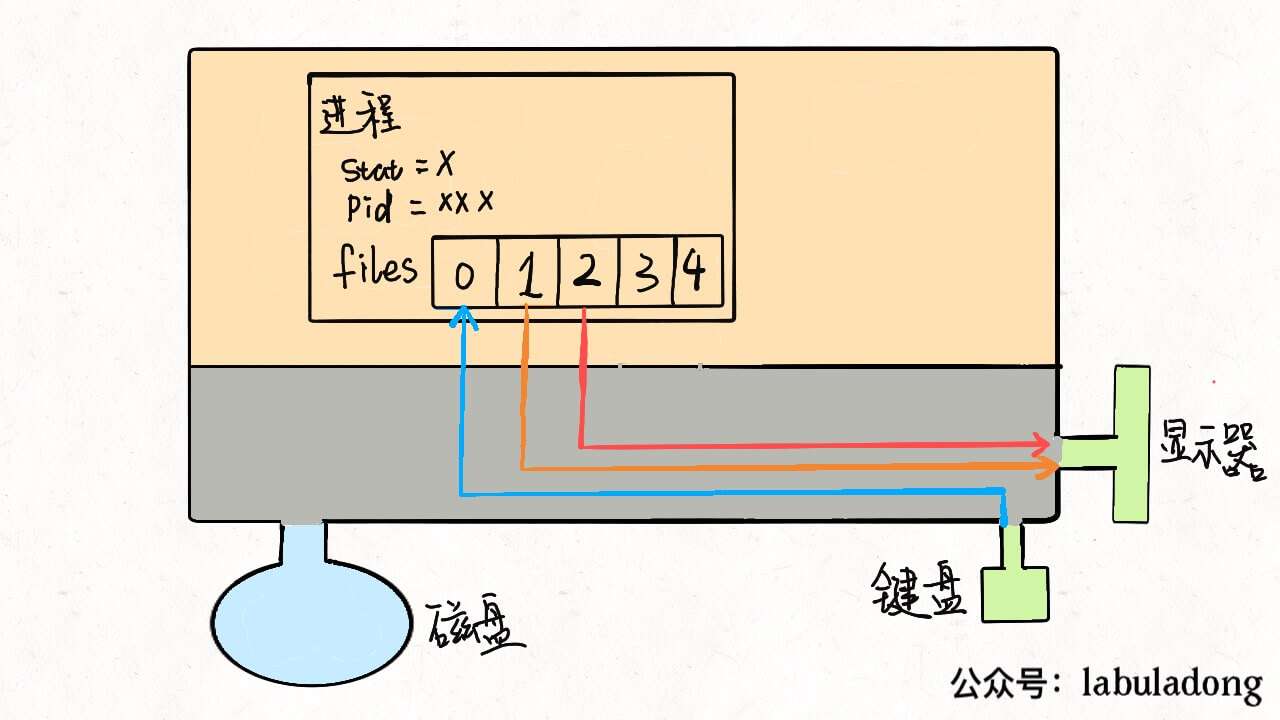
关于进程通信, 先看看对于操作系统,进程是 task_struct 类型的结构体

struct task_struct {
    // 进程状态
    long              state;
    // 虚拟内存结构体
    struct mm_struct  *mm;
    // 进程号
    pid_t             pid;
    // 指向父进程的指针
    struct task_struct __rcu  *parent;
    // 子进程列表
    struct list_head        children;
    // 存放文件系统信息的指针
    struct fs_struct        *fs;
    // 一个数组,包含该进程打开的文件指针
    struct files_struct     *files;
};

进程间通信的方式一般有哪些?

  1. 匿名管道( pipe ):管道是一种半双工的通信方式,数据只能单向流动,而且只能在具有亲缘关系的进程间使用。进程的亲缘关系通常是指父子进程关系。
  2. 消息队列( message queue ) : 消息队列是由消息的链表,存放在内核中并由消息队列标识符标识。消息队列克服了信号传递信息少、管道只能承载无格式字节流以及缓冲区大小受限等缺点。
  3. 信号量( semophore ) : 信号量是一个计数器,可以用来控制多个进程对共享资源的访问。它常作为一种锁机制,防止某进程正在访问共享资源时,其他进程也访问该资源。因此,主要作为进程间以及同一进程内不同线程之间的同步手段。
  4. 信号 ( sinal ) : 信号是一种比较复杂的通信方式,用于通知接收进程某个事件已经发生。
  5. 共享内存( shared memory ) :共享内存就是映射一段能被其他进程所访问的内存,这段共享内存由一个进程创建,但多个进程都可以访问。共享内存是最快的 IPC 方式,它是针对其他进程间通信方式运行效率低而专门设计的。它往往与其他通信机制,如信号两,配合使用,来实现进程间的同步和通信。
  6. 套接字( socket ) : 套接口也是一种进程间通信机制,与其他通信机制不同的是,它可用于不同机器间的进程通信。

3.4. socketpair - 通信的关键

先说一下 nodejs 子进程 options.stdio 其中的两个选项

  1. 'pipe':在子进程和父进程之间创建管道。 管道的父端作为 child_process 对象上的 subprocess.stdio[fd] 属性暴露给父进程。 为文件描述符 0、1 和 2 创建的管道也可分别作为 subprocess.stdin、subprocess.stdout 和 subprocess.stderr 使用。

  2. 'ipc':创建 IPC 通道,用于在父进程和子进程之间传递消息或文件描述符。 一个 ChildProcess 最多可以有一个 IPC stdio 文件描述符。 设置此选项会启用 subprocess.send() 方法。 如果子进程是 Node.js 进程,则 IPC 通道的存在将会启用 process.send() 和 process.disconnect() 方法、以及子进程内的 'disconnect' 和 'message' 事件。

基于这个场景, socketpair 能够给到完美的支持

3.4.1. socketpair

Linux实现了一个源自BSD的socketpair调用,可以实现在同一个文件描述符中进行读写的功能。
该系统调用能创建一对已连接的UNIX族socket。
在Linux中,完全可以把这一对socket当成pipe返回的文件描述符一样使用,唯一的区别就是这一对文件描述符中的任何一个都可读和可写,函数原型如下:

#include <sys/types.h>
#include <sys/socket.h>

int socketpair(int domain, int type, int protocol, int sv[2]);

关于 socketpair 创建的 Unix domain socket 补充知识

Unix domain socket 又叫 IPC(inter-process communication 进程间通信) socket,用于实现同一主机上的进程间通信。socket 原本是为网络通讯设计的,但后来在 socket 的框架上发展出一种 IPC 机制,就是 UNIX domain socket。虽然网络 socket 也可用于同一台主机的进程间通讯(通过 loopback 地址 127.0.0.1),但是 UNIX domain socket 用于 IPC 更有效率:不需要经过网络协议栈,不需要打包拆包、计算校验和、维护序号和应答等,只是将应用层数据从一个进程拷贝到另一个进程。这是因为,IPC 机制本质上是可靠的通讯,而网络协议是为不可靠的通讯设计的。
UNIX domain socket 是全双工的,API 接口语义丰富,相比其它 IPC 机制有明显的优越性,目前已成为使用最广泛的 IPC 机制,比如 X Window 服务器和 GUI 程序之间就是通过 UNIX domain socket 通讯的。
Unix domain socket 是 POSIX 标准中的一个组件,所以不要被名字迷惑,linux 系统也是支持它的。

// socketpair 通信的例子

#include <sys/types.h>
#include <sys/socket.h>
#include <stdlib.h>
#include <stdio.h>

int main ()
{
    int fd[2];
    int r = socketpair(AF_UNIX, SOCK_STREAM, 0, fd);
    if (r < 0){
        perror( "socketpair()" );
        exit(1);
    }

    if (fork()){ /* 父进程 */
        int val = 0;
        close(fd[1]);
        while (1){
            sleep(1);
            ++val;
            printf("发送数据: %d\n", val);
            write(fd[0], &val, sizeof(val));
            read(fd[0], &val, sizeof(val));
            printf("接收数据: %d\n", val);
        }
    }else{  /*子进程*/
        int val;
        close(fd[0]);
        while(1){
            read(fd[1], &val, sizeof(val));
            ++val;
            write(fd[1], &val, sizeof(val));
        }
    }
}

例子分析: 一开始由socketpair创建一个套接字对,父进程关闭fd[1],子进程关闭fd[0],父进程sleep(1)让子进程先执行,子进程read(fd[1], &val, sizeof(val))阻塞,
然后父进程write(fd[0]..)发送数据,子进程接收数据处理后再发送给父进程数据write(fd[1]..),父进程读取数据,打印输出。

既然 socketpair 返回的一对文件描述符中的任何一个都可读和可写,那么 nodejs options.stdio 设置为

  1. 为 pipe 时, 只需把子进程的 files 文件指针数组的某一项重定向到 fd[1] 即可
  2. 为 ipc 时, 会复杂一点, 下面我们详细记录一下

3.5. ipc - 主进程

下面是我写的一个简单的例子, 当我们在主进程中启动一个子进程时, stdio 其中一项设置为 ipc

// p.js
const { spawn } = require("child_process");
const p = spawn("node", ["c.js"], { stdio: ["pipe", "pipe", "pipe", "ipc"] });

p.send(1);

p.on("message", console.log);
  1. 首先进入 lib/child_process.js 运行 spawn 函数, 接着我们看看 ChildProcess 的 实现
function spawn(file, args, options) {
  options = normalizeSpawnArguments(file, args, options);
  ...
  const child = new ChildProcess();
  child.spawn(options);
  ...
  return child;
}
  1. 进入 lib/internal/child_process.js 中的 ChildProcess 类中的 spawn 函数, 由于 ipc 设置为 stdio 数组的索引为 3, 此时 ipcFd 的值为 3, 并且通过环境变量 NODE_CHANNEL_FD 注入到了子进程中
ChildProcess.prototype.spawn = function(options) {
  let i = 0;

  validateObject(options, 'options');

  // If no `stdio` option was given - use default
  let stdio = options.stdio || 'pipe';

  stdio = getValidStdio(stdio, false);

  const ipc = stdio.ipc;
  const ipcFd = stdio.ipcFd;
  stdio = options.stdio = stdio.stdio;
  ...

  if (ipc !== undefined) {
    ...
    ArrayPrototypePush(options.envPairs, `NODE_CHANNEL_FD=${ipcFd}`);
    ArrayPrototypePush(options.envPairs,
                       `NODE_CHANNEL_SERIALIZATION_MODE=${serialization}`);
  }
  ...
  const err = this._handle.spawn(options);
  ...
  for (i = 0; i < stdio.length; i++)
    ArrayPrototypePush(this.stdio,
                       stdio[i].socket === undefined ? null : stdio[i].socket);

  // Add .send() method and start listening for IPC data
  if (ipc !== undefined) setupChannel(this, ipc, serialization);

  return err;
};

关于写入子进程的环境变量中的 NODE_CHANNEL_FD

这里回顾一下 socketpair 的例子, 这个 fd 可以理解为例子中的 fd[1], 其实现主要是后面要讲的 uv__process_child_init 函数通过调用 dup2 函数把子进程中的 files 文件指针数组的第 3 个 fd 重定向到了 fd[1]!

3.6. ipc - 子进程

下面的流程主要讲了

  • 子进程如何收到父进程 message 的全过程
  • 子进程发送消息给父进程的原理
// c.js
process.on('message', data => {
    process.send(data + 1)
    process.exit(0)
})

提示: 以下涉及的 i/o 相关的实现已经忽略, 可以参考【libuv 源码学习笔记】2. 线程池与i/o

主进程通过 spawn 方法运行一个新的 node 子进程, 类似于新运行一个 node c.js 命令, 会走一遍初始化数据等流程, 其中一步会运行 lib/internal/bootstrap/pre_execution.js 中的 setupChildProcessIpcChannel 函数

  1. setupChildProcessIpcChannel 该函数拿到环境变量的 NODE_CHANNEL_FD 后, 调用了 _forkChild 函数
function setupChildProcessIpcChannel() {
  if (process.env.NODE_CHANNEL_FD) {
    const assert = require('internal/assert');

    const fd = NumberParseInt(process.env.NODE_CHANNEL_FD, 10);
    ...
    require('child_process')._forkChild(fd, serializationMode);
    assert(process.send);
  }
}
  1. _forkChild 函数会新建一个 Pipe 实例, 其主要是通过环境变量获取的 fd, 通过 epoll 监听该 fd 的写入, 从而获取主进程来的信息, 也可向该 fd 写入数据发送给主进程
function _forkChild(fd, serializationMode) {
  // set process.send()
  const p = new Pipe(PipeConstants.IPC);
  p.open(fd);
  p.unref();
  const control = setupChannel(process, p, serializationMode);
  process.on('newListener', function onNewListener(name) {
    if (name === 'message' || name === 'disconnect') control.refCounted();
  });
  process.on('removeListener', function onRemoveListener(name) {
    if (name === 'message' || name === 'disconnect') control.unrefCounted();
  });
}
  1. 接着看 _forkChild 中的 p.open 方法的实现, 在文件 src/pipe_wrap.cc 中, 主要调用了 uv_pipe_open 方法
void PipeWrap::Open(const FunctionCallbackInfo<Value>& args) {
  ...

  int err = uv_pipe_open(&wrap->handle_, fd);
  wrap->set_fd(fd);

  if (err != 0)
    env->ThrowUVException(err, "uv_pipe_open");
}
  1. uv_pipe_open 方法主要是调用了 uv__stream_open 方法设置了 io_watcher.fd 的 fd, 即通过 epoll 进行观察, 此时如果主进程向 socketpair 例子中一样调用 write(fd[0], &val, sizeof(val)), 这里的 fd 即例子中的 fd[1] 此时有可读的数据即会被 epoll 捕获!
int uv__stream_open(uv_stream_t* stream, int fd, int flags) {
  ...
  stream->io_watcher.fd = fd;
  
  return 0;
}
  1. 接着看 _forkChild 中调用的 setupChannel 函数, 该函数将近 400 行的代码在 lib/internal/child_process.js 文件中, 主要调用了 readStart 方法
function setupChannel(target, channel, serializationMode) {
  ...
  channel.readStart();
  return control;
}
  1. 其中的 readStart 主要是设置了有可读消息的回调函数即是 socketpair i/o 观察者设置的回调, 其中的调用链路比较长, 实现主要在 src/stream_base.cc 文件中, 下面记录了一下在 c++ 中的调用链路
readStart: env->SetProtoMethod(t, "readStart", JSMethod<&StreamBase::ReadStartJS>);

ReadStartJS: int StreamBase::ReadStartJS(const FunctionCallbackInfo<Value>& args) {
  return ReadStart();
}

ReadStart: int LibuvStreamWrap::ReadStart() {
  return uv_read_start(stream(), [](uv_handle_t* handle,
                                    size_t suggested_size,
                                    uv_buf_t* buf) {
    static_cast<LibuvStreamWrap*>(handle->data)->OnUvAlloc(suggested_size, buf);
  }, [](uv_stream_t* stream, ssize_t nread, const uv_buf_t* buf) {
    static_cast<LibuvStreamWrap*>(stream->data)->OnUvRead(nread, buf);
  });
}

OnUvRead: void LibuvStreamWrap::OnUvRead(ssize_t nread, const uv_buf_t* buf) {
  ...

  EmitRead(nread, *buf);
}

EmitRead: void StreamResource::EmitRead(ssize_t nread, const uv_buf_t& buf) {
  DebugSealHandleScope seal_handle_scope;
  if (nread > 0)
    bytes_read_ += static_cast<uint64_t>(nread);
  listener_->OnStreamRead(nread, buf);
}

OnStreamRead: void EmitToJSStreamListener::OnStreamRead(ssize_t nread, const uv_buf_t& buf_) {
  ...
  stream->CallJSOnreadMethod(nread, buf.ToArrayBuffer());
}
CallJSOnreadMethod: MaybeLocal<Value> StreamBase::CallJSOnreadMethod(ssize_t nread,
                                                 Local<ArrayBuffer> ab,
                                                 size_t offset,
                                                 StreamBaseJSChecks checks) {
  ...
  // 🔥 onread
  Local<Value> onread = wrap->object()->GetInternalField(
      StreamBase::kOnReadFunctionField);
  CHECK(onread->IsFunction());
  return wrap->MakeCallback(onread.As<Function>(), arraysize(argv), argv);
}
  1. 根据 readStart 的调用链路追踪, 我们发现回调函数为 setupChannel 给 pipe 设置的 onread 方法
  2. 在 child_process.js 文件中, 设置了 onread 方法主要是调用了 handleMessage
function handleMessage(message, handle, internal) {
  if (!target.channel)
  return;

  const eventName = (internal ? 'internalMessage' : 'message');

  process.nextTick(emit, eventName, message, handle);
}
  1. handleMessage 主要是调用了 process 上的 emit 方法, 至此上面的例子 c.js , process.on('message' 的回调被触发, 即收到主进程的 data

提示: emit, on 为 event 事件触发器 的实现, 在 nodejs 中大部分类都继承于 event, 在前端浏览器端也能经常看到。

  1. 代码运行符合预期 ~
    image

3.6.1. 子进程向父进程发消息的实现

这里由于篇幅有限, 子进程发送信息给主进程, 其实上向环境变量拿到的 fd 写入数据, 正如我们上面看到的 socketpair 的例子, 子进程可以从 fd[1] 中读数据, 也可从 fd[1] 中写入数据, 当子进程向 fd[1] 写入数据后, 主进程的 fd[0] 就会有了数据被 epoll 捕获调用主进程 i/o 观察者相应的回调, 其机制和子进程收到父进程 的消息类似。

3.6.2. pipe 与 ipc 读写数据的区别

两次模式下, 读取另一个进程来的消息也是有区别的

  • pipe 模式: 直接通过 read 方法读取
  • ipc: 模式: 通过 uv__recvmsg 读取

recvmsg 其实是能接受更多的参数替代 read 的存在, 这个具体的原因也是查了很多的资料。其中一个重要原因是 recvmsg 中 msg_control 字段能够接受来自其他进程的 fd。那么与像 node 一样写入子进程环境变量 NODE_CHANNEL_FD 传递有何异同了?

通常,此操作称为“传递文件描述符”到另一个进程。但是,更准确地说,传递的是对打开文件的引用描述(参见open(2)),并在接收过程中可能会有不同的文件描述符编号用过的。在语义上,这个操作等价于将(dup(2))文件描述符复制到文件中另一个进程的描述符表。

原来是可以实现 fd 引用的传递, 在 node cluster 集群 模块的实现起到了重要的作用。后面需要单独写一篇 cluster 集群的实现来细说一下 node 进程的通信。

static void uv__read(uv_stream_t* stream) {
  ...

  is_ipc = stream->type == UV_NAMED_PIPE && ((uv_pipe_t*) stream)->ipc;

  while (stream->read_cb
      && (stream->flags & UV_HANDLE_READING)
      && (count-- > 0)) {
    assert(stream->alloc_cb != NULL);

    buf = uv_buf_init(NULL, 0);
    stream->alloc_cb((uv_handle_t*)stream, 64 * 1024, &buf);
    if (buf.base == NULL || buf.len == 0) {
      /* User indicates it can't or won't handle the read. */
      stream->read_cb(stream, UV_ENOBUFS, &buf);
      return;
    }

    assert(buf.base != NULL);
    assert(uv__stream_fd(stream) >= 0);

    if (!is_ipc) {
      do {
        nread = read(uv__stream_fd(stream), buf.base, buf.len);
      }
      while (nread < 0 && errno == EINTR);
    } else {
      /* ipc uses recvmsg */
      msg.msg_flags = 0;
      msg.msg_iov = (struct iovec*) &buf;
      msg.msg_iovlen = 1;
      msg.msg_name = NULL;
      msg.msg_namelen = 0;
      /* Set up to receive a descriptor even if one isn't in the message */
      msg.msg_controllen = sizeof(cmsg_space);
      msg.msg_control = cmsg_space;

      do {
        nread = uv__recvmsg(uv__stream_fd(stream), &msg, 0);
      }
      while (nread < 0 && errno == EINTR);
    }

    if (nread < 0) {
      /* Error */
      ...
    } else {
      /* Successful read */
      ssize_t buflen = buf.len;

      if (is_ipc) {
        err = uv__stream_recv_cmsg(stream, &msg);
        if (err != 0) {
          stream->read_cb(stream, err, &buf);
          return;
        }
      }
...
}

3.7. uv__process_child_init

main > uv_spawn > uv__process_child_init

这里很关键的是使用 dup2 函数可以把将第二个参数fd指向第一个参数fd所指的文件,相当于重定向功能

类似于我们运行一个命令使其的标准输出重定向到一个文件中, 可以这样做

$ command > file.txt
// Tips: 根据 fork 的特性, 这个函数的只有子进程才会被运行

static void uv__process_child_init(const uv_process_options_t* options,
                                   int stdio_count,
                                   int (*pipes)[2],
                                   int error_fd) {
  ...
  
  if (options->flags & UV_PROCESS_DETACHED)
  //   编写守护进程的一般步骤步骤:
  // (1)在父进程中执行fork并exit推出;
  // (2)在子进程中调用setsid函数创建新的会话;
  // (3)在子进程中调用chdir函数,让根目录 ”/” 成为子进程的工作目录;
  // (4)在子进程中调用umask函数,设置进程的umask为0;
  // (5)在子进程中关闭任何不需要的文件描述符
    setsid();
  
  for (fd = 0; fd < stdio_count; fd++) {
    use_fd = pipes[fd][1];
    if (use_fd < 0 || use_fd >= fd)
      continue;
    pipes[fd][1] = fcntl(use_fd, F_DUPFD, stdio_count);
    if (pipes[fd][1] == -1) {
      uv__write_int(error_fd, UV__ERR(errno));
      _exit(127);
    }
  }

  for (fd = 0; fd < stdio_count; fd++) {
    close_fd = pipes[fd][0];
    use_fd = pipes[fd][1];

    ...

    if (fd == use_fd)
      uv__cloexec_fcntl(use_fd, 0);
    else
      // 🔥
      fd = dup2(use_fd, fd);

    if (fd == -1) {
      uv__write_int(error_fd, UV__ERR(errno));
      _exit(127);
    }

    if (fd <= 2)
      uv__nonblock_fcntl(fd, 0);

    if (close_fd >= stdio_count)
      uv__close(close_fd);
  }

  for (fd = 0; fd < stdio_count; fd++) {
    use_fd = pipes[fd][1];

    if (use_fd >= stdio_count)
      uv__close(use_fd);
  }
  
  // setuid,setuid的作用是让执行该命令的用户以该命令拥有者的权限去执行,
  // 比如普通用户执行passwd时会拥有root的权限,这样就可以修改/etc/passwd这个文件了。
  // 它的标志为:s,会出现在x的地方,例:-rwsr-xr-x  。而setgid的意思和它是一样的,即让执行文件的用户以该文件所属组的权限去执行。
  if ((options->flags & UV_PROCESS_SETGID) && setgid(options->gid)) {
    uv__write_int(error_fd, UV__ERR(errno));
    _exit(127);
  }

  if ((options->flags & UV_PROCESS_SETUID) && setuid(options->uid)) {
    uv__write_int(error_fd, UV__ERR(errno));
    _exit(127);
  }

  if (options->cwd != NULL && chdir(options->cwd)) {
    uv__write_int(error_fd, UV__ERR(errno));
    _exit(127);
  }
  ...
  execvp(options->file, options->args);
  uv__write_int(error_fd, UV__ERR(errno));
  _exit(127);
}

上面的 for 循环, 实质上是对进程的文件指针数组的操作, 并使用 dup2 函数进行重定向。

for (fd = 0; fd < stdio_count; fd++) {
    close_fd = pipes[fd][0];
    use_fd = pipes[fd][1];
    if (fd == use_fd)
      uv__cloexec_fcntl(use_fd, 0);
    else
      // 重定向
      fd = dup2(use_fd, fd);

3.8. dup2

将 newfd 指向 oldfd 所指的文件,相当于重定向功能。如果 newfd 已经指向一个已经打开的文件,那么他会首先关闭这个文件,然后在使newfd指向oldfd文件;

// 把进程的标准输出指向某个文件的一个例子

#include <stdio.h>
#include <unistd.h>
#include <fcntl.h>
#define file_name "dup_test_file"
int main(int argc, char *argv[])
{
    //先调用dup将标准输出拷贝一份,指向真正的标准输出
    int stdout_copy_fd = dup(STDOUT_FILENO);//此时stdout_copy_fd也指向标准输出
    int file_fd = open(file_name, O_RDWR);//file_fd是文件"dup_test_file"的文件描述符
 
    //让标准输出指向文件
    dup2(file_fd, STDOUT_FILENO);//首先关闭1所指向的文件,然后再使文件描述符1指向file_fd
    printf("hello");//使用stdout输出"hello",此时stdout已经被重定向到file_fd,相当于把其输出到文件中
   
    fflush(stdout);//刷新缓冲区
 
    //恢复标准输出
    dup2(stdout_copy_fd, STDOUT_FILENO);
    printf("world");
    return 0;
}

3.9. uv__make_pipe

main > uv_spawn > uv__make_pipe

Tips: libuv 为了保证 fork 出的子进程成功运行 execvp 函数才设置流的 i/o 观察者。

首先通过 uv__make_pipe 函数调用 pipe2 函数, 设置 flags = O_CLOEXEC, 即当 fork 出的子进程运行 execvp 函数后, 会发送一个退出信号, 主进程 read 函数返回 0, 主进程才能继续往下运行。

read: 一旦成功,将返回读取的字节数(0 表示文件结束)。文件结束),并且文件的位置被提前这个数字。如果这个数字比要求的字节数小,则不是错误。字节数,这不是错误;例如,这可能是因为现在可用的字节数较少这可能是因为现在实际可用的字节数较少(可能是因为我们已经接近可能是因为现在可用的字节数较少(可能是因为我们接近文件的末端,或者是因为我们正在从管道或从终端),或者因为read()被一个信号打断了。

int uv_pipe(uv_os_fd_t fds[2], int read_flags, int write_flags) {
  uv_os_fd_t temp[2];
  int err;
#if defined(__FreeBSD__) || defined(__linux__)
  int flags = O_CLOEXEC;

  if ((read_flags & UV_NONBLOCK_PIPE) && (write_flags & UV_NONBLOCK_PIPE))
    flags |= UV_FS_O_NONBLOCK;

  if (pipe2(temp, flags))
    return UV__ERR(errno);
  ...
}

主进程 uv_spawn 中的 read

do
    r = read(signal_pipe[0], &exec_errorno, sizeof(exec_errorno));
while (r == -1 && errno == EINTR);

3.10. uv__process_open_stream

main > uv_spawn > uv__process_open_stream

设置主进程的 i/o 观察者的 fd, 相当于 socketpair 例子中的 fd[0], 当 fd 有变化时, 即收到来自子进程的写入的数据

流相关实现参考 【libuv 源码学习笔记】网络与流

static int uv__process_open_stream(uv_stdio_container_t* container,
                                   int pipefds[2]) {
  int flags;
  int err;

  if (!(container->flags & UV_CREATE_PIPE) || pipefds[0] < 0)
    return 0;

  err = uv__close(pipefds[1]);
  if (err != 0)
    abort();

  pipefds[1] = -1;
  uv__nonblock(pipefds[0], 1);

  flags = 0;
  if (container->flags & UV_WRITABLE_PIPE)
    flags |= UV_HANDLE_READABLE;
  if (container->flags & UV_READABLE_PIPE)
    flags |= UV_HANDLE_WRITABLE;
  
  // 🔥 uv__stream_open 函数主要运行代码 stream->io_watcher.fd = fd;
  return uv__stream_open(container->data.stream, pipefds[0], flags);
}

3.11. uv_signal_start

main > uv_spawn > uv_signal_start

通过 libuv 信号机制, 在子进程退出时, 调用例子中设置的 on_exit 回调函数, 程序运行结束

process->exit_cb = options->exit_cb;

信号相关实现参考 【libuv 源码学习笔记】信号

4. 小结

  • 子进程通过调用 fork 函数进入子进程的逻辑, 然后调用 execvp 函数执行具体命令实现。
  • thread-loader 管道通信以及 ipc 都是由 dup2 将子进程的files文件指针数组重定向到 socketpair 创建的匿名通信管道来实现。
@xiaoxiaojx xiaoxiaojx added the libuv libuv is a multi-platform support library with a focus on asynchronous I/O. It was primarily develop label May 28, 2021
@xiaoxiaojx xiaoxiaojx changed the title 【libuv 源码学习笔记】3. 进程与ipc 【libuv 源码学习笔记】3. 子进程 May 29, 2021
@xiaoxiaojx xiaoxiaojx changed the title 【libuv 源码学习笔记】3. 子进程 【libuv 源码学习笔记】3. 子进程与ipc May 29, 2021
@xiaoxiaojx xiaoxiaojx changed the title 【libuv 源码学习笔记】3. 子进程与ipc 【libuv 源码学习笔记】子进程与ipc Jun 8, 2021
Sign up for free to join this conversation on GitHub. Already have an account? Sign in to comment
Labels
libuv libuv is a multi-platform support library with a focus on asynchronous I/O. It was primarily develop
Projects
None yet
Development

No branches or pull requests

1 participant