Download & Installation
On Linux I would recommend using LGSM(Linux Game Server Managers) to facilitate setting up the server: https://linuxgsm.com/lgsm/csgoserver/.
Once you have your server setup with LGSM, you can run ./csgoserver mi and select Metamod and then you can run ./csgoserver mi and select Sourcemod.
Follow the instructions here to get your server setup: https://developer.valvesoftware.com/wiki/Counter-Strike:_Global_Offensive_Dedicated_Servers
Once the server is setup, install the latest version of Metamod and Sourcemod on the server: http://www.metamodsource.net/downloads.php
http://www.sourcemod.net/downloads.php
The Discord bot requires the latest release of Get5 to be installed.
Download the latest release.
Extract the download archive into the csgo/ directory on the server.
Once the plugin first loads on the server, you can edit general get5 cvars in the autogenerated cfg/sourcemod/get5.cfg.
All the CVARS can be found on the Get5 Github.
I would recommend changing the following CVARs:
get5_kick_when_no_match_loaded "0"
A full installation guide and documentation on the Get5 Github.
Go to the releases section of the Github and download the latest get5_eventapi.smx.
Copy that file to csgo/addons/sourcemod/plugins on your CSGO Server.
Don't forget to install SteamWorks
- Connecting the Bot to your Server
-
Head over to the Discord Developer Portal and log in with your Discord account

-
Name it
Discord 10manand click create- You can add an icon afterward and a description to personalize the bot
-
On the menu on the left hand side, select
bot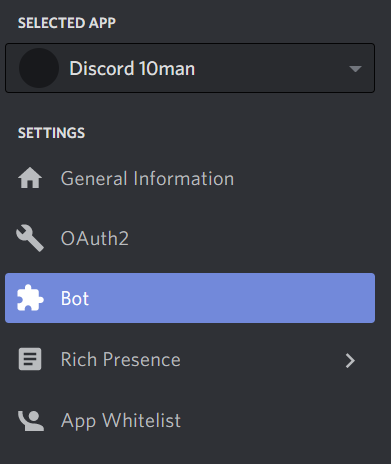
-
Then click on
add boton the right
-
Under
token, click oncopy. This is your secret discord bot token, save it somewhere because we will need it for theconfig.jsonfile. Don't give this to anyone else because then they can take control of your bot.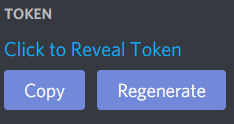
-
Scroll down to
SERVER MEMBER INTENTand toggle it on
-
Click on
Save Changes -
For those familiar with Discord bots, the Perms Integer is
17300560 -
Click on
0Auth2on the menu on the left hand side
-
Under
SCOPESselectbot
-
Scroll down to
BOT PERMISSIONSand select the following:- Image
- Under
GENERAL PERMISSIONSManage ChannelsView Channels
- Under
TEXT PERMISSIONSSend MessagesSend TTS MessagesManage MessagesEmbed LinksAttach FilesRead Message HistoryMessage EveryoneUse External EmojisAdd Reactions
- Under
Voice PermissionsMove Members
-
Under
SCOPES, copy the URL by pressing copy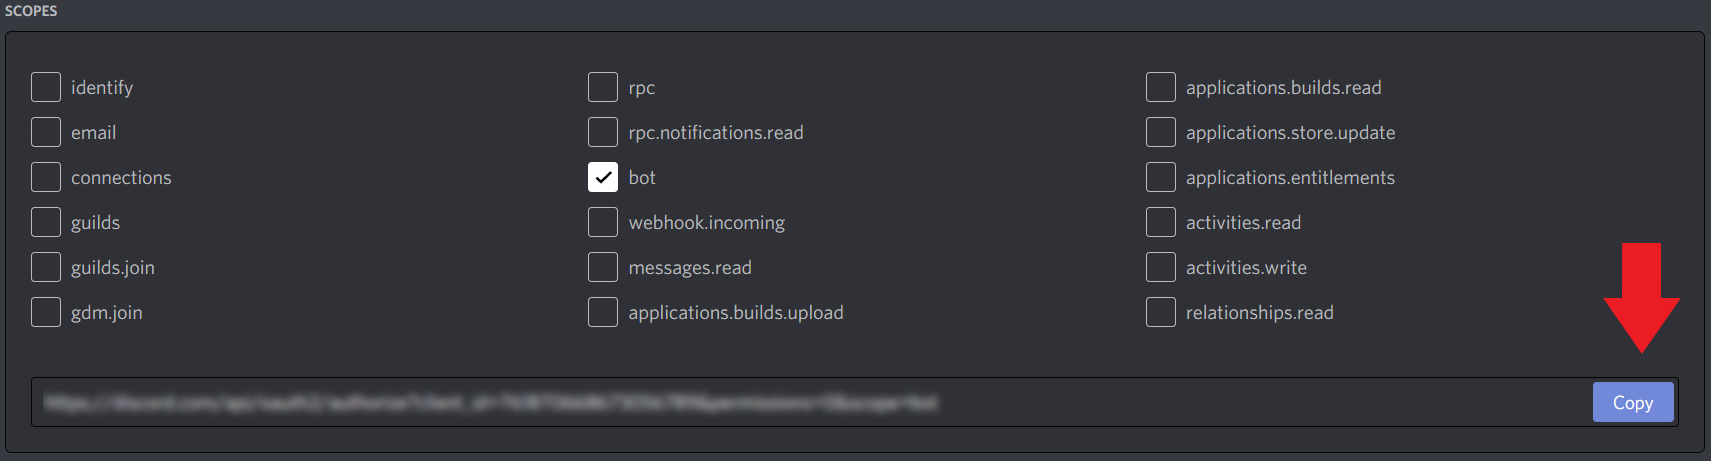
-
Paste the link into a new tab in your browser
-
Select the server you want to add it to!
-
Now the bot is connected to the server, lets get the bot up and running!
-
- Install Python & Python Requirements
- Install the latest version of Python
- Check that python installed correctly by opening a terminal (Command Prompt on Windows), and running the command
python --version- It should return
Python 3.8.3(or a greater version number)
- It should return
- Install Pipenv by following these instructions:
- Verify that Pipenv is installed by opening a terminal (Command Prompt on Windows) and running
pipenv --version- It should return
pipenv, version 2020.8.13(or a greater version number)
- It should return
- Setting Up & Running the Bot
-
Download the latest release from the releases tab or download the latest development build by click on
codeon the github homepage and then clicking onDownload ZIP -
Unzip the files
-
Rename
config_example.jsontoconfig.json -
Open the file and edit the information:
- Replace the
discord_tokenwith the token we got from your bot in Section 1) subsection v. - Fill in
bot_IPwith the public IP of the bot, more info on that later on - Leave
bot_portwith default value of 3000, unless you want to portforward and use a different port - Get a Steam Web API Key from here
- Fill in your server information
- If you have multiple servers, the json file might look something like this:
{ "discord_token": "123fkdjsh123alksjfhlaskdjafhlkj1hl3kj4hlkjss", "bot_IP": "321.321.321.321", "bot_port": "3000", "steam_web_API_key": "123ABDKLK12938712938SBDDS1723987", "servers": [ { "server_address": "csgo.yannickgloster.com", "server_port": 27015, "server_password": "pasword1234", "RCON_password": "1234password" }, { "server_address": "123.123.123.123", "server_port": 27015, "server_password": "pasword1234", "RCON_password": "1234password" } ] } - Replace the
-
Open a terminal (Command Prompt on Windows) and go to the folder where the bot is
-
Install the requirements by running
pipenv install -
Run the bot by running
pipenv run python3 run.py -
Go into the discord and send
.aboutinto a text channel- It should return an embed with the version number
- Alternatively, run the command
.connectand it should display an embed with the information on the server. If this doesn't work, theconfig.jsonfile was not configured properly.
-
To run the bot permanently, you can use
tmuxon Linux.- Example
tmuxcommandtmux new-session -d -s discord 'pipenv run python3 run.py'- This creates a new session called Discord
- There are other cheap hosting alternatives if you don't want to run your PC permanently or don't have a server. The DiscordPY community recommends the following:
Need to run your bot 24/7? Get a cheap VPS. https://www.scaleway.com/ EU https://www.linode.com/ US/EU/Asia https://www.digitalocean.com/ US https://www.vultr.com/ US https://www.ovh.co.uk/ EU/Canada https://www.hetzner.com/ Germany https://www.time4vps.eu/ Lithuania. Self-hosting: Free hosting: Kinda free: Any computer. No. Not even heroku. GCP, AWS have one year free micros. - Example
-
If you are self hosting, on a different service, or not on the same server as the csgo server, you will have to portforward
port 3000(or whatever port you set in theconfig.json)- If you google the following, you will find a tutorial on how to do so:
How do I portforward [INSERT ROUTER NAME/SERVICE NAME]
- If you portfoward, you will need to edit
config.json. Open it in a text editor - For
bot_IPput in your public IP
-