Rapid Prototyping: The process of quickly mocking up the future state of a system (Source: Design Better And Faster With Rapid Prototyping).
The goal of this session is to work through a suggested workflow for creating rapid prototypes of a web site or app. The techniques used will emphasize speed, team coding, and ease of iteration.
- GIT - Source control, versioning, and code sharing
- Node.js - Server side js (runs Yo, Grunt, and Bower).
- NPM (Node Package Manager) - The name says it all: This manages all of your Node packages
- Ruby - Server side scripting language. We’re using it for SASS, Compass, Jekyll, and Foundation.
- Yeoman (‘Yo’) - ‘Scaffolding’ i.e. automatic project setup.
- Grunt - Build tool and task runner. Automates development, testing, and deployment.
- Bower - Front end package manager (built by Twitter).
- Zurb Foundation - Front end framework (Responsive, Mobile First)
- Jekyll - Fast static html templates from markdown and Liquid tags.
- Angular.js - Fast interactive javascripting (by Google)
- Console 2 - Tabbed and improved console for Windows. GIT Bash integration how-to
- Sublime Text - A fantastic code editor
- Emmet - Crazy fast html shortcuts for Sublime (and other editors)
You'll need a way to use command line GIT and SSH. If you're using Linux/Mac for development you probably already have both and can run them from your operating system's native terminal.
Windows users can get everything they need by downloading and installing the appropriate installer here. When you run the installer, use the default options except be sure to set your line endings to Unix style (see fig 1). This will install Git, ssh, and other related utilities that you'll need for development. It also installs a custom terminal called 'Git Bash'. NOTE: All commands should be run from Git Bash from now on. Do NOT use Windows' cmd.exe.
If you already have an alternative way of running Git/SSH on windows (like cygwin) feel free to stick with that.
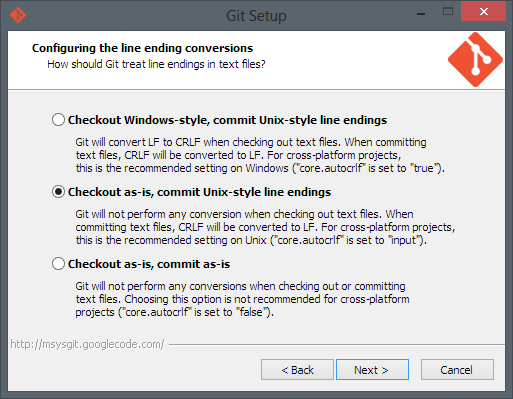
fig 1: Setting commit Unix-style line endings
**Download: **http://git-scm.com/downloads
Download the windows installer from the Node Downloads Page. Run the installer with its default options. This should also install NPM and add Node to your system PATH (so you can type Node commands no matter what directory you’re in).
Test it by launching GIT Bash and entering node -v. If Node is working, you’ll get the version number back. Now try npm -v. You should get a version number back again. Congrats! You can now Node.
If you get an error, make sure Node was added to PATH (see this thread for help).
The fastest way to do get Ruby going on Windows is to use Rails Installer. Download at least version 1.8 and run the installer. This will install Ruby, as well as some other packages that we need (namely the devkit, which we need to get some other things running, and Bundler, which makes sure we have all the right versions of all Ruby gems etc.).
If that doesn’t work for you, try Ruby Installer. Just be sure to also install the devkit, and Bundler, because they’re not included. You may also need to add Ruby to PATH yourself.
Fire up GIT Bash and enter npm install -g yo. Wait for the install to download and complete. If you have errors, try running GIT Bash as an administrator. Beyond that, Googling any errors you’re getting is amazing for helping overcome system specific snags.
Generators are instructions that help Yeoman set up new projects automatically. Install the one for Jekyll by entering npm install -g generator-jekyllrb.
Note: All GIT techniques are roughly based on the article ‘How I Use GIT’ by Glenn Stovall. If you are unfamiliar with GIT, I recommend working through the 15min interactive tutorial at Try Git.
- Create a directory
- Move into new dir and GIT init
git init - Create dev branch
git checkout -b dev
yo jekyllrb- causes an error - Googled ‘Error: building is not supported on win32 npm install’ and found a [fix here].(gruntjs/grunt-contrib-imagemin#109)
- run
npm installto finish the installation
- Now run
grunt serverto see the site Yeoman built - Commit your changes by adding the new files to GIT tracking (
git add .) and committing them (git commit -am ‘your message about the commit)
- Connect to remote GIT repo
git remote add origin [Bitbucket or Github repository URL] - Create a master branch on the remote server
git push origin master - Create a dev branch on the remote server
git push origin dev
bower install foundation --save- Add
@import "../_bower_components/foundation/scss/foundation.scss";to main.scss
- YAML
- Folder structure (for pretty urls)
- layouts
- includes
- logic
- Add any Foundation .js files you need to the usemin blocks
- Add any supporting .js to
copy:distgrunt task grunt serverto see results
- Simply enter
grunt build - Take a look at your files to make sure everything was minified and copied correctly.
bower install angular --save- Add script to
<head> - Add script url to
copy:disttask in Gruntfile.js (like we did for the foundation files)
- This is another lesson for another day
- If you’re curious, check out Egghead.io. All of the beginner lessons are free, as are a lot of the advanced ones. Watching 1 - 31 is how I got started. Angular’s official tutorial is also quite good.