Using the 3D visualization tools in the UCSC Science & Engineering DSI I plan to make an interactive visualization. Specifically I plan to replicate flocking behavior using Boids, an emerging phenomena and example of complexity theory.
I hope to use the Looking Glass Portrait, and the Looking Glass 4K to display my simulation in holographic 3D space. Additionally, I plan to use Ultraleap to interact with the simulation by tracking a hand in open air.
Here is my non-holographic demo.
This project was built with nodejs, and I use bun as the javascript runtime and package manager (although you are welcome to use another package manager). First install the required node packages by running bun install in the project directory.
To run the simulation locally in developer mode execute bun run dev.
To create a static build change the base in vite.config.js to the desired path and then execute bun run build.
I documented my progress on this project below. Although this is not meant to be a guide, it can be used as one given some experience in JavaScript and the code provided at the beginning of each update.
Here is the code at the end of this stage
First Thing I looked into is the software that allows the looking glass/portrait to visualize things real time. Luckily, HoloPlay (the software that the portrait uses) has a plugin for ThreeJS a javascript framework I have a bit of experience in.
HoloPlayer ThreeJS Plugin Tutorial
Fortunately, I had already made a 2D vision of a Boid simulation using JavaScript inspired by Flocks, Herds, and Schools: A Distributed Behavioral Model. It would take some work as I needed to change rendering engines for HTML5's Canvas to ThreeJS, but the logic of the simulation was already figured out which would greatly reduce the difficulty in making the simulation.

After restructuring the project and adding a import-map to use JavaScript Modules, I made a simple rotating cube animation.

Here is the code at the end of this stage
Now that the camera and renderer were setup, I began working on animating a single Boid. I used my constructed box as a bounding box to contain the Boids (eventually this bounding box will be the Looking Glass). I used my previous 2D Boid Code as a template for the methods and operations I needed, and I kept the same Boid/BoidController structure with my BoidController class needing minor adjustments.
The first thing I did was create a Boid mesh. The geometry of a Boid can be anything; in more practical examples the mesh would be a bird, or a fish. However to simplify debugging I made the mesh a Tetrahedron with the built-in normal material:
const geometry = new THREE.ConeGeometry(0.05, 0.2, 3);
const material = new THREE.MeshNormalMaterial();
Along with the shape, the main Differences in Boid proprieties were representing the position and velocity as a THREE.vector3 instead of as individual vector components.
Since I was now using vectors, most of my code could be easily simplified as ThreeJS has all of the needed vector operations built into their THREE.Vector3 class. This left the refactored code looking much cleaner but also took some time and research into using ThreeJS properly.
Here is how the Boid is initialized now:
constructor(x, y, z) {
  // Create Mesh
  this.mesh = new THREE.Mesh(geometry, material);
  this.mesh.position.set(x, y, z);

  // Randomize velocity
  this.vel = new THREE.Vector3().randomDirection();
  this.maxSpeed = 0.02
}Now that Boids can be created, I need them to move and do things. First I made a simple function to randomly place the Boid somewhere in the bounding box. Next I focused on the basic operations in the update loop: moving a Boid according to its velocity, and pointing a Boid in the direction of its velocity.
These operations only required basic vector operations already implemented in ThreeJS
// Update positions
this.mesh.position.add(this.vel);

// Update direction
const axis = new THREE.Vector3(0, 1, 0);
this.mesh.quaternion.setFromUnitVectors(axis, this.vel.clone().normalize());
Now that a Boid can move, it needs to stay below a maximum speed, and stay within a bounding box. To handle speed I again used simple ThreeJS methods to clamp the speed of a Boid. Then to keep inside the bounding Box, I implemented a function pushOnScreen(boundary) that checks if the position of a Boid exceeds the box boundary subtracted by a margin. I adjust each component of the velocity vector by a turning factor to steer away from the wall and back towards the center.
const boundingBox = new THREE.Box3().setFromObject(boundary);
const origin = boundingBox.min;
const size = new THREE.Vector3();
boundingBox.getSize(size);

// x component
if (this.mesh.position.x < origin.x + this.margin)
  this.vel.x += this.turnFactor;
else if (this.mesh.position.x > origin.x + size.x - this.margin)
  this.vel.x -= this.turnFactor;

// y & z components are the same
After making some debug methods and camera controls, I can now spawn a Boid that moves within a box:
Spawning multiple Boids makes the animation already has some pizzaz:

Finally, I implemented the other rules of Boids using the same component approach as the 2D implementation. This is bad because computing vector components this way uses the CPU with each calculation being one at a time. I think A better implementation would take advantage of ThreeJS vector operations. The code would be cleaner as vector operations would be one line and done as ThreeJS intended. However, for even faster computations I may need to implement JavaScript workers or run vector computations on the GPU.
Regardless, here are some working swarms with different meshes and other small tweaks:

Here is the code at the end of this stage
As I have stated before, there are a few ways to optimize the simulation so I can render more Boids with less work from the computer. There are 2 main things I can do:
- Optimize vertex computations - Perform all vertex operations in one loop, instead of three functions
- Optimize draw calls - Since all the Boids are the same mesh, ThreeJS has a special mesh instance that can draw all of them in one call
First I rewrote the Boid methods to use ThreeJS vector operations instead of "manual" component computations. After the three methods were reimplemented, I combined them into one single method, sim(boids), that enacted all three forces in a single loop. This improved performance as the algorithm was running through every Boid three times per Boid before, and now is only running through every Boid once per Boid.
let neighbors = 0;
let match = new THREE.Vector3();
let center = new THREE.Vector3();
for (let otherBoid of boids) {
  if (this.distance(otherBoid) >= this.field) continue;

  neighbors++;

  // Avoid Others (separation)
  if (otherBoid !== this && this.distance(otherBoid) < this.minSeperation) {
    let avoid = this.vel.clone().sub(otherBoid.vel);
    this.vel.addScaledVector(avoid, this.avoidFactor); // apply avoid force
  }

  // Match (alignment)
  match.add(otherBoid.vel);

  // Center (cohesion)
  center.add(otherBoid.mesh.position);
}

// Apply Match Force
match.add(this.vel);
match.divideScalar(neighbors);
this.vel.addScaledVector(match, this.matchFactor);

// Apply Center Force
center.divideScalar(neighbors);
center.sub(this.mesh.position);
this.vel.addScaledVector(center, this.centeringFactor);
Second, I tried optimizing the mesh drawing, into a single GPU draw call. Since all the meshes are the same, I wanted to use THREE.InstancedMesh in ThreeJS. I got multiple meshes to render successfully, but I could not figure out a position transformation on a single mesh. After a lot of struggling I gave up, as the draw calls do not seem to be much of a bottle neck, and it was not worth the pain to try and figure it out. I will probably revisit this when I start importing more complicated meshes but for now I am leaving it alone.
Now the total amount my computer could render before lagging and heating up went from 300 Boids to 800 Boids.
Here is the Code at the end of this stage
Now that I can simulate flocking and my computer does not light on fire, I want to apply this simulation in a scenario. So why not simulate fish?
First I added some debugging tools using dat.gui. This way I could adjust the parameters of a flock easily and see the changes real time.
Now I focused on the scene. I added a yellow plane at the bottom of the bounding box and changed the color of the fog to blue. Then I expanded the bounding box and camera depth to make the scene feel more like an ocean.
Next I wanted to be able to simulate different kinds of fish, possibly with different attributes and colors. To do this I just made another Boid controller. This way Boids would only be affected by the other Boids in their flock, meaning different types of fish will not try to swim together. One problem with this solution is that flocks will not try to avoid other flocks, the meshes will past straight through each other. However, this is not a big concern for me right now so maybe I'll come back to it later.
Here is how the simulation looks now:

With all these changes to the scene, the initialization function (Init()) became really dense and hard to read. It was about time to make a World class that would store the various world elements and their initialization.
The following objects are contained in the World instance called ocean:
- Scene
- Camera
- Light
- Fog
- Bounding Box
- Renderer
- Camera Controls
Each of these objects has its own initialization method, to make the main World constructor easier to understand as well.
In addition to separating some of the initialization from main.js, I also gave the BoidController class its own file, instead of keeping it at the bottom of boid.js.
The next step in making my simulation look more like the ocean is actually importing the fish models. Luckily, ThreeJS has a module to import 3D models from a variety of 3D formats. The format I will be using is glTF 2.0 (here is why) so I downloaded the and setup the ThreeJS glTF Loader Module.
All I needed to do was load the model in, then clone the Model for each Boid instance to store. This should have been a simple step but I had a bit of difficulty because I did not read enough into the documentation. In the ThreeJS loader I was using it loaded things asynchronously, meaning JavaScript would create a task to load the model, but continue to animate and execute code why the model loaded in the background.
const loader = new GLTFLoader();
const fishData = await loader.loadAsync("../models/logo.glb");
const fishMesh = fishData.scene.children[0];
return { fishMesh };
This is obviously helpful most cases where you want to reduce loading lag. Usually you do not want your whole program to halt completely while it loads in a bunch of data. However, to initialize and animate a Boid, the model needed to be initialized first. The mesh holds the position data so the position cannot be changed until the mesh exists. To solve this issue I used the await keyword to insure the import finishes before the rest of the initialization code is executed.
For the test fish 3D Model I used blender to convert a STL file into a glTF. I used the UCSC letters model from my 3D Print - UCSC Word project. After scaling and adjusting some world values, the result looks like so:
Here is the code at the end of this stage
As the simulation is nearly finished, it was time to figure out the logistics of interfacing Holoplay (the holographic display software) with my simulation. I knew that ThreeJS would work with the software but I had to think about the easiest way to do this. At the same time, I looked over my javascript modules and I didn't like my long import map in my index. Although I loved the simplicity of vanilla Javascript, it was about time to put some more infrastructure behind my code.
I decided to refactor my code and use Typescript with NodeJS. Dealing with all the different types of meshes and geometries and various objects being passed through functions it would definitely help to have a strongly typed language to stop me from making silly mistakes. I decided to use Vite to bundle my Typescript into a static site. I have heard a lot of good things about Vite and I wouldn't a simple web bundler that did not require much configuration. Not that I was using Node I imported ThreeJS and its extensions through npm instead of using downloaded releases.
After all the refactoring, I decided to redo the GUI that controlled the Boid Parameters. I did not like how it was so cluttered, and I wanted the separation, alignment, and cohesion to be clearly distinct with one value each. Here is the old GUI:
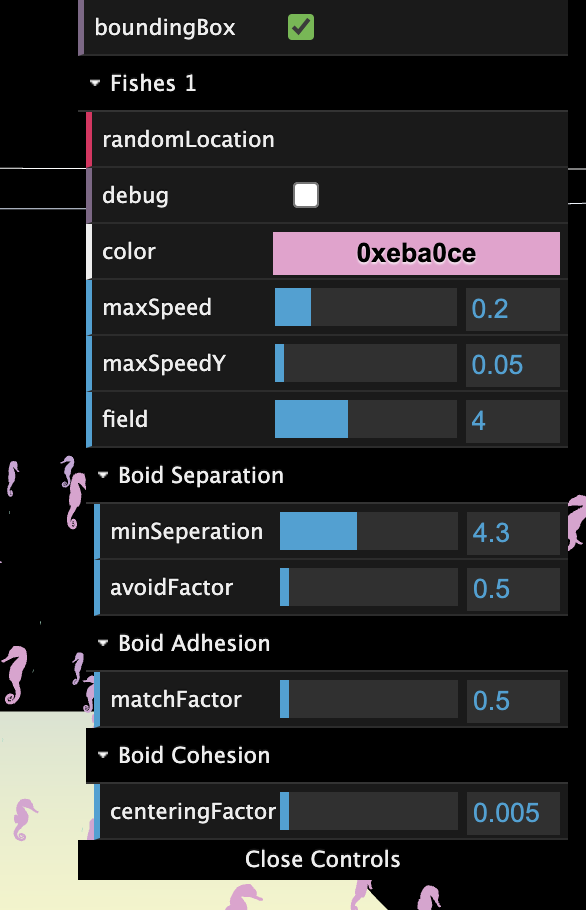
First I got rid of the avoidFactor attribute and instead made it equal to 2*this.attributes.maxSpeed/100*this.attributes.minSeperation. This way the avoid factor would scale with the speed and separation distance instead of being a manually controlled parameter. This allowed me to get rid of the subfolders in the GUI making the overall interface a lot cleaner.
Next, I decided to scale my Boid attributes to have more sensible parameters. The decimal representations were not very pretty and it was confusing that the centeringFactor was 100x smaller than everything else. I spent some time making good coefficients to this attributes, so that the scales would all be from 1 to 10, except for the maxSpeedY which was a ratio of the total speed from 0 to 1. With all of this implemented, the updated GUI looked a lot cleaner and was a lot more satisfying to control:

Finally, I decided to do some Git cleanup and add this log to the Github. I wanted the repo to contain all the information about the project so I uploaded the images and this README. I merged the 3D branch into the main, and created a gh-pages branch to designate for the static site to be displayed. Finally, I aded a "See How I work" button to link to the github code.
No uploaded code changes for this stage
Finally I have fish! Thanks to @vickychaij from the DSC, I finally have 3D fish models to represent my boids. Here they are imported into the simulation:

One thing I need to address is the material on the fish. Flat shading like this makes them sort of resemble blobs and takes away from the excellent modeling work that was done. Either I need to add texture, or change the material and lighting for the scene.
No uploaded code changes for this stage
Finally the Looking Glass Portrait has arrived! I am excited to get my simulation running on the technology at last. I followed the ThreeJS Looking Glass Integration Documentation, and tried running the simulation. Sadly, when trying to run the VR simulation the console threw the following error:
TypeError: Cannot read properties of undefined (reading 'matrix')
Frustratingly the stack trace only pointed to internal library functions within three.js and XRSession.js that had something to do with a camera variable inside some array being undefined. Infuriatingly I have to find a way to track down what is causing this error, without having any good idea where to start looking. Hopefully I can fix this next time I work on it.
Here is the code at the end of this stage
After an hour of troubleshooting I figured out why my simulation was not running. The was solution was frustratingly simple. The version of Three.JS that my visualization used needed to be updated to a more recent version. After I got that fixed the code worked and I could finally see my visualization on the Looking Glass!
However, there were quite a few problems to solve. First, the scale of everything was way to big. This took a bit of time as the speed needed to be adjusted with the scale of the boids.
Here is a quick preview how it looks in a dark room:
