Setting Up A Development Environment
Note: This details how to use GCC with Eclipse to program the Sprite rather than Energia. Most people will want to use Energia as detailed here.
The following guide will be a step by step tutorial in installing the development environment for the msp430 line of microcontrollers in Xubuntu, tailored specifically for sprite chipsat boards. Although Eclipse will be downloaded later and a mps430 plugin installed for it, it's debugging features are not fully functional, therefore a separate version of the toolchain will additionally be compiled.
First download the following packages from the Development Kit:
- mspgcc-20120406.tar.bz2
- msp430mcu-20120407.tar.bz2
- msp430-libc-20120224.tar.bz2
- binutils-2.21.1a.tar.bz2
- gcc-core-4.6.3.tar.bz2
- gdb-7.2a.tar.bz2
- mspdebug-0.19.tar.gz
Place these packages in a folder on the desktop, do not include any spaces in the name of that folder.
The mspgcc toolchain can be automatically built by running the script mspgcc_build.sh which can be found in the development kit. Place this script file in the same folder as the packages, then open a terminal window in the same directory and run the script using the command: sudo sh mspgcc_build.sh
Let this script run until everything is completed. This process may take 15-30 minutes.

After the toolchain finishes building, we need to create a UDEV rule to take care of the Launchpad programming board every time it is plugged in via usb.
Open a terminal and enter the following command:
sudo nano /etc/udev/rules.d/46-TI_launchpad.rules
Enter the following string into this new file
ATTRS{idVendor}=="0451", ATTRS{idProduct}=="f432", MODE="0660", GROUP="plugdev"
Press CTRL-X to save the file, then press Y to agree, and then enter. You should now be back at the terminal. Enter the following command to restart udev:
sudo restart udev
The mspgcc toolchain build is now complete; the next step is configuring eclipse to work with it.
First Download Eclpise, we need the Indigo version, so go to eclipse's website and download the Eclipse IDE for C/C++ developers (including incubating components). When it finishes downloading, extract the package and run eclipse. We will now install some plugins.
Go to the "Help->Install new software" menu, and type in "http://eclipse.xpg.dk" as the repository. Select the msp430 32 bit toolchain and msp430eclipse to install, press ok to all warnings during installation. After installation, restart eclipse when prompted. This installs the msp430 eclipse plugin with prebuilt toolchains, however the prebuilt version of mspdebug has some bugs in it, so we will use our own.

When eclipse restarts, go to Window->Preferences and click on the mps430 tab. Select Precompiled GCC 32 bit linux tools for both the GCC and GDB provider. For the MSPDEBUGGER, choose system tools and use the usr/local/bin directory.

You can create a new project by going to File->New->Project.... Open a new C/C++ group, select C Project, and press next. Name your project, and choose the MSP430 Cross Target Application group and select "Empty Project". Press next, and then next again, and you will be brought to a window asking you to specify your mcu. From the very long dropdown list, choose the cc430f5137 and press finish. Go to the workbench if you have not already.
Next, right click on the project and choose properties, and then the msp430 tab. Make sure the right mcu is still selected. Also select rf2500 for the MSPDEBUG driver, USB connection, and SBW Protocol and hit Apply.

That completes the setup of the msp430 elcipse plugin. We will now also install a second debugging plugin.
Once again go to Help->Install New Software, and install the Zylin Embedded CDT from the following repository: http://opensource.zylin.com/zylincdt
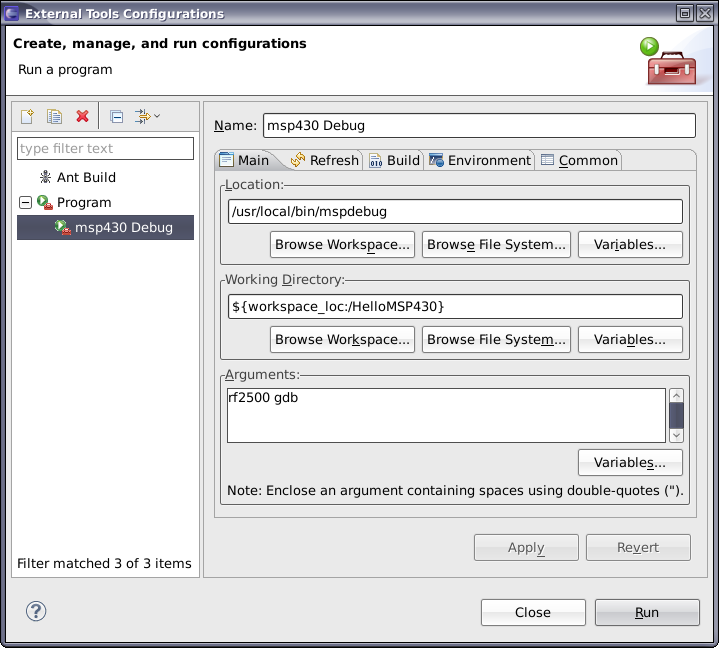
Once this finishes installing, restart Eclipse when prompted again. Now go to Run->Debug Configurations, then select the “Program” in the tree control of the left pane and then click the icon for “New Launch Configuration”. Name this configuration "msp430 Debug". In the location field, browse to /usr/local/bin/mspdebug. For the working directory, select your current workspace project. For the arguments box, enter "rf2500 gdb". Press Apply and close this window.
Next, go to Run->Debug Configurations. Create a new configuration under the tree heading –> Zylin Embedded Debug (Native)
In the "main" tab, choose your project, and under the C/C++ application, you will have to point to the .elf of the application you are going to debug. Since we don't have one yet, leave this blank for now, but once you compile your code and create an .elf file, you need to come back to this window and point to it. You need to create a different debugging configuration for each project you make in Eclipse.
Under the "Debugger" tab, selected "Embedded DGB" as the debugger, and enter msp430-gdb as the GDB debugger below, or browse to in it /usr/local/bin. Under the "Commands" tab, enter the following commands under initialize:
set remoteaddresssize 64set remotetimeout 999999target remote localhost:2000
and under the 'Run' commands, enter continue.

This completes the development environment setup. See the "How to Program and Debug Chipsat Boards" wiki page for information on how to use this development environment.
Optional: Set up the Eclipse MPS430 plugin debugger for one click debugging (displaying numerical values does not work, only step through functionality)
Once again, go to "Run->Debug Configurations..." from the Eclipse menubar. Right click the "MSP430 Debug"-group on the left, and select "New". Name this new configuration and make sure it points to the applications .elf file, and is using your correct project. Hit Apply to save it.

- Installing MSPGCC toolchain: http://sourceforge.net/apps/mediawiki/mspgcc/index.php?title=Install:fromsource
- Installing Eclipse MPSP430 Eclipse plugin: http://www.43oh.com/forum/viewtopic.php?f=5&p=13656#p13656
- Setting up Zylin CDT: http://blog.engine12.com/?tag=msp430