IP visualizer is a tool for visualizing IP addresses on a map inside a selected area determined by a radius drawn by the user.
Live demo available at https://ipv.karate.monster
Simply click on the crosshair button to activate select mode. Click anywhere on the map and drag to select a radius.
To cancel out of selection mode without drawing simply right click or press escape button.
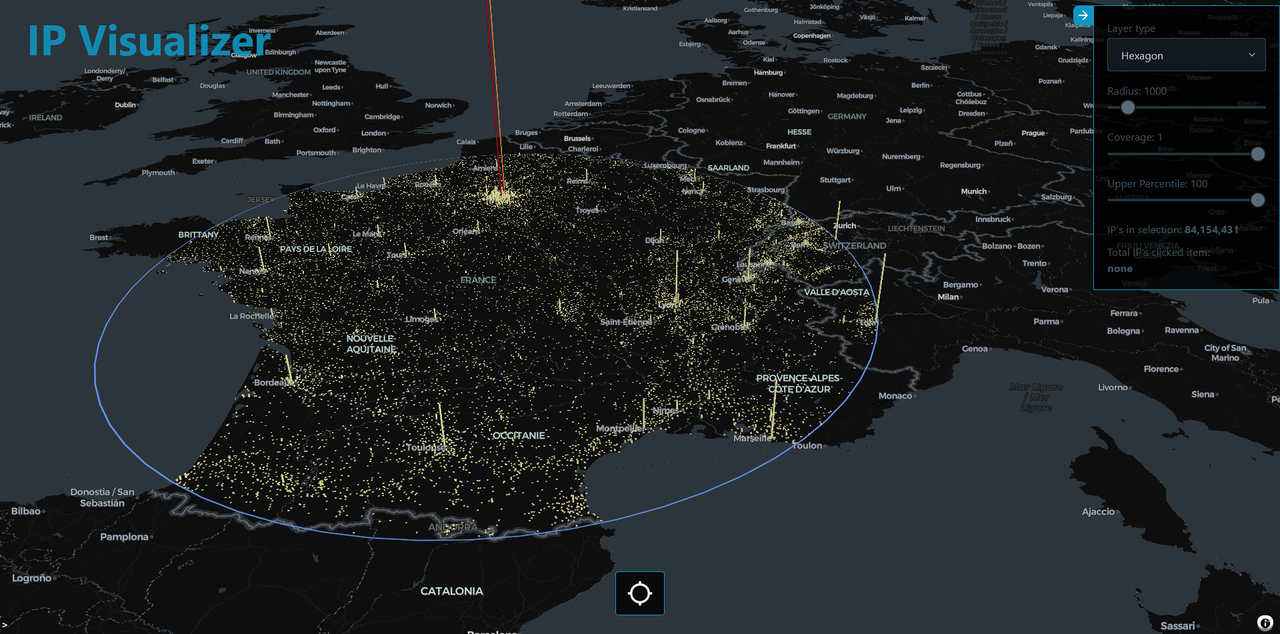
When finished selecting the area, data is fetched and visualized on the map. The layer controller allows the user to switch between the different visualization layers and options.
In some layers you can click on an entity to see more information.
Here's a short video that explains the project and how it uses Redis:

The user activates the select mode by clicking the crosshair button.
When this mode is selected the mouse position will be captured when the user left click with the mouse.
When user moves the mouse while the button is pressed a circle will be drawn. The circle radius will be calculated with the help of the Turf.js library.
Once the user releases the mouse button the circle will be drawn on the map as a polygon with the help of Turf.js.
At the same time a post request is sent to the server with the starting coordinates and the radius.
This data is then used sent to Redis with a request to get all the IP-addresses within the specified radius of the starting coordinates.
The IP-address data is then sent back to the client and with help of deck.gl it is visualized on the map.
The data is stored in Redis using the GEOADD command. The first parameter is the name of the "set" that the data belongs to, followed by the coordinates for longitude and latitude. The last parameter is the range of IP-addresses in CIDR format.
Here is an exmaple of the command: GEOADD ips -115.171971 36.120609 182.134.22.20/22
The application itself do not change the data (with the exeception of the ratelimiter I'm using), it only fetches it, so it needs to be loaded into Redis before being used. This can be done automatically by using the "update-data" script. It will download the necessary .csv file and give options on how to load it into Redis, either the fast approach by using redis-cli if available or the slower way by using the redis-client.
This shows the function when loading data with the redis-cli. The encodeRedis function implements the needed protocol.
import { spawn } from 'child_process';
import { createReadStream } from 'fs';
import CsvReadableStream from 'csv-reader';

const uri = process.env.REDIS_CONNECT_STRING;
const redisPipe = spawn(`redis-cli`, ['-u', `${uri}`, '--pipe']);

redisPipe.on('error', function (err) {
	console.log('Failed spawning redis-cli, check your REDIS_CONNECT_STRING in .env or try slow loading instead');
	process.exit();
});

redisPipe.stdout.setEncoding('utf8');
redisPipe.stdout.pipe(process.stdout);
redisPipe.stderr.pipe(process.stderr);

const BUFFER_SIZE = 524288; // 512KB
let buffer = '';

async function updateWithCLI(file) {
	let inputStream = createReadStream(file, 'utf8');
	console.log('Pleas wait...');

	inputStream
		.pipe(new CsvReadableStream({ asObject: true }))
		.on('data', async function (row) {
			if (row.longitude && row.latitude) {
				buffer += encodeRedis(`geoadd ips ${row.longitude} ${row.latitude} ${row.network}`);
				//when buffer is filled then write it n empty buffer.
				if (buffer.length > BUFFER_SIZE) {
					redisPipe.stdin.write(buffer);
					buffer = '';
				}
			}
		})
		.on('end', async function () {
			redisPipe.stdin.write(buffer); //write the remaining buffer if any left
			redisPipe.stdin.end();
			console.log('Update complete');
			process.exit();
		});
}

function encodeRedis(dataString) {
	const dataArr = dataString.split(' '); //put data in array
	let msg = '*' + dataArr.length + '\r\n'; //create start of message with amount of args

	for (let i = 0; i < dataArr.length; i++) {
		msg += '$' + dataArr[i].length + '\r\n' + dataArr[i] + '\r\n'; //encode the data
	}
	return msg; //return the encoded message
}
export default updateWithCLI;
Below is function used for loading the data into Redis using the node redis-client.
import { createClient } from 'redis';
import CsvReadableStream from 'csv-reader';
import { createReadStream } from 'fs';
const redisClient = createClient({ url: process.env.REDIS_CONNECT_STRING });

async function slowLoad(file) {
	await redisClient.connect().catch((err) => {
		console.error('Failed to to connect to redis! Check your REDIS_CONNECT_STRING in .env');
		process.exit();
	});

	let inputStream = createReadStream(file, 'utf8');
	let counter = 0;
	inputStream
		.pipe(new CsvReadableStream({ asObject: true }))
		.on('data', async function (row) {
			if (row.longitude && row.latitude) {
				try {
					await redisClient.sendCommand(['GEOADD', 'ips', row.longitude + '', row.latitude + '', row.network]);
					counter++;
					console.log(`${counter} rows processed`);
				} catch (error) {
					console.error('redis_err', error);
				}
			}
		})
		.on('end', async function () {
			console.log('Update complete');
			process.exit();
		});
}

export default slowLoad;
Refer to this example for a more detailed example of what you need for this section.
Accessing the data is done on the server and really simple. It uses the node redis client and just send the GEORADIUS command with the name of the set, coordinates for the center point of the circle and the radius in kilometers. The withcord parameter is set to true, so the results are returned with the coordinates .
The paramters for coordinates and radius is ofcourse sent from the client side of the application.
const data = await redisClient.sendCommand(['GEORADIUS', 'ips', lng + '', lat + '', radius + '', 'km', 'WITHCOORD']);The data is then parsed into a more usable format and sent back to the client.
If only want to run locally and not do any development work you only need the dist folder. This folder contains the backend server and in the public folder is a compiled version of the frontend that will be served by the backend server.
- Go to the dist folder and run npm install to install all the dependencies.
npm install-
You will need to change the .env file and set valid REDIS_CONNECT_STRING for your Redis instance.
-
You need to load data into Redis. For this a license key to use GeoLite2 from MaxMind is needed. It is free to get and you can sign up at the MaxMind website.
-
Put the license key as MAXMIND_KEY in the .env file.
-
Now run the command
npm run update-dataThis will download the needed file and you get a choice to load the data into Redis with the redis-cli or the node redis client. The redis-cli is faster but you need to have the redis-cli installed to use it. The node redis client is slower but an option if you don't have the cli.
If you for some reason want to handle the data loading yourself, you can parse the .csv into a simple textfile with the Redis commands.
- Start the app
node index.js
or
node .
or
npm run start- Open the browser and go to http://localhost:3000/
Node, Preferably LTS (v16.16.0) but tested and working with v16.7
MaxMind GeoLite2 License Key
A Redis instance with enough capacity to fit the data, around 200MB of storage should be enough.
Configuration is done in the .env file.
API_PORT = 3000;
USE_PROXY = 'false';
NEED_CORS = 'false';
REDIS_CONNECT_STRING = 'redis://localhost:6379';
MAXMIND_KEY = 'your maxmind key';
LISTEN = '';
API_PORT: is the port the server will listen on.
USE_PROXY: setting this to 'true' makes Express trust the X-Forwarded-* headers. Use this if running server with a reverse proxy so ratelimiting works like intended.
NEED_CORS: setting this to 'true' makes Express allow CORS requests. It is not needed if serving the frontend from the backend api
REDIS_CONNECT_STRING: is the connection URI for the redis instance.
MAXMIND_KEY: is the license key for the MaxMind GeoLite2 database.
LISTEN: can be set to 'localhost', this means the server will listen to localhost only. Is usefull if running server behind reverse proxy.\
Direct deployment to cloud is not supported. I don't do cloud! If wan't to deploy to cloud, you will have to figure it out yourself. Deploy the way you usually do other node projects. I prefer to run them with PM2 behind a Nginx reverse proxy.
If reverseproxy the connection to IP visualizer you should set the "USE_PROXY" to "true" in the .env file
Want to mess around with the code or do your own development?
The server folder holds all the code for the backend server. It is just a simple express API.
The .env file needs to be changed just as described in "How to run it locally?"
The other needed options are already set so NEED_CORS will be set to true as frontend will be run on a different port.
Same as before the server is started with node index.js or simply node .
node index.js
or
node .
or
npm run startThe client is in the client folder, it is a Svelte application and uses Vite. To start up the client run the command
npm run devFor production build that is meant to be served from the backends public folder run
npm run build --productionThis will use the .env.production file and set the api path to the correct url.
If you want to serve client independently from a regular webserver you can run
npm run buildIf doing so you need to make sure the api url/port is set correctly in the .env file before to match the backend server.
The server will also need to have CORS enabled and you should also set the allowed origins for it. See the documentation for more information.
MIT License
Copyright (c) 2022 Tony Sjögren
Permission is hereby granted, free of charge, to any person obtaining a copy of this software and associated documentation files (the "Software"), to deal in the Software without restriction, including without limitation the rights to use, copy, modify, merge, publish, distribute, sublicense, and/or sell copies of the Software, and to permit persons to whom the Software is furnished to do so, subject to the following conditions:
The above copyright notice and this permission notice shall be included in all copies or substantial portions of the Software.
THE SOFTWARE IS PROVIDED "AS IS", WITHOUT WARRANTY OF ANY KIND, EXPRESS OR IMPLIED, INCLUDING BUT NOT LIMITED TO THE WARRANTIES OF MERCHANTABILITY, FITNESS FOR A PARTICULAR PURPOSE AND NONINFRINGEMENT. IN NO EVENT SHALL THE AUTHORS OR COPYRIGHT HOLDERS BE LIABLE FOR ANY CLAIM, DAMAGES OR OTHER LIABILITY, WHETHER IN AN ACTION OF CONTRACT, TORT OR OTHERWISE, ARISING FROM, OUT OF OR IN CONNECTION WITH THE SOFTWARE OR THE USE OR OTHER DEALINGS IN THE SOFTWARE.
This repository does not include any data, it just provides a simple way to download the GeoLite2 database from MaxMind.
For usage rules and restrictions on mentioned data please cunsult the license agreement
Dependencies are licensed under their own respective license and are their code is not included in this repository, it only holds a list of dependencies in form of a package.json file
Here some resources to help you quickly get started using Redis Stack. If you still have questions, feel free to ask them in the Redis Discord or on Twitter.
- Sign up for a free Redis Cloud account using this link and use the Redis Stack database in the cloud.
- Based on the language/framework you want to use, you will find the following client libraries:
- Redis OM .NET (C#)
- Watch this getting started video
- Follow this getting started guide
- Redis OM Node (JS)
- Watch this getting started video
- Follow this getting started guide
- Redis OM Python
- Watch this getting started video
- Follow this getting started guide
- Redis OM Spring (Java)
- Watch this getting started video
- Follow this getting started guide
- Redis OM .NET (C#)
The above videos and guides should be enough to get you started in your desired language/framework. From there you can expand and develop your app. Use the resources below to help guide you further:
- Developer Hub - The main developer page for Redis, where you can find information on building using Redis with sample projects, guides, and tutorials.
- Redis Stack getting started page - Lists all the Redis Stack features. From there you can find relevant docs and tutorials for all the capabilities of Redis Stack.
- Redis Rediscover - Provides use-cases for Redis as well as real-world examples and educational material
- RedisInsight - Desktop GUI tool - Use this to connect to Redis to visually see the data. It also has a CLI inside it that lets you send Redis CLI commands. It also has a profiler so you can see commands that are run on your Redis instance in real-time
- Youtube Videos
- Official Redis Youtube channel
- Redis Stack videos - Help you get started modeling data, using Redis OM, and exploring Redis Stack
- Redis Stack Real-Time Stock App from Ahmad Bazzi
- Build a Fullstack Next.js app with Fireship.io
- Microservices with Redis Course by Scalable Scripts on freeCodeCamp