Tutorial: Character
Source Code: sample-character
Object models are the building blocks of any game. They define how the game looks, and they're also fun to create. Sometimes though, you want to take your game to the next level. Adding animations and physics will allow you to put objects into your game that move realistically, adding depth and character to your game.

This tutorial will show you how to create, animate, and control a character in a game. It will look at the key steps of the modeling pipeline, from creating a model in a design tool, animating it, and importing it into an application using the gameplay library (https://github.com/gameplay3d/gameplay). Gameplay provides tools and APIs that make the process of importing and controlling your fully realized model easy and effective. It is recommended that you read the gameplay Development Guide before following this tutorial.
- Create game assets
- Export assets into commonly used formats
- Encode assets for use in your game
- Create the game!
This tutorial also explains how the relevant pieces of the gameplay library work. It is suggested that readers follow along with the sample-character sample available on GitHub.
This tutorial is presented using the Autodesk Maya (http://usa.autodesk.com/maya/) tool, however many other tools can be utilized to create for your game.
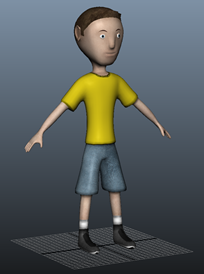
A game isn't a game without cool visual elements that bring the player into the environment. One of the ways to keep a player interested in the game is to have a character that represents them, such as an avatar. To illustrate how you can create a character, we will take this funky guy here, named StevieGee, and bring him into a simple game:
The content creation process for bringing StevieGee into the game is as follows:
- Create the game asset in a modeling tool
- Export the asset out of the modeling tool
- Encode the asset into a format that your game framework understands
- Import the asset into your game
We will discuss content creation steps in-depth, but first, we'll describe how to create your game asset. You can use any number of tools to create your model, but here we'll use Autodesk Maya to illustrate the character creation process. The process for creating a game asset involves four steps:
- Creating the mesh
- Binding the skeleton to the mesh
- Animating the character
- Lighting the character
The first step in building a model is to create the 3-D surfaces that represent your object in the scene. To do this, you need some idea of what the objects will look like, and how they will move in order to accurately create them in the modeling tool. This requires some degree of imagination and artistic skill, as well as a familiarity with how modeling tools work. We'll give a very brief description of the concepts here but you are encouraged to browse the web and play around with tools to learn more details about object modeling.
Typically, each surface on an object model is represented by a network of shapes that have three or more sides, these shapes are called polygons. Polygons are connected together to create an object model, or mesh, and the points where the polygons connect are called vertices.
The higher the amount of polygons, the more detailed you can make your objects. For this tutorial, we use the relatively simple StevieGee mesh.


Of course, there are more ingredients involved in making a mesh look good, such as applying textures, materials, and lighting to the polygons, but we'll talk about those later in the tutorial. While we haven't gone into a lot of detail about creating meshes here (that could take several tutorials!), you can search the web to find your own content. There are plenty of freely available models out there, so it's just a matter of finding what you want. For now, we need to make the StevieGee mesh move, so that the player can interact with him in the game.
To make a mesh move, you need to give it a framework that defines which parts of the mesh are moveable and how those parts can be adjusted. A skeleton is used to define this framework. Just like a real human body, a mesh's skeleton has bones that define immovable sections and joints that define articulation points between bones. You set the position and rotation limits of joints on the skeleton so that they rotate in a convincing manner and, when they are animated in the game, you adjust these values to give the appearance of movement.

You combine the character's mesh with the character's skeleton through a process called binding. Binding a skeleton to a mesh defines a controlling mechanism that is used to deform the mesh according to the bone and joint properties of the skeleton. This means that when StevieGee's arm moves, you'll get the vertices and sides of the polygons around his elbow stretching or contracting, giving the appearance of realism. Usually the modeling tool calculates the deformation as part of the animation process, but you can further tweak how it looks. One such adjustment is to switch between the techniques used for binding, such as rigid and smooth binding. Here we'll use smooth binding because it allows for more than one joint in the skeleton to influence each vertex in the mesh, giving you a more realistic mesh deformation.
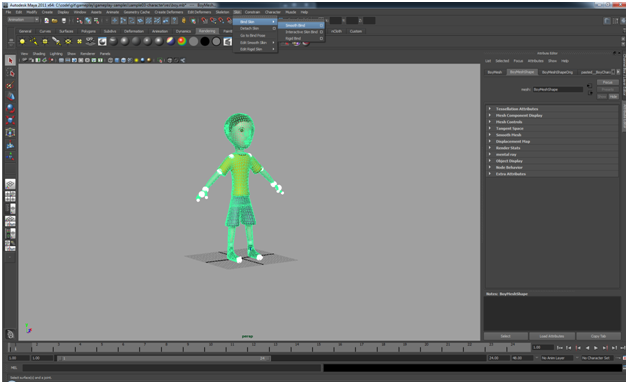
In Maya, the options used to smooth bind the skeleton to the mesh are located under the Animation view. Once in the Animation view, select both the model's mesh and skeleton. Then from the menu bar select Skin > Bind Skin > Smooth Bind and click the box next to Smooth Bind to bring up the Smooth Bind Options. To apply the bind, click the Bind Skin button in the Smooth Bind Options window.
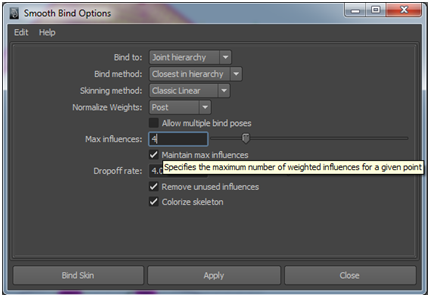
Note: Our GPU shader programs only support a maximum of four weighted influences per joint.
For more information on these properties, please visit the Smooth Bind section in the Maya User Guide.
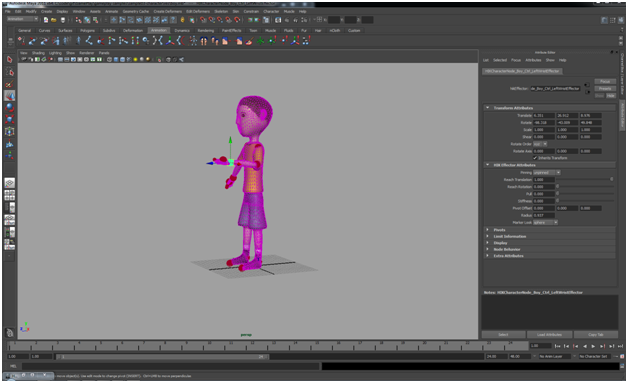
Now, you have bound the skeleton to the mesh, but when you move the joints, the mesh might not deform in a realistic manner. This is where influence objects come into play. Influence objects are customized shapes you add to the skeleton to define deformation points beyond the joints. For example, you can position a spherical influence object near StevieGee's elbow so that the mesh bulges out as you move the joint. This can take a lot of fine-tuning and experimenting, but you'll see the results can add a lot to the overall impression of the model.
Now that StevieGee looks good, and has a backbone, it's time to get him moving. The act of animating a mesh is essentially defining a path that each joint in the mesh's skeleton can take for a particular movement. "Snapshots" are taken along that path to store as the skeleton's different states, and these can be played back to re-create the movement. Each snapshot is referred to as a frame and when a set of frames is played in sequence, you get an animation.
The rate at which frames are played back define how the animation looks and it is highly dependent on the medium where the animation is being played (television, film, video game, etc.). Typical frame rates are 24 or 30 frames per second (fps). The higher the frame rate, the more intensive the resource usage is. Because of this, it is typical for an animation to define keyframes. Keyframes are a subset of an animation's total amount of frames and specify the mesh's attributes at specific points in time. The application that does the rendering will generate the intermediate values between keyframes so the object moves smoothly and consistently. The more keyframes you have, the more you are directing the renderer along a specific path, so it takes a bit of experimentation to find the right balance between keyframes and performance. Keyframe animation is more traditional than some newer methods, like inverse kinematics, but it works for our purposes.
For StevieGee, we have defined five animation clips corresponding to his joints:
- Idle
- Walk
- Run
- Jump
It is essential to create your animations in place. This makes it easier to bring your animations into your game. To do this, ensure that you've selected the root or hip joints. Typically, you create the complete set of animations for your mesh sequentially along one timeline. The animations can then be indexed by frame and broken up into multiple animation clips. For example, we have set up StevieGee's animation so his idle pose is at frame 29 and his walk animation is from frame 42 to 66. Once you have defined these clips in your modeling tool, you can export them to an .animation file for use by your application. You can see these definitions in the boy.animation file located in the /res project directory. More information will be provided on the .animation file later in this document.
You use light in a game to create variations in shading, giving added depth to the models in the scene. There are two parts to lighting a model inside a game - one is to define the location and properties of light sources in the environment, and the other is to define how the model itself reacts to light. Defining how the model reacts is accomplished by the properties of the material that is applied to the mesh. You can apply these properties either programmatically in the game, or by creating a materials file that can be loaded in at runtime. Either way, these properties are needed for the game to render the appearance of the model appropriately.
For StevieGee, we have decided to use material files that contain the information required to light the model, and the dance floor, correctly in the scene. The portion of the material file for the character looks like:
material boy : texturedTransparent
{
    technique
    {
        pass
        {
            defines = SKINNING;SKINNING_JOINT_COUNT 31;MODULATE_ALPHA
            u_matrixPalette = MATRIX_PALETTE
            u_modulateAlpha = 1.0

            sampler u_diffuseTexture
            {
                path = res/character.png
            }
        }
    }
}

material boyShadow : texturedTransparent
{
    technique
    {
        pass
        {
            sampler u_diffuseTexture
            {
                path = res/shadow.png
            }
        }
    }
}
For more information on the properties contained within a .material file, please consult the Materials and shaders section of the gameplay Development Guide.
Using the gameplay library, your game can load these material files dynamically at runtime, like this:
Material* meshMaterial = model->setMaterial("res/scene.material");Once you have completed your model, it needs to be taken out of the modeling tool so that you can bring it into your game. The method of exporting models varies from tool to tool, but it's always a good idea to export it into a commonly used format. This way, you have the most flexibility in terms of using the object.
FBX is the interchange format between popular Autodesk tools like Maya, 3ds Max, Blender and most other major DCC tools. Using Maya an example tool, we'll show you how to export StevieGee into both formats.
- If you don't already have the latest FBX plug-in for Maya, you will need to download and install it in order to export to FBX. Please go to http://www.autodesk.com/fbx-downloads to download and install it.
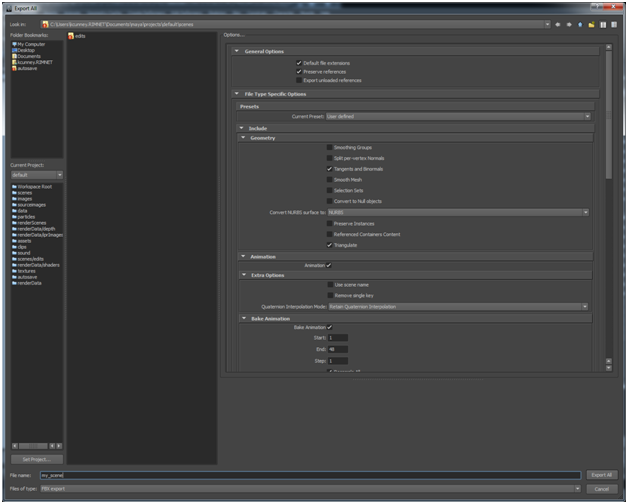
- To export your scene to
.fbx, click File > Export All or Export Selection - Change the Files of type to FBX export.
- Ensure the following additional options are checked off:
- Geometry > Triangulate
- Geometry > Tangents and Binormals
- Name your file, and click Export All.
Now that your model has been exported to a known format, there is one more step to complete in order to get it ready for use. Your model needs to be converted from the exported interchange format .FBX into an efficient binary bundle format that the gameplay framework can use. To do this run gameplay-encoder with the required parameters.
To encode your FBX scene file(.fbx) into the gameplay binary format (.gpb), run the following command:
gameplay-encoder -g HIKCharacterNode_boy_Reference animations "../../gameplay-samples/sample-character/res/boy.fbx"
Encoding your FBX file is quite similar to encoding your FBX file. Let's take a look at some of the extra parameters passed into the encoder.
The -g parameter says that you want to group all animations on HIKCharacterNode_boy_reference, and its children node into an animation called 'animations'.
This encoding is necessary because the FBX, or in the case of fonts, TrueType files are really just interchange formats, and are huge ascii files that are not recommended for runtime format. Encoding them packs them into a more efficient binary bundle and only takes the data that is needed by the gameplay framework.
The .scene file is used to specify the characteristics of the scene. The .scene file must include the path to the .GPB file that the scene's content is loaded from. Additionally, the .scene file can include information about the active camera, physics properties, such as collision objects and constraints, animations, and various node attachments, such as particle emitters, audio sources. Also materials are not transferred from the exported data into the encoded file. This is since the materials used in the 3-D tools like Maya are not in a format that is useable in GLSL and cross-platform.
Here is the .scene file for our sample:
scene
{
    path = res/scene.gpb

    node boycharacter
    {
        collisionObject = res/scene.physics#boy
    }

    node boymesh
    {
        material = res/scene.material#boy
        dynamic = true
    }

    node boyshadow
    {
        material = res/scene.material#boyshadow
        transparent = true
        dynamic = true
    }

    node camera
    {
        collisionObject = res/scene.physics#camera
    }

    ...

    physics
    {
        gravity = 0.0, -9.8, 0.0
    }
}
(For the full sample please refer to res/scene.scene)
As you can see, we make use of node attachments like materials and rigid bodies. We also specify the global gravity constant to be applied within the scene. You can also define your physics constraints between rigid bodies here. The gameplay framework supports hinge, fixed, socket, spring, and generic six-degree-of-freedom type constraints.
Another thing to point out is the wildcard character (*). This is used as a convenience to apply the same settings on all nodes with IDs starting with the string provided in front of the wildcard. This saves you from having to define several nodes that will all have the same properties.
For more information on this, please consult the gameplay Development Guide.
The .material file is used to specify the techniques used to render the various materials within your scene. As you can see in the .scene file, the .material file is referenced in various nodes followed with a hash-tag. This simply states that the material for the node should utilize the technique with the specified namespace defined in the .material file. For more information on the .material file please consult the gameplay Development Guide.
For the reference sample please refer to res/scene.material.
The .physics file is used to define the rigid body objects within the scene. Collision objects are used to represent the geometry of the objects within your scene in the physics world. They serve as a definition of how each object interacts with other objects in the world. The physics system in gameplay supports rigid bodies, ghost objects and characters. The can be represented with shapes such as collision objects of type box, sphere, capsule, mesh and terrain height field. All complex rigid bodies should be defined in the .physics file. For more information on the .physics file please consult the gameplay Development Guide.
For the reference sample please refer to res/scene.physics.
The .animation file is used to define how you break up the animations of your scene into separate animation clips. We identify the animation by its ID and then namespace the clips we're going to define for the animation. At the very least for each clip definition you must include the 'begin' and the 'end' frame. Here we have also included the repeatCount property to specify how many times the animation clip should repeat. We have used the INDEFINITE flag for cycle animations like walk, and run, and a repeat once for one-off animations like jump. Additionally, you could define properties on the clip, such as speed.
animation boyAnimation
{
    frameCount = 1100
    clip idle
    {
        begin = 27
        end = 167
        repeatCount = INDEFINITE
    }
    clip walking
    {
        begin = 274
        end = 298
        repeatCount = INDEFINITE
    }
    clip running
    {
        begin = 331
        end = 346
        repeatCount = INDEFINITE
    }
    clip jump
    {
        begin = 473
        end = 486
        repeatCount = 1
        speed = 0.4
    }
}
For the full sample please refer to res/boy.animation
Finally, you can bring you can bring your animation clips into your game as follows:
_animation->createClips("res/boy.animation");For more information on the .animation file please consult the gameplay Development Guide.
Before we get into the actual code of the game, let's look at what we're trying to accomplish:
- Bring StevieGee into a scene
- Control StevieGee's movements using touch inputs
Pretty simple, right? To create the game, we'll follow the standard lifecycle used for any game: initialize, update, render and finalize. The gameplay library provides the underlying framework for your application, so all you need to worry about at runtime is overriding the appropriate functions and callbacks to handle inputs. These methods are called automatically by the gameplay library at the application's frame rate. This allows you, as the game developer, to cleanly separate code for both handling updates to your game state and to render/draw your games visuals using a variety of built-in graphics classes.
The first thing you should do is subclass Game in CharacterGame.h :
class CharacterGame: public Game, public AnimationClip::Listener
{
    ...

    void initialize();

    void finalize();

    void update(float elapsedTime);

    void render(float elapsedTime);

    ...
}
For the main program, we need to bring the visual elements we've created into the game. This is done in CharacterGame::initialize() function.
void CharacterGame::initialize()
{
    ...

    // Load scene.
    _scene = Scene::load("res/scene.scene");

    // Update the aspect ratio for our scene's camera
    // to match the current device resolution.
    _scene->getActiveCamera()->setAspectRatio((float)getWidth() / (float)getHeight());

    // Initialize the physics character.
    initializeCharacter();

    // Initialize the gamepad.
    ...
}
In this method, the first thing we do is load the .scene into the application using the cene::load(const char*) function. As stated earlier, the scene file contains the references to the gameplay binary to load, as well as the active camera, animations, material definitions, physics properties and various node attachments.
_scene = Scene::load("res/scene.scene");In order for the player to have a viewport into the scene, we need to define a camera. Here, we take the existing camera defined in the model file. We have defined a perspective camera that makes objects in the distance appear smaller than objects closer by. This camera is defined to have an aspect ratio set by the game window's width and height.
_scene->getActiveCamera()->setAspectRatio((float)getWidth() / (float)getHeight());Next, we call CharacterGame::initializeCharacter(), where we obtain the PhysicsCharacter object for StevieGee along with the nodes for his mesh and his shadow. Then we store alpha parameter from StevieGee's material to allow us to draw him partially transparent when the camera is close up. Following that, we get the clips defined in boy.animation and load them into the _animation class variable. The last thing this method does is set the default animation to that defined by idle and sets it to play in an indefinite loop.
void CharacterGame::initializeCharacter()
{
    Node* node = _scene->findNode("boycharacter");

    // Store the physics character object.
    _character = static_cast<PhysicsCharacter*>(node->getCollisionObject());

    // Store character nodes.
    _characterMeshNode = node->findNode("boymesh");
    _characterShadowNode = _scene->findNode("boyshadow");

    // Store the alpha material parameter from the character's model.
    _materialParameterAlpha = _characterMeshNode->getModel()->getMaterial()->
                                              getTechnique((unsigned int)0)->
                                              getPass((unsigned int)0)->
                                              getParameter("u_modulatelAlpha");

    // Load character animations.
    _animation = node->getAnimation("animations");
    _animation->createClips("res/boy.animation");
    _jumpClip = _animation->getClip("jump");
    _jumpClip->addListener(this, _jumpClip->getDuration() - 250);

    // Start playing the idle animation when we load.
    play("idle", true);
}
The PhysicsCharacter class is a convenience class that is used to control the movement and collisions of a character model within a game. It interacts with the physics system to handle gravity or any collisions, as well as controlling the character's movements. For additional information on PhysicsCharacter please consult the gameplay Development Guide.
Using the scene.scene file (see previous snippet) and the scene.physics file, we also define a collision object for the camera node. This will help position the camera so that it does not become occluded by a wall or some other object in the scene.
...

collisionObject camera
{
    type = GHOST_OBJECT
    shape = SPHERE
    radius = 0.5
}

...
The last thing we do is create a Gamepad object and position its joystick and buttons on the screen. This Gamepad implementation will be used to control our character's walk, run and jump animations. For more information on the Gamepad, please consult the gameplay Development Guide.
The update() method is utilized to apply your game logic, such as controlling your character. Here is the implementation of update() method for the game:
void CharacterGame::update(float elapsedTime)
{
    Vector2 direction;

    if (_gamepad->getButtonState(0) == Gamepad::BUTTON_PRESSED)
    {
        // Jump while the gamepad button is being pressed
        jump();
    }
    else if (_gamepad->isJoystickActive(0))
    {
        // Get joystick direction
        direction = _gamepad->getJoystickState(0);
    }
    else
    {
        // Construct direction vector from keyboard input
        if (_keyFlags & NORTH)
            direction.y = 1;
        else if (_keyFlags & SOUTH)
            direction.y = -1;
        if (_keyFlags & EAST)
            direction.x = 1;
        else if (_keyFlags & WEST)
            direction.x = -1;

        direction.normalize();
        if ((_keyFlags & RUNNING) == 0)
            direction *= 0.5f;
    }

    // Update character animation and velocity
    if (direction.isZero())
    {
        play("idle", true);
        _character->setVelocity(Vector3::zero());
    }
    else
    {
        bool running = (direction.lengthSquared() > 0.75f);
        float speed = running ? RUN_SPEED : WALK_SPEED;

        play(running ? "running" : "walking", true, 1.0f);

        // Orient the character relative to the camera
        // so he faces the direction we want to move.
        const Matrix& cameraMatrix = _scene->getActiveCamera()->getNode()->getWorldMatrix();
        Vector3 cameraRight, cameraForward;
        cameraMatrix.getRightVector(&cameraRight);
        cameraMatrix.getForwardVector(&cameraForward);

        // Get the current forward vector for the mesh
        // node (negate it since the character was modelled facing +z)
        Vector3 currentHeading(-_characterMeshNode->getForwardVectorWorld());

        // Construct a new forward vector for the mesh node
        Vector3 newHeading(cameraForward * direction.y + cameraRight * direction.x);

        // Compute the rotation amount based on the difference
        // between the current and new vectors
        float angle = atan2f(newHeading.x, newHeading.z) -
                      atan2f(currentHeading.x, currentHeading.z);
        if (angle > MATH_PI)
            angle -= MATH_PIX2;
        else if (angle < -MATH_PI)
            angle += MATH_PIX2;

        angle *= (float)elapsedTime * 0.001f * MATH_PIX2;
        _characterMeshNode->rotate(Vector3::unitY(), angle);

        // Update the character's velocity
        Vector3 velocity = -_characterMeshNode->getForwardVectorWorld();
        velocity.normalize();
        velocity *= speed;
        _character->setVelocity(velocity);
    }

    // Adjust camera to avoid it from being obstructed
    // by walls and objects in the scene.
    adjustCamera(elapsedTime);

    // Project the character's shadow node onto the surface directly below him.
    PhysicsController::HitResult hitResult;
    Vector3 v = _character->getNode()->getTranslationWorld();
    if (getPhysicsController()->rayTest(Ray(Vector3(v.x, v.y + 1.0f, v.z),
                                            Vector3(0, -1, 0)), 100.0f, &hitResult))
    {
        _characterShadowNode->setTranslation(Vector3(hitResult.point.x,
                                                     hitResult.point.y + 0.1f,
                                                     hitResult.point.z));
    }
}
In this method, we determine what animation our character StevieGee should currently be playing, as well as his directional movement. We do this by polling the state of the gamepad's controls. Here we've defined the joystick to control the character's movement around the scene, and the gamepad's button to make the character jump.
The last thing we do is call adjustCamera(elapsedTime). This method will position our camera so it is not occluded by another object within the scene.
The render() method is simply used to draw your scene.
void CharacterGame::render(float elapsedTime)
{
    // Clear the color and depth buffers.
    clear(CLEAR_COLOR_DEPTH, Vector4(0.41f, 0.48f, 0.54f, 1.0f), 1.0f, 0);

    // Draw our scene, with separate passes for opaque and transparent objects.
    _scene->visit(this, &CharacterGame::drawScene, false);
    _scene->visit(this, &CharacterGame::drawScene, true);
    ...
    // Draw gamepad for touch devices.
    _gamepad->draw(Vector4(1.0f, 1.0f, 1.0f, 0.7f));

    ...
}
The first thing we do is clear the color and depth buffers so we can start with a clean buffer to draw into, then we draw the scene by calling visit() on the scene object. This will traverse the scenes hierarchy, and for each node in the scene callback on the user specified method. Here we get it to call back on the drawScene() function, which checks to see if the node it is passed has a model, and if it has, draws it.
bool CharacterGame::drawScene(Node* node, bool transparent)This game is touch input only, so we will override the Game::touchEvent() method to process the different types of touch inputs.
void CharacterGame::touchEvent(Touch::TouchEvent evt, int x, int y, unsigned int contactIndex);The touchEvent() function is able to handle three types of TouchEvent:
-
TOUCH_PRESS- This represents the initial contact of a finger to the screen. -
TOUCH_RELEASE- This represents the end of a contact of a finger to the screen. -
TOUCH_MOVE- This handles any gestures on the screen. Here we rotate StevieGee by figuring out where on the screen the move event occurred (using the x input parameter), calculating the delta between that and StevieGee's current rotation, and calling the_modelNode->rotateY()method to perform the rotation by the new delta
Conveniently, we have chosen to use the Gamepad implementation to handle the touch inputs for our game. So in here we simply call _gamepad->touchEvent() with the provided parameters. The joystick will allow the user to move StevieGee around the scene. Buttons will make him jump and we rotate him about his Y-axis so you can appreciate his moves from all angles.
That's it, that's the full game that you can now build, deploy, and try out for yourself!
Run the game a few times, try changing the code and see what you can come up with. Some suggestions are:
- Create different animations for StevieGee, like making him wave or point.
- Add audio to the game for some atmospheric effects. Once you're comfortable with this, try finding new meshes on the web (or even create your own from scratch) and load them into the game. See what gameplay can do!
Source Code: sample-character