Tutorial: Spaceship
Source Code: sample-spaceship
Have you ever wanted to fly a spaceship? Or better yet, fly a spaceship in a race against time? Imagine how this would look and feel as a game: what kind of ship would you create and how would a player interact with it? This tutorial takes you through one possible approach using the gameplay library.

This tutorial looks at the key steps of the game development life cycle, from initial design and requirements to implementation and coding, using the SpaceshipGame sample. A significant resource for developing games on mobile and desktop platforms is the gameplay library, and it's used extensively here as the glue between the application and the underlying OS.
- Design the game
- Set up and initialize the ship and environment
- Handle touch input
- Handle collisions
- Update and render the game
- Reset the game
This tutorial also explains how the relevant pieces of the gameplay library work and give you some information on creating and importing graphics into the application. It is suggested that readers follow along with the code in the SpaceshipGame sample.
Any game involving a spaceship needs a few important things:
- An overall goal
- A cool-looking spaceship
- An interesting environment to fly in
- Flight controls that are easy to use and provide feedback
- A pleasing sound
Let's talk about one possible approach to these ideas.
Before thinking about specific game elements, there needs to be an overall goal for the player to accomplish. It could be something as simple as getting the spaceship off the ground, or as complex as flying the ship through an obstacle course, collecting upgrades as it goes. For the purposes of this tutorial, the goal will be somewhere in between: pilot the spaceship through a challenging environment with a fixed distance in the shortest amount of time possible.
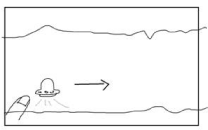
The game needs a spaceship that looks good and feels fun to play with. To achieve this, we need to create a spaceship with cool shapes (squares, spheres, lots of windows, big antennae, it's all up to you) that is also simple enough that the player always knows what the spaceship is doing. For this tutorial, the spaceship will be vaguely thimble-shaped (perhaps the designer's second hobby is sewing) with some key features that make it easy to use:
- The narrow end is up, the wider end is down,
- The wider end will be surrounded by a rotating set of shapes that provide visual cues of velocity,
- An engine exhaust glow effect will be placed under the wider end to give visual cues of thrust magnitude.
The spaceship wireframe looks like this:
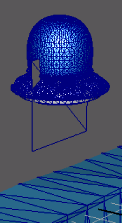
The spaceship will also be textured and lighted such that it looks like a solid object and is pleasing to the eye.
For the ship to fly, there must be something to fly around in. Since this is a spaceship, it could be simple, empty space but that isn't very exciting or challenging to a game player. So objects can be put into the environment to provide visual cues (such as the impression of movement and progress) and tasks for the player to overcome (such as not hitting anything).
For this tutorial, the spaceship will be travelling down a long corridor, such as an asteroid cavity or a wormhole. To make the game challenging, the roof and floor of the corridor will be "live" such that an impact will slow the ship down and force the player to adjust. The corridor itself will be shaped and textured to provide clear motion cues as the ship moves along it. The wireframe looks like this:

To make things a little easier for the game designer, each roof and floor segment has been repeated several times to create a longer gaming area. The final element in the environment is the background, for which a simple PNG graphic will be used.
Because the goal of the game is to reach the end of the corridor in the shortest amount of time, there needs to be some feedback showing how much time has elapsed since the game started. This will be provided using a timer that appears on the screen:

Once the spaceship reaches the end of the playing area, the game will allow the user to start over again, hopefully to get a faster time!
Now that there's a ship and an environment to fly around in, the game controls should be defined. Depending on your platform, there are different types of input controls available, such as keyboard, mouse, accelerometer, or gyroscope. For this tutorial, we'll consider the platform to have a touch screen and use that. It offers an easy input mechanism with numerous types of gestures that the game can take advantage of. Since this game is all about challenging the player to move the spaceship through a corridor, the inputs should be easy to trigger but somewhat difficult to master. It should also entice the user to play around with it beyond the strict goals of the game. So this is how it'll work:
- The player touches the screen near the ship to activate the throttle,
- The distance between the finger and the center of the ship determines the throttle magnitude,
- The angle between the finger and the horizontal axis of the ship determines the thrust angle,
- If no inputs are applied to the ship, the ship drops as a result of gravity,
- The ship itself tilts around its z axis relative to the throttle magnitude and thrust angle,
- The ship itself rotates around its y axis relative to the throttle magnitude,
- The engine exhaust glow adjusts according to the throttle magnitude.
The first four items on the list deal with how a player controls the ship and the last three items specify how feedback is provided. As you can probably tell, the difficulty for the player will be in adjusting the throttle magnitude and thrust angle just enough so that the ship moves forward but not so much that it crashes into the roof or the floor. Players can also try to improve their times by making the ship go faster (increasing the throttle magnitude) while minimizing the loss of forward speed (decreasing angular thrust corrections).
An additional source of feedback for the player will be some type of sound that varies with the speed of the spaceship. This provides both an audible cue and an extra layer to the atmosphere of the game. A simple "oscillating rubber band" sound will be used and its pitch will be adjusted to match the throttle of the spaceship (increasing the throttle increases the pitch).
Reviewing the game design, you can probably see a few elements that need to be created outside of the coding environment. These are:
- The cool-looking spaceship
- The font used for the timer
- The corridor, including the roof, floor, and background
- The pleasing sound
Gameplay supports the FBX digital asset exchange format and provides a tool to encode/convert FBX assets into the .gpb format that the framework understands. For the purposes of this tutorial, the spaceship and environment scene are included in one file (created in Maya) and the font used for the timer is in another file (using a standard TrueType font). The gameplay-encoder tool is used to convert these source files into the .gpb format, which can then be used programmatically from the game code, like this:
_font = Font::create("res/airstrip.gpb");
// ...
_font->drawText("Click to Play Again", getWidth()/2 - 175, getHeight()/2 - 40, Vector4::one(), _font->getSize());
You can use your own shaders and textures for object materials in the game, or you can use the ones that gameplay provides. These are located in gameplay-resources\res and can be used programmatically like this:
material = _shipNode->getModel()->setMaterial("res/shaders/colored.vert", "res/shaders/colored.frag", "SPECULAR; ...Examples of this usage appear in later sections. The spaceship's sound can be created using any sound editing tool and brought into the game like this:
_spaceshipSound = AudioSource::create("res/spaceship.wav");
// ...
_spaceshipSound->setPitch(_throttle * SOUND_PITCH_SCALE);
Most game applications execute a standard series of steps: get inputs, update data, and render output. To get this working, the application needs to set up the input devices, initialize the necessary data, and prepare the output devices. This process is no different when using the gameplay library.
The gameplay library gives you access to all the core functionality of the platform without having to worry about setting up graphics libraries, event handling, and sensor interfaces. As long as you extend your application class from the gameplay Game class, all of this functionality is provided. For the purposes of this game, all of the underlying graphics, audio, and file system functionality is provided by the gameplay library and you don't have to worry about it. Another benefit of gameplay is that base service support is provided by different platform implementations, supporting both mobile and desktop environments with no change to your application code.
Assuming you're comfortable with creating your application class and constructor, the first method to look at in creating this game is SpaceshipGame::initialize(). The main goals of this method are to set the initial render state, load the game scene with the ship and environment graphics, and initialize the application state.
Gameplay provides the RenderState::StateBlock class that is used to set up the render parameters that are reused across all materials in the application. This is the first thing we set up in initialize():
_stateBlock = RenderState::StateBlock::create();
_stateBlock->setDepthTest(true);
_stateBlock->setCullFace(true);
_stateBlock->setBlend(true);
_stateBlock->setBlendSrc(RenderState::BLEND_SRC_ALPHA);
_stateBlock->setBlendDst(RenderState::BLEND_ONE_MINUS_SRC_ALPHA);The game scene contains all the visual objects in the game, including the spaceship and the corridor. The SpaceshipGame class has a member variable, _scene that stores all of the visual elements defined in the input graphics file. This is represented as a tree of graphics elements, or nodes, that are accessed by searching or traversing them.
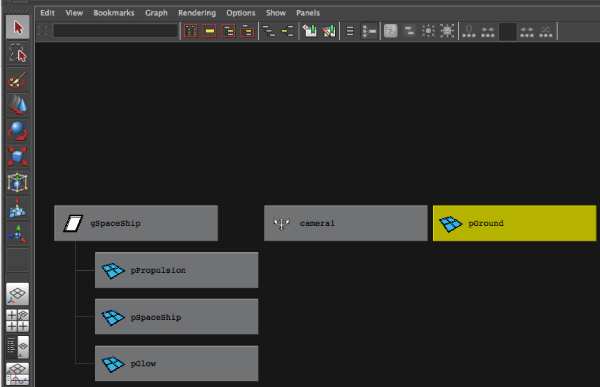
This variable is set as follows, where spaceship.gpb is the input file:
Bundle* bundle = Bundle::create("res/spaceship.gpb");
_scene = bundle->loadScene();
SAFE_RELEASE(bundle);
Given that the original graphics file may have used a different aspect ratio for the scene's camera than what the platform's display provides, the application's aspect ratio should be adjusted to the proper device resolution.
_scene->getActiveCamera()->setAspectRatio((float)getWidth() / (float)getHeight());SpaceshipGame::initialize() calls SpaceshipGame::initializeSpaceship() to prepare the spaceship for display. The first thing to do is find the spaceship in the scene and apply the appropriate properties to it. Part of the game's requirements was that the ship should look good and be able to collide with the roof and floor of the corridor. A bounding shape determines the area around the object that's used for detecting collisions between it and other objects. Gameplay calculates a bounding sphere for all nodes by default; this is what is used for the spaceship in this case. The visual properties are applied by traversing through all the ship-related nodes in _scene and setting values for shader, color, and reflection. In SpaceShipGame::initializeSpaceship(), this looks like:
_shipGroupNode = _scene->findNode("gSpaceShip");

// Setup spaceship model
// Part 0
_shipNode = _scene->findNode("pSpaceShip");
material = _shipNode->getModel()->setMaterial("res/shaders/colored.vert", "res/shaders/colored.frag", "SPECULAR", 0);
material->getParameter("u_diffuseColor")->setValue(Vector4(0.53544f, 0.53544f, 0.53544f, 1.0f));
initializeMaterial(material, true, true);
The findNode() method searches the scene for the specified node (as set in the source graphics file). The remaining code sets the visual characteristics for the node and, although there are numerous properties available in the COLLADA format, only a few are chosen here. For this particular node, the shader applied to the material is loaded in from the specified file and the light reflection properties are set as shown. The initializeMaterial() method sets the render state and light source direction and color for this particular node, as follows:
void SpaceshipGame::initializeMaterial(Material* material, bool lighting, bool specular)
{
    // Set the common render state block for the material
    material->setStateBlock(_stateBlock);

    // Bind the WorldViewProjection matrix
    material->setParameterAutoBinding("u_worldViewProjectionMatrix", RenderState::WORLD_VIEW_PROJECTION_MATRIX);
    if (lighting)
    {
        // Apply lighting material parameters
        material->setParameterAutoBinding("u_inverseTransposeWorldViewMatrix",
                                   RenderState::INVERSE_TRANSPOSE_WORLD_VIEW_MATRIX);

        Node* lightNode = _scene->findNode("directionalLight1");
        Vector3 lightDirection = lightNode->getForwardVector();
        lightDirection.normalize();

        material->getParameter("u_lightDirection")->setValue(lightDirection);
        material->getParameter("u_lightColor")->setValue(lightNode->getLight()->getColor());
        material->getParameter("u_ambientColor")->setValue(AMBIENT_LIGHT_COLOR);

        if (specular)
        {
            // Apply specular lighting parameters
            material->getParameter("u_specularExponent")->setValue(SPECULAR);
            material->setParameterAutoBinding("u_worldViewMatrix", RenderState::WORLD_VIEW_MATRIX);
            material->setParameterAutoBinding("u_cameraPosition", RenderState::CAMERA_WORLD_POSITION);
        }
    }
}
The remainder of the initializeSpaceship() method sets the same properties on the spaceship model, the spaceship propulsion model, and the glow effect.
The final step is to initialize the spaceship's sound. This is done by loading a .wav file and setting it to loop throughout the game, so that it never appears to end. Later, the pitch of this sound will be altered to match the throttle of the spaceship.
_spaceshipSound = AudioSource::create("res/spaceship.wav");
if (_spaceshipSound)
_spaceshipSound->setLooped(true);SpaceshipGame::initialize() calls the SpaceshipGame::initializeEnvironment() method next. It is similar to initializeSpaceship() in that it discovers nodes in the scene and applies material properties to them. However, there is one key difference: since the ground of the game's corridor is made up of many duplicates of the same object, the Scene::findNodes() method is used to find all partial matches (by setting the last parameter to false) to the given string and the results are looped through to set properties to the same values.
_scene->findNodes("pGround", nodes, true, false);
for (unsigned int i = 0, count = nodes.size(); i < count; ++i)
{
    Node* pGround = nodes[i];
    material = pGround->getModel()->setMaterial("res/shaders/colored.vert",
                                                "res/shaders/colored.frag",
                                                "SPECULAR");
    material->getParameter("u_diffuseColor")->setValue(Vector4(0.280584f, 0.5584863f, 0.6928f, 1.0f));
    initializeMaterial(material, true, true);
}
The same logic applies to the nodes of the corridor's roof:
nodes.clear();
_scene->findNodes("pRoof", nodes, true, false);
for (unsigned int i = 0, count = nodes.size(); i < count; ++i)
{
    Node* pRoof = nodes[i];
    material = pRoof->getModel()->setMaterial("res/shaders/colored.vert",
                                              "res/shaders/colored.frag",
                                              "SPECULAR");

    material->getParameter("u_diffuseColor")->setValue(Vector4(0.280584f, 0.5584863f, 0.6928f, 1.0f));
    initializeMaterial(material, true, true);
}
The game's background is a little different, as a texture (background.png) is applied to the object with some shader and light properties applied to add visual depth.
nodes.clear();
Node* pBackground = _scene->findNode("pBackground");
material = pBackground->getModel()->setMaterial("res/shaders/textured.vert", "res/shaders/textured.frag");
material->getParameter("u_diffuseTexture")->setValue("res/background.png", true);
initializeMaterial(material, true, false);
The remainder of the SpaceshipGame::initialize() method loads in the TrueType font to be used throughout the game, finds and stores the camera node for later use (essentially keeping the camera focused on the ship at all times), and transforms the initial position of the spaceship and camera from the source coordinates to the game coordinates.
// Create font
_font = Font::create("res/airstrip28.gpb");

// Store camera node
_cameraNode = _scene->findNode("camera1");

// Store initial ship and camera positions
_initialShipPos = _shipGroupNode->getTranslation();
_initialShipRot = _shipGroupNode->getRotation();
_initialCameraPos = _cameraNode->getTranslation();Since this game should behave somewhat realistically in terms of motion and collisions, a few numerical constants are defined for the game's physics equations. For motion, the following constants are used to determine ship velocity, acceleration, rotation, tilt, and exhaust glow:
// Mass of the space ship
#define MASS 50.0f

// Gravity constant (earth's gravity is ~9.8m/s/s)
#define GRAVITY 9.8f

// Force applied due to gravity (F = mg)
#define GRAVITATIONAL_FORCE (MASS * GRAVITY)

// Amount to scale screen-space push/force vector by
#define FORCE_SCALE 4.0f

// Constant for the maximum force that can be applied to the ship
#define FORCE_MAX (TOUCH_DISTANCE_MAX * FORCE_SCALE)

// Maximum velocity (+/-)
#define VELOCITY_MAX 75.0f

// Maximum ship tilt (degrees)
#define SHIP_TILT_MAX 45.0f

// Maximum ship rotation (degrees) at full throttle
#define SHIP_ROTATE_SPEED_MAX 500.0f

// Multiplier for engine glow effect (based on throttle)
#define ENGINE_POWER 2.5f
The following constants are used to determine collisions and friction between the ship and its environment (to slow down the ship):
#define ROOF_HEIGHT 11.6f
#define FLOOR_HEIGHT 0.6f

// Normal force used in friction computations (Fn = -mg)
#define FORCE_NORMAL (-GRAVITATIONAL_FORCE)

// Friction between floor and spaceship (Ff = u * Fn)
#define FLOOR_FRICTION (0.4f * FORCE_NORMAL)

// Friction between roof and spaceship (Ff = u * Fn)
#define ROOF_FRICTION (0.035f * FORCE_NORMAL)
To control the ship's thrust, the player will touch the screen a certain distance away from the ship. The maximum screen distance at which touch inputs will be considered is:
#define TOUCH_DISTANCE_MAX 400.0fThe sound of the engine will be adjusted according to the ship's throttle and scaled according to:
#define SOUND_PITCH_SCALE 2.0fTo position the camera such that the ship is always within its field-of-view, these limits are set to slightly in front of and behind the ship:
#define CAMERA_RANGE_FRONT -1
#define CAMERA_RANGE_BACK 8
Finally, the game is over when the ship has reached the maximum distance of the environment:
#define MAP_LENGTH 1000.0fWith the game set up and initialized, the focus turns to getting player inputs, updating data, and rendering output to the display. This process flow includes three key methods that are derived from the Game class: touchEvent(), update(), and render().
The only input that this game cares about is the player touching the screen. Even simpler than that, the only types of touches that are relevant are press, move, and release. Gameplay provides a callback method called touchEvent() that is called when a touch event is received. This method is overridden in the game as:
void SpaceshipGame::touchEvent(Touch::TouchEvent evt, int x, int y, unsigned int contactIndex)
{
    switch (evt)
    {
    case Touch::TOUCH_PRESS:
        if (_finished && (getAbsoluteTime() - _finishedTime) > 1000L)
        {
            resetGame();
        }
    case Touch::TOUCH_MOVE:
        if (!_finished)
        {
            _pushing = true;
            _pushPoint.set(x, y);
        }
        break;
    case Touch::TOUCH_RELEASE:
        _pushing = false;
        break;
    }
}
For the three types of touch events listed, the game performs the following:
-
TOUCH_PRESS: If the game is finished and the current game time is more than one second (or 1000 ms) past the finish time of the game, reset the game back to the beginning (the one second delay allows the player's finger to lift from the screen once the game has completed without triggering a restart). -
TOUCH_MOVE: The player wants to control the ship, so set_pushPointto the x and y position of the touch for later use. -
TOUCH_RELEASE: The player does not want to control the ship, so set_pushingto false for later use.
Gameplay provides another callback method, update(), which is called once per frame while the game is running. It is here where the game modifies the data needed to track the state of objects, such as spaceship position, throttle, velocity, and time. For every frame, the same steps are performed to update the game.
The gameplay framework provides the elapsed game time as a parameter to update(), so the first thing to do is convert it to seconds for use in rendering the timer to the display.
float t = elapsedTime / 1000.0f;

if (!_finished)
{
    _time += t;
}
The next thing to do is move the spaceship according to where the player has pressed the screen. This involves calculating the direction and magnitude of a vector drawn between the center of the spaceship and the touch point. This vector determines the "pushing" angle and force used to propel the spaceship away from its current location. This code looks like:
_force.set(0, -GRAVITATIONAL_FORCE);

// While we are pushing/touching the screen, apply a push force vector based on the distance from
// the touch point to the center of the space ship.
if (_pushing)
{
    // Get the center point of the space ship in screen coordinates
    Vector3 shipCenterScreen;
    _scene->getActiveCamera()->project(getViewport(),
                                       _shipGroupNode->getBoundingSphere().center,
                                       &shipCenterScreen.x, &shipCenterScreen.y);

    // Compute a screen-space vector between the center point of the ship and
    // the touch point. We will use this vector to apply a "pushing" force to the
    // space ship, similar to what happens when you hold a magnet close to an object
    // with opposite polarity.
    Vector2 pushForce((shipCenterScreen.x - _pushPoint.x), -(shipCenterScreen.y - _pushPoint.y));

    // Transform the vector so that a smaller magnitude emits a larger
    // force and applying the maximum touch distance.
    float distance = (std::max)(TOUCH_DISTANCE_MAX - pushForce.length(), 0.0f);
    pushForce.normalize();
    pushForce.scale(distance * FORCE_SCALE);
    _force.add(pushForce);
Here, the default force for every frame is set to the gravitational force in order to make the game a little more challenging and cause the ship to fall if no inputs are applied. If the player is touching the screen, the center point of the spaceship is determined by the _scene->getActiveCamera()->project() method, which translates the center of the bounding sphere enclosing the spaceship object (shipGroupNode->getBoundingSphere().center) from world space to screen space (shipCenterScreen.x and shipCenterScreen.y). With the center point in the same coordinate system as the touch point, the vector between them is calculated and stored in pushForce. This vector is normalized to a length of 1 and scaled to provide the relative force between the spaceship and the maximum allowable distance of the touch point on the screen. This is then added to the gravitational force.
The game uses the calculated force to determine the throttle amount and acceleration of the spaceship. The throttle directly affects the visual components of the spaceship (tilt, rotation, and sound) while the acceleration affects the spaceship's position via derived velocity. The throttle value is calculated as:
    // Compute a throttle value based on our force vector, minus gravity
    Vector2 throttleVector(_force.x, _force.y + GRAVITATIONAL_FORCE);
    _throttle += throttleVector.length() / FORCE_MAX * t;
}
else
{
    // Gradually decrease the throttle
    if (_throttle > 0.0f)
    {
        _throttle *= 1.0f - t;
    }
}

// Clamp the throttle
_throttle = CLAMP(_throttle, 0.0f, 1.0f);
The acceleration and velocity are calculated and the spaceship's position adjusted as:
// Update acceleration (a = F/m)
_acceleration.set(_force.x / MASS, _force.y / MASS);

// Update velocity (v1 = v0 + at)
_velocity.x += _acceleration.x * t;
_velocity.y += _acceleration.y * t;

// Clamp velocity to its maximum range
_velocity.x = CLAMP(_velocity.x, -VELOCITY_MAX, VELOCITY_MAX);
_velocity.y = CLAMP(_velocity.y, -VELOCITY_MAX, VELOCITY_MAX);

// Move the spaceship based on its current velocity (x1 = x0 + vt)
_shipGroupNode->translate(_velocity.x * t, _velocity.y * t, 0);
Notice that the spaceship is moved after the velocity is updated. This leaves the velocity and position in sync with respect to the frame. You can try updating the position before velocity and see how it affects the game.
With the new spaceship position, it's time to determine whether it is colliding with anything. Since the main challenge in the game is for the player to avoid the roof or floor, this is a very important step. A call to handleCollisions() is made from update() and the function looks like this:
void SpaceshipGame::handleCollisions(float t)
{
    float friction = 0.0f;

    // Use the ship's bounding sphere for roof collisions
    const BoundingSphere& shipBounds = _shipNode->getBoundingSphere();

    // Compute a bounding box for floor collisions
    BoundingBox propulsionBounds = _propulsionNode->getModel()->getMesh()->
                                                                getBoundingBox();
    propulsionBounds.transform(_propulsionNode->getWorldMatrix());

    if (propulsionBounds.min.y <= FLOOR_HEIGHT)
    {
        // Floor collision
        friction = FLOOR_FRICTION;
        _shipGroupNode->translateY(FLOOR_HEIGHT - propulsionBounds.min.y);
        if (_velocity.y < 0.0f)
        {
            // Cancel vertical velocity
            _velocity.y = 0.0f;
        }
    }
    else if ((shipBounds.center.y + shipBounds.radius) >= ROOF_HEIGHT)
    {
        // Roof collision
        friction = ROOF_FRICTION;
        _shipGroupNode->translateY(ROOF_HEIGHT –
                                  (shipBounds.center.y + shipBounds.radius));
        if (_velocity.y >= 0.0f)
        {
            // Cancel vertical velocity
            _velocity.y = 0.0f;
        }
    }

    // Apply friction to velocity
    if (friction != 0.0f)
    {
        if (_velocity.x > 0)
        {
            _velocity.x = (std::max)(_velocity.x + friction * t, 0.0f);
        }
        else if (_velocity.x < 0)
        {
            _velocity.x = (std::min)(_velocity.x - friction  * t, 0.0f);
        }
    }


    // Keep the ship within the playable area of the map
    const Vector3& shipPos = _shipGroupNode->getTranslation();
    if (shipPos.x < _initialShipPos.x)
    {
        _shipGroupNode->translateX(_initialShipPos.x - shipPos.x);
        _velocity.x = 0.0f;
    }
    else if (shipPos.x > (_initialShipPos.x + MAP_LENGTH))
    {
        if (!_finished)
        {
            // Passed the finish line
            _finished = true;
            _finishedTime = getAbsoluteTime();
            _pushing = false;
        }
    }
}
The first section of this function determines whether a collision occurred by comparing the lowest point of the spaceship (the propulsion node) with the height of the floor and the highest point of the spaceship (the center of the ship node plus the radius of its bounding sphere) with the height of the roof. If any of the points intersect, the function sets the vertical velocity, _velocity.y, to 0 and the position as follows:
- If it's a floor collision, position the ship above the floor.
- If it's a roof collision, position the ship below the roof.
In both cases, the horizontal velocity, _velocity.x, is slowed by the appropriate friction coefficient adjusted by the current game time. This is so there's an increasing amount of friction applied as the player keeps sliding along the floor or roof (harsh, but challenging!).
The last part of handleCollisions() determines whether the spaceship has reached the end of the playing area or not. If the spaceship's current position is less than its position when the game started (if (shipPos.x < _initialShipPos.x)), the spaceship is moved to the start of the playing area. If its current position is beyond the end of the playing area (if (shipPos.x > (_initialShipPos.x + MAP_LENGTH))), the game state is set to finished.
Now that the ship's position and movement is taken care of, the camera must be moved to keep the ship in view. The SpaceshipGame::updateCamera() method is called from update() to do this:
void SpaceshipGame::updateCamera()
{
    if (_finished)
        return;

    // Keep the camera focused on the ship
    const Vector3& cameraPos = _cameraNode->getTranslation();
    const Vector3& shipPos = _shipGroupNode->getTranslation();
    float diff = cameraPos.x - shipPos.x;
    if (diff > CAMERA_RANGE_BACK)
    {
        _cameraNode->translateX(-(diff - CAMERA_RANGE_BACK));
    }
    else if (diff < -CAMERA_RANGE_FRONT)
    {
        _cameraNode->translateX(-(diff + CAMERA_RANGE_FRONT));
    }
}
Assuming the ship hasn't reached the end of the playing area and finished, this method determines the distance between the camera and the spaceship, and then translates the camera to fit the ship within the range defined by CAMERA_RANGE_BACK and CAMERA_RANGE_FRONT.
The remainder of the update() method changes the visual and audible feedback of the spaceship based on all the data just calculated. This provides the player with cues as to how they are progressing. The key actions here are to change the spaceship's tilt around the z axis according to the magnitude of the force calculated above and to spin the ship around the y axis according to the throttle. If either the force or throttle are zero, then the spaceship's tilt and spin are brought back to zero. The other action is to scale the pitch of the spaceship's sound effect and the glow of the exhaust according to the throttle value. The sound stops completely if the throttle is zero.
// Reset ship rotation
_shipGroupNode->setRotation(_initialShipRot);

// Apply ship tilt
if (_force.x != 0 && abs(_velocity.x) > 0.1f)
{
    // Compute an angle based on the dot product
    // between the force vector and the Y axis
    Vector2 fn;
    _force.normalize(&fn);
    float angle = MATH_RAD_TO_DEG(acos(Vector2::dot(Vector2(0, 1), fn)));
    if (_force.x > 0)
        angle = -angle;
    angle *= _throttle * t;
    _shipTilt += angle;
    _shipTilt = _shipTilt < -SHIP_TILT_MAX ?
                -SHIP_TILT_MAX :
                (_shipTilt > SHIP_TILT_MAX ? SHIP_TILT_MAX : _shipTilt);
}
else
{
    // Interpolate tilt back towards zero when no force is applied
    _shipTilt = (_shipTilt + ((0 - _shipTilt) * t * 2.0f));
}
_shipGroupNode->rotateZ(MATH_DEG_TO_RAD(_shipTilt));

if (_throttle > MATH_EPSILON)
{
    // Apply ship spin
    _shipNode->rotateY(MATH_DEG_TO_RAD(SHIP_ROTATE_SPEED_MAX * t * _throttle));

    // Play sound effect
    if (_spaceshipSound->getState() != AudioSource::PLAYING)
        _spaceshipSound->play();

    // Set the pitch based on the throttle
    _spaceshipSound->setPitch(_throttle * SOUND_PITCH_SCALE);
}
else
{
    // Stop sound effect
    _spaceshipSound->stop();
}

// Modify ship glow effect based on the throttle
_glowDiffuseParameter->setValue(Vector4(1, 1, 1, _throttle * ENGINE_POWER));
_shipSpecularParameter->setValue(SPECULAR - ((SPECULAR-2.0f) * _throttle));The SpaceshipGame::update() method does all the heavy lifting to modify game data based on player inputs. After all its work is done, the results are displayed on the screen. Gameplay lets you do this fairly quickly and easily, so you can keep your render code tight and efficient. The entire method looks like this:
void SpaceshipGame::render(float elapsedTime)
{
    clear(CLEAR_COLOR_DEPTH, Vector4::zero(), 1.0f, 0);

    // Visit scene nodes for opaque drawing
    _scene->visit(this, &SpaceshipGame::drawScene, (void*)0);

    // Visit scene nodes for transparent drawing
    _scene->visit(this, &SpaceshipGame::drawScene, (void*)1);

    // Draw game text (yellow)
    drawText();
}
After clearing the color and depth buffers, each node in the scene is traversed to draw the opaque objects first, such as the top part of the spaceship, then the transparent objects next, such as the exhaust glow. The _scene->visit() method provides an easy way to invoke a method pointer with a user-defined parameter (in this case, 0 or 1 to indicate opaque or transparent drawing) on every object in the scene. For this game, the method called is SpaceshipGame::drawScene() and its purpose is to call the Model::draw() method from the gameplay library to update the display. SpaceshipGame::drawScene() looks like:
bool SpaceshipGame::drawScene(Node* node, void* cookie)
{
    Model* model = node->getModel();
    if (model)
    {
        // Transparent nodes must be drawn last (stage 1)
        bool isTransparent = (node == _glowNode);

        // Skip transparent objects for stage 0
        if ((!isTransparent && (int*)cookie == 0) ||
            (isTransparent && (int*)cookie == (int*)1))
            model->draw();
    }
    return true;
}
The remainder of the render() method calls the drawText() method which updates the display with the game's frame rate and the game time. If the _finished flag was set to true in SpaceshipGame::handleCollisions(), then a prompt is given for the player to play again. You must always bookend any font drawing with _font->begin() and _font->end() in order to let the gameplay library know when to flush the data out to the screen. SpaceshipGame::drawText() looks like:
void SpaceshipGame::drawText()
{
    _font->begin();
    char text[1024];
    sprintf(text, "%dsec.", (int)_time);
    _font->drawText(text, getWidth() - 120, 10, Vector4(1, 1, 0, 1), _font->getSize());
    if (_finished)
    {
        _font->drawText("Click to Play Again", getWidth() / 2 - 175,
                        getHeight() / 2 - 40, Vector4::one(), _font->getSize());
    }
    _font->end();
}
The last action that the game must handle is allowing the player to reset the game and start over. Once the Click to Play Again text is displayed, we know that a finger touch means the user wants to try again. As we saw earlier, the SpaceshipGame::touch() method calls SpaceshipGame::resetGame() when a TOUCH_PRESS event occurs and _finished is set to true. This resets the game's state variables and the spaceship itself back to initial conditions, as follows:
void SpaceshipGame::resetGame()
{
    _time = 0;
    _finished = false;
    _velocity.set(0, 0);
    _shipGroupNode->setTranslation(_initialShipPos);
    _cameraNode->setTranslation(_initialCameraPos);
}
Once the next frame comes around, the update() method picks up the new state and the game starts again.
After you've run the game a few times, try changing a few things in the code. See what you can come up with. Some suggestions to try are:
- Alter the logic in the
update()method to change the update order. - Change some of the game's constants and equations to apply different physics to the spaceship.
- Use different shaders and textures to mix up the look of the game.
- Explore the different types of inputs (for example, inverting the controls can provide a different challenge or using a finger press can stop the spaceship completely).
Source Code: sample-spaceship