


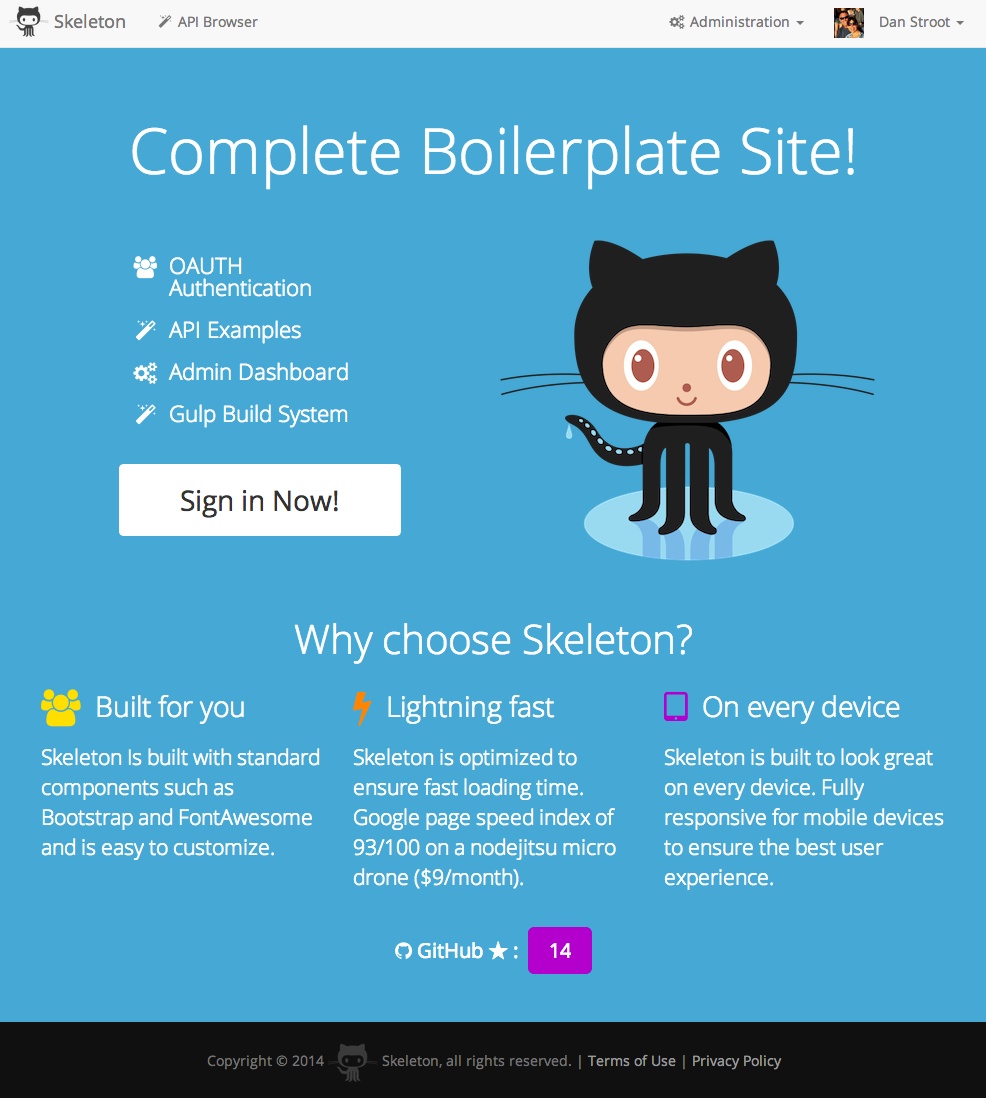
Live Demo: Skeleton
There are many excellent Node/Express/Mongo frameworks out there. I have played with many, and contributed to a few of them. Since there is really no one "right" way to do things you kind of have to explore. Once I did that I found that none of them were "just right" as Goldilocks would say. So I built this one!
I borrowed heavily from Hackathon-starter and Drywall. The reason is third party OAUTH authentication is painful. Passportjs helps tremendously but there are not many good examples of how to use it. Both of these frameworks really show how it's done. Both are actively maintained and are really great starting points. I recommend either of them highly.
Of the two, Drywall is more sophisticated. It has an extensive User/Account/Roles system to handle different types of accounts and account permissions. It also has a very cool Administration area. In addition, the client side uses Backbone. This framework allows for unique scripts and css on a per page basis - nice! Overall this framework has some GREAT stuff in it. It's just maybe a little too big/rich if you just want to start building a simple site.
This brings us to Hackathon-starter. This is GREAT site to get started with and has many outstanding API integrations as well as the authentication all built out. It really lives up to it's billing. It was easier to build up from here rather than take stuff out of Drywall.
- Dozer
- Locomotive
- Flatiron
- API Only: Restify
So why offer "yet another framework"? First, I like a fully working built-out site as a starting point to "see" a framework in action. Also because I want a playground of my own and you might find something interesting in here!
This could literally save hundreds of hours of work. If it you find it valuable I would appreciate your support!
- Features
- Technology
- Getting Started
- Coding Style
- Obtaining API Keys
- FAQ
- Pro Tips
- Useful Tools
- Interesting Design
- Interesting Node.js Libraries
- Interesting Client-Side Libraries
- Deployment
- TODO
- Contributing
- License
- Modern Technology Stack
- Node.js
- Node.js clusters support
- Express.js
- Gulp.js build system
- Jade templates (all nicely laid out: head, navigation, footer, etc.)
- LESS stylesheets
- Bootstrap 3.x UI
- FontAwesome
- etc.
- MVC project structure (in my own style) - "Views" are the Jade Templates, "Models" are the Mongo/Mongoose models, and "Controllers" are the glue for routing, page logic and data access via the models. These should be the only things you need to touch to build out new pages and functionality.
- Robust Authentication
- Local Authentication using Email and Password, with optional email verification step. [1]
- OAuth 1.0a Authentication via Twitter
- OAuth 2.0 Authentication via Facebook, Google or GitHub
- Two-factor TOTP and SMS Authentication optional feature for users to enable two-factor authentication. Can be turned off/on via the config file.
- Account Management
- Gravatar
- Profile Details
- Change Password
- Link multiple OAuth strategies to one account
- Delete Account
- Password Reset
- Enable/disable enhanced security [2]
- Administrative Pages
- Real-time Dashboard
- Accounts Listing
- API Examples: Facebook, Foursquare, Tumblr, Twitter, PayPal, etc.
- Sample Pages
- Contact Form
- Boilerplate Terms and Privacy pages. Note: I am not a lawyer. These have never been reviewed or even seen by a lawyer as far as you know. Use them only as a starting point with your lawyer.
[1] If account verification is turned on (via config.js) then we require people who sign up for a local account to verify their email address first before they can log in. We send them an email with a verification token and when they click the link they are verified and signed in.
This is pretty minimal at this point - since we don't have an easy way to regenerate/resend a verification email we don't expire the verification token - it remains good until used. There is also no cleanup of unverifed accounts.
People who signup via a social OAUTH provider are not required to verify their accounts in any case (even if account verification is turned on) since they are already considered "valid" via the account provider. The one loophole is that Twitter does not provide us with the user's email address so we are trusting the user in this case to give us a valid email.
I am not a big fan of this practice since it raises the barrier to entry and therefore have not built the functionality out very far. It is turned off in the live example.
[2] If enhanced security is enabled in the config file then users can enable enhanced security via their profile. This turns on two-factor TOTP based authentication for the user.
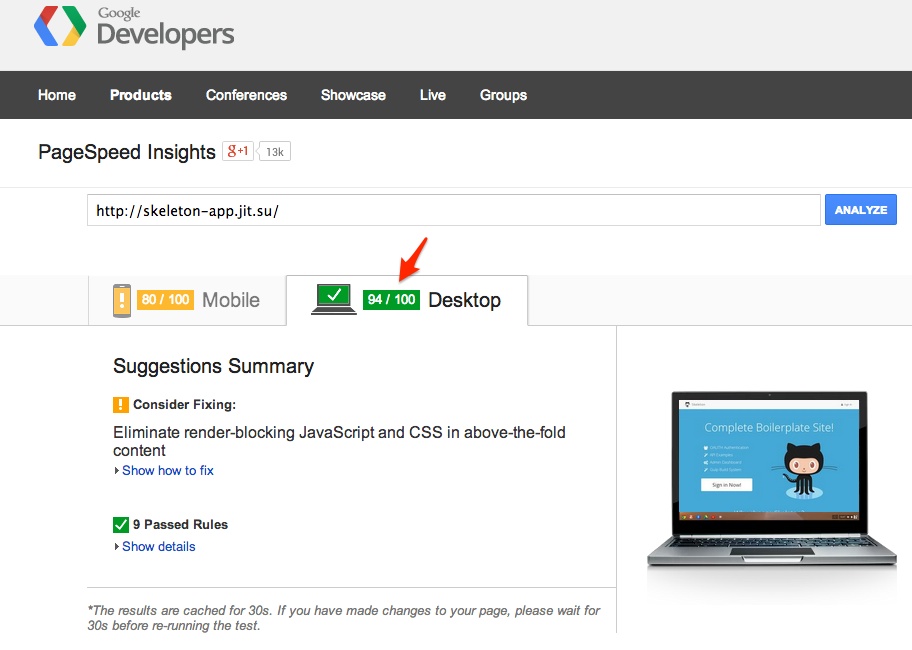
The Gulp build pipeline makes sure our assets are optimized. The only thing we haven't done is break up our CSS into "Above the fold" and "Below the fold". This is running on one drone at Nodejitsu ($9/mo!):
In addition we meet all basic security guidelines. This is the result of a Tinfoil security scan of our site on Nodejitsu:
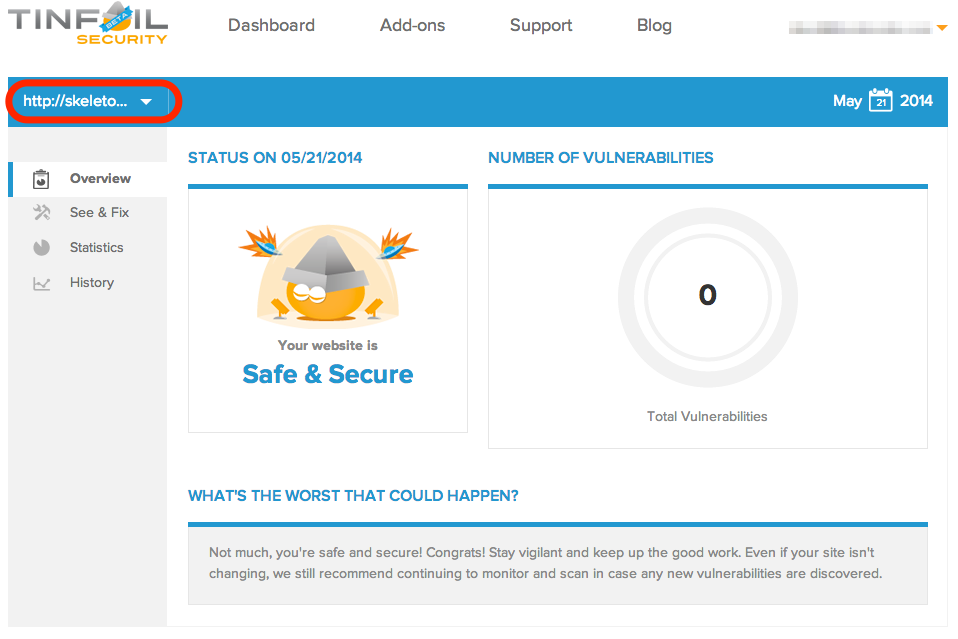
Security Tests Passed:
- Cross-Site Request Forgery
- Code Injection
- Code injection (timing)
- LDAP Injection
- Operating system command injection
- Operating system command injection (timing attack)
- Path Traversal
- File Inclusion
- Source Code Disclosure
- Response splitting
- Remote file inclusion
- SQL Injection
- Blind SQL Injection (timing attack)
- Unvalidated redirect
- XPath Injection
- Cross-Site Scripting (XSS)
- Cross-Site Scripting in event attribute of HTML element
- Cross-Site Scripting in attribute of HTML element
- Cross-Site Scripting (XSS) in path
- Cross-Site Scripting in HTML "script" tag
- Cross-Site Scripting in HTML "vbscript" tag
- Cross-Site Scripting in HTML tag
- YAML Injection
- YAML Injection (timing)
- Allowed HTTP methods
- Found a CAPTCHA protected form
- Credit card number disclosure
- CVS/SVN user disclosure
- Directory listing is enabled.
- Disclosed e-mail address
- Found an HTML object
- Non HTTP-Only Cookies
- Insecure Cookies
- Private IP address disclosure
- Disclosed US Social Security Number
- Misconfiguration in LIMIT directive of .htaccess file
- HTTP PUT is enabled
- Mixed Resource
- Unencrypted password form
- Unencrypted HTTP Basic Authentication
- WebDAV
- The TRACE HTTP method is enabled
- Spammable contact form
- Common sensitive file
- Found Robots.txt
- Password field with autocomplete
- Found Stacktrace
- OpenSSL Heartbeat Extension Memory Leak (Heartbleed)
| On The Server | On The Client | Development | Testing |
|---|---|---|---|
| Node/NPM | Bootstrap | Bower | Mocha |
| Express | Font-Awesome | Gulp | Chai |
| Jade | jQuery | JSHint | Supertest |
| Mongoose | Moment.js | JSCS | |
| Passport | animate.css | Nodemon | |
| Async | Odometer | ||
| Modemailer | |||
| Socket.io | |||
| Helmet | |||
| Winston | |||
| express-validator | |||
| express-flash |
- MongoDB - however I recommend Mongolab, more below about this.
- Node.js
- Command Line Tools (some NPM modules must be compiled):
- Mac OS X: Xcode (or OS X 10.9 Mavericks:
xcode-select --install) - Windows: Visual Studio
- Ubuntu:
sudo apt-get install build-essential - Fedora:
sudo yum groupinstall "Development Tools" - OpenSUSE:
sudo zypper install --type pattern devel_basis
# Install global dependencies
npm install -g nodemon gulp mocha

# Clone the repo (and fetch only the latest commits)
git clone --depth=1 git@github.com:dstroot/skeleton.git
cd skeleton

# Install local dependencies
npm install
bower install

# Start everything up with Gulp
# (builds the assets and starts the app with nodemon)
gulp
❗ Note: It probably won't really run yet! Go setup
config/config.js. To use any of the APIs or OAuth authentication methods, you will need to obtain appropriate credentials: Client ID, Client Secret, API Key, or Username & Password. You will need to go through each provider to generate new credentials. More information below.

Many people use Express.js middleware to build assets, however I generally like a separate build system like Grunt or Gulp.
Our build system compiles and minifies all assets and starts the app app using nodemon. Nodemon will restart node every time a server .js file changes. We also start a livereload server that will trigger a reload of your page in the browser when any client .js, .css, .jade or images change.
To take advantage of the livereload functionality install Google Chrome and then using the chrome web store install the livereload chrome extension.
❗ Click on the tiny center dot to turn on the livereload capability after you start up via gulp.
Now every time you make a change to a client component things will be recompiled and your browser will reload. Cool!
My general approach:
- Write code in a simple and consistent way.
- Find and use good tools.
- Use tools in their native/default behavior.
My coding style:
- I like braces and use them always, even for single-line if statements and the like.
- I like variable names that mean something, rather than trying to be short.
- I favor single quotes above double quotes.
- I use a LOT of comments, because JS can always be minified so there's really no reason to worry about comments contributing to filesize. My assumption is I will have to go change something 12 months from now and want to quickly see what is going on.
- I use a decent amount of whitespace for the same reason.
- I like my opening braces on the same line, not a new line.
- My eyes like alignment so I can scan down lists of things quickly (like dependencies).
This and more is pre-configured in the .jshintrc file.
Recommened reading: Airbnb JavaScript Style Guide

- Visit Google Cloud Console
- Click CREATE PROJECT button
- Enter Project Name, then click CREATE
- Then select APIs & auth from the sidebar and click on Credentials tab
- Click CREATE NEW CLIENT ID button
- Application Type: Web Application
- Authorized Javascript origins: http://localhost:3000
- Authorized redirect URI: http://localhost:3000/auth/google/callback
- Copy and paste Client ID and Client secret keys into
config/config.js
❗ Note: When you ready to deploy to production don't forget to add your new url to Authorized Javascript origins and Authorized redirect URI, e.g. http://my-awesome-app.herokuapp.com and http://my-awesome-app.herokuapp.com/auth/google/callback respectively. The same goes for other providers.

- Visit Facebook Developers
- Click Apps > Create a New App in the navigation bar
- Enter Display Name, then choose a category, then click Create app
- Copy and paste App ID and App Secret keys into
config/config.js - App ID is clientID, App Secret is clientSecret
- Click on Settings on the sidebar, then click + Add Platform
- Select Website
- Enter
http://localhost:3000for Site URL
- Go to Account Settings
- Select Applications from the sidebar
- Then inside Developer applications click on Register new application
- Enter Application Name and Homepage URL.
- For Authorization Callback URL: leave blank
- Click Register application
- Now copy and paste Client ID and Client Secret keys into
config/config.js
- Sign in at https://dev.twitter.com
- From the profile picture dropdown menu select My Applications
- Click Create a new application
- Enter your application name, website and description
- For Callback URL: http://127.0.0.1:3000/auth/twitter/callback
- Go to Settings tab
- Under Application Type select Read and Write access
- Check the box Allow this application to be used to Sign in with Twitter
- Click Update this Twitter's applications settings
- Copy and paste Consumer Key and Consumer Secret keys into
config/config.js
- Visit PayPal Developer
- Log in using your existing PayPal account
- Click Applications > Create App in the navigation bar
- Enter Application Name, then click Create app
- Copy and paste Client ID and Secret keys into
config/config.js - App ID is client_id, App Secret is client_secret
- Make a note of your Sandbox accounts (test user accounts) for testing purposes.
- Change host to api.paypal.com if you want to test against production and use the live credentials
- Go to foursquare for Developers
- Click on My Apps in the top menu
- Click the Create A New App button
- Enter App Name, Welcome page url,
- For Redirect URI: http://localhost:3000/auth/foursquare/callback
- Click Save Changes
- Copy and paste Client ID and Client Secret keys into
config/config.js
- Go to http://www.tumblr.com/oauth/apps
- Once signed in, click +Register application
- Fill in all the details
- For Default Callback URL: http://localhost:3000/auth/tumblr/callback
- Click ✔Register
- Copy and paste OAuth consumer key and OAuth consumer secret keys into
config/config.js
You need to create just two files and edit one:
- NEW View: In
viewscreate your new Jade template. For example to create a "Hello World" page you could createviews/hello/hello.jade. - NEW Controller: In
controllersyou need to create a new controller to render the page when the page's route is called (/hello). It would look like this:
module.exports.controller = function(app) {
  app.get('/hello', function(req, res) {  // When user requests hello page
    res.render('hello/hello', {           // Render hello page
    });
  });
};- EDIT Navigation: You need to edit the navigation to show the new page. You will need to edit
views/partials/navigation.jadeand add a list item 'li' for your new page to show it in the Navbar.
Boom! That's it.
If you need authentication then you would add the Authentication Middleware as a dependency in your controller and then change one line of code in the controller. You will change the app.get line to include the .isAuthenticated middleware. It always reads from left to right. A user visits /hello page. Then isAuthenticated middleware checks if you are authenticated:
var passportConf  = require('../config/passport');  // New dependency

module.exports.controller = function(app) {
  app.get('/hello', passportConf.isAuthenticated, function(req, res) { // Changed
    res.render('hello/hello', {
    });
  });
};
The isAuthenticated middleware checks if you are authenticated and if not redirects you to the login page, otherwise it just calls next and your controller renders the page.
exports.isAuthenticated = function(req, res, next) {
  if (req.isAuthenticated()) return next();
  res.redirect('/login');
};
Express.js has app.get, app.post, app.put, app.del, but for the most part you will only use the first two. If you just want to display a page, then use GET, if you are submitting a form, sending a file then use POST.
You may need to add this hidden input element to your form.
input(type='hidden', name='_csrf', value=_csrf)
From the Node.js Documentation:
A single instance of Node runs in a single thread. To take advantage of multi-core systems the user will sometimes want to launch a cluster of Node processes to handle the load. The cluster module allows you to easily create child processes that all share server ports.
app_cluster.js allows you to take advantage of this feature by forking a process of app.js
for each CPU detected. For the majority of applications serving HTTP requests,
this is a resounding boon. However, the cluster module is still in experimental stage, therefore it should only be used after understanding its purpose and behavior. To use it, simply run node app_cluster.js. Its use is entirely optional and app.js is not tied in any way to it. As a reminder, if you plan to use app_cluster.js instead of app.js, be sure to indicate that in Procfile if you are deploying your app to Heroku.
As the message says, you need to have a MongoDB server running before launching app.js and a valid URL connection string in config/config.js.
You can get MongoDB from mongodb.org/downloads, or install it via a package manager (Homebrew on Mac, apt-get on Ubuntu, yum on Fedora, etc.).
Even Better: Setup a free account with Mongolab and get a free database to develop with. More below.
Chances are you haven't changed the Dabatase URI in config.js. If db is set to localhost, it will only work on your machine as long as MongoDB is running. When you deploy to Heroku, OpenShift or some other provider, you will not have MongoDB running on localhost.
You need to create an account with MongoLab or MongoHQ, then create a free tier database. See Deployment section for more information on how to setup an account and a new database step-by-step with MongoLab.
Subjectively speaking, Jade looks much cleaner and shorter than Handlebars, or any non-HAML style for that matter. I like it. You can use anything you like.
Absolutely! But things get messy quickly. In Drywall, several of the pages are Backbone apps. You can check that out.
In this project we have a rudimentary AJAX page (the accounts page for administrators) - that could be a good starting point.
Flash messages allow you to display a message at the end of the request and access it on next request and only next request. For instance, on a failed login attempt, you would display an alert with some error message, but as soon as you refresh that page or visit a different page and come back to the login page, that error message will be gone. It is only displayed once.
This project uses express-flash module for flash messages. And that module is built on top of connect-flash, which is what I used in this project initially. With express-flash you don't have to explicity send a flash message to every view inside res.render(). All flash messages are available in your views via messages object by default, thanks to express-flash.
Flash messages have a two-step process. You use req.flash('error', { msg: 'Error messages goes here' }
to create a flash message in your controllers, and then display them in your views.
In the first step, 'error' is the type of a flash message, which should match the name of the property on messages object in your views. You place alert messages inside if message.error because you don't want to show them flash messages are actually present.
The reason why you pass an error like { msg: 'Error messages goes here' } instead of just a string - 'Error messages goes here', is for the sake of consistency. To clarify that, express-validator module which is used for validating and sanitizing user's input, returns all errors as an array of objects, where each object has a msg property with a message why an error has occured. Here is a more general example of what express-validator returns when there are errors present:
[
  { param: "name", msg: "Name is required", value: "<received input>" },
  { param: "email", msg: "A valid email is required", value: "<received input>" }
]
To keep consistent with that style, you should pass all flash messages
as { msg: 'My flash message' } instead of a string. Otherwise you will just see an alert box without an error message. That is because, in partials/flash.jade template it will try to output error.msg (i.e. "My flash message".msg), in other words it will try to call a msg method on a String object,
which will return undefined. Everything I just mentioned about errors, also applies to "warning", "info" and "success" flash messages.
The flash messages partial template is included in layout.jade, along with footer and navigation.
doctype html
html
  include ../partials/head
  body
    include ../partials/navigation
    include ../partials/flash
    block content
    include ../partials/footer
block scripts- When you install a new npm package, add a --save flag and it will be automatially added to
package.jsonas well. For example,npm install --save moment. - Use async.parallel() when you neeed to run multiple asynchronous tasks, and then render a page, but only when all tasks are completed. For example, you might want to scrape 3 different websites for some data (async operation) and render the results on a page after all 3 websites have been scraped.
- Use async.waterfall() when you need to run sequential tasks before you render a page.
- Need to find a specific object inside an Array? Use _.findWhere function from Underscore.js. For example, this is how you would retrieve a Twitter token from database:
var token = _.findWhere(req.user.tokens, { kind: 'twitter' });, wherereq.user.tokensis an Array, and a second parameter is an object with a given key/value.
- Jade Syntax Documentation by Example - Even better than official Jade docs.
- HTML to Jade converter - Extremely valuable when you need to quickly copy and paste HTML snippets from the web.
- JavascriptOO - A directory of JavaScript libraries with examples, CDN links, statistics, and videos.
- DailyJS - Blog about JS coding, libraries and tools.
- Bootstrap - Start here. ;)
- Bootstrap Expo - Examples of Bootstrap based sites.
- Wrap Bootstrap - Bootstrap themes and templates
- Bootswatch - Bootstrame themes (simple stuff)
- Google Bootstrap - Google-styled theme for Bootstrap.
- Font Awesome Icons - It's already part of the Hackathon Starter, so use this page as a reference.
- Colors - a nicer color palette for the web.
- CSS Spinning Loaders - spinning loader in CSS.
- SpinKit - 8 awesome looking spinning loaders in CSS.
- Creative Button Styles - awesome button styles.
- 3D Dropdown Menu - CSS3 3D Dropdown Menu that folds and unfolds.
- Creative Link Effects - Beautiful link effects in CSS.
- Medium Scroll Effect - Fade in/out header background image as you scroll.
- HTML5UP - Beautifully designed HTML templates.
- Codrops - Excellent design tutorials!
- geoip-lite - get geolocation coordinates from IP address.
- filesize.js - make file size pretty, e.g.
filesize(265318); // "265.32 kB". - Numeral.js - a javascript library for formatting and manipulating numbers.
- Hover - Awesome css3 animations on mouse hover.
- retina.js - Retina.js checks each image on the page to see if there is a high-resolution version. If a high-resolution variant exists, the script will swap in that image in-place.
- platform.js - Get client's operating system name, version, and other useful information.
- iCheck - Custom nice looking radio and check boxes.
- Magnific Popup - Responsive jQuery Lightbox Plugin.
- jQuery Raty - Star Rating Plugin.
- Headroom.js - Hide your header until you need it.
- Fotorama - Very nice jQuery gallery.
- X-editable - Edit form elements inline.
- Offline.js - Detect when user's internet connection goes offline.
- Color Thief - Grabs the dominant color or a representative color palette from an image.
- select.js - Styleable select elements.
- drop.js - Powerful Javascript and CSS library for creating dropdowns and other floating displays.
- scrollReveal.js - Declarative on-scroll reveal animations.
Recommendations:
- Create an account with MongoLab

❗Note: As an alternative to MongoLab, there is also MongoHQ.
- Create an account with Nodejitsu or Heroku
I think Nodejitsu is dead simple and it works great!
- Install Nodejitsu tools:
npm install -g jitsu - Signup:
jitsu signup - Deploy:
jitsu deploy - Done!
Heroku is also very good and Skeleton already includes Procfile, which is necessary for deployment to Heroku.
- Download and install Heroku Toolbelt
- In terminal, run
heroku loginand enter your Heroku credentials - From your app directory run
heroku create, followed bygit push heroku master - To use socket.io you have to opt-in to websockets support by running this command:
heroku labs:enable websockets -a myapp - Done!
If something is unclear, confusing, or needs to be refactored, please let me know. Pull requests are always welcome!
The MIT License (MIT)
Copyright (c) 2014 Dan Stroot
Permission is hereby granted, free of charge, to any person obtaining a copy of this software and associated documentation files (the "Software"), to deal in the Software without restriction, including without limitation the rights to use, copy, modify, merge, publish, distribute, sublicense, and/or sell copies of the Software, and to permit persons to whom the Software is furnished to do so, subject to the following conditions:
The above copyright notice and this permission notice shall be included in all copies or substantial portions of the Software.
THE SOFTWARE IS PROVIDED "AS IS", WITHOUT WARRANTY OF ANY KIND, EXPRESS OR IMPLIED, INCLUDING BUT NOT LIMITED TO THE WARRANTIES OF MERCHANTABILITY, FITNESS FOR A PARTICULAR PURPOSE AND NONINFRINGEMENT. IN NO EVENT SHALL THE AUTHORS OR COPYRIGHT HOLDERS BE LIABLE FOR ANY CLAIM, DAMAGES OR OTHER LIABILITY, WHETHER IN AN ACTION OF CONTRACT, TORT OR OTHERWISE, ARISING FROM, OUT OF OR IN CONNECTION WITH THE SOFTWARE OR THE USE OR OTHER DEALINGS IN THE SOFTWARE.