This repository is a collection of experimental PWA Studio extensions. It is not actively maintained. There may be better, more recently updated examples in the PWA Studio repo extensions directory.
- If you want to open an issue about PWA Studio extensions, go to the PWA Studio repository issues page.
- If you have general questions or comments about Magento PWAs, visit us at the community Slack channel or go to the Developer Documentation site.
- If you want to do something else, then I don't know why you're here, but you could go look at people dancing to Steely Dan, or go play the legendary 1993 video game Star Control 2.
- Setup
- Walkthrough
- Concepts
This repo should live in a sibling directory to your working copy of PWA Studio. It has scripts which connect the PWA project with the extension code in these packages, much like a filesystem dependency in Composer or a linked package in NPM.
-
Clone this repository.
-
Run
yarn installin the repository root. This repo uses Yarn Workspaces, like PWA Studio does, so this command will also install all the dependencies inpackages/. -
Here comes the magic! In the repository root, run
yarn studiolink </path/to/your/pwa_studio_repo>.
ℹ️ Use the absolute path to your PWA Studio repo.yarn studiolink /Users/jzetlen/Projects/pwa-studio/packages/venia-concept
All the packages in
packagesare now available torequire()andimportin your PWA project.
ℹ️ From now on, if you runyarn installin your PWA project, you may have to re-run this command.
-
Your PWA normally only runs targets from its explicitly declared dependencies. However, these modules aren't published to NPM, so if you explicitly declared one in
package.jsonit would cause problems on install. To help with development, PWA Buildpack has aBUILDBUS_DEPS_ADDITIONALenvironment variable. Specify it at the command line, or put it in your.envfile:BUILDBUS_DEPS_ADDITIONAL=@magento-research/pwa-upward-csp,@magento-research/pwa-venia-color-scheme
If these packages are resolvable (installed) in your project, then Buildpack will run their interceptors as if they are declare dependencies. In step 3, you linked all of these experiments to your PWA project, so this should work!
-
Run
yarn run watch:veniain your PWA directory. The extensions will take effect! -
Test your extensions: switch your computer's display settings to dark mode, for instance.
Now that this repository's code is running in your PWA, it's time to look at how they work in more detail. If you want to review the concepts of Extensions and Targets, you can skip to Concepts before continuing with the walkthrough.
Each of the example extensions here demonstrates a concept of the type of functionality that can be customized, and a pattern for doing that customization. Some of the examples require new Targets that PWA Studio doesn't have yet! In those examples, you'll find a link to a pull request to PWA Studio, implementing these targets.
develop branch. Instead, you can check out the branch in the linked pull request.
💡Example: Content Security Policy for Venia
This extension for Venia modifies the Venia UPWARD definition to send Content Security Policy headers for all pages. It automatically adds the Magento backend as a legal source, and it relaxes the security policy in developer mode while leaving it very strict in production. It currently is in Report-Only mode, because it's experimental!
-
Make sure you have run
yarn run studiolink /path/to/pwain this repo root. -
Open a terminal in
/path/to/pwaand run:BUILDBUS_DEPS_ADDITIONAL=@magento-research/pwa-upward-csp \ yarn run build && yarn run stage:venia -
View staging site in browser.
-
Open your JS console and watch the report-only CSP errors pile up. In strict mode, these requests would be blocked.
In its code, you'll find two different implementations of the same functionality. One of them is in intercept-upward-file.js, and the other is in intercept-upward-target.js.
Out of the box, the extension uses intercept-upward-file.js, so look at that first.
The code in intercept-upward-file.js is verbose. It needs to tap Webpack directly and use very generic module interceptors to find the UPWARD file in the compilation graph and manually modify it. Since UPWARD will be a very common target of customization, there should be a builtin Target to make it simpler to get to that logic.
That's where the intercept-upward-target.js file comes in. This implementation relies on a functionality that is currently in a pull request to PWA Studio. It adds a new Target which makes the same functionality much simpler and more maintainable, allowing us to use intercept-upward-target.js instead. You can demo this workflow too.
⚠️ Have the companion PWA Studio pull request checked out in your/path/to/pwadirectory. This will not work on the develop branch of PWA Studio.- Edit
packages/upward-csp/package.jsonin this repository. Change thepwa-studio.targets.interceptfile path fromintercept-upward-file.jstointercept-upward-target.jsand save. - Go to step 1 above.
💡Example: Venia Color Scheme
Venia stores its colors in CSS Variables in a global stylesheet, so that even though most of its component CSS is encapsulated in modules, they can use the same global color scheme.
This extension for Venia adds a "dark mode".
It parses the CSS of the global stylesheet, then autogenerates a dark theme by manipulating the theme colors in the HSL color space, to preserve contrast and key colors. It puts that dark theme in a prefers-color-scheme: dark media query.
-
⚠️ Have the companion PWA Studio pull request checked out in your/path/to/pwadirectory. This will not work on the develop branch of PWA Studio. -
Make sure you have run
yarn run studiolink /path/to/pwain this repo root. -
Open a terminal in
/path/to/pwaand run:BUILDBUS_DEPS_ADDITIONAL=@magento-research/pwa-venia-color-scheme \ yarn watch:venia
-
View site in browser.
-
Switch between dark mode and light mode. There's no UI control; it detects your system preference.
| iOS | Android | Google Chrome |
|---|---|---|
| Firefox | macOS | Windows |
Or, you could wait around a few hours. Time is a bitter, cosmic joke on us all.
This extension also declares its own target to allow the project, or other dependencies, to set overrides for certain colors.
⛔️This extension relies on a pull request to PWA Studio to work. This PR replaces the (very few) hardcoded color declarations throughout the Venia stylesheets with global color variables.
It also adds a new type of module transform to the transformModule target, called postcss!
ℹ️ If you find these additions valuable, please comment on the pull request to urge the merge.
💡Example: NextJS-Style Routes
NextJS is a very popular and powerful framework for server-side-rendered React applications. It has a lot of friendly APIs and sensible organizational concepts. So we thought we'd steal them Some of these developer-friendly features can be brought to PWA Studio via the Targets framework.
This extension adds NextJS-style filesystem-based route structure to a PWA Studio app. It also shows how to implement more declarative, simple and strict interfaces "on top" of the low-level Targets.
-
In your PWA Studio repository, create a new folder in
packages/venia-concept/src/calledpages. -
In that folder, create another folder called
compare, and then in that folder, another folder called[left](in brackets). -
Download these examples and put them in these new folders. You should end up with two new files in your repo:
packages/venia-concept/src/pages/hello_next.md.js
packages/venia-concept/src/pages/compare/[left]/[right].js
-
Make sure you have run
yarn run studiolink /path/to/pwain this repo root. -
Open a terminal in
/path/to/pwaand run:BUILDBUS_DEPS_ADDITIONAL=@magento-research/pwa-nextjs-routes \ yarn watch:venia
-
View site in browser. Go to
/hello_next.md. -
Now pick two product SKUs and visit
/compare/[sku1]/[sku2]. On a Venia store, you could use/compare/VA12-SI-NA/VA11-GO-NA.
This extension doesn't require any additional Target work from PWA Studio itself to work in a basic way. However, a few things might improve it:
- Better support for watch-mode dependency management in Targets
- Better exposal of resolver functions in Targets, to determine real fs paths
- Distinguishing between page routes and RootComponents
💡Example: Contentful Blog
There's nothing worse than trying to put a "blog" on your web store using a bare-bones add-on to your ecommerce store.. Dedicated blog platforms can't be beat for features; if only there was a way to smoothly integrate blog content on to your store without a jarring transition.
This extension adds blog content from Contentful, by adding some routes and invisibly welding Magento GraphQL and Contentful GraphQL together.
It demonstrates a few potentially common uses of the Targets framework:
- Adding visual items (the nav item, in this case)
- Adding configuration for external integrations
- Changing the behavior of API clients
- Injecting third-party content
-
Clone the starter-gatsby-blog project into a sibling directory alongside your PWA Studio folder and this repository.
-
Follow the instructions for setting up that repository. Run the local development environment. When it is running locally, you can visit the localhost server to see what the content should look like. Make a note of the GraphQL endpoint logged in the terminal; it will be something like
http://localhost:8080/___graphql. -
⚠️ Have the companion PWA Studio pull request checked out in your/path/to/pwadirectory. This will not work on the develop branch of PWA Studio. -
Make sure you have run
yarn run studiolink /path/to/pwain this repo root. -
Open a terminal in
/path/to/pwaand run:CONTENTFUL_GRAPHQL_ENDPOINT=http://localhost:8080/___graphql \ BUILDBUS_DEPS_ADDITIONAL=@magento-research/pwa-contentful-blog \ yarn watch:venia
⚠️ Yourstarter-gatsby-blogmay be running at a different URL than this example. SetCONTENTFUL_GRAPHQL_ENDPOINTto the GraphQL endpoint your local Gatsby server exposed. -
View site in browser.
-
Open the left nav. Observe the new nav item. Click it.
-
Watch the network tab. Note that multiple GraphQL APIs are in use.
-
Click a blog entry. Notice the slug in the URL.
-
As an extra bonus, if you want to make a Contentful account and add/modify this sample content, do so and refresh your site to prove to yourself that all this data is live!
⛔️This extension relies on a pull request to PWA Studio to work. This PR adds several targets to Venia to enable a seamless integration:
- VeniaUI has an
apolloLinktarget, exposing the already composable concept of Apollo Links to PWA Studio extensions - VeniaUI has a
navItemstarget, exposing the main navigation menu in the same way thatroutesexposes the routing table
💡Example: Venia Critical CSS
A great PWA store gives your new shopper a good impression by loading as quickly as possible. One of the most important PWA best practices is to identify your critical rendering path and optimize the resources necessary for it as much as possible. One part of that is to find and inline the "critical CSS" for your critical path.
This extension for Venia enhances the Webpack compiler to extract the CSS for a hand-picked list of modules in the Venia critical path, and then to inline that CSS directly into the index.html application shell. It demonstrates:
- How to do more advanced build integrations with Webpack hooks alone
- Working with the
HtmlWebpackPluginand its own extension hooks to customize the application shell How bad choices can make your extension annoying and useless🌈✨ Fun goodies! 🎉🌈
-
Make sure you have run
yarn run studiolink /path/to/pwain this repo root. -
Open a terminal in
/path/to/pwaand run:BUILDBUS_DEPS_ADDITIONAL=@magento-research/pwa-venia-critical-css \ yarn build && yarn stage:venia -
View site in browser. Loads a bit faster, huh?
-
View page source to see what happened.
This is a proof-of-concept. It would be a much more noticeable speed boost if the critical path was also rendered with SSR, perhaps just constructing the outside of the page at build time.
It's designed for Venia alone. It relies on a manual list of Venia components to inline; it can't detect the critical path of your app automatically.
Ways to improve on the shortcomings mentioned above might include:
- Use one of the many critical-path-detecting tools at build time
- Webpack Critters (fastest)
- Penthouse
- Critical
- react-snap
- Change Webpack
optimizeparameters to combine stylesheets - Refactor Venia to load the critical path synchronously and then subsequent stylesheets asynchronously
💁♂️ There you have it: five quick PWA Studio extensions! Please, feel free to PR this repository and contribute more. Read on for a reintroduction to the concepts behind Targets.
PWA Studio extensions are very similar to Webpack plugins, in that they use Tapables as individual extension points, to "hook in" to other parts of the framework.
The big difference between the PWA Studio extension system and Webpack plugins is in how a project uses them. Webpack is designed for developers, so the way to add Webpack plugins is to manually install them with NPM, and then manually edit Webpack's JavaScript configuration file to add them.
PWA Studio is designed for developers, sysadmins, and business users to customize, so it works a little bit more automatically. Instead of editing code, you can add and activate a PWA Studio extension in one step: by installing it with your package manager (NPM or Yarn). Buildpack, the PWA Studio toolkit, detects which installed packages are PWA Studio extensions, then automatically runs their code. After installing an extension with one command, e.g. npm install @magento/pagebuilder, a PWA project will integrate the new feature into the storefront with no additional work required .
This works a lot like Magento Commerce, the backend server for PWA Studio apps. If you make an extension for Magento which enhances its backend API and requires frontend changes as well, you can make a Composer package for the former and an NPM package for the latter; each will install and activate in one step.
But when PWA Studio detects and runs extension code, what does that code do? It connects to the rest of your project using Targets.
The Target is a low-level extensibility "primitive". It's a building block for extension functionality. More detail can be found in the developer documentation for PWA Studio, but it's time for a quick review.
A Target is an enhanced Tapable. It's an object that an NPM module declares and uses to expose a part of its functionality to third-party code, via the interceptor pattern.
An NPM package becomes a PWA Studio extension when it declares Targets, then calls those targets in its own code. Those targets become available for all other PWA Studio code to intercept, via the Buildpack BuildBus.
Targets run in NodeJS, in a few scripts but primarily in the build process. To invoke Targets, Buildpack creates a BuildBus object. That object runs the Target lifecycle in a prescribed order:
- Declare
- BuildBus scans all installed extensions for declared Targets.
- Extensions which declare Targets have a declare file, a NodeJS script which exports a function.
- BuildBus loads the declare file and calls that function with a
TargetProviderobject, an interface to the BuildBus. - The declare file should run
targets.declare(targetDictionary)to publish Target objects so that other packages can use them.
- Intercept:
- BuildBus scans all installed extensions for an intercept files.
- BuildBus loads the intercept file and calls it in the same way as the
declarefile, but the passedTargetProvideris now fully stocked with declared targets from all dependencies. - The intercept file should run
targets.of(desiredDependencies)to retrieve a dictionary of named targets, then tap those targets and pass callbacks with custom functionality.
- Build:
- BuildBus is done scanning dependencies. The build process begins to call builtin targets (those targets declared by Buildpack itself) on BuildBus directly.
- Interceptors execute, in turn calling other interceptors, until the build process completes. The implementation of interceptors and the timing of the Webpack compiler object will determine what order targets are called at this point.
Targets don't run on the storefront. They run at build time and can change the code that runs the storefront, but they are designed to resolve extension logic at build time in NodeJS, so they don't impose any performance cost at build time.
Targets run their interceptors in order when they are called. An extension first declares a target, then gives it functionality by calling that Target at some point in its code.
You're the author of an extension called @you/pwa-studio-dupcheck. You want it to add the DuplicatePackageCheckerPlugin, which detects when multiple versions of the same code are bundled into the app, and warns the developer, so they can correct the issue and reduce bundle size. This is your code.
const DupCheckPlugin = require('duplicate-package-checker-webpack-plugin');

function intercept(targets) {
    targets.of('@magento/pwa-buildpack').webpackCompiler.tap(compiler => {
        const plugin = new DupCheckPlugin({ verbose: true });
        plugin.apply(compiler);
    });
}

module.exports = intercept; [...]
+"pwa-studio": {
+ "targets": {
+ "intercept": "./apply-plugin.js"
+ }
+}Once a PWA project has @you/pwa-studio-dupcheck installed, its build process will log warnings when duplicate modules are detected!
-
The PWA project calls
Buildpack.configureWebpack(config)in itswebpack.config.jsfile. -
In
configureWebpack(), Buildpack creates a BuildBus. -
The BuildBus scans installed dependencies, and and finds the
pwa-studio.targets.interceptin the extension'spackage.jsonas shown above. -
Declare phase: modules declare Targets. Buildpack declares its own first, including
webpackCompiler. -
Intercept phase: BuildBus calls all intercept files, including
apply-plugin.jsas shown above. -
The extension gets the Buildpack
webpackCompilertarget and intercepts it via.tap, passing a synchronous callback. -
Run phase: With the initialized BuildBus, Buildpack continues assembling Webpack config.
-
Webpack creates a Compiler object.
-
Buildpack calls its own
webpackCompilertarget, passing the compiler instance.// Simplified for readability targets.own.webpackCompiler.call(compiler);
-
Each interceptor of
webpackCompileris called with the compiler object. The callback inapply-plugin.jsruns. -
A new
DupCheckPluginadds itself to the Webpack compiler instance.
Users of your @you/pwa-studio-dupcheck extension are loving it, but some complain that they want to hide some of the warnings. There are a few duplicates that they simply can't remove, so the plugin warnings clutter up the build log, tempting them to turn the entire plugin off.
You see in duplicate-package-checker-webpack-plugin's documentation that it has an option called exclude. You can pass an options.exclude function, which will be called for every duplicate. If that function returns true, the warning is not logged. That would solve this problem well!
But the project that uses @you/pwa-studio-dupcheck does not have access to the constructor arguments of DupCheckPlugin. The interceptor is hiding in a dependency.
You decide that @you/pwa-studio-dupcheck should declare its own target, so that other packages, including the app itself, can hide duplicate errors about certain modules.
function declare(targets) {
    targets.declare({
        exclude: new target.types.SyncBail(['instance'])
    });
} [...]
"pwa-studio": {
"targets": {
+ "declare": "./declare-dup-exclude.js",
"intercept": "./apply-plugin.js"
}
}Now you've declared a Target. but it doesn't do anything yet. How do you implement it?
You'll almost always call your own targets within your interceptors of other targets. This is how the PWA Studio extension framework builds up rich functionality out of a small number of builtin targets from Buildpack itself.
A SyncBail Target is one of the two types of Target which return a value. When you call this Target, it will call each of its interceptors with the supplied argument. If any of the interceptors return a non-undefined value, the Target "exits early", returning that value. It doesn't call the rest of the interceptors.
This makes sense for the options.exclude function, since if any of the interceptors return true, then the passed module should be excluded.
 const plugin = new DupCheckPlugin({
+  exclude: instance => targets.own.exclude.call(instance),
   verbose: true
 });
You're using your Target as the options.exclude function, so it has the same API as described in the plugin documentation. Except now, you've allowed the PWA project and any other extensions to decide what to exclude!
-
Install it in your PWA:
yarn add --dev @you/pwa-studio-dupcheck -
Installed extensions activate in the next build. Run
yarn build. -
Uh oh! Your build logs a warning that you're using two separate versions of
lodash!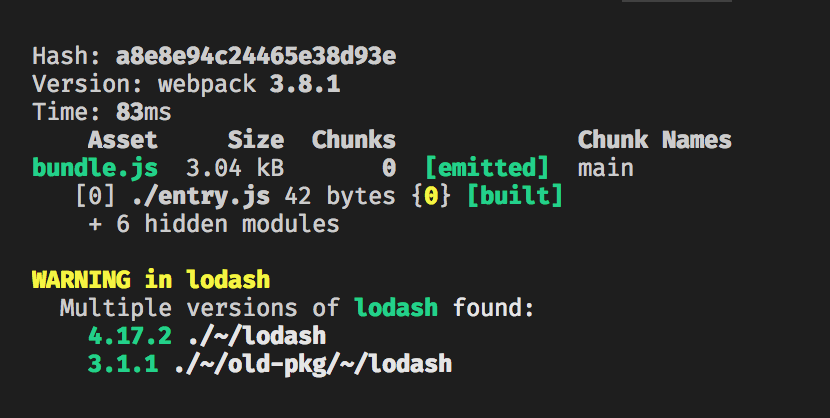
-
First, you try and resolve it, using Yarn resolutions.
-
But this breaks your app! It turns out that the dependencies which require
lodashreally do require mutually incompatible versions of it. You'll address this problem later; for now, you need to control noise in the build. -
Add to the
local-intercept.jsfile in your project. (If you don't have one, set one up and list it inpackage.json).targets.of('@you/pwa-studio-dupcheck').exclude.tap(instance => { if (instance.name === 'lodash') { return true; } });
-
On your next build, the
lodashwarning is quiet.
Now you've created a useful extension, intercepted a builtin Target, declared your own Target, and demonstrated that it works!
There's more to learn: you can use sync or async Targets, add special behavior to Targets via the .intercept meta-method, and most importantly, you can help PWA Studio out by noticing when something that should be easy in an extension system is too difficult. Fix it by opening an issue in PWA Studio and describing what you want, or even by forking PWA Studio, adding or enhancing the Target you want, and opening a pull request!
- Tap the very extensible HtmlWebpackPlugin!
- You get it from the compiler or compilation instance, check the docs
- Would need to refactor Buildpack and Venia to move the plugin use out of the main project into utility methods
- Could add metadata, inline styles, or even template code to be evaluated by UPWARD
- Generalize the concept of appending JSX nodes so there's less boilerplate
- Make a declarative layer for common, low-logic interceptors
- An XML file or JSON in an additional package.json property on
"pwa-studio" envVarDefinitions,specialFeatures,routes,navItems, anything with an array to be pushed into
- An XML file or JSON in an additional package.json property on
- Checkout stuff
- Custom renderers for payment methods
- Shipping estimators and tax estimators
- Store locators
- Adapters for useful add-on libraries
- A Quicklink extension that would auto-integrate Quicklink's viewport-aware prefetching
- Inject the
window.onloadhandler to register the IntersectionObserver (use HtmlWebpackPlugin targets) - Wrap registered routes with the
withQuicklinkReact HOC (expose a new target in Venia's BabelRouteInjectionPlugin) - Expose and use additional properties in registered routes (same as above)
- Inject the
- A Quicklink extension that would auto-integrate Quicklink's viewport-aware prefetching
- Data integration
- Targets for modifying GraphQL queries
- Adding Fragments (via a new transformRequest type?)
- High-level rules to observe documents as they pass (mergeable visitors?)
- Validating prop contracts for React components
- Autogenerating prop types from GraphQL queries?
- Targets for modifying GraphQL queries
- More builtin request transformers
- GraphQL transform type
- Fragment insertion
- Validation
- Linting
- Module replacer
- Convenience functions for a module to register an allowed list of modules to be overridden, e.g.
require('@magento/pwa-target-utils').publishOwnComponents(targets, { 'src/components/Main': { name: 'mainComponent', canReplace: true } })would automate the declare-intercept boilerplate to do that
- Convenience functions for a module to register an allowed list of modules to be overridden, e.g.
- GraphQL transform type
.vscodeand.ideafolders for debug configurations and tasksdotenvfor local configurations- Publishing instructions and best practices
- Demo of Marketplace integration TBD