
This guide uses: sudo, git, pacman, and the Arch/AUR repositories.
The mentioned later script was tested only on EndeavourOS(Arch-based)
I do not take any responsibility for any kind of damage this guide or script might cause,
use them at your own risk.
download the auto-Installer-Visual-Studio-Code.sh file.
🞄 Note: if you have multiple users on your system edit the script and
🞄 in userName=* replace the * with your preferred user's name.
now enter the next commands into the terminal:
sudo chmod +x auto-Installer-Visual-Studio-Code.sh
sudo pacman -Syu
./auto-Installer-Visual-Studio-Code.sh
🞄 the script will ask you multiple times to confirm the installations.
🞄 after the script finishes follow the Manual-Install (set-up C# and Code-Runner)
enter the next command into the terminal: sudo pacman -Syu
now enter the next commands:
sudo pacman -S dotnet-sdk git gcc-libs glibc gnupg gtk3 libnotify libsecret libxss lsof nss shared-mime-info xdg-utils glib2
to verify that the installation of the framework worked, type:
dotnet --version
now we'll install the software itself:
cd Downloads/
git clone https://AUR.archlinux.org/visual-studio-code-bin.git
cd visual-studio-code-bin/
makepkg
sudo pacman -U visual-studio-code-bin-*
cd ..
rm -rf visual-studio-code-bin/
🞄 now you can start Visual Studio Code.
If you need to setup C#(CSharp) and Code-Runner on VSCode here's how:
in VSCode go to Extensions
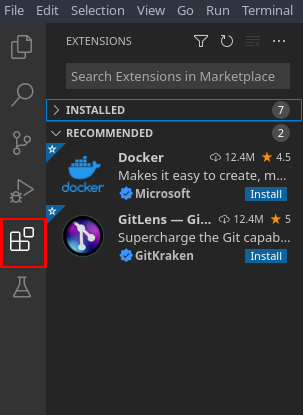
and install the C# and code runner extensions
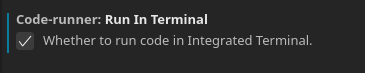
now go to File ➔ Preferences ➔ Settings
search run in terminal and enable Code-runner: Run In Terminal
🞄 if you followed the Auto-Install section you can skip this step with Code-Runner.
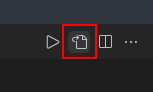
click on the open settings icon top right
write code-runner.executorMap and press enter.
the script should automatically update and look like this:

scroll down to csharp and instead of scripts write:
cd $dir && sudo dotnet run $fileName

save the file.
open in File ➔ Open Folder... your chosen work directory
then go to Terminal ➔ New Terminal
🞄 to create a C# console application run the next command:
dotnet new console
🞄 then to be able to save your project, run:
sudo chmod +x Program.cs
🞄 hopefully this guide covered everything that you needed, and I hope that everything worked!
🞄 now you should be able to run your C# projects with the 'Code-Runner' extension and save properly!
🞄 happy coding!
- created by https://github.com/000DanielPublish/Release dates: 06.01.2022