Bot Commands
This page echos the help commands currently loaded onto the bot. You can summon these commands with using the ? prefix. This list will be updated periodically.
Do not use a 2-perimeter test piece to calibrate extrusion multiplier/flowrate. While it may be tempting to think that using two perimeters gives a thicker wall that is easier to measure, printing two walls next to each other puts you at the mercy of filament expansion/shrinkage forcing the walls apart or pulling them closer together, significantly affecting accuracy.
Instead, simply print your test piece/cube in vase mode. This results in the best layer alignment and consistency to give you a very accurate wall. If you must, it's acceptable to increase the wall thickness (say, 0.6mm wall with an 0.4mm nozzle).
https://www.3dhubs.com/knowledge-base/definitive-3d-printing-glossary/
https://community.octoprint.org/
<Here are some resources on gcode (it varies slightly depending on your firmware): https://reprap.org/wiki/G-code http://marlinfw.org/meta/gcode/ >
<This looks like a leveling issue. Here's a handy guide <@305676897189363713> put together! https://i.imgur.com/tbvOlB9.jpg>
https://letsprint3d.net/all-metal-hotends-troubleshooting-guide/
https://www.reddit.com/r/3Dprinting/comments/8cnpad/can_we_sticky_an_anet_a8chinese_prusa_awareness/
https://github.com/InsanityAutomation/Marlin/tree/ArtilleryX1_2.0_Devel
Please provide some more information to help us help you! For example, printer model, slicer, filament, and general slicer settings (temperature, speeds, etc). Photos of the issue can be helpful if possible.
Also let us know any troubleshooting methods you've tried so far, and if you have made any modifications/changes to your printer before the issue started.
Please ask for help in a free help channel and not general chats!
Don't ask to ask! Just describe your issue or question as with as much relevant information as possible, and wait for someone who is able to help you. Asking for help without describing your issue often results in no help at all - people are reluctant to commit when they don't know what they're getting themselves into.
https://reprap.org/forum/thumbcache/434/896/ad3/5aa/2b5/366/d50/e0a/8a6/5f6/8a_800x400.png
A common misconception is that the heating time of a bed is based off of its voltage - that 24v beds heat faster than 12v beds, and 120v or 240v mains beds heat faster than both. While there is an element of truth to this, it is not the whole picture and will not lead to accurate conclusions all the time.

A bed's heating rate is a function of the bed's electrical power, usually expressed in Watts (W) - the more watts a bed is, the faster it will heat. Voltage is not strictly a variable in this function. If a certain bed has a 12v, 200W heater, it will heat at the same rate as the same bed with a 24v 200W heater, or even a 110v 200W mains heater. Meanwhile, upgrading the heater to a 12v, 500W heater will cause the same bed to heat significantly faster than both the 24v and 110v 200W heaters.

The element of truth to higher voltage beds heating faster comes from the fact that it's typically more difficult (but not impossible) to implement a high powered bed at a lower voltage such as 12v. The current requirements increase, which demands a larger and higher capacity MOSFET as well as thicker and bulkier wires, making them impractical to install and use. As a result, high powered heaters and beds such as the aforementioned 500W heater are almost never made in 12v. However, even when considering this, it's important to remember that it's not a universal rule that all 24v heaters are more powerful than 12v heaters - low-powered 24v heaters exist and are common in more affordable printers.
https://www.reddit.com/r/3dprinting/comments/eetzxn/_/
A large number of people ask about good printers or designs with large build areas (>350x350x350). Unfortunately, large printers come with a number of drawbacks that you might want to consider before going down that route.
First, the size limits the kinematics that will work effectively so the popular CoreXY style likely wont work and it will be much less rigid (which will affect the quality of all prints - even small ones!). As a result you will be severely limited on speed and quality. People often think that a 200x200 mm printer is small but there is actually a lot of space there! Try setting up the printer sizes in cura and importing some models you want to print to see if its big enough!
Secondly, to make use of that larger build area you going to be printing either big parts or a lot of parts. This means you're going to be running multiple day prints which come with a much higher failure rate. To use the whole volume of a 180x180 mm printer will take over ~3.5 days of printing and that time grow exponentially as your build plate gets bigger. You will also likely have to make sacrifices in terms of detail quality by using a larger nozzle.
Your larger printer will also be making larger prints so expect to use a lot more filament than a normal printer. Be prepared for the higher consumables cost!
Remember also that a printer is slightly larger than its bed. At sizes 300 mm squared and up you're likely going to encounter issues if you ever need to move the printer as it might not fit through your doorways meaning you'll have to disassemble it to move it!
If you're considering a larger printer first check if you have any specific projects that require parts that are that size. (If you do perhaps consider other manufacturing methods.) Make sure that you're comfortable with the extremely long build times and likely reduction in quality that will result and check if you couldn't split the part up into smaller pieces to be glued together.
https://i.imgur.com/ZGxP85u.png
Capricorn lists melting temps, not degradation temps when advertising their PTFE tubing. This could lead to people thinking their products are more durable than they are.
Capricorn tubes have a unique selling point in that their quality control ensures accurate inner and outer diameters of extrusion. This is in contrast to generic manufacturers who may not have as stringent a requirement for manufacturing.
A 1.9mm ID (inner diameter) has been shown to help in reducing hysteresis when extruding flexible filaments in a Bowden setup but in other setups, i.e. filament with a higher variance in diameter, this can actually become detrimental. Use best judgement when deciding what form or brand of PTFE to use in your printer.
Capricorn tubing is relatively high quality for its price point, but there is insufficient independent evidence to show that it has more thermal resistance to pyrolysis than "generic" PTFE tubing. One difficulty in testing is that due to the colorants in the PTFE resin, the distinctive "browning" of degradation or pyrolysis is much harder to detect. Another point of concern is to do with Capricorn's line of translucent "TL" PTFE. Though the exact composition of their resin remains proprietary, the nature of PTFE and related fluoropolymers speculatively suggests the addition of PFA or FEP (which are optically transparent) into the mix. The issue with this is that both PFA and FEP have lower working temperatures than PTFE. PFA is rated to a similar ceiling of 260 C but has a higher thermal conductivity whereas FEP undergoes degradation at temperatures as low as 200 C. Unfortunately without further evidence, this must remain speculative.
In short, caveat emptor. Capricorn is a quality product, but it is not magic.
All simulations are wrong, only some are useful!
Chain and sprocket systems, such as those used in bicycle drivetrains, are not suitable for use in a 3D printer. The pitch diameter of chain sprockets varies throughout the cycle of engaging, driving, and disengaging each link of the chain, resulting in a chain velocity profile that oscillates if the sprocket itself is turning at a constant speed. This means that you cannot use a sprocket and a chain to turn some amount of rotational motion into a 1:1, constant amount of linear motion, which makes it impossible to use in a precision linear axis without some form of closed loop control.
Bicycles and many other applications can work perfectly fine with chains because they don't demand exact precision. 3D printers do.
Timing belts were created specifically to solve this issue. The profile of the teeth and the pulleys gives the pulleys a constant pitch diameter, so that any rotational motion is transformed into an exactly corresponding amount of linear motion, making them suitable for 3D printers.
- a chainmail like fabric
- thickness up to 2mm
- layer height .04mm
- chainmail size 10x1000mm
- a single print-in-place print that is done right off the print surface -single material
- no supports
- FDM print
- maximum print area 250x250mm
- must start print on a pristine, empty print surface -all source files must be released as open source
https://cdn.discordapp.com/attachments/167661427862142976/705036434603507713/cheapnozzle.jpg
https://community.io3dp.com/wp-content/uploads/2020/01/Io3DP_Cheat_Sheet_Revised.pdf
https://www.plasticsintl.com/chemical-resistance-chart
https://www.thingiverse.com/thing:4062101
https://www.youtube.com/watch?v=fzWj6adWc-Y
This video explains how to do a cold/atomic pull, which is useful in clearing nozzles. https://youtu.be/c03P3UNRoFE Something that's not well explained in the video is that you have to push down on the rubber collet (little donut thing holding the Bowden tube) to release it. (Be sure not to use this method on an e3D nozzle X as it will remove the nano coating on these specific nozzles)
http://bukobot.com/nozzle-cleaning
View commands with !hc
https://www.simplify3d.com/support/print-quality-troubleshooting/
https://bornity.com/projects#/constant-force-joints/
https://www.ruland.com/resources/technical-articles/technical-article-servo-coupling
https://imgur.com/gallery/E4IzOOl
https://github.com/InsanityAutomation/Marlin/tree/CrealityDwin_2.0
https://www.youtube.com/watch?v=FRzsGttNMyk
https://www.youtube.com/watch?v=sPAs-DzgOWM
https://www.youtube.com/watch?v=9NO4f56oXX0
Cross threading is when you screw something in at the wrong angle, in this case the nozzle into the heater block. Doing this can result in disintegrating your threads and rendering your heater block unusable. It is easier to do when the nozzle material is harder than the heater block material (for example a hardened steel nozzle with an aluminium block) but is still easy to do by accident otherwise.

In the picture below the unsuspecting aluminium heater block was annihilated by a humble brass nozzle.

**Do not cross thread your heater block <:feelssobman:393783865241501696> **
https://cdn.discordapp.com/attachments/260957117412802561/719595049641312417/image0.jpg
https://ultimaker.com/software/ultimaker-cura
M140 S{material_bed_temperature} ; heat bed, nonblocking
M104 S{material_print_temperature} ; heat hotend, nonblocking
M190 S{material_bed_temperature} ; heat bed, blocking
M109 S{material_print_temperature} ; heat hot end, blocking
By default Cura hides a lot of settings. You can configure which settings are visible from the preferences. https://cdn.discordapp.com/attachments/167661427862142976/712377752535433226/unknown.png
M140 S{material_bed_temperature} ; heat bed, nonblocking
M104 S{material_print_temperature} ; heat hotend, nonblocking
M190 S{material_bed_temperature} ; heat bed, blocking
M109 S{material_print_temperature} ; heat hot end, blocking
https://www.youtube.com/watch?v=Hvw3DrVAeTA
https://www.youtube.com/watch?v=NU1kYEE3qrQ
https://www.instructables.com/id/Best-Support-Settings-for-3D-Printing/
https://8020.net/deflection-calculator
http://www.escher3d.com/pages/wizards/wizarddelta.php
http://boim.com/DeltaUtil/CalDoc/Calibration.html
https://imgur.com/gallery/SqIdFwB/comment/1790142179
The term "direct drive" is widely misused. Increasingly commonly it is used to refer to an extruder/hotend combo where the extruder is mounted with the hotend on the same carriage, such as the hotend/extruder combination that Prusa or Artillery use. Technically, this usage of terminology is incorrect.

According to industry definitions from outside of hobbyist 3D printing, a "direct drive mechanism" is one that "uses the torque coming from a motor without any reductions (such as a gearbox)". This also aligns with definitions within 3D printing itself from years ago. A "direct drive" extruder refers to an extruder where the filament drive gear is mounted directly on the motor shaft, i.e an ungeared extruder, such as the one that a stock Ender 3 uses. The anthithesis, then, of a direct drive extruder is not a Bowden extruder but rather a geared extruder, such as the Bondtech BMG or the E3D Titan.

Instead, the extruder configuration that many refer to as "direct drive" nowadays should more accurately be called a "direct" extruder. A "direct" extruder is one where the filament drive mechanism is mounted in close proximity to the hotend, eliminating a long Bowden tube. The antithesis of a "direct" extruder is a "Bowden" extruder.

Consequently, you cannot have a "direct Bowden" extruder, but you can have a "direct drive, direct" extruder. Additionally, and perhaps confusingly, a "direct drive Bowden" extruder is just as valid.

Given the confusion between the terms and the fact that "direct drive" is so commonly used to mean "direct" nowadays, the suggested usage of terms is to simply eliminate the term "direct drive" from your vocabulary entirely. True "direct drive" extruders can be just as accurately referred to as "ungeared" extruders with much better distinction. Meanwhile, "direct" extruders should be called "direct" to avoid confusing the definition of "direct drive" in 3D printing compared with its actual definition.
https://duet3d.dozuki.com/Wiki/Gcode
https://duet3d.dozuki.com/Wiki/Connecting_an_Emergency_Stop
https://e3d-online.dozuki.com/
https://www.youtube.com/watch?v=Nx-GwKOH5qc
https://www.youtube.com/watch?v=me8Qrwh907Q
https://mattshub.com/blog/2017/04/19/extruder-calibration
https://www.youtube.com/watch?v=0Mnq5SfXVSA https://3daddict.com/3d-printer-extruder-calibration-steps/ https://media.discordapp.net/attachments/167661427862142976/669725382202884149/unknown.png
While a simple extruder can often do the job, there are many extruder features that offer better performance. Such as:
Dual Drive - Dual Drive extruders have two gears on either side of the filament, as opposed to a single gear and bearing. This allows the extruder to grip on the the filament more reliably, making it less likely to slip.
Gearing - Extruders that have the drive gear directly attached to motor shaft are known as Direct Drive extruders. While this term is often shared with an extruder mounting configuration, the two are unrelated. Some extruders are geared and have an extra reduction gear in between the drive gear and motor, allowing for higher torque and finer extrusion control.
Adjustable Tension - Some extruders allow you to increase and decrease the amount of tension that is exerted on the filament. Being able to adjust this is useful for flexible filaments, as too high tension will crush or squish the the material. Flexible materials aside, it is useful to have for standard filaments, as sometimes an extruder with pre set tension is not satisfactory.
Filament Paths - Many extruders have gaps and spaces where the filament is not constrained as it passes through. While not an issue for harder materials (like PLA, ABS, and PETG), flexibles can jam into, and squeeze through these gaps. A well constrained path is necessary to print flexible materials well.
🎐
Do you know what air doesn't like to do? Turn 90 degrees. Here's a prime example of how not to make a fan duct. Multiple sharp bends in the airflow completely rob the air of any cooling power or static pressure it might once have aspired towards.
[PLACEHOLDER FOR TIPS ON DUCT DESIGN - TIRED RN]
Cura https://ultimaker.com/de/software/ultimaker-cura Ideamaker https://www.raise3d.com/ideamaker/ IceSL https://icesl.loria.fr/ KISS http://www.kisslicer.com/ 💵 MatterControl https://www.matterhackers.com/store/l/mattercontrol/sk/MKZGTDW6 PrusaSlicer https://www.prusa3d.com/prusaslicer Repetier-Host https://www.repetier.com/ Simplify3D https://www.simplify3d.com/ 💵 slic3r https://slic3r.org/ slic3r++ https://github.com/supermerill/Slic3r
https://rigid.ink/blogs/news/advanced-finish-quality
https://i.redd.it/hoa3qf6ub5gz.jpg
https://e3d-online.dozuki.com/Guide/Flow+rate+(Extrusion+multiplier)+calibration+guide./89
https://e3d-online.dozuki.com/Guide/Flow+rate+(Extrusion+multiplier)+calibration+guide./89
https://formlabs.com/blog/guide-to-food-safe-3d-printing/
Fusion 360 is free forever under the personal license, as long is it is used non commercially.
Individuals with “hobby businesses,” generating less than $1,000 USD in annual revenue, are exempt from the non-commercial requirement
https://www.autodesk.com/campaigns/fusion-360-for-hobbyists
https://www.autodesk.com/products/fusion-360/blog/subscription-types/
https://www.autodesk.com/products/fusion-360/blog/subscription-types/
https://reprap.org/wiki/G-code http://marlinfw.org/meta/gcode/ https://duet3d.dozuki.com/Wiki/Gcode
M18 ; Disables stepper motors and allows axes to move 'freely.' For more info: http://reprap.org/wiki/G-code
https://reprap.org/wiki/G-code
GrabCad is a great resource for 3D models but there are a couple of things to remember:
• The models are not designed for 3D printing meaning that they often dont have a flat base / suitable overhangs.
• Like Thingiverse anyone can upload models to GrabCad and so the accuracy of models isn't guaranteed! Don't get caught out using them as reference models only to find they aren't right!
test
https://www.youtube.com/watch?v=Mbn1ckR86Z8 https://www.youtube.com/watch?v=YUPfBJz3I6Y
Hi! To get the best help please provide as much of the following information as you can.
Printer
  - Make:
  - Model:
  - Any Mods:
  - Firmware:
Filament
  - Material:
  - Brand:
  - Print Temp:
  - Bed Temp:
Settings
  - Any relevant settings:
  - What Slicer are you using?:
Printer Health
  - Calibrated XYZ?:
  - Calibrated E steps?:
  - Calibrated Flow?:
  - Calibrated retraction / Coasting?:
  - Have you hot tightened your nozzle?:
Any recent changes to:
  - The printer:
  - Slicer Settings:
  - Firmware:
Troubleshooting
  - What are you trying to do?:
  - What is it not doing?:
  - What steps have you tried so far?:
First off, please restrict this to helpful commands, not memes or anything since y'all don't get that power, we want this database to be only helpful ones to keep it from being cluttered.
https://www.youtube.com/watch?v=loBHYcifzRM
ℹ️ 3️⃣
Most printers sold as an "i3" are generic Chinese printers often made with an acrylic frame, lower quality parts, and potentially miss key safety features. i3 is not a brand name or model name but instead describes the style of printer.
"i3" stands for "iteration 3", and is a leftover from Prusa's later work with the RepRap project. It is characterised by its use of 8mm smooth rods with LM8UU linear bearings for linear motion components, specifically in a vertical orientation for the x-carriage borrowed from aspects of the Mendel90 design. It also uses dual z-leadscrews instead of threaded rod, and generally represents the evolution of Prusa's designs beyond the scope of RepRap (see Mk1, Mk2... etc.).
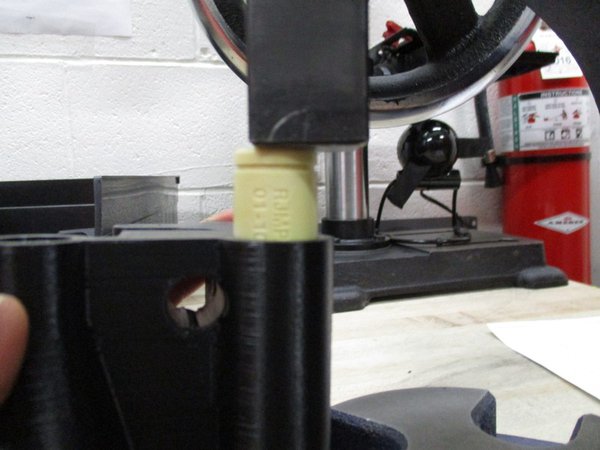
IGUS bushings need to be "preloaded" before they can be properly used in a build. Their "self-lubricating" feature relies on the little ridges inside (the "tribological" component) being compressed against the linear rod component, causing the polymer to deposit a lubricant as it travels. Many 3D printer builders make the mistake of designing for IGUS bushings without accounting for this preload and find their linear motion components too loose or misaligned.
As seen in the image, Lulzbot use IGUS in their TAZ line of printers and to fit the bushings in their printed housings they have to use a one-ton arbor press to exert adequate force on the biggest ones. Beware of designs for IGUS bushes that do not plan for preload!
https://ohai.lulzbot.com/media/uploads/IMG_6464.jpg.600x0_q85.jpg source: https://ohai.lulzbot.com/project/cluster-linear-bearings/cluster/
https://cdn.discordapp.com/attachments/667463307963138058/720300104262615070/Cura-Infill-Patterns.png https://cdn.discordapp.com/attachments/667463307963138058/720264625177886790/unknown.png
https://github.com/InsanityAutomation/Marlin/
Don't ask to ask! Just describe your issue or question as with as much relevant information as possible, and wait for someone who is able to help you. Asking for help without describing your issue often results in no help at all - people are reluctant to commit when they don't know what they're getting themselves into.
If you buy from Kickstarter, you should consider anything you give a donation without the assumption that you will ever receive anything in return. A low percentage of kickstarters from the technology category are successful, especially those related to 3D printing.
https://github.com/KevinOConnor/klipper/blob/master/docs/G-Codes.md
https://www.youtube.com/watch?v=A5bc9c3S12g&t
https://www.youtube.com/watch?v=A5bc9c3S12g&t
https://cdn.discordapp.com/attachments/167661427862142976/550863786446422037/unknown.png
https://i.imgur.com/tbvOlB9.jpg
https://i.imgur.com/tbvOlB9.jpg
A guide to Marlin’s linear advance feature by teaching tech https://www.youtube.com/watch?v=n3yK0lJ8TWM
https://cdn.discordapp.com/attachments/339978089411117076/457438932603371521/unknown.png
https://blog.prusaprinters.org/calculator_3416/#optimallayer
Mains beds are a great way to reduce the current demand on your PSU and improve your heating times. Unfortunately they can also be quite dangerous if not properly installed. As always: don’t work on mains wiring unless you are sure of what you are doing! It has the potential to kill you. When installing a mains bed there are three key safety devices you will want to make sure you have:
• An RCD - A residual current device can often be found in modern breakers and will cut the power if you get electrocuted. These exist as a last line of defence but you won’t want to be without it!
• TCO - A thermal cut off fuse is a fuse that blows when it reaches a certain temperature. You would typically wire this in line with the supply voltage of bed and attach it to the bed surface. If thermal runaway (uncontrolled heating) occurs a mains bed will have enough power to cause a serious fire. This fuse will detect over temperature and cut the power. Make sure to select a non-self-resetting TCO.
• Earthing - Connecting the metal of a bed to an earth is also really important. Your bed is likely to be a large metal plate attached to mains powered heater. Should a fault appear then your bed could end up becoming live. An earthing point on the bed will allow either the RCD or the printer fuse to blow preventing a likely deadly shock when you try to remove your print!
Other good practices include properly shielding your wires in conduit (especially those section that see movement) and applying proper strain relief. This reduces the chance of mains cables breaking free and ensures that if they do they are safely contained and won’t make other parts of the printer live.
https://github.com/MarlinFirmware/Configurations
http://marlinfw.org/meta/gcode/
https://marlinfw.org/docs/gcode/M106.html https://marlinfw.org/docs/gcode/M107.html
https://marlinfw.org/docs/gcode/G000-G001.html
For PID autotune in Marlin send:
gcode
 M303 S200 C3 U1
S defines the temp C defines the cycles (3 recommended) U1 replace the need for M500 (saving)
For all the guys without serial interface you can download the gcode here: https://cdn.discordapp.com/attachments/667463307963138058/720967109588287562/MarlinPID.gcode
Do not leave your printer unattended while it is auto-tuning as thermal runaway protections are disabled
https://twitter.com/RealSexyCyborg/status/1242285063095664640?s=20
spool https://www.thingiverse.com/thing:2769823
https://mattshub.com/blog/2017/04/19/extruder-calibration?format=amp
http://lokspace.eu/3d-printer-auto-bed-leveling-mesh-visualizer/
https://service.netfabb.com/ https://tools3d.azurewebsites.net/
https://github.com/thothloki/3DPrinterStuff/blob/master/MKD1.6Wiring.jpeg
There are various ways to make 3D models, depending on your goals. Here's some more info! The wiki linked contains more options and tutorials.
https://i.imgur.com/ZGxP85u.png https://www.reddit.com/r/3Dprinting/wiki/makingmodels
https://i.imgur.com/ZGxP85u.png https://www.reddit.com/r/3Dprinting/wiki/makingmodels https://www.reddit.com/r/3dprinting/comments/bm6wq2/_/
When using parametric CAD you should always try and follow best practises to make your models easier to rebuild, easier to maintain, and easier to alter.In general:
Sketch Entities make contours, Contours make sketches, Sketches make features, Features make bodies (or edit them!), Bodies make parts, Parts make assemblies.
Generally, you would try and split large assemblies up into sub-assemblies to help manage them. You would also typically try and keep a single body per part and a single contour per sketch. Try to avoid having the same sketch do multiple jobs!
these two services are really great free 3d model repair tools, to fix non-manifold obejcts (objects with tiny gaps or reversed faces): https://tools3d.azurewebsites.net/ https://service.netfabb.com/
https://www.myminifactory.com https://pinshape.com https://www.youmagine.com https://cults3d.com https://grabcad.com https://www.cgtrader.com https://repables.com/ https://www.prusaprinters.org https://www.thingiverse.com
https://www.reddit.com/r/MPSelectMiniOwners/comments/aa6dba/i_shall_call_it_mondoprice
A large number of people ask about good printers or designs with large build areas (>350x350x350). Unfortunately, large printers come with a number of drawbacks that you might want to consider before going down that route.
First, the size limits the kinematics that will work effectively so the popular CoreXY style likely wont work and it will be much less rigid (which will affect the quality of all prints - even small ones!). As a result you will be severely limited on speed and quality. People often think that a 200x200 mm printer is small but there is actually a lot of space there! Try setting up the printer sizes in cura and importing some models you want to print to see if its big enough!
Secondly, to make use of that larger build area you going to be printing either big parts or a lot of parts. This means you're going to be running multiple day prints which come with a much higher failure rate. To use the whole volume of a 180x180 mm printer will take over ~3.5 days of printing and that time grow exponentially as your build plate gets bigger. You will also likely have to make sacrifices in terms of detail quality by using a larger nozzle.
Your larger printer will also be making larger prints so expect to use a lot more filament than a normal printer. Be prepared for the higher consumables cost!
Remember also that a printer is slightly larger than its bed. At sizes 300 mm squared and up you're likely going to encounter issues if you ever need to move the printer as it might not fit through your doorways meaning you'll have to disassemble it to move it!
If you're considering a larger printer think first of all if you have any specific projects that require parts that are that size. (If you do perhaps consider other manufacturing methods.) Make sure that you're happy with the extremely long build times and likely reduction in quality that will result and check if you couldn't split the part up into smaller pieces to be glued together.
https://hackaday.com/2020/02/22/3d-printable-nameplates-from-your-web-browser/
What we usually call '3D Printing' is actually 2.5D, flat 2 Dimensional layers are built up into a 3 Dimensional object. Non-planar printing aims to achieve true 3D printing, where the print head moves in 3 Dimensions, which can lead to a much higher quality surface finish where there are more curves, eliminating a staircase-like appearance
A slightly older Hackaday non-planar article, with scripts and GitHub link (also demonstrated in the Teaching Tech video)
Link:
https://hackaday.com/2016/07/27/3d-printering-non-planar-layer-fdm/
The following links contain resources and information about the Slic3r branch for nonplanar printing, primarily developed by Daniel Ahlers, later along with Florens Wasserfall, Norman Hendrich and Jianwei Zhang at the University of Hamburg:
The original accompanying video to the paper:
https://www.youtube.com/watch?v=km1lvuva5mI
The Teaching Tech video which can be a good place to start:
https://www.youtube.com/watch?v=gmePlcU0TRw
Researcher page (Daniel Ahlers) and link to master thesis:
https://tams.informatik.uni-hamburg.de/research/3d-printing/nonplanar_printing/index.php
Further 2019 research paper:
https://www.researchgate.net/publication/335542750_3D_Printing_of_Nonplanar_Layers_for_Smooth_Surface_Generation or https://tams.informatik.uni-hamburg.de/publications/2019/case_ahlers_2019.pdf
The Slic3r non planar branch on GitHub:
https://github.com/Zip-o-mat/Slic3r/tree/nonplanar
The following links are related to Curvislicer: Slightly curved slicing for 3-axis printers, developed by Jimmy Etienne, Nicolas Ray, Daniele Panozzo, Samuel Hornus, Charlie Wang, Jonàs Martínez, Sara Mcmains, Marc Alexa, Brian Wyvill and Sylvain Lefebvre
Curvislicer research paper:
https://hal.archives-ouvertes.fr/hal-02120033/document or https://cims.nyu.edu/gcl/papers/2019-CurviSlicer.pdf
Curvislicer on GitHub:
https://github.com/mfx-inria/curvislicer
https://youtu.be/g8uvh6kvr54 (Note that cold pulls are not recommended for the NozzleX from E3D as it can damage the non-stick coating.)
https://www.thingiverse.com/thing:2613057/files
https://community.octoprint.org/
https://community.octoprint.org/
https://i.imgur.com/Bi8LkZW.jpg?1
Please keep your help request in one channel, thank you. One per issue or person. Asking in multiple channels will likely not get you a reply.
Please keep your help request in one channel, thank you. One per issue or person. Asking in multiple channels will likely not get you a reply.
While often recommended paper "leveling" also often causes issues for people. The reason is simple - it is a very inaccurate way of levelling your bed. Theres no defined units, you're working off feel alone, and that is highly subjective. It's not easy to explain through words - "just scraping the paper" can mean something to one person z and something completely different to another.
What paper levelling is useful for, is getting the bed at the same height away from the nozzle in all four corners of the bed. As long as you can consistently make sure you have the same amount feel for each corner, your bed should have minimal tilt in relation to your gantry.
It may be higher than it should be, it may be lower than it should be. But you can easily correct that - print something, look at the first layer, and just adjust the levelling knobs accordingly. Since your bed should not be tilted anymore, you can easily turn each knob, in the exact same increments to raise and lower it, or adjust Z offset on your machine or slicer. This of course, assumes your bed is not warped.
https://www.instructables.com/id/Parametric-Lego-Bricks-in-Fusion-360/
https://www.youtube.com/watch?v=qEaNVfT8y9w
https://cdn.discordapp.com/attachments/667463307963138058/705934750254235658/QSP-Triangle.jpg
Please avoid tagging members when asking for help.
If you have asked your question in an appropriate help channel then those available to help you will offer help. Tagging specific members may result in you getting no help at all as that person may not be around to help you.
Polyoxymethylene, a.k.a. POM, Acetal, Delrin or any number of trade names, is a thermoplastic utilised for its low-friction, wear-resistant properties for gears, bushings, and rollers. You may have encountered it before being used in the v-rollers for many 3D printer designs, the IGUS line of tribological Delrin bushings for linear rods, and being sold in filament form by resellers. There are however concerns about the safety of such products.

POM is a material finely suited for subtractive manufacturing; it machines easily, is cheaply produced in block and rod stock, and produces parts with a long service lifetime.

Unfortunately, extruding molten POM to the tolerances required for filament is difficult, and only done by manufacturers with precision equipment. Above its melting and glass temperatures, POM is also highly sensitive to changes in ambient heat and will warp as it's being printed. This makes printing POM effectively very challenging and often better suited to other processes.

There are also major safety concerns when printing POM since once raised above ~210 C out-gassing can occur. Much like PTFE, POM is prone to release toxic vapours when overheated, however research shows POM degrades at a much faster rate and the primary component of its gaseous emissions is formaldehyde.

This off-gassing is often not adverted on filament and sometimes claims are made that it can be printable up to 250-260 C - temperatures at which significant off-gassing will occur.

There is also an uncommon but potential risk in using POM in environments where hot POM may come in contact with PVC plastic parts. The ensuing reaction is self-sustaining, releases chlorine and formaldehyde gas, and is explosive.

For more reading check out a material datasheet: http://www.ifa.hawaii.edu/instr-shop/SDS/Delrin.pdf
https://duet3d.dozuki.com/Wiki/Pressure_advance
https://www.printitindustries.com/pages/print-speed-calculator
https://www.youtube.com/watch?v=y_1Kg45APko
General advice is to avoid downloading preconfigured profiles from people online.
The reasons for this are that these profiles often contain niche settings which work for the owners specific machine but not for all machine of the make / model and can make configuration extremely tricky since you dont know what is being overridden or set. Downloaded profiles may also focus on different things than you are interested in (e.g. high speed printing, or lower quality requirements). Profiles can contain settings that may cause damage to your machine.
The standard profiles available in your slicer should work well as a starting point for you to build your own profile and understanding the settings you use will enable to you more effectively manage your printer in the future.
https://www.prusa3d.com/prusaslicer/
https://www.ewg.org/research/canaries-kitchen/teflon-offgas-studies
Sit yourself down for storytime:
Birds have more efficient metabolisms than we do. Like many other living creatures, they rely on breathing to not die. This means they're also a lot more sensitive to airborne pollutants! This is why canaries were used in coal mines as an early-detection system for leaking coal seam gas.

Polytetrafluoroethylene, a.k.a. PTFE, a.k.a. Teflon, is a polymer renowned for its extremely low coefficient of friction. It is used in many industrial and domestic applications, most famously in non-stick pans. Relevant to us, PTFE is used as Bowden tubing and heatbreak liners in 3D printers for ease of filament transport. This places the polymer in close contact with areas where high temperatures are routinely encountered.

PTFE will begin to pyrolyze at 220 degrees centigrade. It will begin offgassing at significant amounts at 240. At 260, this process will have accelerated to the point where the structural integrity of your tubing will have been compromised. Most contemporary citations focus not on the physical decomposition of PTFE but on the health effects of byproducts used in its manufacture. However one major health risk is directly attributable to PTFE pyrolysis: Polymer fume fever.

Polymer fume fever, or colloquially "Teflon flu", is a condition caused by overexposure to fumes (over the course of 4-8 hours) caused by the decomposition of PTFE. The advanced respiratory metabolism of birds make them particularly sensitive to polymer fumes, which leaves them at high risk of death in environments where such fumes are prevalent. Further reading is linked below.

TL;DR - do not heat your PTFE above 230 C for long periods of time, and never above 260 C. Unless you hate birds.
(Further reading: https://www.ewg.org/research/canaries-kitchen/teflon-offgas-studies)
https://github.com/InsanityAutomation/Marlin/tree/Raptor_2.0.X
https://www.filabot.com/pages/services https://replay-3d.com/
https://www.youtube.com/watch?v=Hvw3DrVAeTA
https://configtool.reprapfirmware.org/Start
https://cdn.discordapp.com/attachments/448300550858080256/672144142020640813/resin.jpg
https://www.youtube.com/watch?v=KjF54SFaMAQ
https://www.youtube.com/watch?v=KjF54SFaMAQ&t=7s
https://rigid.ink/pages/ultimate-troubleshooting-guide
https://learn.adafruit.com/program-an-avr-or-arduino-using-raspberry-pi-gpio-pins/overview
https://duet3d.dozuki.com/Wiki/Gcode
https://www.polytek.com/sites/default/files/Shore-Hardness-Scale_Polytek-1024x382.jpg
There are a couple of popular slicers available: Cura - Probably the most popular slicer - supports almost all printers. PrusaSlicer - A more up to date version of Slic3r and probably the best option if you own a Prusa but supports nearly all printers.
https://ultimaker.com/software/ultimaker-cura https://www.prusa3d.com/prusaslicer/
https://www.reddit.com/r/ender3/comments/du3luv/psa_cheap_and_effective_way_to_strengthen_the/
list of great 3d printing subreddits by devtholt https://old.reddit.com/user/devtholt/m/3d_printing/
https://github.com/supermerill/SuperSlicer
https://github.com/InsanityAutomation/Marlin/tree/TM_SX4_2.0_Devel
Support Marlin Dev - https://www.tinymachines3d.com/?rfsn=3419592.cc302fe
https://m.youtube.com/watch?v=xzQjtWhg9VE
https://i.imgur.com/tbvOlB9.jpg
https://github.com/InsanityAutomation/Marlin/tree/TM_Trex2+_2.0.x
https://reprap.org/wiki/Triffid_Hunter's_Calibration_Guide
https://www.simplify3d.com/support/print-quality-troubleshooting/
https://cdn.discordapp.com/attachments/576557087119769650/704658715390771200/image0.png
3D Printing is an awesome new technology that has quickly become a buzzword in the media. Unfortunately, the media also like to claim it as a miracle solution to almost every problem. So, what is printing good for and what is it not good for?
When to use printing: • One off parts, • Small parts (under 300 mm cubed), • Detailed parts with complex features.
When not to use printing: • Mass manufacturing – Printing is too slow, expensive and has too high of a failure rate to mass produce products. If you need lots of something, consider a quicker production method. • Large parts - larger parts have a higher failure rates and can take many days to print. • Simple parts – Simple parts such as boxes, and plates may be better made with laser cutting. • Parts for food or medical use – Micro-gaps and porosity make printed parts impossible to fully clean and can therefore harbour bacteria. • Structural Parts – Some structural parts may be ok in plastic, but other times you need a stronger material. Printed parts can be hard to assess for suitability due to their non-homogenous nature.
https://cdn.discordapp.com/attachments/339978089411117076/439066923725094912/unknown.png
If you would like advice on purchasing a printer, head to <#576557087119769650>.
Sounds like you may be having an XY problem!
"The XY problem is asking about your attempted solution rather than your actual problem. This leads to enormous amounts of wasted time and energy, both on the part of people asking for help, and on the part of those providing help."
Help us help you by: • Including information about a broader picture along with any attempted solution. • Offering more information when asked and provide details. • Mentioning any other solutions you've already ruled out and share why you've ruled them out. This gives more information about your requirements.
For more info: http://xyproblem.info
The X, Y, and Z steps/mm values of your printer should not be calibrated using a measure-adjust-measure approach. Doing so may lead to a perfect calibration test print, but as soon as you print objects that are not the same size as your calibration print, significant dimensional inaccuracies may arise. To understand why, read this post: http://karlzhao314.blogspot.com/2019/08/calibrating-stepsmm-right-way-and-wrong.html Instead, the XYZ steps/mm values should be calculated based on the known quantities of your printer. The easiest way to do this is to use the Prusa calculator here and enter in your printer's specs. https://blog.prusaprinters.org/calculator_3416/#steppermotors
Most motion systems will result in an even, round number! Common values are 80 or 100 for X and Y, and 400 for Z (as well as even multiples of these numbers). It's not impossible to get a strange decimal number such as 78.7402 (Ultimaker Original), but these numbers are not common anymore.
On the other hand, your extruder and flowrate should be calculated with a measure-adjust-measure approach. This is only because the extruder is far more unpredictable as the drive gear sinks into the filament, and because the extrusion error is relatively independent of any possible error induced by the motion system.
https://e3d-online.dozuki.com/c/V6_Drawings
https://blog.adafruit.com/2016/12/26/new-reference-card-soldering-101/
Thermal Runaway Protection is an essential safety feature usually provided by your 3D Printer firmware. https://github.com/3DprinterDiscord/wiki/wiki/Thermal-Runaway-Protection
https://www.youtube.com/playlist?list=PL926EC0F1F93C1837
Test
https://cdn.discordapp.com/attachments/667463307963138058/730047610697547856/20200611_202232.gif
<@564006456525848577> https://cdn.discordapp.com/attachments/667463307963138058/730047610697547856/20200611_202232.gif
This is an embed custom command! -e "Embed Title here!"
You can embed links with markdown: Im an inline-style link -e "Embeds Markdown" -c 0xFF0000
https://cdn.discordapp.com/attachments/690193739460640856/726562478644920330/unknown.png
https://www.hiwin.com/linear-guideways.html
Many reprappers and vendors have been confused by various belt profiles. 2GT and GT2 are often confused and called the same thing. They are different, incompatible profiles that happen to share a 2mm belt pitch. Using one with the other may cause vibrations, noise, excessive belt dust and print defects.
2GT was originally a profile made by the Unitta corporation in Asia. When Gates bought Unitta it adopted 2GT and continued production of it in Asia as the Gates Unitta corporation. 2GT has a simple circular profile for the teeth.
GT2 is a profile patented by Gates US. It is a more complex curvlinear profile which Gates claims reduces teeth meshing vibrations and improves position accuracy. GT2 pulleys, idlers and belts must be made under license from Gates, and cost significantly more than 2GT. GT2 can be sourced from Misumi (they call it MR2), SDP/SI or Royal Supply.
GT3, to further create more confusion is available in a 2mm profile that is compatible with GT2. It offers belts with better construction than GT2, but is the same otherwise.
To continue the confusion, sometimes 3d printer vendors sell MXL profile pulleys and idlers as 2GT or GT2. MXL is a trapezoidal profile and has a pitch of 2.03mm. Using 2GT belts with MXL pulleys or vice versa makes for significant vertical 2mm artifacts in prints. The best way to inspect a pulley or idler is to pop off the flange and look at the tooth profile. MXL has a noticeably squared off profile vs continuous curves with 2GT.
E3D, Powge, Mellow and Triangle Labs are vendors known to provide quality 2GT pulleys, idlers and genuine Gates Unitta belts
Drawings of the various profiles can be found here: https://blog.misumiusa.com/youve-got-the-power-mr-vs-gt/
Many reprappers and vendors have been confused by various belt profiles. 2GT and GT2 are often confused and called the same thing. They are different, incompatible profiles that happen to share a 2mm belt pitch. Using one with the other may cause vibrations, noise, excessive belt dust and print defects.
2GT was originally a profile made by the Unitta corporation in Asia. When Gates bought Unitta it adopted 2GT and continued production of it in Asia as the Gates Unitta corporation. 2GT has a simple circular profile for the teeth.
GT2 is a profile patented by Gates US. It is a more complex curvlinear profile which Gates claims reduces teeth meshing vibrations and improves position accuracy. GT2 pulleys, idlers and belts must be made under license from Gates, and cost significantly more than 2GT. GT2 can be sourced from Misumi (they call it MR2), SDP/SI or Royal Supply.
GT3, to further create more confusion is available in a 2mm profile that is compatible with GT2. It offers belts with better construction than GT2, but is the same otherwise.
To continue the confusion, sometimes 3d printer vendors sell MXL profile pulleys and idlers as 2GT or GT2. MXL is a trapezoidal profile and has a pitch of 2.03mm. Using 2GT belts with MXL pulleys or vice versa makes for significant vertical 2mm artifacts in prints. The best way to inspect a pulley or idler is to pop off the flange and look at the tooth profile. MXL has a noticeably squared off profile vs continuous curves with 2GT.
E3D, Powge, Mellow and Triangle Labs are vendors known to provide quality 2GT pulleys, idlers and genuine Gates Unitta belts
Ocho Camino: Drawings of the various profiles can be found here: https://blog.misumiusa.com/youve-got-the-power-mr-vs-gt/
https://blog.prusaprinters.org/calculator_3416/
💎
Ruby-tipped nozzles were originally designed and launched for use with the Olsson block, one of the granddaddies of 3d printing standards; Olsson-type blocks are still used by Ultimaker's print cores today. Since then, ruby nozzles have proliferated to other standards like the V6 and Volcano.
Ruby nozzles (and their cousins the sapphire, emerald, etc.) were designed for applications involving highly abrasive materials, on a level beyond which most hobbyist 3d printer operators will ever really encounter. Ruby is used in situations that would chew through even hardened steel, such as boron nitride- or tungsten-filled filaments.
The fact is, for a hobbyist operator, ruby nozzles are not only overkill but desperately unsuited for jobs where its hardness is not needed. Ruby is not a good conductor of heat nor does it have the thermal capacity to act as a good nozzle material. In addition, the ruby itself often has to be loosely embedded in the rest of the nozzle, which often leads to it cracking or coming loose if dropped. Finally, the back of the ruby itself is usually flat on the inside of the nozzle, which leads to plastic buildup on the unchamfered edges of the nozzle aperture.
In short, the benefits of using a ruby nozzle are highly limited compared to the drawbacks. While one has a theoretical infinite lifetime against abrasive materials, the raw cost of one against its potential utility makes it a no-go for most budgets.
