Quick Tour
Two new maven project wizards gets added to NetBeans.
Click on the New Project... button (Ctrl + Shift + N) and select the Maven category, you'll find Spring Boot basic project and Spring Boot Initializr project.
The first one creates a simple project with a very basic Spring Boot setup, the second one is more advanced and interfaces with the Spring Initializr web service to generate a project based on a set of inputs.
Choose for example the Spring Boot Initializr project and click Next >.
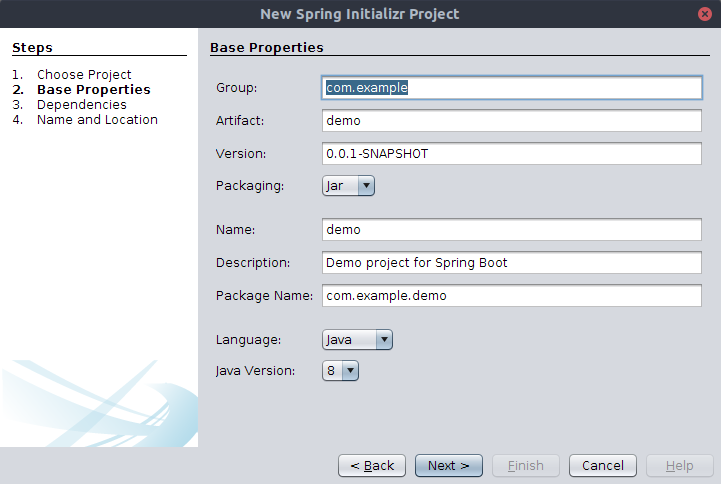
Fill the parameters or accept the proposed defaults, the Name value will also be used to build the main class name, then click Next >.

Now you can choose the Spring Boot version and the starter dependencies you wish to use in the project. The chosen Spring Boot version enables/disables certain dependencies as indicated in the information tooltip on disabled dependencies. The Filter textfield can be used to narrow down the list.
Choose for example the Web, DevTools, Configuration Processor and H2 dependencies then click Next >.

Finally you can choose the project folder name and location on disk. Leave the last two checkbox selected for a better experience in NetBeans then click Finish.

At this point the Spring Initializr web service is queried and the resulting zip archive uncompressed in the chosen disk location, by default the maven wrapper bits contained in the project is removed (as the embedded NetBeans maven distribution is used instead) and a NetBeans configuration file is added at the project root (nbactions.xml file).
To support the following steps create a Person entity class with a Long primary key type using the dedicated NetBeans file template wizard paying attention to not select the Create Persistence Unit checkbox.
You could also create the entity by hand.
A persistence unit is not necessary as created automatically by Spring Boot.
NBSpringBoot plugin adds several new file templates, for example now you can create a Spring Data repository: click on the New File... button (Ctrl + N), select the Spring Framework category, select the Repository Interface file type then click Next >.

Name it PersonRepository, choose a Base Interface (for example CrudRepository) and fill in the Entity Class and Id Class appropriately based on the previously created Person entity then click Finish.

Spring Boot has a clever configuration externalization mechanism based on binding values to @ConfigurationProperties annotated POJOs (see the section on custom configuration properties below for details).
There are several binding sources: command line arguments, environment variables and configuration files (in Java properties or YAML format).
If the spring-configuration-processor dependency is added to the project, on every build an annotation processor scans the code base and gathers metadata on those annotated POJOs writing them out to a JSON file.
The NBSpringBoot plugins makes use of the configuration properties metadata and provides a specialized editor for Spring Boot configuration properties files (application.properties).
That editor provides syntax highlighting, auto completion and error highlighting.
Those facilities are also available for user defined configuration properties if the project has been built.
Open the application.properties file and add some configuration values modifying the server.port property (type port then press Ctrl + Space to invoke autocompletion) also type shsql then press Tab to expand the predefined code template into a property setting that enables SQL statements logging.

Deprecated configuration properties are shown with strike-trough red text and their replacement, if defined, is indicated in the documentation tooltip.
the NBSpringBoot plugin here contributes a Spring Boot dedicated panel to the Project Properties dialog for maven projects having a spring-boot-starter dependency (right click on the project node in the Projects view and choose Properties).
The panel is active only if the project has been configured at generation time to be run/debugged trough the spring boot maven plugin.

In this panel you can control how the Spring Boot application is launched: specify how to restart the application when the DevTools are in use (see below), specify application arguments, custom JVM options, toggle the debug mode and the color output and finally override the application properties trough a helper dialog.

The default values used at project creation are specified in the plugin options (Tools > Options in the Java > Spring Boot tab).
For example try to select the Debug Mode checkbox and override the server.port property clicking on the + button and filtering for port then click OK and immediately start typing the new port value as the focus is on the Value column.

Activating the debug mode beside enabling logging statements at DEBUG level makes the application log the CONDITIONS EVALUATION REPORT detailing the Spring Boot autoconfiguration decisions.

A newly created project is setup to be run or debugged via the spring-boot-maven-plugin which compiles and runs/debugs the project in exploded form (no jar is created).
Simply clicking the Run Project button (F6) or the Debug Project button (Ctrl + F5) in the toolbar should do.

Keep the application running.
NBSpringBoot provides file templates for Spring MVC, for example to create a new @RestController annotated class.

You can then specify whether to generate sample CRUD methods and an error handling method.

When a project has the spring-boot-devtools dependency, the development cycle is shortened because fast restart of the application is available.
When the application is running, the DevTools facility monitors the classpath and whenever a new/modified class file is detected or a special trigger file is altered the application is restarted.
The flag specified in the project properties Spring Boot panel, allows to choose between the two modes: automatic restart (upon modification of class files) or manual restart (trigger file).
The alteration of the trigger file is made by clicking on the Spring Boot Restart (Ctrl + Shift + A) button that NBSpringBoot plugin adds to the NetBeans Run toolbar.
Try clicking on the Spring Boot Restart to trigger a restart and verify that new web endpoints corresponding to the previously added REST controller class are there.
Even modifications to the application configuration are effective only after an application restart.
Open the application.properties file and modify the server.port value then click on the Spring Boot Restart to trigger a restart and verify in the Output view that the embedded Tomcat server port has changed.
Stop running the application clicking on the stop button in the Output view.
If you need to add some starter dependencies after project generation the NBSpringBoot plugin offers a convenient code generator available when editing maven pom.xml files.
Open the pom.xml file right click and choose Insert Code... (Alt + Ins) then choose Spring Boot Dependencies....
The resulting dialog allows to select the desired starter dependencies similarly to the Spring Initializr project wizard.

NBSpringBoot plugin also provides a new file template for Configuration Properties classes.

Define a prefix and add some members together with their getters/setters, optionally provide a descriptive javadoc on the members, then rebuild the project.

You should now be able to get autocompletion on the newly created configuration properties class members.

To use the class in a bean annotate it with @EnableConfigurationProperties(MyProps.class) and autowire a MyProps object to automatically get an instance of MyProps with members values coming from configuration properties file, command line arguments or environment variables.