This repository presents Continuous Analysis, a process demonstrating computational reproducibility by producing verfiable end-to-end runs of computational research. The process is described in detail at: Biorxiv Preprint
We encourage additions and improvements, please create an issue or better yet, implement it and create a pull request. Please let us know if you run into any difficulty implementing continuous analysis on your own.
This repository uses a test run of Kallisto as an example. The figures below are re-generated with each commit. We also use this process with Denoising Autoencoders for Phenotype Stratification. Additional examples include:
- RNA-seq Analysis
- [Phylogenetic Tree Building] (https://github.com/greenelab/continuous_analysis_phylo)
- Microarray Differential Expression Analysis - example from Continuous Analysis Paper
<img src=https://github.com/greenelab/continuous_analysis/blob/master/drone/output/fig1.png?raw=true" alt="Drawing" style="width: 600px;"/> <img src=https://github.com/greenelab/continuous_analysis/blob/master/drone/output/fig2.png?raw=true" alt="Drawing" style="width: 300px;"/><img src=https://github.com/greenelab/continuous_analysis/blob/master/drone/output/fig3.png?raw=true" alt="Drawing" style="width: 300px;"/>
We consider 3 configurations of continuous analysis:
-
Installing a personal local continuous integration service.
-
Using a full service continuous integration service.
-
Provisioning a personal continuous integration service in the cloud.
Using a full service continuous integration service requires the least set up time but cannot handle computational intensive work. Local continuous integration can be used at no cost, and configured to take advantage of institutional clusters or GPU computing. Continuous integration in the cloud offers elastic computing resources with the ability to scale up or down depending on the computational complexity of your work.
Each of the local and cloud implementations uses a common .drone.yml format. See here for a full example.
# choose the base docker image
image: brettbj/continuous_analysis_base
script:
	# run tests
	# perform analysis

# publish results
publish:
	docker:
		# docker details
Drone is a CI platform built on container technology. It can be used to easily run a local or private cluster based CI service. Instructions adapted from - http://readme.drone.io/setup/overview/
1.) Install Docker on host machine - Linux, Mac, Windows
2.) Pull the drone image via docker
sudo docker pull drone/drone:0.4
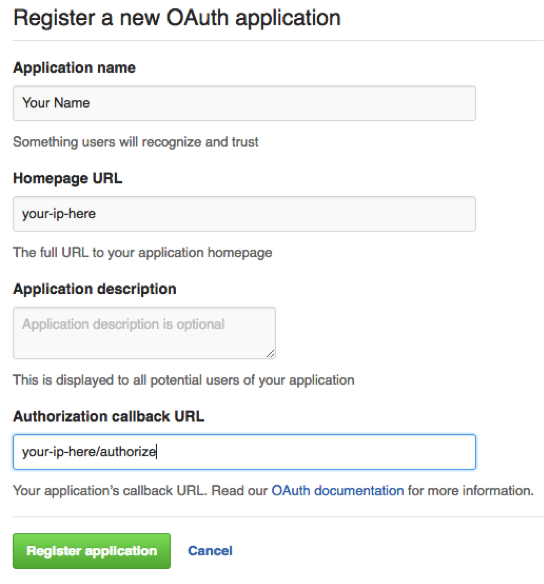
3.) Create a new application at - https://github.com/settings/developers - with your hosts ip address in the homepage URL and the authorization callback followed by /authorize/
Homepage URL: http://YOUR-IP-HERE/
Callback URL: http://YOUR-IP-HERE/authorize/
<img src=https://github.com/greenelab/continuous_analysis/blob/master/readme_images/register_application.png?raw=true" alt="Drawing"/>
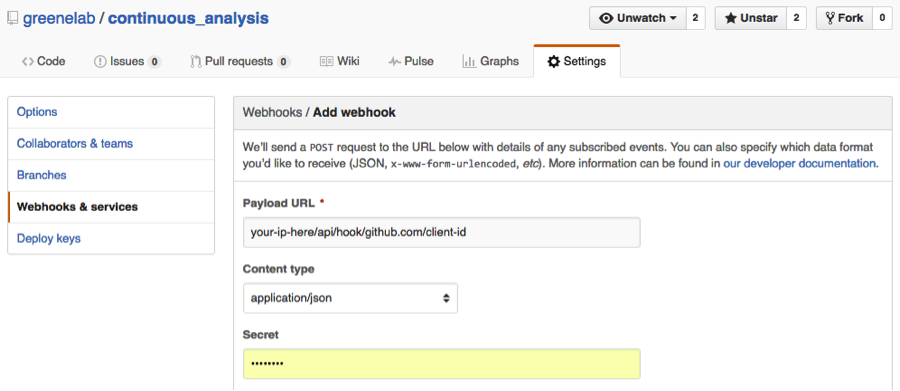
4.) Add a webhook in to notify the continuous integration server of any updates pushed to the repository.
<img src=https://github.com/greenelab/continuous_analysis/blob/master/readme_images/add_webhook.png?raw=true" alt="Drawing"/>
The payload URL should be in the format of your-ip/api/hook/github.com/client-id
5.) Create a configuration file at (/etc/drone/dronerc), filling in the client
REMOTE_DRIVER=github
REMOTE_CONFIG=https://github.com?client_id=....&client_secret=....
6.) Create and run your drone container
sudo docker run \
	--volume /var/lib/drone:/var/lib/drone \
	--volume /var/run/docker.sock:/var/run/docker.sock \
	--env-file /etc/drone/dronerc \
	--restart=always \
	--publish=80:8000 \
	--detach=true \
	--name=drone \
	drone/drone:0.4
6.) Access the drone control panel - your-ip-address/login and press the github button.
Shippable is the only example shown that does not rely on the open source drone project
1.) Sign in to Shippable using Github
2.) Select the account owner for your repository in the Subscriptions dropdown, click the enable project button for the desired project.
3.) Add a shippable.yml file to the root of your repository
- First pull in your base docker image
pre_ci_boot:
      image_name: brettbj/continuous_analysis_base
      image_tag: latest
      pull: true
options: "-e HOME=/root" - Then run any unit tests and/or integration tests you have
ci:
    - cd /root/src/github.com/greenelab/continuous_analysis
    - nose2 --plugin nose2.plugins.junitxml --junit-xml test
    - mv nose2-junit.xml shippable/testresults/tests.xml
    - coverage run --branch test.py
- coverage xml -o shippable/codecoverage/coverage.xml test.py- If that passes, re-run your analysis
	# run kallisto on a few simple tests
    - cd /kallisto/test
    - kallisto index -i transcripts.idx transcripts.fasta.gz
    - kallisto quant -i transcripts.idx -o output -b 100 reads_1.fastq.gz reads_2.fastq.gz
    - cp -R /kallisto/test/output /root/src/github.com/greenelab/continuous_analysis/shippable/output

    # plot the results from a jupyter notebook
    - cd /root/src/github.com/greenelab/continuous_analysis
    - jupyter nbconvert --to html --execute ./Shippable_Plotting.ipynb
4.) Push completed Results -
- Push results back to github (create a variable $git_publish_key holding a git deploy key to perform this) -
	- git config user.email "brettbj@gmail.com"
    - git config user.name "Brett Beaulieu-Jones"
    - git config --global push.default simple
    - git remote set-url origin https://brettbj:$git_publish_key@github.com/greenelab/continuous_analysis.git

    - git checkout master
    - git pull
    - git add shippable/.
    - git commit -a -m "Shippable output [CI SKIP] [SKIP CI] ."
    - git stash
- git push- To push a docker image containing the completed results enable an integration with dockerhub. From your project page in shippable, go to the settings tab. In the hub integration dropdown, choose create integration and follow the instructions. Add code resembling the following to your shippable.yml file:
post_ci:
    - docker build -t brettbj/continuous_analysis .
- docker push brettbj/daps:latest- Pull in docker image
box: brettbj/continuous_analysis_base- Run any unit tests or integration tests you have
build:
  steps:
    - script:
        name: Run Tests + Coverage
        code: |
          nose2 --plugin nose2.plugins.junitxml --junit-xml test
          mkdir wercker
          mv nose2-junit.xml wercker/tests.xml
          coverage run --branch test.py
coverage xml -o wercker/coverage.xml test.py- Run analysis
	- script:
        name: Run Kallisto
        code: |
          cd /kallisto/test
          kallisto index -i transcripts.idx transcripts.fasta.gz &>-
          kallisto quant -i transcripts.idx -o output -b 100 reads_1.fastq.gz reads_2.fastq.gz &>-
cp -R /kallisto/test/output /pipeline/source/wercker/output- Plot figures
	- script:
        name: Plot Results
        code: |
          cd /pipeline/source
jupyter nbconvert --to html --execute ./Wercker_Plotting.ipynb-
Create a personal access token in github (Personal settings -> Personal access tokens -> generate new token -> give it repo access)
-
Set an environment variable in Wercker to push results to github. Go to settings, environment variables (example used git_publish_key, the url in wercker.yml is then - https://{TOKEN}@github.com/{ACCOUNT}/{REPOSITORY}.git)
-
Push results to github
	- script:
        name: Push Results back to github
        code: |
          git config user.email "brettbj@gmail.com"
          git config user.name "Brett Beaulieu-Jones"
          git config --global push.default simple
          git remote set-url origin https://brettbj:$git_publish_key@github.com/greenelab/continuous_analysis.git

          git checkout master
          git pull
          git add wercker/.
          git commit -a -m "Wercker output [CI SKIP] [SKIP CI] ."
          git stash
git pushDigitalOcean provides an extremely easy way to start a cloud-based private continuous integration service. Instructions below were adapted from here.
1.) Create a drone droplet, selecting Drone on Ubuntu 14.04 from the applications tab.
2.) Create a new application at - https://github.com/settings/developers - with your hosts ip address in the homepage URL and the authorization callback followed by /api/auth/github.com
Homepage URL: http://YOUR-IP-HERE/
Callback URL: http://YOUR-IP-HERE/api/auth/github.com
3.) Take note of the Client ID and Client Secret and log into your new droplet via ssh. You'll be asked a few questions, for simplest configuration choose automatic configuration. You'll be prompted to choose your code repository and enter your Client ID and Client secret.
4.) You're ready to start by going to: http://YOUR-IP-HERE/login
Instructions adapted from here.
1.) Log into the AWS and launch an Ubuntu image based off the Amazon provided AMI (ami-9abea4fb).
2.) SSH into the created instance -
ssh ubuntu@<aws-instance>
3.) Install Docker
4.) Create a new application at - https://github.com/settings/developers - with the ec2 application url in the homepage URL and the authorization callback followed by /authorize/
Homepage URL: http://YOUR-IP-HERE/
Callback URL: http://YOUR-IP-HERE/authorize/
5.) Create a configuration file at (/etc/drone/dronerc), filling in the client info -
REMOTE_DRIVER=github
REMOTE_CONFIG=https://github.com?client_id=....&client_secret=....
6.) Run the Drone Docker container
sudo docker run \
	--volume /var/lib/drone:/var/lib/drone \
	--volume /var/run/docker.sock:/var/run/docker.sock \
	--env-file /etc/drone/dronerc \
	--restart=always \
	--publish=80:8000 \
	--detach=true \
	--name=drone \
	drone/drone:0.4
7.) Adjust your EC2 AWS Security settings to allow inbound visitors. Do this by going to the instance details for your EC2 instance and clicking on the security group. Choose the inbound tab, edit and add a listener on port 80, with source 0.0.0.0.
8.) Go to your EC2 instances adddress and you should now be able to log in.
1.) Log into google cloud platform, and create a new VM instance under compute engine.
2.) SSH into the new vm instance (this can be done via the browser)
3.) Install Docker
4.) Create a new application at - https://github.com/settings/developers - with the compute engine instance ip in the homepage URL and the authorization callback followed by /authorize/
Homepage URL: http://YOUR-IP-HERE/
Callback URL: http://YOUR-IP-HERE/authorize/
5.) Create a configuration file at (/etc/drone/dronerc), filling in the client info -
REMOTE_DRIVER=github
REMOTE_CONFIG=https://github.com?client_id=....&client_secret=....
6.) Run the Drone Docker container
sudo docker run \
	--volume /var/lib/drone:/var/lib/drone \
	--volume /var/run/docker.sock:/var/run/docker.sock \
	--env-file /etc/drone/dronerc \
	--restart=always \
	--publish=80:8000 \
	--detach=true \
	--name=drone \
	drone/drone:0.4
Please feel free to email me - (brettbe) at med.upenn.edu with any feedback or raise a github issue with any comments or questions.
This work is supported by the Gordon and Betty Moore Foundation's Data-Driven Discovery Initiative through Grant GBMF4552 to C.S.G. as well as the Commonwealth Universal Research Enhancement (CURE) Program grant from the Pennsylvania Department of Health.