Tutorial Simulation Scene Objects
This tutorial covers topics in relation with simulation objects, called scene objects which can be static objects (objects rigidly fixed on the robot workspace) or dynamic objects (objects with which the robot can interact, i.g. pick, place, push ...etc), that can be considered in the motion planning for a collision-free interpolation. This document covers specifically:
- Dynamic Objects:
- Programmatic insertion/deletion of scene objects
- Static Objects:
- Preparation of scene objects CAD files
- Set up of scene objects through the MoveIt Rviz panel
- Loading of the default simulation scene
Moveit Collision Objects are published through moveit_msgs/CollisionObject messages that allow you to place either a mesh (.stl or .dae) or primitive objects (Boxes, Spheres, Cylinders, and Cones). Since primitive object publishing is already covered by the Moveit MoveGroupInterface tutotial, here we will show you how to insert meshes into the planning scene.
Import the header files you need
#include "geometric_shapes/shapes.h"
#include "geometric_shapes/mesh_operations.h"
#include "geometric_shapes/shape_operations.h"
#include <moveit/planning_scene_interface/planning_scene_interface.h>
#include <geometric_shapes/shape_operations.h>
And on your main or any other function, load CAD file and create collision object
//Vector to scale 3D file units (to convert from mm to meters for example)
Vector3d vectorScale(0.001, 0.001, 0.001);
// Define a collision object ROS message.
moveit_msgs::CollisionObject co;
// The id of the object is used to identify it.
co.id = "<YOUR_OBJECT_ID>";

//Path where the .dae or .stl object is located
shapes::Mesh* m = shapes::createMeshFromResource("<YOUR_OBJECT_PATH>", vectorScale);
ROS_INFO("Your mesh was loaded");

shape_msgs::Mesh mesh;
shapes::ShapeMsg mesh_msg;
shapes::constructMsgFromShape(m, mesh_msg);
mesh = boost::get<shape_msgs::Mesh>(mesh_msg);

//Define a pose for your mesh (specified relative to frame_id)
geometry_msgs::Pose obj_pose;
obj_pose.position.x = 0.1;
obj_pose.position.y = 0.1;
obj_pose.position.z = 1.0;

// Add the mesh to the Collision object message
co.meshes.push_back(mesh);
co.mesh_poses.push_back(obj_pose);
co.operation = geometry_msgs::Pose::ADD;
Publish object in monitored planning scene
// Create vector of collision objects to add
std::vector<moveit_msgs::CollisionObject> object;
object.push_back(co);

// Add the collision object into the world
moveit::planning_interface::MoveGroupInterface move_group(<YOUR_PLANNING_GROUP>);
planning_scene_interface.addCollisionObjects(object);
Rviz and MoveIt allow only for .stl or .dae file formats, these are both human-readable files that define 3D meshes. In this tutorial, we will use .stl files, but before importing it is important to:
- Ensure the units of the file are in Meters [m]. (STL files do not have units by definition but most 3D modeling software export meshes in Millimeters)
- Know the position of the origin of the .stl file with respect to the mesh. (Since the position and orientation of the object will be with respect to this origin reference frame)
Note: If you already have a .STL file, and wish to scale it (change units of measurement) it is recommended to use Autodesk Print Studio to do so.
In this tutorial we are going to use the file structure.stl located in the invite_motoman_moveit_config/scenes/STL folder.
To visualize it, first launch the robot demo file.
roslaunch invite_motoman_moveit_config demo.launch
Then in the MoveIt Motion Planning panel open the Scene Objects window and click on the import file button on the bottom left part of the panel and select the structure.stl file. The mesh will appear in the robot workspace and its position, orientation, and scaling can be modified on the same panel, or by dragging the object with the interactive markers.

Modify the position of the structure to familiarize yourself with the panel, and then remove the mesh by clicking the remove button.
A default group of scene objects is already set up for ease of use. To load it on the Scene Objects window press the Import from text button, then find the invite_motoman_moveit_config/scenes/default_scene_objects.scene file. Once loaded, you should get a result like the one shown below.
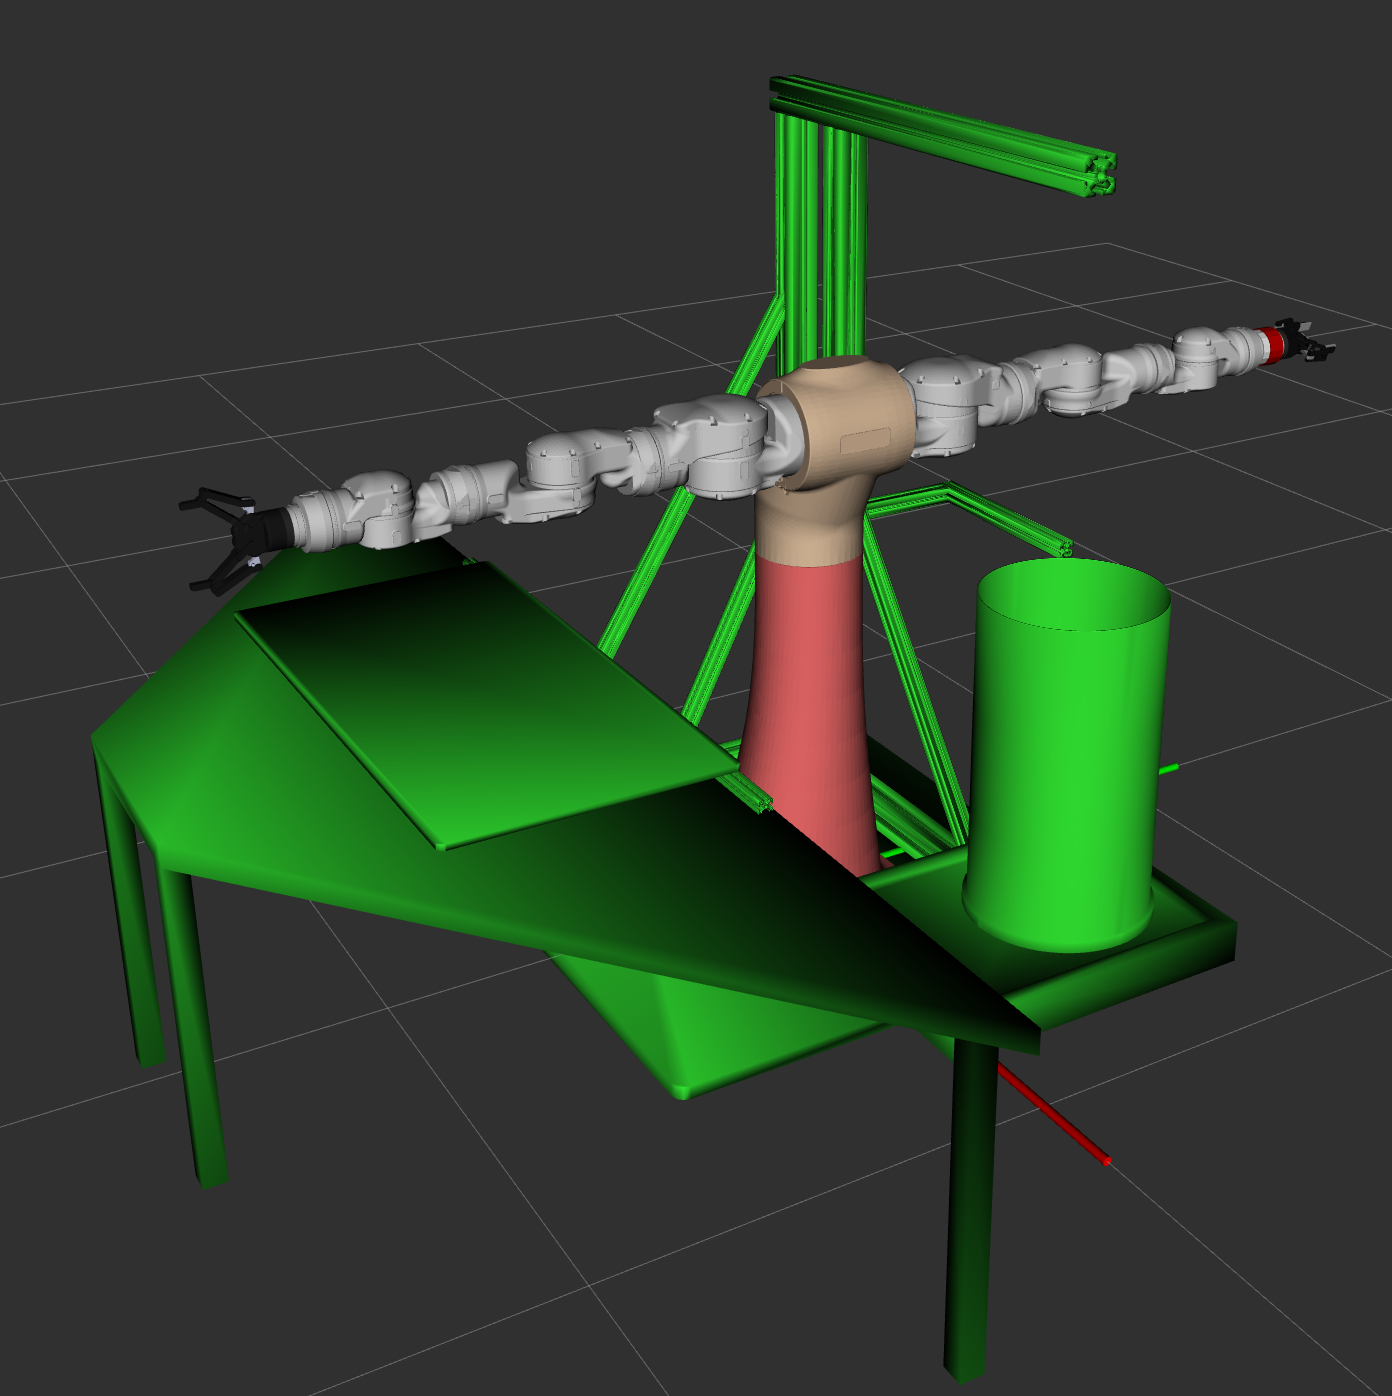
Note: Without publishing the planning scene, the collision objects loaded would not be considered for collision avoidance by any Moveit planning.

Invite-Robotics
-
Tutorials
