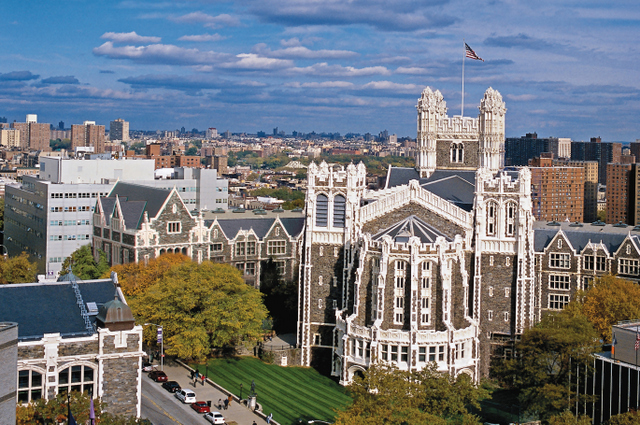
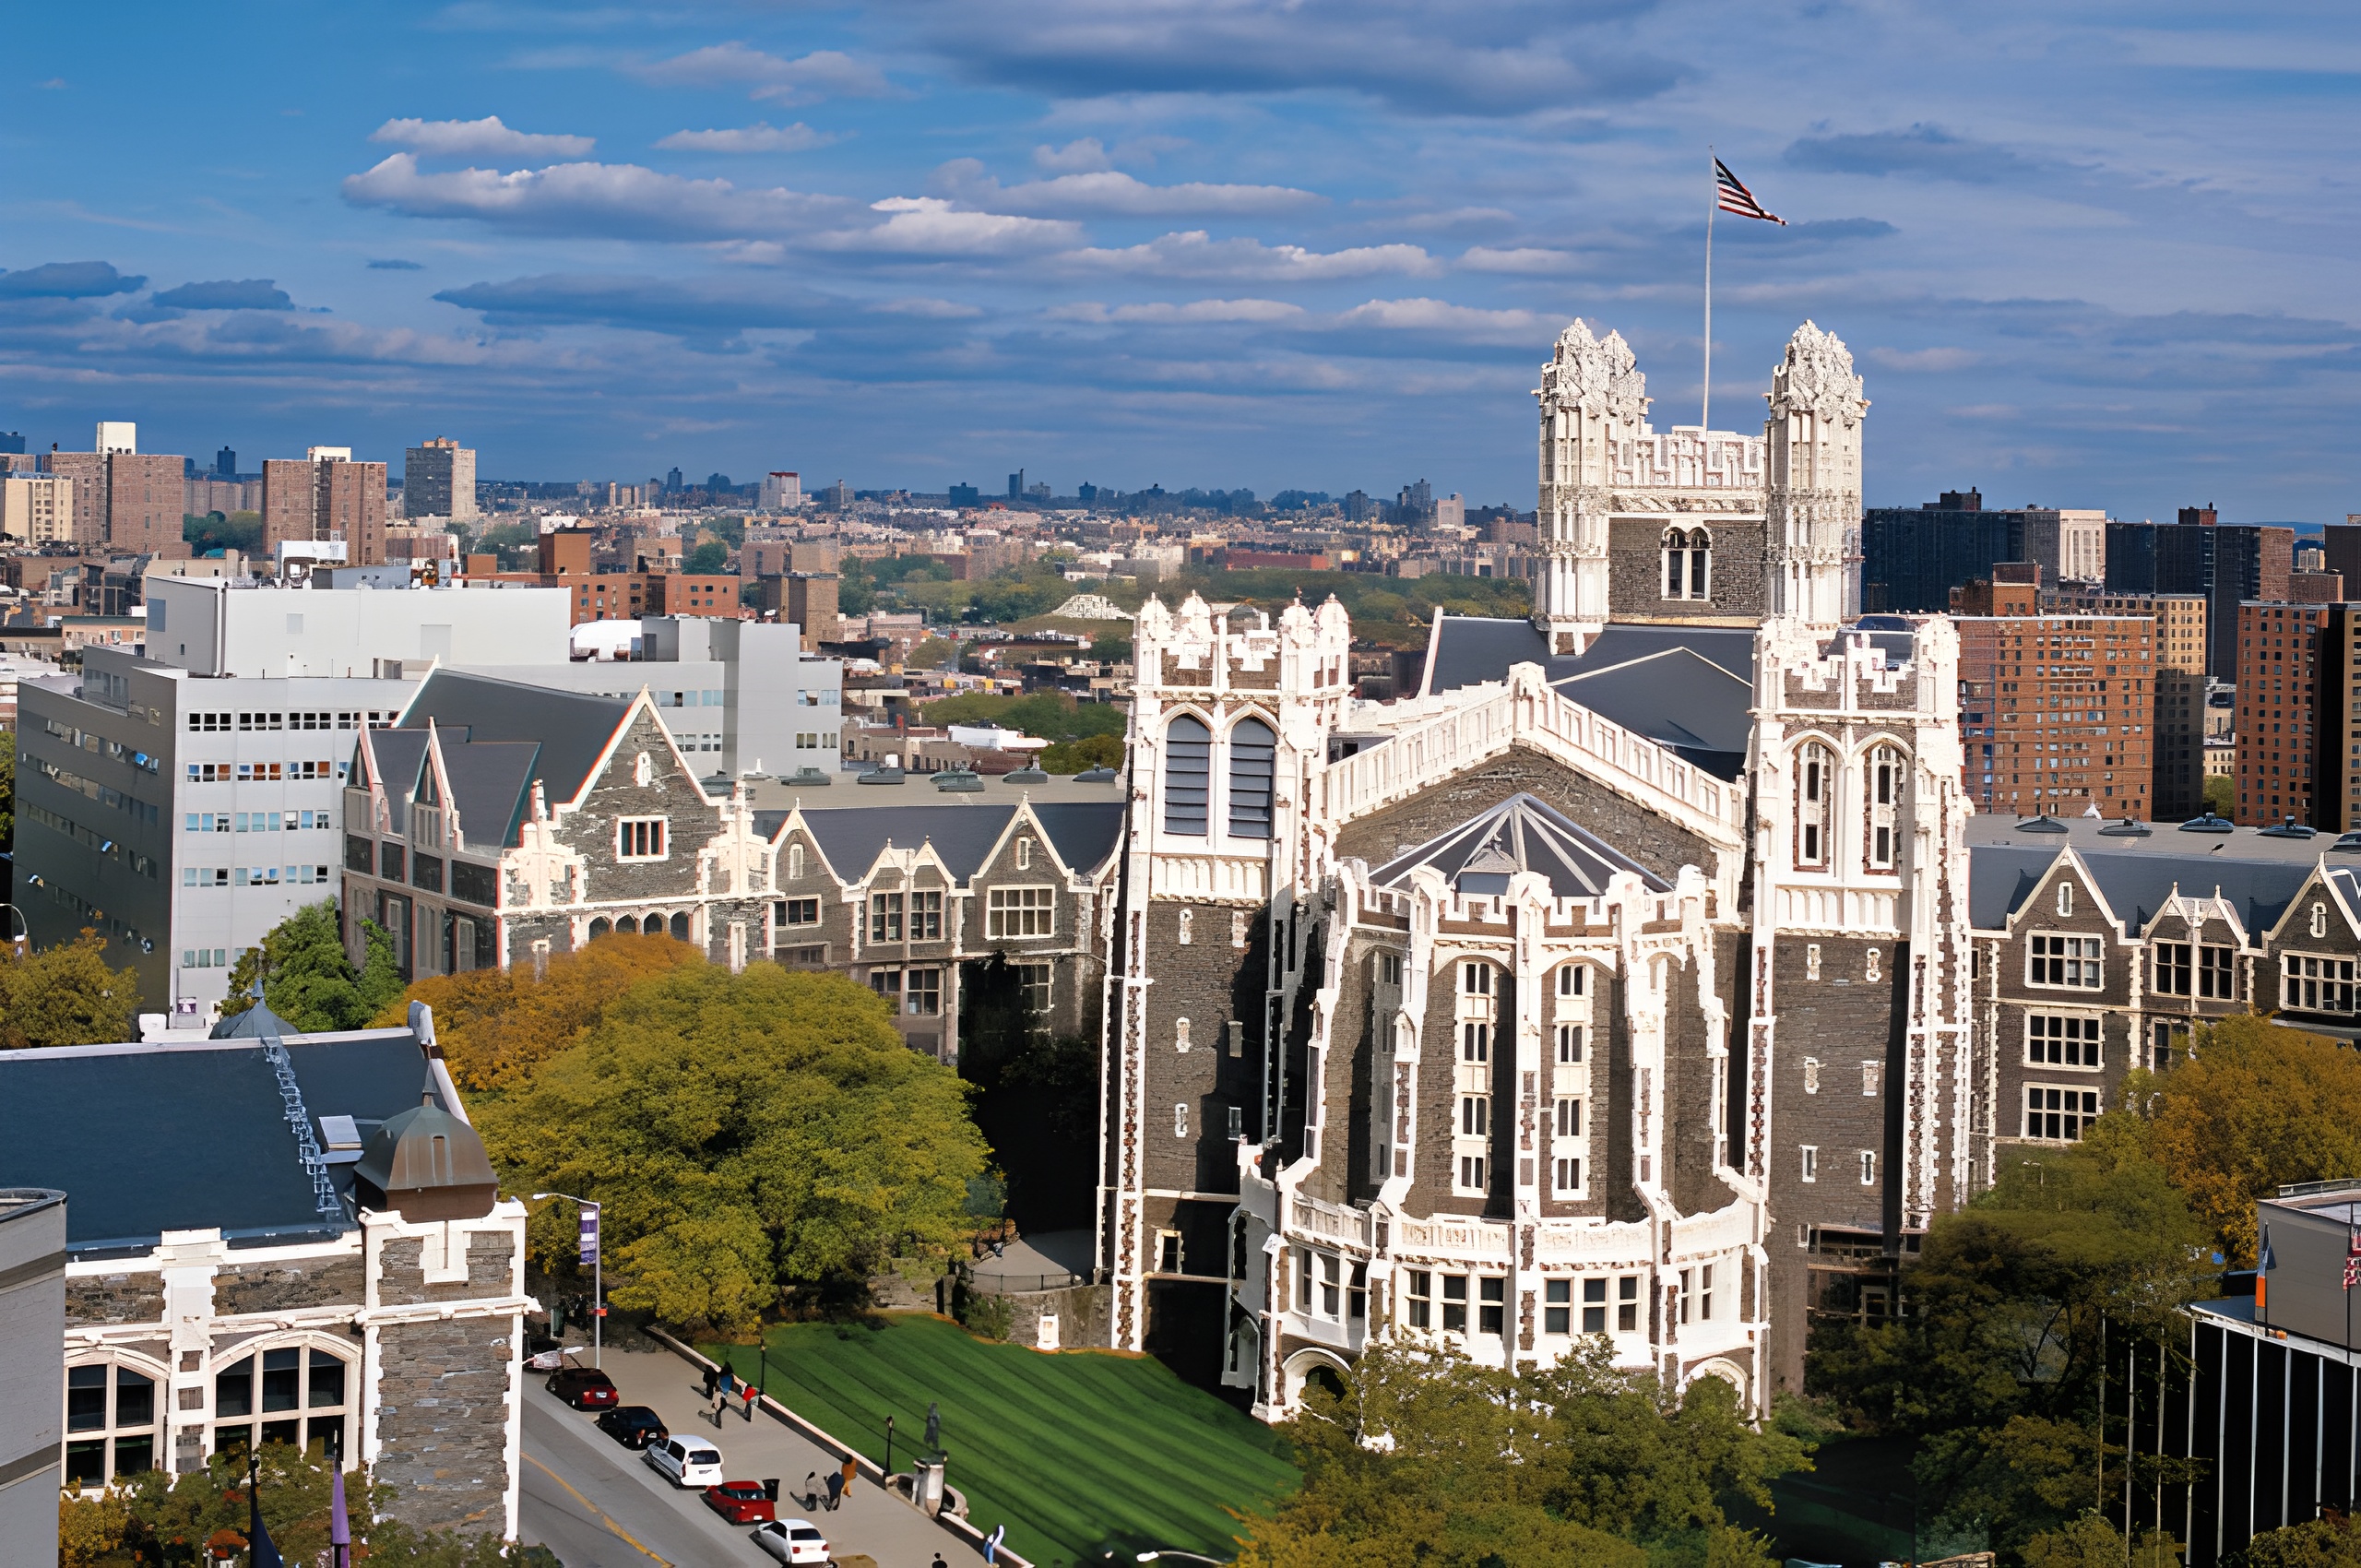
For the building image above please click here to see the original image and please click here to see the resulting/inference image.
Note: Images on the left are the original ones. Images on the right are coming from this project's model inference.
Implementation of the paper
Real-ESRGAN: Training Real-World Blind Super-Resolution with Pure Synthetic Data
Explore the docs »
Report Bug
Request Feature
Table of Contents
- This project is the implementation of the Real-ESRGAN and the Real-ESRNet models from the paper "Real-ESRGAN: Training Real-World Blind Super-Resolution with Pure Synthetic Data"
Trying to improve the quality of blurry images without knowing how they got blurry in the first place. However, existing methods still struggle with fixing common issues in real-world pictures. In this project, a strong image enhancement tool called ESRGAN is adapted for practical use and it is now called Real-ESRGAN. Real-ESRGAN has been trained using computer-generated data to better imitate complex real-world image problems. Real-ESRGAN also accounts for some common visual problems that might occur during the enhancement process. Real-ESRGAN does a better job than other methods when fixing real images.
- Practical Application of ESRGAN: The researchers extended the use of ESRGAN (Enhanced Super-Resolution Generative Adversarial Network) for practical image restoration applications.
- Training with Synthetic Data: Real-ESRGAN is trained using exclusively synthetic data. This means the model learns from computer-generated examples rather than real-world images.
- High-Order Degradation Modeling: The authors introduced a high-order degradation modeling process. This helps the model better simulate and understand complex real-world image degradations.
- Consideration of Common Artifacts: Real-ESRGAN takes into account common visual artifacts like ringing and overshoot that can occur during the image synthesis process.
- Improved Discriminator Capability: A U-Net discriminator with spectral normalization is employed to enhance the discriminator's ability to evaluate and improve the training process's stability.
- Superior Visual Performance: Extensive comparisons with previous methods on various real datasets demonstrate that Real-ESRGAN outperforms them in terms of visual quality.
To get a local copy of the Real-ESRGAN up and running locally follow these simple example steps:
NOTE: How to check if Python is installed and what is its version
python --versionNOTE: How to check if Git is installed and what is its version
git -v-
Please make sure you have pyenv installed and use Python3 version 3.10.9:
- You can use pyenv to switch between different Python versions:
-
Please make sure you have git installed
-
Please look at the setup folder found in this project.
-
Navigate to the directory where you want to clone/run/save the application:
cd your_selected_directory -
Clone this repository:
git clone https://github.com/GeorgiosIoannouCoder/realesrgan.git
-
Navigate to the realesrgan git repository:
cd realesrgan -
Use Python3 3.10.9 version in the cloned repository folder:
pyenv local 3.10.9 -
Create virtual environment in the cloned repository folder:
python -m venv .realesrgan-venv
-
Activate the virtual environment (Windows OR Mac/Linux):
- Windows
.\.realesrgan-venv\Scripts\activate
- Mac/Linux
source .realesrgan/bin/activate -
Install the dependencies listed in the requirements.txt file:
pip install -r requirements.txt
-
Run Streamlit:
streamlit run app.py
NOTE: You can also use the inference/inference.py script to test the model in the command line. More instructions can be found below in the Usage section.
NOTE: For training, NERSC was used with four A100 GPUs due to the huge size of the datasets and network architectures. It took five days to train both the Real-ESRNet and Real-ESRGAN.
-
To get any of the model weights from this project please contact me at any time. They have not been uploaded to GitHub due to the large file size. Please see the README.md files of the directories model_needed_for_esrnet_training and models for the required file structure and names of the model needed for the first training and the models resulting from both the first and second training for this project respectively.
-
To train your own model please follow the following instructions:
NOTE: Please make sure that you have installed the dependencies listed in the requirements.txt file as shown in the Setup section before proceeding.
- Download the datasets DF2K and OST Training from here. Please see the readme file of the directory datasets in this project for the required file structure.
- For the DF2K dataset, use a multi-scale strategy to downsample HR images to obtain several Ground-Truth images with different scales. Use the script multiscale_df2k.py to do this.
python image_scaling/multiscale_df2k.py --input datasets/DF2K/DF2K_HR --output datasets/DF2K/DF2K_HR_multiscale
- Next, crop the DF2K images obtained from step 2 into sub-images. Use the script image_crop.py to do this.
python image_cropping/image_crop.py --input datasets/DF2K/DF2K_HR_multiscale --output datasets/DF2K/DF2K_HR_multiscale_subimages
- Prepare a txt file containing the image paths. Use the script image_path.py to do this.
python image_path_generator/image_path.py -input datasets/DF2K/DF2K_HR_multiscale_subimages datasets/OST/ANIMAL datasets/OST/BUILDING -root "" "" "" -path ./image_path_generator/gt_image_paths.txt
- Train Real-ESRNet using the script training.py.
python training/training.py -opt training_parameters/real_esrnet_x4.yml
- Train Real-ESRGAN using the script training.py and the model obtained from step 5.
python training/training.py -opt training_parameters/real_esrgan_x4.yml --auto_resume
-
The training process happens in two stages:
- First, train Real-ESRNet with L1 loss from the pre-trained model
ESRGAN_SRx4_DF2KOST_official-ff704c30.pth. - Next, use the trained Real-ESRNet model from the previous step as an initialization of the generator, to train the Real-ESRGAN with a combination of L1 loss, perceptual loss, and GAN loss.
- First, train Real-ESRNet with L1 loss from the pre-trained model
-
To inference any of the models, use the script inference.py:
python inference/inference.py -input "ccny.jpg" -model_name "REALSRGAN_x4" -output "inferences" -upscale 4 -model_path "./models/REALESRGAN_x4.pth" -extension "auto"
-
Training Process

-
Inference Process: Command Line | inference.py

-
Inference Process: Streamlit Web Application | app.py


- You can find the report for this project here where it explains this project in detail.
Contributions are what make the open source community such an amazing place to learn, inspire, and create. Any contributions you make are greatly appreciated.
If you have a suggestion that would make this better, please fork the repo and create a pull request. You can also simply open an issue with the tag "enhancement". Don't forget to give the project a star! Thanks again!
- Fork the Project
- Create your Feature Branch (
git checkout -b feature/AmazingFeature) - Commit your Changes (
git commit -m 'Add some AmazingFeature') - Push to the Branch (
git push origin feature/AmazingFeature) - Open a Pull Request
Distributed under the MIT License. See LICENSE for more information.
MIT License
Copyright (c) 2023 Georgios Ioannou
Permission is hereby granted, free of charge, to any person obtaining a copy of this software and associated documentation files (the "Software"), to deal in the Software without restriction, including without limitation the rights to use, copy, modify, merge, publish, distribute, sublicense, and/or sell copies of the Software, and to permit persons to whom the Software is furnished to do so, subject to the following conditions:
The above copyright notice and this permission notice shall be included in all copies or substantial portions of the Software.
THE SOFTWARE IS PROVIDED "AS IS", WITHOUT WARRANTY OF ANY KIND, EXPRESS OR IMPLIED, INCLUDING BUT NOT LIMITED TO THE WARRANTIES OF MERCHANTABILITY, FITNESS FOR A PARTICULAR PURPOSE AND NONINFRINGEMENT. IN NO EVENT SHALL THE AUTHORS OR COPYRIGHT HOLDERS BE LIABLE FOR ANY CLAIM, DAMAGES OR OTHER LIABILITY, WHETHER IN AN ACTION OF CONTRACT, TORT OR OTHERWISE, ARISING FROM, OUT OF OR IN CONNECTION WITH THE SOFTWARE OR THE USE OR OTHER DEALINGS IN THE SOFTWARE.
Georgios Ioannou - @LinkedIn
Georgios Ioannou - @georgiosioannoucoder - Please contact me via the form in my portfolio.
Project Link: https://github.com/GeorgiosIoannouCoder/realesrgan