Dexter Setup
Caution: When following the directions below to remove a Dexter from its shipping / storage case, please be very careful to rotate each joint in the correct direction to unfold the arm and stand it up straight. This direction should be obvious for the base (joint1) and joints 2 and 3, but joints 4 and 5 can be rotated in the wrong direction and end up 360 degrees from the correct place. Pictures placed in the case when a new Dexter is sent out should indicate the correct directions, but you can also figure them out by looking at what the tool interface will run into as it's rotated. Just make sure the wires don't get wrapped up.
Normally, all that is required is rotating Joint 3, "the elbow" up to a straight vertical position.

The top layer of the case will contain the base, remove it and place it with the feet down, and the center mounting pole up. The standard Dexter base is NOT intended to be perfectly stable. It must be mounted to a stable surface by gluing, screwing, or clamping the legs down.
-
If the surface has a lip, you can clamp 2 or 3 of the feet down. Check that the lower part of the arm body will clear the tops of the clamps.

-
For wooden, metal, or other surfaces which can have holes, screw or bolt the feet down.

-
For a flat, inviolate surface like steel, marble, cement, etc... use large amounts of hot glue injected up into the bottom of each "foot"


-
Other options are available for customization, please contact us.
Now remove the Dexter robot from the lower level of the case.

This picture shows a Dexter with a skin, your's may not have one.
Typically, you should grip it by the handle on Joint 3 aka "the elbow" (avoid gripping the side of joint 3 which has the belts) and by the base mounting column. Align the strakes with holes in the base mount and slide it in. Tighten the base clamp. It requires a Phillips head screwdriver.
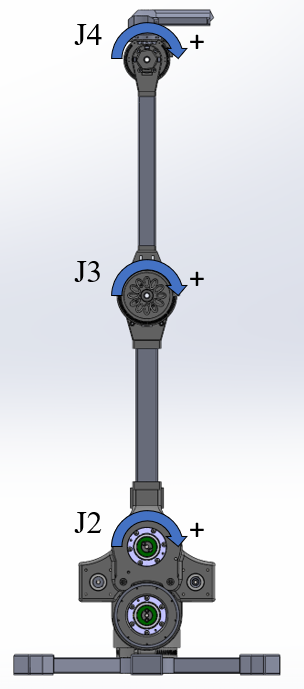
Before powering on Dexter, position each joint at the home position. This is less important for the Dexter HDI models as it will find it's own home position when powered up, however, it's faster if it's already closer to home. Prior models will need to be placed as close to home position as is possible using the knobs on the motors. The default position is with all the joints vertical, and the tool interface (the last segment) pointed to the right when facing the joints, as shown here:

On the Dexter HDI, there is a mark on the base that indicates the home position. The robot should be rotated until the mark is close to the J1 Opto block, as shown here:

This easily visible alignment will place the "X" on the base mount directly behind the main arm body (where it is hard to see).
Normally, when unpacking Dexter, all you should need to do is rotate Joint 3 in the direction shown by the arrow (clockwise, when facing the motors) and make minor adjustments to the other joints. Each motor drive shaft has a small dial / handle which can be used to rotate it to a consistent position on startup. The exception is Joint 1, which can be aligned by simply rotating it. Wherever the robot is located when powered on is accepted as the zero or home position. For more on this, see Encoder Calibration. DDE will walk you through initial calibration. Note: The Dexter HDI should NEVER be calibrated outside the factory as it is not necessary and is a complex process.
Before powering up your Dexter, make sure the SD card is in place (powering on a microZed without an SD card will destroy it) and that no wires have come loose. If your Dexter is skinned, this shouldn't be an issue.
Plug in the power cord to fire up your Dexter robot. You should see a blue light on the control board. Wait for the "boot dance" to complete (if it's enabled).

If you don't see the boot dance, or the board doesn't light up, see Troubleshooting
If the robot appears to be working ok, continue to connect to Dexter. In general, you want to connect Dexters CAT 5 cable to the network port adapter on your PC or laptop and configure your settings for that Adapter to have a fixed IP address of 192.168.1.10 and no gateway. Then you should be able to ping Dexter at 192.168.1.142. If you have issues, see Dexter Networking
On power up, Dexter will load the OS, then move slightly to let you know it's working. That's it for the Dexter 1 and HD models. On the new HDI, the robot will take a minute or two. If so configured, it may then go into PHUI mode where it is waiting for you to move the end effector and record or play back recordings. While in any of these startup modes, you will NOT be able to communicate with the robot via DDE. You can use web interface if installed, or SSH or the console cable. Once those startup modes end, you will be able to communicate with the robot via DDE.
To change the startup jobs, edit, via the web editor or nano in SSH, the autoexec.jobs file, or if it is not present (older robot) then edit the end of the RunDexRun file.
To exit PHUI mode once it is running: Grab the tool interface and "cog" up twice to exit PUI mode. After exiting, Dexter firmware will respond to commands from a PC or other connected device.