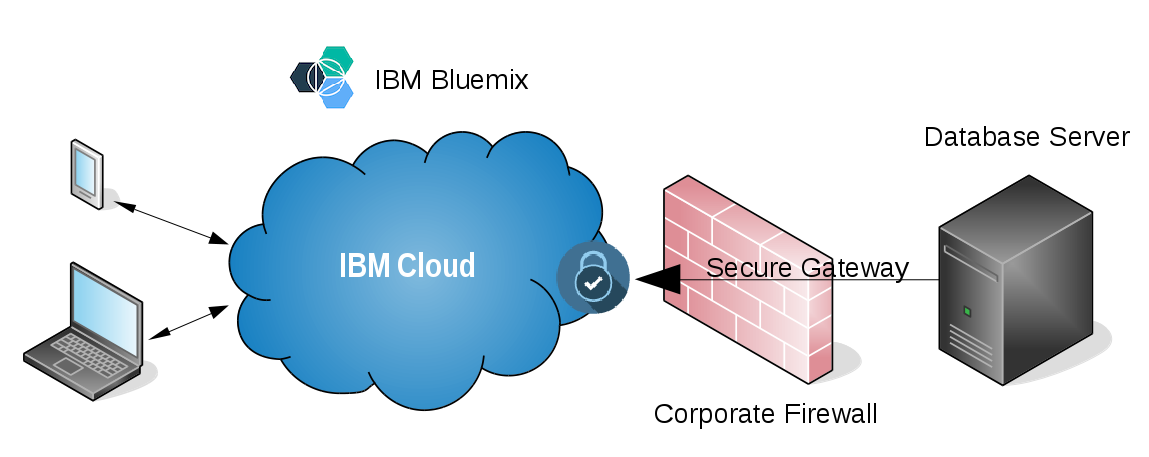
This project provides the skeleton for a modern Cloud-based web application that accesses on-premises data, a database behind the corporate firewall. It shows how a (public or dedicated) cloud environment is used for a "System of Engagement", while sensitive data remains in a "System of Record". For this example we are going to create an app that displays a list of web-based reading material, basically bookmarks. The user can add to the list via the web interface.
What you will learn:
- Simple database-agnostic web app built with Pythong using Flask and SQLAlchemy
- Combine Cloud Foundry app with external database resource using user-provided services
- Bluemix and third-party cloud database, or
- Bluemix and unbound database on Bluemix, or
- Bluemix Dedicated/Local and existing enterprise database behind the corporate firewall
- (Optional) Using the Secure Gateway service on Bluemix
- (Optional) Using Virtual Machines on Bluemix
- (Coming) Using Docker/Container service on Bluemix
What you need:
- An IBM Bluemix account
- A (laptop) computer
- 30-60 minutes of time, depending on deployment option and experience
The web app is built with Python, the Flask microframework and the SQLAlchemy database toolkit. The app itself is database-agnostic and can be deployed with MySQL, DB2, MariaDB, Oracle and other relational database systems. The database server could be located anywhere, in the cloud or on-prem. In our example we show how the secure gateway service can be utilized to implement an encrypted connection between an on-premise database server and a cloud application. Depending on corporate policies it may not be possible to simply test this scenario, so we will be using a virtual machine (in the cloud) to simulate the corporate data center. The same instructions can be used to connect a database server on a local (virtual) machine.
For many large customers, the core data that drives their business resides in established database systems behind their firewall, accessed through classic middleware (i.e., an Oracle or DB2 database accessed with .Net software). While this system sustains their business, its evolution is generally slow to non-existent. This structure does not promote the creation of nimble and engaging apps that employees and customers require.
By connecting modern cloud applications to these on-prem systems, we are able to quickly create quality user experiences, while safely surfacing the data that we need. The Secure Gateway that is used in this tutorial opens a communication channel from behind the firewall to the IBM Cloud. The architecture our application and is shown here.
- Installation
- Understanding and Using the App
- Alternative Setup
- Contribute
- Troubleshooting
- Secure Gateway
- Links to more information
There are some components that need to be set up before being able to use this app. Most are related to setting up a "mock" back-end "system of record" that our cloud application will connect to. We estimate it will take you 30 to 45 minutes to run through the steps.
For convenience, we have split the steps up into 4 phases:
Phase 1: Instantiate an OpenStack virtual machine (VM), which will simulate an on-premises data center.
Phase 2: Install a MySQL database instance.
Phase 3: Create a Secure Gateway and connect it to the database running in the VM.
Phase 4: Create the Python app, deploy it to Bluemix, then connect it to the Secure Gateway endpoint.
In the Data Center document we are describing how to set up a Virtual Machine on Bluemix. As another option you could use a virtual machine installed on your laptop or server. You need to install MySQL or another database into it (see alternative setup for details.
-
Install MySQL on your VM:
$ sudo apt-get install mysql-server
Note: During the installation process you will be asked to assign a password to your MySQL server. Make sure to write it down, you will need it for database access.
-
Grant remote access to your MySQL DB instance (by using the password you assigned in step 1 above), create a database and then restart the mysql service:
$ mysql -u root -p
Enter password: <PasswordFromStep1>

mysql> GRANT ALL ON *.* to root@'%' IDENTIFIED BY '<PasswordFromStep1>';
mysql> flush privileges;
mysql> create database readlist;
mysql> exit

$ sudo service mysql restart
Please note that create database readlist is not part of the actual server installation, but included for convenience. It is all in preparing the database itself. The rest is done by the web application on its own.
Create a secure connection between your Bluemix app and the database running in your VM.
-
Navigate to the Bluemix catalog and select the new Secure Gateway service. Choose
Leave Unboundfor now and clickCREATE. -
In the secure gateway console choose
ADD GATEWAYand:a) Give your gateway a name, toggle
Require security token to connect clientsso that it is not active, and then click onADD GATEWAY. The gateway is created and a dashboard with a tile for the gateway should be shown.
b) Click on the tile with your gateway name. On the next screem click onAdd Destinationwhich should bring up a configuration wizard with several steps or the option forAdvanced Setup. Click onAdvanced Setup. c) ChooseOn-Premises Destination(and notCloud). Give the destination a name, enter127.0.0.1as hostname/IP address, resource port 3306, keep TCP selected, and click theADD DESTINATIONbutton. The loopback ip address (127.0.0.1) is used because the Secure Gateway client connects to the MySQL server locally. If the MySQL server is on another machine, its IP address must be specified.d) In the overview screen select
Add Clients(with the+symbol) to retrieve the command you will need to establish the secure connection from your VM. There are options for the native installer (IBM Installer), running a docker image or using IBM DataPower. SelectIBM Installer, the screen should look as shown. Note down the Gateway ID. It is needed in step 3b.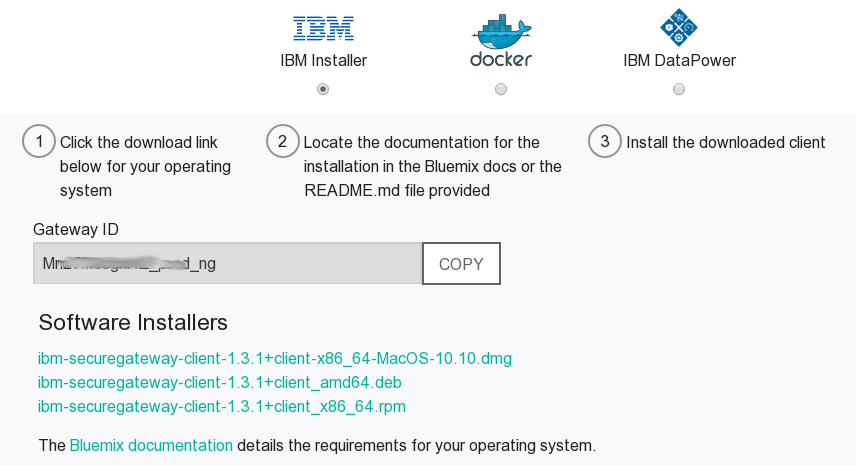
-
Install the Secure Gateway client into your VM using the native installer
a) Within the terminal of your VM download the native installer using the
wgetcommand. The file name needs to match the one shown in step 2c. Here is an example:$ wget https://sgmanager.au-syd.bluemix.net/installers/ibm-securegateway-client-1.5.1+client_amd64.debb) Create an Access Control List (ACL) to allow access to the tcp port used by MySQL. The following first creates the needed directory, then the file "sgacl.conf" and populates it with the rule
acl allow :3306- allow access to port 3306.$ sudo mkdir /etc/ibm $ sudo bash -c 'echo "acl allow :3306" > /etc/ibm/sgacl.conf'c) Install and configure the Secure Gateway using the native installer.
$ sudo dpkg -i ibm-securegateway-client-1.4.2+client_amd64.debDuring the install process you are prompted several times for input.
- For "Stop and restart the client..." type in "y".
- When prompted for the "gateway ID", enter the id obtained in step 2c above.
- When asked to "supply an ACL File", specify "/etc/ibm/sgacl.conf" - the file created above.
- You can just hit enter and go with the defaults for everythin else.
Once the install process is finished, the Secure Gateway client should start automatically.
(Note: If your installation is not working, a work-around is to remove the configuration using
sudo rm /etc/ibm/sgenvironment.conf, install again (see command above) and just hit "enter" for each prompt. Thereafter edit the filesgenvironment.confwith the required information. Start the gateway client manually (see commands below under troubleshooting).
d) Verify the Secure Gateway client is connected
$ cat /var/log/securegateway/client_console.logThe output should indicate that "The Secure Gateway tunnel is connected".
-
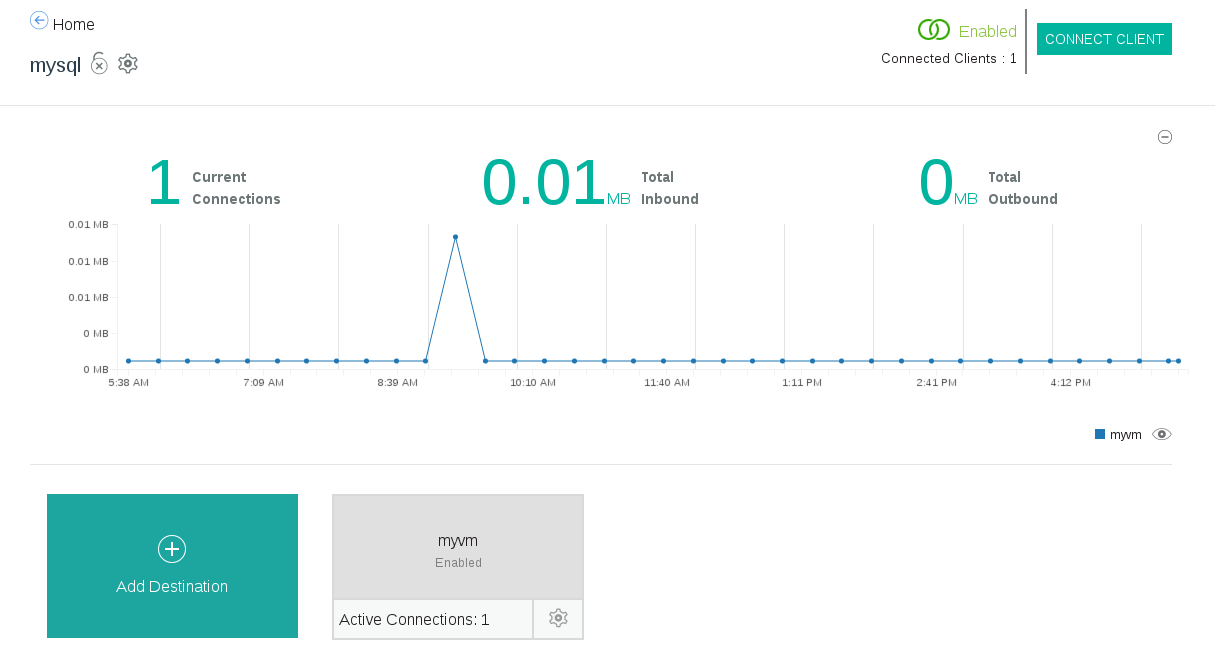
The Secure Gateway dashboard on Bluemix should also indicate that the Secure Gateway is now connected. Something similar to this should be shown:
Now that we have a connection to our MySQL data base (serving as a stand-in for our on-premises system of record) established, we will turn to our System-of-Engagment application. To keep it simple it will display a list of bookmarks (reading list) and it will be possible to add items.
As mentioned earlier, the app is based on Python and uses the Flask microframework and the SQLAlchemy database toolkit. The application logic itself is in a single file and the application can be run either locally or on Bluemix. As a first step we need to get application code, either by cloning via git (see below) or by downloading the files as zip archive.
To clone, build and deploy the app on Bluemix, follow these steps:
-
Clone the github code repository (or extract the zip archive) and navigate to the app folder named "webclient". The code in the webclient directory consists of a single Python script "readapp.py", a file "requirements.txt" that specifies dependencies (and hence modules that need to be installed by Bluemix) and a "Procfile" which tells Bluemix how to start the Python app.
$ git clone https://github.com/data-henrik/Bluemix-onprem-data.git $ cd Bluemix-onprem-data/webclient/ -
Download and install the Cloud Foundry CLI tool if you have not already. The Bluemix documentation has a section with details about the CLI, additional interfaces, and more.
-
Connect to Bluemix using the CLI and follow the prompts to log in.
$ cf login -a https://api.eu-gb.bluemix.net -
Push your app to Bluemix:
cf push <APPNAME>Note that the push should succeed, but starting the app will fail. The reason is that the app is looking for a specific service that we need to create first.
-
Create a user provided service to configure the communication to your MySQL database:
cf cups readlist -p '{
"url": "mysql://root:rootpassword@cap-sg-prd-y.integration.ibmcloud.com:xxxxx/readlist"
}'
The "rootpassword" is the administrator password you chose during the MySQL setup. The port number and the exact hostname can be obtained from the Secure Gateway dashboard by clicking on the "i" (info) icon as shown:

-
Now bind the service to your app.
$ cf bind-service <APPNAME> readlist -
Finally, we need to restage our app to ensure the environment variables changes took effect.
$ cf restage <APPNAME>
The guide to understanding and using the simple reading list app are in this separate file.
Instead of using the web application with a MySQL database as described above it can also be used with other database systems. The reason is that the SQLAlchemy framework is used. By specifying a different URL type within the user-provided service, the schema and related queries are adapted to the other target system. The only other change is to add the database-specific Python module to the requirements.txt file.
If you want to use dashDB on Bluemix, the command to register the database URL would look like this:
cf cups readlist -p '{
"url": "db2+ibm_db://dashDBUser:password@yp-dashdb-small-xx-lonyy.services.eu-gb.bluemix.net:50000/BLUDB" }'
The same database prefix would be used for a DB2 system. The dashDB/DB2-specific Python module would be ibm_db_sa and ibm_db. A sample requiremens.txt is provided as requirements.txt.db2.
See the SQLAlchemy documentation for how to specify the URL for other supported database systems.
We are more than happy to accept external contributions to this project, be it in the form of issues and pull requests. If you find a bug, please report it via the Issues section or even better, fork the project and submit a pull request with your fix! Pull requests will be evaulated on an individual basis based on value add to the sample application.
The primary source of debugging information for your Bluemix app is the logs. To see them, run the following command using the Cloud Foundry CLI:
$ cf logs <APPNAME> --recent
For more detailed information on troubleshooting your application, see the Troubleshooting section in the Bluemix documentation.
You can start/stop/restart the Secure Gateway client within your virtual machine by issuing the following commands:
sudo systemctl start securegateway_client
sudo systemctl stop securegateway_client
sudo systemctl restart securegateway_client
The logs for the Secure Gateway client are located at /var/log/securegateway/client_console.log. If you want to see what is going on, follow the output by using:
tail -f /var/log/securegateway/client_console.log
IBM Redbook: Secure Cloud-to-Mainframe Connectivity with IBM Bluemix