What if customer feedback automatically drove business decisions?
Customer feedback contains invaluable insight into client satisfaction. Assistant Shop.r enables a department store to analyze aggregated customer feedback and consumer behavior in order to enable their buyers to make smarter purchasing decisions.
In this demo, a video call (using the new [Twilio video API] twilio_video_url) is held between a customer and a customer service agent. As the video call is happening [IBM Watson Speech to Text] speech_to_text_url service is transcribing the audio in real time. After the video call completes, [AlchemyLanguage API] alchemy_api_url is used to automatically determine which product the customer was giving feedback on and then determines the sentiment of that feedback. The corresponding product's feedback score, a number between 0 and 100, fluctuates based on this feedback. After the score is updated, Business Rules are invoked to determine if the product has crossed a threshold to automatically suggest a review of investment in the product. If the rules suggest a review, a process instance for a change in product investment is then started and managed by the Bluemix Workflow service. This creates a task for a buyer at the company. The buyer can then decide whether to ignore or go through with the review, thus completing the process.
Video Walkthrough - https://www.youtube.com/watch?v=EcOryuaGYCI

Note: If deploying by this method, the app will fail on first deploy. After this initial failure, you must complete steps 12-16 as described in the section 'Running the app on Bluemix', as well as configure your business rules and workflow. Only then will your app start successfully.
This application requires two machines to run through the demo. The users need to be running either the Firefox or Chrome browser for the demo to function properly.
-
Have the first person open a web browser and go to [https://assistant-shop-r.mybluemix.net/agent] demo_agent_url. They will play the role of the agent.
-
Click "Go Online" at the top.
-
Have the second person open a web browser on another machine and go to https://assistant-shop-r.mybluemix.net/. They will play the role of the customer.
-
Click the camera icon for one of the products, you will get an alert asking for permission to use your microphone and camera. Allow permission.
-
The agent will then get an alert asking for permission to their microphone and camer. Allow permission as well.
-
The customer should speak some text and it will be transcribed in real time for the second person (the agent).
-
One of the two people click "End call".
-
The agent will see keywords extracted from the conversation transcript and overall sentiment, determined by the AlchemyLanguage API
-
Behind the scenes, business rules and a workflow are invoked to automatically determine whether an investment review needs to be triggered.
-
Open a web browser and go to https://assistant-shop-r.mybluemix.net/tasks. If a review was triggered by your conversation, you will see a new task as a result of the customer's feedback.
Customer View - https://assistant-shop-r.mybluemix.net
Customer Service View - https://assistant-shop-r.mybluemix.net/agent
Buyer View - https://assistant-shop-r.mybluemix.net/tasks
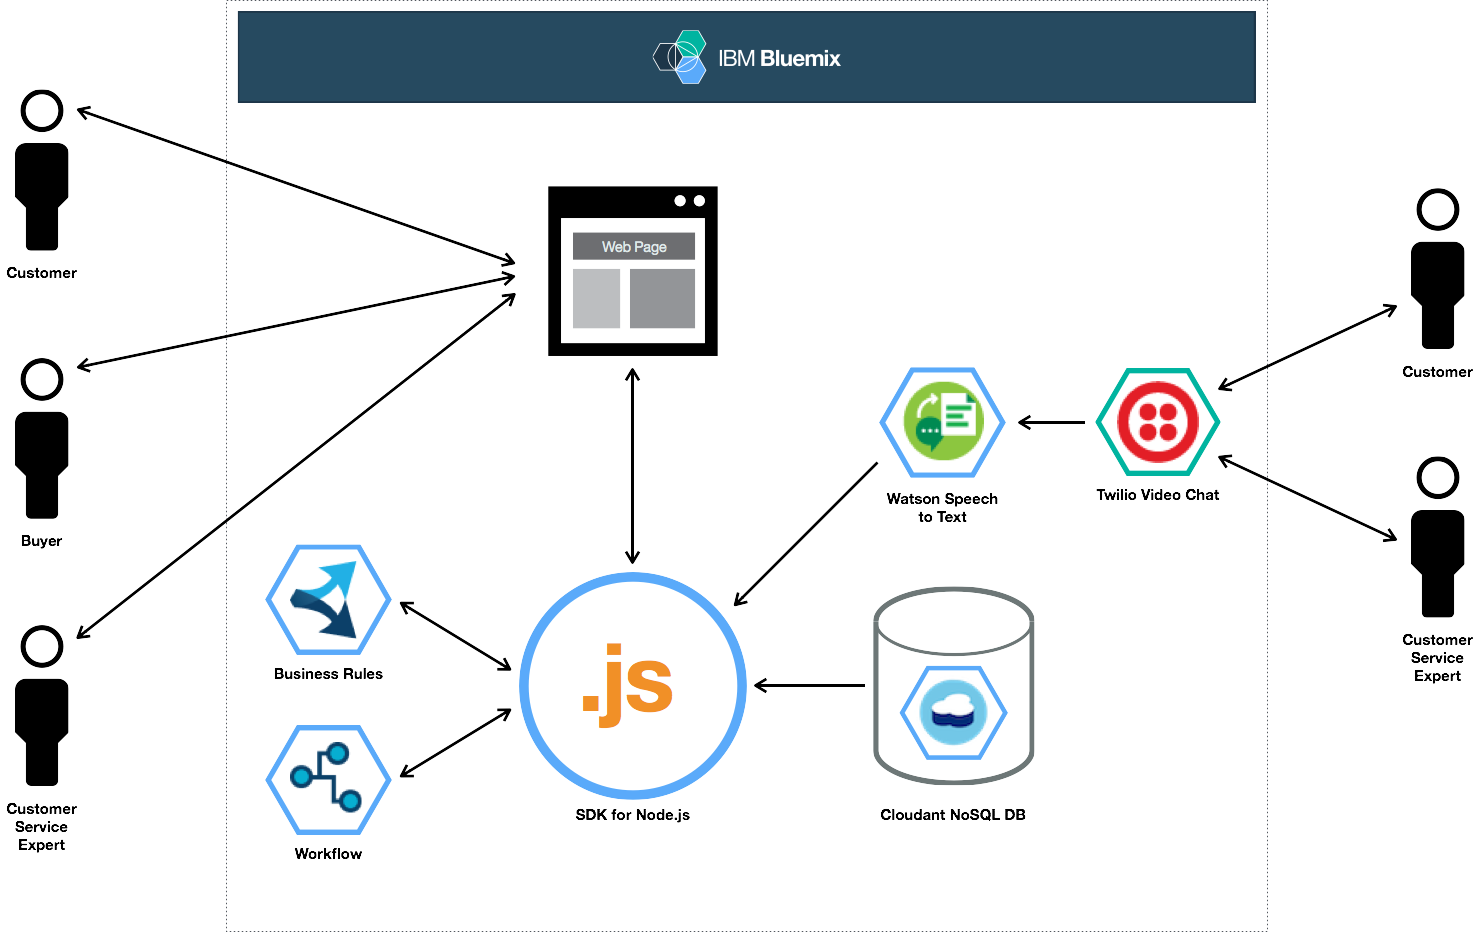
This an architectural overview of the systems that make this app run.
-
Sign up for Bluemix or use your existing account.
-
Download and install the Cloud-foundry CLI tool
-
Clone the app to your local environment from your terminal using the following command
git clone https://github.com/IBM-Bluemix/assistant-shop.r.git
-
cdinto this newly created directory -
Edit the
manifest.ymlfile and change the<application-name>and<application-host>to something unique.applications: - name: assistant-shop-r host: assistant-shop-r command: node app.js runtime: node12 memory: 512M instances: 1
The host you use will determinate your application url initially, e.g. <application-host>.mybluemix.net.
-
Connect to Bluemix in the command line tool and follow the prompts to log in.
$ cf api https://api.ng.bluemix.net $ cf loginNote: Several of the services in the following steps may produce warnings when you create them, alerting you that they are not entirely free. Creating and demoing this app leaves you well within the limits of your free quota, however, always remain cognizant of your monthly service usage.
-
Create the Speech to Text service in Bluemix.
$ cf create-service speech_to_text standard assistant-shop-r-speech-to-text
- Create the Cloudant service in Bluemix.
$ cf create-service cloudantNoSQLDB Shared assistant-shop-r-db
- Create the Business Rules service in Bluemix.
$ cf create-service businessrules standard assistant-shop-r-rules
- Create the Workflow service in Bluemix.
$ cf create-service Workflow standard assistant-shop-r-workflow
- Create the AlchemyAPI service in Bluemix.
$ cf create-service alchemy_api free assistant-shop-r-alchemy
-
Next, you need to sign up for a Twilio developer account if you do not have one already. You can do this [here] twilio_signup_url.
-
Once you have created an account, navigate to your account page. Take note of your Live Account SID and AuthToken on this page, as you will need it to plug in as your credentials for accessing Twilio's API from within Bluemix.
-
Go to the Bluemix catalog, select the Twilio service, choose to leave it unbound, name it
assistant-shop-r-twilio, populate Account SID and Auth Token using your credentials from step 13, and finally click Create. -
Currently, Twilio Video is in beta, so you will need to request access to the beta program, designating that you would like access to the JavaScript SDK.
-
Push your app to Bluemix
$ cf push
And voila! You now have your very own instance of Assistant Shop.r running on Bluemix.
Before you get too excited, we are not done just yet! We still need to define what the business rules and process for our application are going to look like. In the next few sections we will look at configuring these services.
-
If you don't have it already, download the [Eclipse Juno IDE for Java EE Developers] eclipse_download_url.
-
Start Eclipse and install IBM Rule Designer by completing the following steps:
- Go to the menu Help > Install New Software
- In the install dialog, click Add
- In the Add Repository dialog, enter the following details:
- Name: Business Rules Service Rule Designer
- Location: http://businessrules-updates.ng.bluemix.net/
- Select the package Business rules and events
- Click Next and then Next again
- Accept the license terms
- Click Finish and then OK
- Restart Eclipse to complete the installation
-
Open Eclipse back up and switch to the Rules perspective by going to the menu and selecting Window > Open Perspective > other > Rule > OK
-
Import the product rules Java project into your workspace
- Click File > Import > General > Existing Projects into Workspace and then Next
- In the Import projects window, select the Select Archive file: radio button and click Browse. Choose the projectRules.zip file from your cloned GitHub repo.
- Select all three projects and click Finish
####Projects
- products - Contains the Java file that holds the product object. A product is composed of an ID, feedback score, and indicators for investment/divestment review.
- products-RuleProject - Contains the three business rules that leverage the product object. These rules define the lower and upper feedback score thresholds that dictate investment reviews. You can view the rules [here] project_gists_url as well.
- products-RuleApp - The app to be deployed to your business rules service instance.
-
Navigate to your application in the Bluemix dashboard. Click on the business rules service and go to the Connection Settings tab to find your instance credentials.
-
Using the credentials found in step 5, we will now create a deployment target in Rule Designer:
- Click File > New > Project > Rule Designer > Rule Execution Server Configuration Project and then Next
- Name your project 'Product Rule Execution Server Configuration' and then click Next
- Select IBM WebSphere AS 8.5 as your applications server and click Next
- Set URL, Login, and Password to their corresponding values from the Business Rules service console.
- Click Test Connection and you should get the message
Connection successful. Click Next. - Keep the default RuleApp deployment option selected and click Finish to close the wizard.
-
Deploy the Rule App to your business rules service instance by taking the following steps:
- Right-click products-RuleApp > RuleApp > Deploy
- Select the Increment RuleApp major version deployment type and then click Next.
- Keep the default selected target server radio button, select IBM WebSphere AS 8.5, and then click Finish.
Your RuleApp should now be successfully deployed to your business rules service instance! To confirm this, first check your Eclipse console which should indicate a successful deployment. Then, return to your business rules service console and go to the Decision Services tab. You should see your recently deployed RuleApp as one of the available decision services. If not, be sure to hit the Refresh button to perform a fresh check.
-
Install the [Workflow for Bluemix plugin] workflow_plugin_url.
-
Navigate to your application in the Bluemix dashboard. Click on the workflow service and copy the configuration information at the bottom of the page. Then go [here] workflow_settings_url, ensure 'Workflow service 1' is chosen in the dropdown, and paste the configuration info into the corresponding textbox. A notification stating
Workflow settings successfully updatedshould appear at the top of the screen. -
Go to [IBM Bluemix DevOps Services] jazzhub_url and create a new project. Name it 'assistant-shop-r-workflow', select 'Create a new repository', select 'Create a Git repo on Bluemix', and click Create.
-
Once the project has been created, click Edit Code in the top-right. In the edit code perspective, click File > New > File and name it productsWorkflow.jsflow.
-
Copy the following gist to this new file, change
<script src="https://gist.github.com/JakePeyser/9527612cf9b5d13e0400.js?file=productsWorkflow.jsflow"></script>appnameon line 13 to your app's host name and save. -
To deploy this workflow to your service, click Tools > Deploy to Workflow service. A notification stating
Workflow deployment successfulshould appear at the top of the screen.
Your workflow should now be successfully deployed to your workflow service instance! To confirm this, navigate to your workflow service and click Launch Admin Console. You can find your deployed workflows and corresponding process instances here.
The primary source of debugging information for your Bluemix app is the logs. To see them, run the following command using the Cloud Foundry CLI:
$ cf logs assistant-shop-r --recent
For more detailed information on troubleshooting your application, see the Troubleshooting section in the Bluemix documentation.
The Assistant Shop.r sample web application includes code to track deployments to Bluemix and other Cloud Foundry platforms. The following information is sent to a Deployment Tracker service on each deployment:
- Application Name (application_name)
- Space ID (space_id)
- Application Version (application_version)
- Application URIs (application_uris)
This data is collected from the VCAP_APPLICATION environment variable in IBM Bluemix and other Cloud Foundry platforms. This data is used by IBM to track metrics around deployments of sample applications to IBM Bluemix. Only deployments of sample applications that include code to ping the Deployment Tracker service will be tracked.
Deployment tracking can be disabled by removing require("cf-deployment-tracker-client").track(); from the beginning of the app.js file.