Installation and Setup
The Alexa-hue Bridge plugin interacts with Alexa devices (Echo, Dot etc). So, the first and most essential installation pre-requisite is that you have some Amazon Alexa devices (Echeo, Dot etc) to communicate with. This Plugin needs Alexa to "talk" to it!
The plugin requires Indigo 7+.
The latest version of the plugin has been developed and tested on OS X El Capitan (10.11.6) and also tested on macOS Sierra (10.12.6). It is not yet tested on macOS High Sierra (10.13).
The plugin is quite straight-forward: the first thing you’ll want to do is install it. Download the version you want from the releases section (we always recommend the most recent release but you can go back to previous releases if you want to). Once downloaded, double-click the plugin file in the Finder on your Indigo Server Mac. This will install and enable the plugin.
On the initial install there will be no Version 3 definitions for any of the Version 2 Alexa Devices previously known to an Alexa-Hue Bridge device. You will need to do an Edit Device Settings... for each Alexa-Hue Bridge. When you do this, there will be a short delay while the plugin scans Indigo devices for V2 definitions associated with the Alexa-Hue Bridge you are editing. It will convert each valid Version 2 definition it discovers to Version 3 and output a message to the Indigo Event Log.
Alexa Device (Plugin V2.x.x) 'Device One' definition detected in Indigo Device 'Device One': Converting to V3 format. Alexa Device (Plugin V2.x.x) 'Device Two' definition detected in Indigo Device 'Device Two': Converting to V3 format.
In the event that the version 2 assigned Alexa name is invalid the migration will be skipped for this device. The name can't contain a vertical bar character ('|'), a comma character (',') or a semicolon character (';'). In the event that this happens an error message will be output to the Indigo Event log, similar to:
Alexa Device (Plugin V2.x.x) 'detector, one' definition detected in Indigo Device 'Detector 1': Unable to convert as Alexa Device Name cannot contain the vertical bar character i.e. '|', the comma character i.e. ',' or the semicolon character i.e. ';'.
if you have more than 20 devices defined to a Version 2 Alexa-Hue Bridge, you will get a warning message (shown as an error to make sure you don't miss it!), similar to:
'Alexa-Hue Bridge 1' updated and now has 25 Alexa Devices published [LIMIT OF 20 DEVICES EXCEEDED - DISCOVERY MAY NOT WORK!!!] Move excess Alexa devices to another existing or new Alexa-Hue Bridge
Although the plugin will convert more than 20 Alexa devices, it may result in the discovery appearing to work from the plugin's perspective but not for Alexa.
When the Edit Device Settings displays, review the list of Published Devices and very important do a Save. Repeat this for each and every existing Alexa-Hue Bridge.
Now the next important part, use the Alexa Desktop (not iOS App) to forget all devices and then do a discovery which is best done by asking Alexa to 'Discover Devices'. If all goes to plan your devices will be discovered and your V2 definitions will have been converted to V3.
-
Background Information Note:
In Version 2 of this plugin, Alexa used the id of the Indigo Device as a unique key for each device it knew about. It used this key when sending a message to Indigo to turn on/off or dim a device. On receipt of the message, Version 2 of this plugin used this key to operate the approriate Indigo Device.
As Version 3 now supports Actions, this method wouldn't work. Internally, Version 3 now uses a 64 character sha-256 hash key to uniquely identify each Alexa Device. This is then associated with the Indigo Device or Indigo Actions as defined by the user via Edit Device Settings.
This is a non-destructive migration: This means that if you want to revert to Version 2, you can. Just install Version 2 of the plugin and it should work as before.
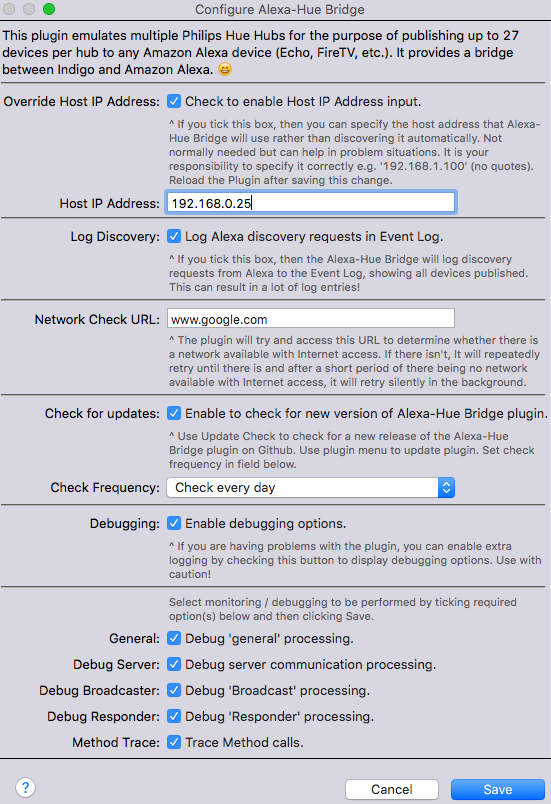
There are five configuration options for the plugin:
-
Override Host IP Address
If you tick this box, then you can specify the host address of the Apple Mac that the Alexa-Hue Bridge plugin is running on (rather than the plugin discovering it automatically). This is not normally needed but can help in problem situations.
When this is ticked, it reveals the field to enter the Host IP Address into. It is your responsibility to specify it correctly e.g. '192.168.1.100' (no quotes). Reload the Plugin after saving this change.
-
Log Discovery
If you tick this box, then the Alexa-Hue Bridge will log discovery requests from Alexa to the Event Log, showing all devices published. This can result in a lot of log entries! So now you can see what discovered devices are being sent to Alexa
Note: see the Discovery section later for a description of how this works.
-
Network Check
The plugin will try and access this URL to determine whether there is a network available with Internet access. If there isn't, It will repeatedly retry until there is and after a short period of there being no network available with Internet access, it will retry silently in the background.
-
Note:
If there is no network available, the plugin can't work and so there is no point in the plugin proceeding until the network becomes available.
-
-
Update Check
Use Update Check to check for a new release of the Alexa-Hue Bridge plugin on Github. Use the plugin menu (see later) to update plugin. Check tick box to enable checks for updates and select frequency (daily or weekly).
-
Debugging
This is not normally required but may be helpful to resolve any error situations.
When this is ticked, it reveals further debugging options.
These further options help control the amount of debugging information that’s shown in the Event Log window. This information will help track down any issues that you may experience using the plugin. We recommend only turning on debugging if you’re asked to by someone trying to help with a specific issue. Some of the debugging options are particularly chatty and will spew a lot of information so that one should really only be enabled when specifically asked.