

AutoHiC is a deep learning tool that uses Hi-C data to support genome assembly. It can automatically correct errors during genome assembly and generate chromosome-level genome.
Author: Zijie Jiang
Email: jzjlab@163.com
-
Currently AutoHiC has integrated
3d-dnainto the complete process. If you are usingYaHS,SALSA,Pin_hicetc, please read this document: Other tools -
AutoHiC updates very fast. If you have already cloned
AutoHiC, please delete theAutoHiCfolder and clone it again.

If you used AutoHiC in your research, please cite us:
AutoHiC: a deep-learning method for automatic and accurate chromosome-level genome assembly
Zijie Jiang, Zhixiang Peng, Yongjiang Luo, Lingzi Bie, Yi Wang

bioRxiv 2023.08.27.555031; doi: https://doi.org/10.1101/2023.08.27.555031# clone AutoHiC
git clone https://github.com/Jwindler/AutoHiC.git
# cd AutoHiC
cd AutoHiC
# create AutoHiC env
conda env create -f autohic.yaml
# activate AutoHiC
conda activate autohic
# configuration environment
cd ./src/models/swin
# install dependencies
pip install -e . -i https://pypi.tuna.tsinghua.edu.cn/simple/Note:
If
src/straw.cpp:34:10: fatal error: curl/curl.h: No such file or directoryis encountered during installation, enter the following commandsudo apt-get install libcurl-dev libcurl4-openssl-dev libssl-devin the terminal or refer:https://stackoverflow.com/questions/11471690/curl-h-no-such-file-or-directory.Either GPU or CPU can be installed according to the above steps, and the program will automatically identify the running configuration and environment.
If you want to use GPU, please install CUDA-11.3 and cuDNN-8.2 before.
# pull images
sudo docker pull jwindler/autohic:main

# start container
sudo docker run -it -v $(pwd):/home/autohic jwindler/autohic:main bash

# You need to use mounts (-v) to exchange files between the host filesystem on which your user can write and the container filesystem. ( Default "./" )

# clone AutoHiC
git clone https://github.com/Jwindler/AutoHiC.git

# cd AutoHiC
cd AutoHiC

# activate AutoHiC
conda activate autohic

# configuration environment
cd ./src/models/swin

# install dependencies
pip install -e . -i https://pypi.tuna.tsinghua.edu.cn/simple/Considering that many users run AutoHiC on HPC, the build dependency environment may not be very free, and Docker has root restrictions, we provide a singularity version. Detailed documentation: doc
Please select your most convenient download link below, You need to download error_model.pth, chr_model.pth , Juicer and 3d-dna for the configuration of subsequent configuration files
| Google Drive (recommend) | Baidu Netdisk (百度网盘) | Quark (夸克) |
|---|---|---|
| Pre-trained model | Pre-trained model | Pre-trained model |
- Contig level genome
- Hi-C reads
- directory structure (as below)
species_name/
├── rawdata
│   └── fastq
│       ├── SRR_X_R1.fastq.gz
│       ├── SRR_X_R2.fastq.gz
└── references
    └── contig.fasta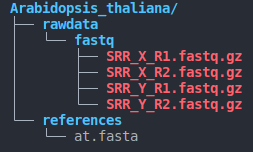
Notes:
- The directory structure must be consistent with the above image.
- Paired-end sequences must end with
X_R1.fastq.gzandX_R2.fastq.gz( also supports uncompressed formats such as :X_R1.fastqandX_R2.fastq)
Copy and edit the configuration file cft-autohic.txt in your local folder.
cft-autohic.txt example files are available in the AutoHiC directory.
To ensure run properly, please refrain from adding any additional lines to cft-autohic.txt .
- Setting the configuration file
| options | value |
|---|---|
| JOB_NAME | Name of the job |
| AutoHiC_DIR | Path to AutoHiC eg: /path_to/AutoHiC |
| RESULT_DIR | Path to AutoHiC result |
| N_CPU | Number of CPU allows per job Default: 10 |
| SPECIES_NAME | Name of the species |
| REFERENCE_GENOME | Path to reference genome |
| JUICER_DIR | Path to Juicer |
| FASTQ_DIR | Path to HiC reads (Just path to the rawdata directory, not fastq folder) |
| ENZYME | Restriction enzyme eg: "HindIII" or "MboI" |
| TD_DNA_DIR | Path to 3d-dna |
| NUMBER_OF_EDIT_ROUNDS | Specifies number of iterative rounds for misjoin correction Default: 2 Modification is not recommended. |
| ERROR_PRETRAINED_MODEL | Path to error pretrained model eg: /path/AutoHiC/src/models/cfgs/error_model.pth |
| CHR_PRETRAINED_MODEL | Path to chromosome pretrained model eg: /path/AutoHiC/src/models/cfgs/chr_model.pth |
| TRANSLOCATION_ADJUST | Whether to adjust for translocation errors Default: True |
| INVERSION_ADJUST | Whether to adjust for inversion errors Default: True |
| DEBRIS_ADJUST | Whether to adjust for debris Default: False |
| ERROR_MIN_LEN | Minimum error length Default: 15000 |
| ERROR_MAX_LEN | Maximum error length Default: 20000000 |
| ERROR_FILTER_IOU_SCORE | Overlapping error filtering threshold Default: 0.8 Modification is not recommended. |
| ERROR_FILTER_SCORE | Error filtering threshold Default: 0.9 Modification is not recommended. |
Notes:
PRETRAINED_MODELandCHR_PRETRAINED_MODELparameters come from the download path of your pre-trained model before and afterJUICER_DIRandTD_DNA_DIRparameters come from the path you downloaded and decompressed respectively (If you have already installed it in advance, you can configure it directly)
# cd AutoHiC directory
# Please modify according to your installation directory
cd /home/AutoHiC

# run
nohup python3.9 autohic.py -c cfg-autohic.txt > log.txt 2>&1 &

# nohup: Run the program ignoring pending signals
Notes:
- Please specify the absolute path of the
cft-autohic.txt- It is recommended to specify a directory for the
log.txt, It will record the running information of AutoHiC- Delete the nohup command if you don't want the program to run in the background.
- If you modify the configuration file and re-run AutoHiC, you must manually delete the previously generated result file.
- If a warning (like the image below) appears in the log while you are using it, this is normal and the program is running normally. You just have to wait for the results.

After the AutoHiC operation is completed, the following results will be obtained.
species_name/
├── AutoHiC
│   ├── autohic_results
│   │   ├── 0
│   │   ├── 1
│   │   ├── 2
│   │   ├── 3
│   │   ├── 4
│   │   └── chromosome
│   ├── data
│   │   ├── reference
│   │   └── restriction_sites
│   ├── hic_results
│   │   ├── 3d-dna
│   │   └── juicer
│   ├── logs
│   │   ├── 3d-dna.log
│   │   ├── 3_epoch.log
│   │   ├── 4_epoch.log
│   │   ├── bwa_index.log
│   │   ├── chromosome_epoch.log
│   │   └── juicer.log
│   ├── quast_output
│   │   ├── chromosome
│   │   └── contig
│   ├── chromosome_autohic.fasta
│   └── result.html
├── cfg-autohic.txt
The main output:
-
fasta file with a "
_autohic" suffix containing the output scaffolds at the chromosome level. If the size ofgenome_autohic.fastadiffers significantly from the genome, it is recommended to usegenome.FINAL.fasta(Path:/path/AutoHiC/autohic_results/chromosome) for optimal results. If the genome scaffolding effect is poor during chromosome assignment, the model may have errors in identifying chromosomes, which can lead to issues. Other scaffolding software can be used, followed by the use of AutoHiC to correct and assign the chromosomes. Please refer to Other tools. -
The
result.htmlfile, which provides detailed information before and after genome correction, where the error occurred, and a heat map of HiC interaction and chromosome length before and after. -
Please see this document for detailed results description.
If you want to run AutoHiC with sample data, you can choose from the following data.
Please follow the link provided for the selected species to download the appropriate data and organize it into the required format, can refer to : Data Preparation.
| Species | Reference genome | Hi-C Data |
|---|---|---|
| Halictus ligatus | hl.fa | SRR14251351 |
| Lasioglossum leucozonium | ll.fa | SRR14251345 |
| Schistosoma haematobium | sh.fa | SRR16086854 |
| Arachis hypogaea | peanut.fa | SRR6796709; SRR6832914 |
- Reference genome : Sample genome files are available at the
example_genomefile in the pre-trained model download link : Pre-trained model download - The default enzyme used for example data is
DpnII
cd AutoHiC

nohup python3.9 autohic.py -c cfg-autohic.txt > log.txt 2>&1 &
- Please modify the
cfg-autohic.txtfile according to the actual situation, can refer to : Configs.
The main results of AutoHiC are genome and assembly reports at the chromosome level. For a detailed description of the results, please refer to Results. At the same time, we also upload the assembly report to Google Drive for users to retrieve and view.
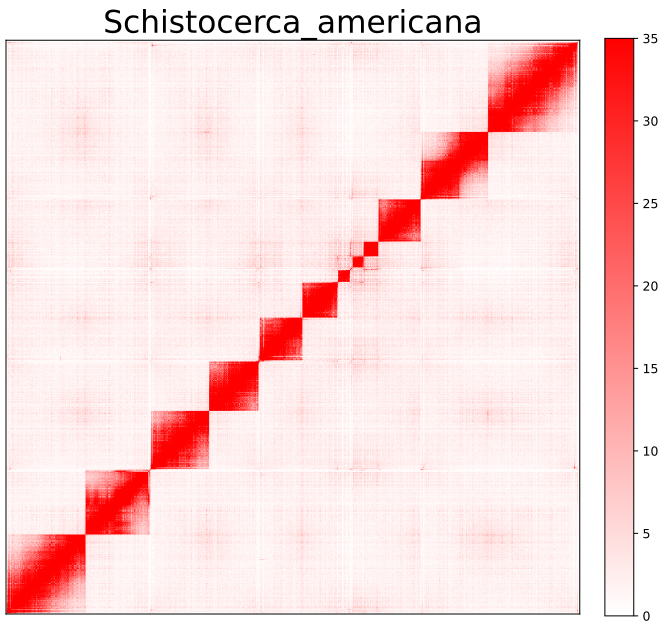
AutoHiC also provides a script to visualise the HiC interaction matrix separately.
python3.9 visualizer.py -hic example.hicFor detailed commands, please refer to the help documentation (--help)
- result
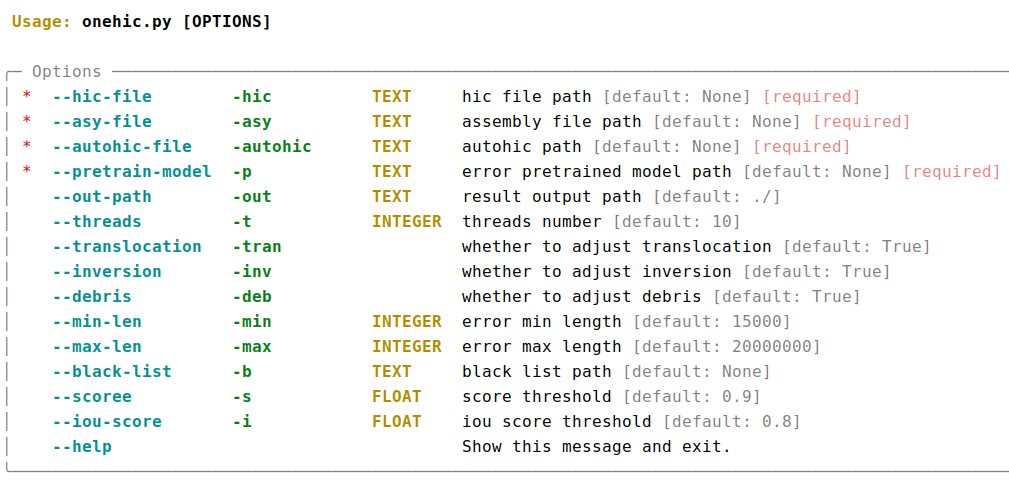
If you have already run Juicer and 3d-dna, you can use the following extended script to use AutoHiC to help you detect HiC assembly errors and generate adjusted assembly files.
# Enter the AutoHiC directory.
cd /home/ubuntu/AutoHic

# run onehic
python3.9 onehic.py -hic test.hic -asy test.assembly -autohic /home/ubuntu/AutoHic -p pretrained.pth -out ./

# run 3d-dna to get fasta
bash run-asm-pipeline-post-review.sh -r adjusted.assembly genome.fasta merged_nodups.txt

# Please specify the absolute path of each file
# adjusted.assembly is output from onehic.py
# merged_nodups.txt is output from Juicer
Notes:
.hicand.assembly: can be obtained from 3d-dna results-autohic: the parameter represents the path of AutoHiC-p: the path to the error pretrained model you downloaded before
If you want to run onehic.py with example data, please get the corresponding data from the previously linked Pre-trained model download example_onehic file.
| Species | Hi-C File | Assembly File |
|---|---|---|
| Mastacembelus armatus | Mastacembelus.hic | Mastacembelus.assembly |
| Arachis hypogaea | peanut.hic | peanut.assembly |
If your genome is very complex, the model may not be very accurate in assigning the chromosomes. It is recommended that you import the last adjustment file into Juicxbox to manually split chromosomes.
The .hic and .assembly files you need to use can be obtained from the chromosome folder under the autohic_results directory.
AutoHiC Copyright (c) 2022 Wang lab. All rights reserved.
This software is distributed under the MIT License (MIT).