Below is for Apex Legends auto shading. For Titanfall 2, go to this page.
Blender addon that auto-shades Apex Legends characters in one click, as well as other functions related to shading.
Currently supports:
- Auto Shade: One click to auto-shade model's active material.
- Recolor Import: Use recolor version of a skin to auto-shade model (by creating new material for that recolor).
- Pathfinder emote rotation toggle: Gives Pathfinder's emote mesh a value shader node, which can change Pathfinder's emote on value changed (e.g. by clicking left & right).
First, it's important that you know how to shade characters manually. I recommend that you read through this reddit post first to understand the very basics of how Apex Legends shading pipeline works.
Do note that this is just a helper tool! Learn how to shade legends manually before using this tool to fix any possible errors.
There are different Apex Shaders on the Internet. We implemented some of them, and you can choose which one to use by Right-click > Apex Shader > Choose Shader. The currently selected shader will be marked (selected) in the menu.
The implemented shader is listed below.
Cores Apex Shader: From this reddit post. CreditsCoReArtZz.- Default. (There's a lot of tutorials regarding this one.)
Apex Shader Plus 1: From ovlack/apex-info.- Seems to shader better on guns and human skin than Cores Apex Shader.
- Sometimes the overall style looks completely different (e.g.
bloodhound_v21_pilot_level03). Refer to here for more discussions. - Opacity multiply only works under Cycles but not Eevee.
Demonstration Video: https://youtu.be/p-CK_bYSK4Y
For mesh and armatures, this addon can find and import all other textures based on the auto-imported albedo texture.
Steps:
- Import Apex Legends characters.
- Choose its armature or mesh (You can choose more than one, the addon will shade all of them).
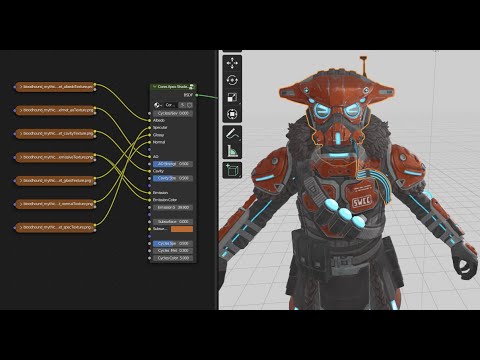
Right-click (on armature or mesh) > Apex Shader > Shade Selected Legends. All the textures (that can be procedurally shaded) will be auto-shaded, using the shader you choose.
If you choose a mesh then only that mesh will be shaded. If you choose an armature then all associated meshes will be shaded.
i.e. if you want to auto-shade the whole legend, choose their armature.
Demonstration Video: https://youtu.be/UTek2qXzxK8
If you want to omit some texture (e.g. opacityMultiplierTexture), you can select mesh / armature, and Right-click > Apex Shader > Remove Texture From Selected Legends > Remove opacityMultiplyTexture. The same goes to other kinds of texture.
This can solve some problems, such as removing bloodhound_v21_heroknight_w (Feral's Future legendary skin)'s opacityMultiplierTexture because the whole skin would look invisible with that texture applied.
Refer to Problem section below for other use-cases.
Demonstration Video: https://youtu.be/UTek2qXzxK8

You can auto-shade using a model's recolor materials exported from Legion+.
For example, if you want to use Feral's Future (bloodhound_v21_heroknight_w)'s recolor: bloodhound_lgnd_v21_heroknight_rt01, follow the steps below:
- Use Legion+ to export all related materials. After exporting, my folder structure looks like this:
Legion/
└── exported_files/
    └── materials/
        ├── bloodhound_lgnd_v21_heroknight_rt01_body/
        │   ├── bloodhound_lgnd_v21_heroknight_rt01_body_albedoTexture.png
        │   └── ...(other texture images)
        └── bloodhound_lgnd_v21_heroknight_rt01_gear/
            ├── bloodhound_lgnd_v21_heroknight_rt01_gear_albedoTexture.png
            └── ...(other texture images)
- Import the original model. In this case, Feral's Future (
bloodhound_v21_heroknight_w). - Select its armature, and
Right-click > Apex Shader > Import Recolor. - Select any folder related to the recolor, e.g.
Legion/exported_files/materials/bloodhound_lgnd_v21_heroknight_rt01_body/.- Any one of the folder will do, the addon will automatically find the other folders related to this recolor.
- i.e. you can also choose
bloodhound_lgnd_v21_heroknight_rt01_gear/if you want, the addon will still find both of them.
- i.e. you can also choose
- DO NOT CHOOSE FOLDERS LIKE
bloodhound_lgnd_v21_heroknight_rt01_body_colpass. The addon treats the last word as the mesh name, so it won't be able to find other related folders. The same goes withprepass, shadow, tightshadow, vsm. Choose folders that ends with mesh names likebody, gear, helmet, fur, etc.
- Any one of the folder will do, the addon will automatically find the other folders related to this recolor.
- Done. Enjoy.
You can also recolor a mesh instead of an armature. In that case, the addon will use the selected folder's textures directly.
Should be the same as any other addons on Github. ref. dtzxporter/io_model_semodel
- Clone this repository and zip it, or just download as zip file on Github. (
Code -> Download ZIP) Edit -> Preferences -> Add-ons -> Install..and choose the zip file.- Activate the addon by checking the box.
- You might have to search the addon if it is not shown automatically. (by the string
apexorApex Legends Auto Shader Addon).
- You might have to search the addon if it is not shown automatically. (by the string
Save Preferences.
If you want to use newer version of this addon: uninstall the older version, reopen Blender, and do the above again. There's no cleaner way to update it to my knowledge.
Some details, tricks and warnings about the addon. You can skip it if you like.
- This will delete currently existing shader nodes from active material. Should use on newly imported model / material.
- The mechanism of auto shading is to get the image directory by looking into material's
Image Texture. Some requirements are:- (All armature's) mesh's active material have at least one
Image Textureinside, and it should have a image file attached to it.- If there are multiple
Image Texture, pick one randomly.
- If there are multiple
- The
Image Texture's file name must be in the format auto-generated by Legion+.- e.g.
bloodhound_lgnd_v20_ascension_body_albedoTexture.png, i.e.<meshName>_<textureName>.<fileType> - That means unnamed texture files (e.g.
0x53237a2cdd03344e.png) cannot be imported this way.
- e.g.
- It will search through that directory (which the image file resides in) and import all similarly-named textures.
- e.g.
bloodhound_lgnd_v20_ascension_body_cavityTexture.png, i.e.<meshName>_*in wildcard.
- e.g.
- (All armature's) mesh's active material have at least one
- If the auto-shading failed and the shader nodes are ruined, you can add one
Image Texturesatisfying the above condition and try to shade it again. - Currently supported Legion-labeled textures (for Cores shader) are:
[O] albedoTexture
[O] aoTexture
[O] cavityTexture
[O] emissiveTexture
[O] glossTexture
[O] normalTexture
[O] specTexture
[O] opacityMultiplyTexture
  -> (ref. https://youtu.be/dMqk0jz749U?t=1108, may fail on some case)
[O] scatterThicknessTexture
  -> (ref. https://youtu.be/dMqk0jz749U?t=1081, may fail on some case)
[X] anisoSpecDirTexture
[X] transmittanceTintTexture
[X] emissiveMultiplyTexture
  -> Mostly animation-related so I don't really want to auto-import this. Make a github issue if you want to know how to use this texture.
[X] uvDistortionTexture

... (there may be other textures not listed here)
Some of the problem that may occur. Do note that this is just a helper addon, you should check the result and modify shader nodes when needed.
Most of those are related to Cores, but other shaders might encounter the same problem.
- When shading
bloodhound_v21_heroknight_w(Feral's Future legendary skin), the whole model would look invisible.- This is because their
opacityMultiplyTextureis not like other model's opacity multiply texture, so the auto-shade method failed. This may also occur on other models. - Remove
opacityMultiplyTexture(byRemove Texture From Selected Legends > Remove opacityMultiplyTextureon armature.)
- This is because their
- Blender stops responding when shading a lot of meshes all at once.
- (At least if you shade 10+ legends at once blender would definitely stop a bit.)
- This is normal, it's just the addon took too long processing those textures. DON'T CLOSE BLENDER and wait a while longer, it will be good soon enough... (or do close blender if you give up waiting.)
- Open console before shading (
Window > Toggle System Console) to track progress.
- Octane's skin looked orange-ish.
- Remove
scatterThicknessTextureor use Plus shader.
- Remove
- Fuse's hair is white.
- Remove
specTexture.
- Remove
- Pathfinder's lens is black.
- Just hide the lens' mesh altogether. The emission is on head.
If you encounter any issues, make an issue on Github and describe what you encounter as complete as possible. Including posting error messages, blender version and relevant file tree (e.g. material folder).
Before you post an issue, you can reinstall the addon with the newest version and try again. Sometimes this helps.