Tutorial for Git, Github & VCS for workshop at CEC.
1. Downloading Git for Windows :-
Accept the options as they are, default settings are good enough.
Before we start make sure git --version command successfully returns. If the output is something like command not found then please make sure Git is properly installed on your machine. My machine output is shown below. Output on your machine might be different.
git --version Output should be similar to:-
git version 2.36.1.windows.1
Commands that a user should type on his/her terminal are prefixed with the shell prompt symbol
$. The output of command follows the command. Also, you don't have to type$on your terminal.
2. Starting with Git :-
Once you have installed Git,
-
Create a folder . Eg :- folder1
-
Create a text file inside the created folder
E.g:- File1.txt -
Type something in the text file ‘File1’
-
Save the file
-
Right click on folder , select
Git Bash here. -
The Git terminal will then open.
2a. Configuring name & E-mail
To configure your name & email to the folder , use
git config --global user.name (your_name)
git config --global user.email (your_email)
Followed by your name & email
The command shown above populates a file named .gitconfig in your user home directory with configuration information.
cat ~/.gitconfig
[filter "lfs"]
        required = true
        clean = git-lfs clean -- %f
        smudge = git-lfs smudge -- %f
        process = git-lfs filter-process
[user]
        name = Karthik
        name = Karthik
        email = karthikprabhu23223@gmail.com
        name = Karthik
2b. init command & other basics
the git init command initializes your folder to the Git.
git init
Initialized empty Git repository in C:/Users/Karthik Prabhu/Desktop/folder1/.git/
ls command lists all the files in the computer’s folder
ls
file1.txt
git status command provides the overview of the git
Time and again we will need to know status of our Git repository. By status what we mean is the current state of the repository. E.g., what needs to be added to the index, what needs to be committed, if there is any change that we have to commit, etc., This is the command that you will use the most.
Use git status to list all new or modified files that haven't yet been committed.
git status
Output :-
$ git status
On branch master

No commits yet

Untracked files:
  (use "git add <file>..." to include in what will be committed)
        file1.txt

nothing added to commit but untracked files present (use "git add" to track)
touch <filename> command creates new files in the folder using git
touch file2.txt
Open your folder and check, you will find 2 files, file1.txt & file2.txt
What is a STAGING AREA ?
2c. Adding files to staging area
git add -A command is used to add all files of the folder to the staging area.
git add -A
git status
Output :-
On branch master

No commits yet

Changes to be committed:
  (use "git rm --cached <file>..." to unstage)
        new file:   file1.txt
        new file:   file2.txt
2d. Commit files to Git
git commit -m “your message” command commits your files from stage to Git
Once you have a smallest working change, you should commit it to your version control system. Smallest working change could be a test case, a small piece of functional code, a line or paragraph in your text file, etc. You should commit often and daily. Also, every commit should strive to do exactly one change.
After staging your changes, next step is to commit them into your local Git repository. To do that, we will use commit command as shown below.
git commit -m "first commit"$ git commit -m "first commit"
[master (root-commit) fa09c03] first commit
2 files changed, 1 insertions(+)
create mode 100644 file1.txt
create mode 100644 file2.txt
Staging and committing are two different steps in Git. You can't commit a change until it has been staged. If you are working with a tracked file, then you can do both of these steps in a single command.
Edit your git file. Make changes in file1.txt
git status
Output :-
On branch master
Changes not staged for commit:
  (use "git add <file>..." to update what will be committed)
  (use "git restore <file>..." to discard changes in working directory)
        modified:   file1.txt
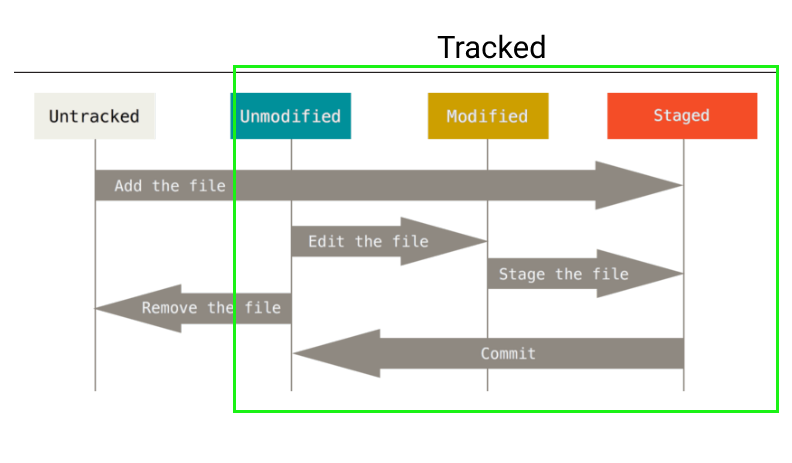
2e. git checkout
git checkout command to revert back the changes
git checkout file1.txt
Output :-
 $ git checkout file1.txt
Updated 1 path from the index
Check status
git status
Output :-
$ git status
On branch master
nothing to commit, working tree clean
You observe that the changes made are deleted. The first version of your file exists !!
Now,Make more changes into file1.txt
Add this in file1.txt
Hope you are having a good time
Git-ting it?
Add the changes to staging area
git add -A
Commit the changes from staging area to Git :-
git commit -m "Added 2 more lines"
Output :-
$ git commit -m "Added 2 more lines"
[master e019564] Added 2 more lines
1 file changed, 3 insertions(+), 1 deletion(-)
Check status again :-
git status
Output :-
$ git status
On branch master
nothing to commit, working tree clean
2nd change :-
Add this line in file1.txt
This is after 2nd change
Add to staging area :-
git add -A
Commit from staging area to Git
git commit -m "2nd change"
Output:-
[master 3cdb441] 2nd change
1 file changed, 2 insertions(+), 1 deletion(-)
2f. Git log
git log command is used to obtain the history of the previous commits
git log
Output :- will look something like this, there might be change
commit 3cdb44131c3b05d44b8a0035d35e65f55af5695c (HEAD -> master)
Author: Karthik <karthikprabhu23223@gmail.com>
Date:   Wed Nov 9 00:06:13 2022 +0530

   2nd change

commit e0195648d7026fe8d53868875deec748ec925130
Author: Karthik <karthikprabhu23223@gmail.com>
Date:   Wed Nov 9 00:04:11 2022 +0530

   Added 2 more lines

commit 7c4c26f8e86120f7a91b0edc50c1347a932bd176
Author: Karthik <karthikprabhu23223@gmail.com>
Date:   Tue Nov 8 23:43:57 2022 +0530

   first commit
2g. git diff
Git diff command :-
- Make a change in your
file1.txt - Add the following line at the end of
file1.txt:-
Change for git diff
Run in terminal :-
git diff
Output :-
$ git diff
diff --git a/file1.txt b/file1.txt
index c78ad48..3927b98 100644
--- a/file1.txt
+++ b/file1.txt
@@ -1,4 +1,5 @@
Hello everybody !!
Hope you are having a good time
Git-ting it?
-This is after 2nd change
\ No newline at end of file
+This is after 2nd change
+Change for git diff
\ No newline at end of file
2h. git rm
The git rm command is used to remove a file from git or from the staging area.
Type 1 :- Removing file from git:-
- Create a new file
waste.txt
touch waste.txt
- Add it to the staging area
git add waste.txt
- commit the file to git
git commit -a -m "Added waste.txt file to git"
Output :-
[master dea6f4d] Added waste.txt file to git
2 files changed, 2 insertions(+), 1 deletion(-)
create mode 100644 waste.txt
- Use the
git rmcommand to remove it from git
git rm waste.txt
Output :-
rm 'waste.txt'
- run
git statusto check if it is deleted
git status
Expected output :-
 $ git status
On branch master
Changes to be committed:
  (use "git restore --staged <file>..." to unstage)
        deleted:    waste.txt
Type 2 :- Removing file from the staging area
- Created a file called ‘waste.txt’
touch waste.txt
- Pushed file to stage
git add -A
- Removed file from stage using command
git rm --cached waste.txt
- Run
git statusto check the status
git status
Output :-
 S git status
 on branch master
 Changes to be comitted:
  (use "git restore --staged to unstage
         deleted:   waste. txt
 Untracked files :
         waste. txt
- The file is not deleted from computer
2i.gitignore files
Every Git repository should have another configuration file .gitignore present in the root. This file is used to specify files and file patterns that you want git to ignore .
3.Working with branches
A branch represents an independent line of development. You use branch for following:
- Develop a new feature. Once you are done with the feature, it can be merged into your main branch.
- Fix a bug.
- Your experiment playground.
By default, every git repository has one branch called master. When you create a new branch, you get a new development workspace. Any change that you make to the new working directory has no impact on your previous working directory.
git branch
git branch command lets you work with Git branches.
Let's suppose we have to implement some new functionality. To work on new functionality, we create a new branch called feature1.
git branch feature1
One thing that is important to understand here is Git branches are just pointers to commits. When you create a branch, all Git needs to do is create a new pointer; it doesn’t change the repository in any other way.