Everything you need as a developer on OpenSuse Leap 15.3

- ClamAV
- RootkitHunter
- Malware Detect
- chkrootkit
- Tiger
- Lynis
- Fail2Ban
- TcpWrapper
- EcryptFs
- Aide
- TripWire
- psad
- nmap
- Tcpdump
- Nginx Modsecurity
- Modsecurity
- HAproxy
- sshfs
- USBGuard
- MySQL Tuner
- Change Default MariaDB Port
- DDOS Deflate
sudo zypper -n install gcc build-essential cmake3 python3-dev python3-devel
udo zypper addrepo https://download.opensuse.org/repositories/windows:mingw:win64/openSUSE_Leap_15.5/windows:mingw:win64.repo && sudo zypper refresh && sudo zypper install mingw64-gcc
if You Install Other Versions of Python Like Python 3.11 You Should Install Thinker Package :
sudo zypper -n install python3.11-tk
sudo zypper refresh
sudo zypper install qt6-qml-devel
sudo zypper -n install git
Note : When you want to install git on opensuse, the opensuse package Manager also installs the graphical user interface for git. If you are not interested in the graphical interface , you can install git amd then remove git-gui:
sudo zypper remove git-gui
Mercurial is a free, distributed source control management tool. It efficiently handles projects of any size and offers an easy and intuitive interface.
sudo zypper -n install mercurial
sudo zypper -n install zsh
sh -c "$(wget https://raw.githubusercontent.com/ohmyzsh/ohmyzsh/master/tools/install.sh -O -)"
For the image to have zsh from the moment you start, add a line to the settings of the bashrc file
sudo vi ~/.bashrc
add exec zsh to end of Line and write and quit.
echo "exec zsh" >> ~/.bashrc
My .bashrc File:
# Sample .bashrc for SuSE Linux
# Copyright (c) SuSE GmbH Nuernberg

# There are 3 different types of shells in bash: the login shell, normal shell
# and interactive shell. Login shells read ~/.profile and interactive shells
# read ~/.bashrc; in our setup, /etc/profile sources ~/.bashrc - thus all
# settings made here will also take effect in a login shell.
#
# NOTE: It is recommended to make language settings in ~/.profile rather than
# here, since multilingual X sessions would not work properly if LANG is over-
# ridden in every subshell.

# Some applications read the EDITOR variable to determine your favourite text
# editor. So uncomment the line below and enter the editor of your choice :-)
#export EDITOR=/usr/bin/vim
#export EDITOR=/usr/bin/mcedit

# For some news readers it makes sense to specify the NEWSSERVER variable here
#export NEWSSERVER=your.news.server

# If you want to use a Palm device with Linux, uncomment the two lines below.
# For some (older) Palm Pilots, you might need to set a lower baud rate
# e.g. 57600 or 38400; lowest is 9600 (very slow!)
#
#export PILOTPORT=/dev/pilot
#export PILOTRATE=115200

test -s ~/.alias && . ~/.alias || true

exec zsh
Tmux is a terminal multiplexer: it’s like a power-up for terminal programming. You can manage several terminals under a session, split terminal screens, detach and re-attach sessions and much more. If you do most of your programming at the command line, you’ll find using a terminal multiplexer invaluable.
sudo zypper -n install tmux
Packman is a collection of third-party repositories that offer various additional packages for openSUSE. It is the largest external repository of openSUSE packages.
Packman repositories offer multimedia related applications and libraries, games, and network related applications, that are on the openSUSE Build Service application blacklist.
Essentials : contains codecs and audio and video player applications.
Multimedia : contains additional many more multimedia related applications.
Extra : additional non-multimedia related applications, mostly network related.
Games : provides all types of games.
To enable Packman Repository on openSUSE distribution, run the following command.
sudo zypper ar -cfp 90 http://ftp.gwdg.de/pub/linux/misc/packman/suse/openSUSE_Leap_15.0/ packman
After installing OpenSuse, we often see an error (h256 codec) that does not allow us to play videos. To solve this problem, we can either install VLC or follow the steps below:
zypper addrepo -f http://opensuse-guide.org/repo/openSUSE_Leap_15.0/ dvd
sudo zypper install ffmpeg lame gstreamer-plugins-bad gstreamer-plugins-ugly gstreamer-plugins-ugly-orig-addon gstreamer-plugins-libav libdvdcss2 vlc-codecs
sudo zypper addrepo -f http://ftp.gwdg.de/pub/linux/misc/packman/suse/openSUSE_Leap_15.5/ packman
sudo zypper addrepo -f http://opensuse-guide.org/repo/openSUSE_Leap_15.5/ dvd
sudo zypper install --allow-vendor-change ffmpeg-4 lame gstreamer-plugins-bad gstreamer-plugins-ugly gstreamer-plugins-ugly-orig-addon gstreamer-plugins-libav libavdevice57 libdvdcss2 vlc-codecs
sudo zypper dup --allow-vendor-change --from http://ftp.gwdg.de/pub/linux/misc/packman/suse/openSUSE_Leap_15.5/
sudo zypper -n install tlp tlp-rdw
sudo systemctl enable tlp
In OpenSuse, the contents of the /tmp directory are not deleted by default every boot, if you want this directory to be deleted, we create a tmp.conf file in the /etc/tmpfiles.d path.
vi /etc/tmpfiles.d/tmp.conf
add this Line
D /tmp 1777 root root -
or
Or in GUI you can chnage setting from the path system_setttng -> privacy -> purge Trash and Temporary Files -> purge After
Lshw is a nifty small command line utility that generates detailed reports about various hardware components on the system. It does so by reading different files in the /proc directory.
sudo zypper -n install lshw
Simplified Package Manager for openSUSE
wget https://codeload.github.com/KooshaYeganeh/suse/zip/refs/heads/main && unzip suse-main.zip && cd suse-main && ./Install && if [ -f "/opt/script/suse" ];then echo "suse Package Manager Installed [ OK ]" ; else echo "suse Package Manager is Not Installed [ ERROR ]" ;fi
sudo zypper -n install openconnect
sudo zypper -n install openvpn
Leap 15.3:
sudo zypper addrepo https://download.opensuse.org/repositories/network/openSUSE_Leap_15.3/network.repo
sudo zypper refresh
sudo zypper install sstp-client

1- It is true that Vim is the best text editor, but if the number of lines of your code increases and you need to open and edit many files (especially in web applications), vscode will help you.
sudo rpm --import https://packages.microsoft.com/keys/microsoft.asc
sudo sh -c 'echo -e "[code]\nname=Visual Studio Code\nbaseurl=https://packages.microsoft.com/yumrepos/vscode\nenabled=1\ntype=rpm-md\ngpgcheck=1\ngpgkey=https://packages.microsoft.com/keys/microsoft.asc" > /etc/zypp/repos.d/vscode.repo'
sudo zypper refresh
sudo zypper -n install code
sudo zypper -n install vim
These are personal settings for the Vim editor and are set for programming with Python. In order for you to have your own settings, you must first install vundle and then install your settings and plugins.
git clone https://github.com/VundleVim/Vundle.vim.git ~/.vim/bundle/Vundle.vim
vi .vimrc
This is My vimrc File
set nocompatible              " required
filetype off                  " required

" set the runtime path to include Vundle and initialize
set rtp+=~/.vim/bundle/Vundle.vim
call vundle#begin()
"
" alternatively, pass a path where Vundle should install plugins
" call vundle#begin('~/some/path/here')
"
" let Vundle manage Vundle, required
Plugin 'gmarik/Vundle.vim'
Plugin 'vim-syntastic/syntastic'
Plugin 'nvie/vim-flake8'
Plugin 'vim-scripts/indentpython.vim'
Plugin 'scrooloose/nerdtree'
Plugin 'jistr/vim-nerdtree-tabs'
Plugin 'Lokaltog/powerline', {'rtp': 'powerline/bindings/vim/'}
Plugin 'chriskempson/base16-vim'
Plugin 'wuelnerdotexe/vim-enfocado'
" add all your plugins here (note older versions of Vundle
" used Bundle instead of Plugin)
"
" ...
"
" All of your Plugins must be added before the following line
call vundle#end()            " required
filetype plugin indent on    " required

set encoding=utf-8

au BufNewFile,BufRead *.py
    \set tabstop=4
    \set softtabstop=4
    \set shiftwidth=4
    \set textwidth=79
    \set expandtab
    \set autoindent
    \set fileformat=unix


au BufRead,BufNewFile *.py,*.pyw,*.c,*.h match BadWhitespace /\s\+$/
highlight BadWhitespace ctermbg=red guibg=darkred

let NERDTreeIgnore=['\.pyc$', '\~$'] "ignore files in NERDTree
let python_highlight_all=1
syntax on


colorscheme desert

set number
set showmatch
set history=1000
set undolevels=1000
set wildignore=*.swp,*.bak,*.pyc
set visualbell
set noerrorbells
and then go to start vim and type PluginInstall to Install All Extensions on Vim.
git clone https://github.com/vlang/v && cd v && make && sudo ./v symlink
sudo zypper -n install lua

sudo rpm --import https://yum.mariadb.org/RPM-GPG-KEY-MariaDB
sudo zypper --gpg-auto-import-keys refresh
sudo zypper addrepo --gpgcheck --refresh https://yum.mariadb.org/10.7/opensuse/15/x86_64 mariadb
sudo zypper refresh
sudo zypper -n install MariaDB-server MariaDB-client
Note : To add the user and password in MariaDB's config file (so that you don't have to enter the user and password every time in your system) you must do This :
sudo vi /etc/my.cnf
add these lines to the config File:
[client]
user=mysql user
password=mysql password
SQLite is a database engine written in the C programming language and maintained by Hwaci. It is not a standalone app; rather, it is a library that software developers embed in their apps. As such, it belongs to the family of embedded databases
sudo zypper -n install sqlite3
Create a a new database
sqlite nedDB.sqlite
Delete a database
rm file.sqlite
Dump to SQL
.output filename
.dump
schema
.schema
Restore a SQL Dump
To restore a backup from a sql dump, use the command:
.read db.sql
Show tables of a database
To list every table of a database, use the command:
.table
Get database information
.dbinfo
PostgreSQL 10 is available to install on openSUSE from default repositories
sudo zypper install postgresql10-server postgresql10
sudo systemctl start postgresql
sudo systemctl enable postgresql
sudo systemctl status postgresql
First switch to the postgres user account, then access the postgres shell and set a new password for the default user as follows.
sudo su - postgres
psql
\password postgres
Configuring PostgreSQL Database Server
sudo vim /var/lib/pgsql/data/pg_hba.conf
Look for the following lines and change the authentication method to md5 as shown in the screenshot (refer to the official PostgreSQL 10 documentation to understand the different authentication methods).
# "local" is for Unix domain socket connections only
local   all             all                                     md5
# IPv4 local connections:
host    all             all             127.0.0.1/32            md5
# IPv6 local connections:
host    all             all             ::1/128                 md5
sudo systemctl restart postgresql
sudo zypper -n install influxdb
sudo zypper -n install nginx
Note : The default path of static files in the Nginix web server is a
little different from other Linuxes. In most Linuxes, it is in the /var/www/nginx
but in OpenSuse it is in the /srv/www/htdocs path.
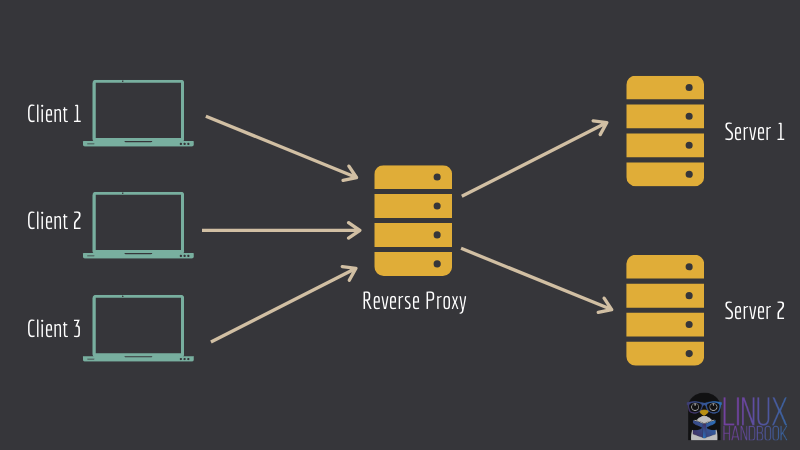
Configuring your reverse proxy
The proxy module’s proxy_pass function provides NGINX with a reverse proxy. To use proxy_pass, you must first know where you want to direct traffic. In real life, this answer varies depending upon your infrastructure, but for the purpose of this article your destination is your Python 3 fake server (located at port 8888), and not the NGINX test page.
Each web server is defined in a server block within /etc/nginx/nginx.conf. In the server, you define a location to set a specific URI. In this case, set the server’s root directory, and use the proxy_pass function to make the root of your web server a proxy to your temporary Python web server.
The default NGINX configuration file, depending on your system, may interfere with this test; so before continuing, move it to a safe place:
sudo mv /etc/nginx/nginx.conf /etc/nginx/nginx.conf-distro
Create a new /etc/nginx/nginx.conf file (indentation doesn’t matter, but semi-colons and brackets do):
worker_processes  1;

events {
    worker_connections  1024;
}

http {
    include       mime.types;
    default_type  application/octet-stream;
    sendfile        on;
    keepalive_timeout  65;

    server {
        listen       80;
        server_name  localhost;

        location / {
        proxy_pass http://localhost:8888/;
            index  index.html index.htm;
            } # end location
        } # end server
    } # end http
In real life, the value for server_name would be your fully-qualified domain name (FQDN)—such as example.com—and the value for proxy_pass would be the location you want your redirected traffic to end up. A proxy location can be referred to by its IP address or its FQDN
Testing your reverse proxy
Your reverse proxy has been created, so it’s time to test. Before restarting NGINX, test your configuration file:
sudo nginx -t
sudo systemctl restart nginx
Http Load Balancing with Nginx
sudo zypper -n install apache2
Nmap is a network scanner created by Gordon Lyon. Nmap is used to discover hosts and services on a computer network by sending packets and analyzing the responses. Nmap provides a number of features for probing computer networks, including host discovery and service and operating system detection
sudo zypper -n install nmap
Fast Scan
nmap -F 192.168.0.1
Multiple Hosts
sudo nmap 192.168.1.10/24
Excluding Hosts from Search
sudo nmap 192.168.1.0/24 --exclude 192.168.1.62
exclude from file
sudo nmap 192.168.1.0/24 --excludefile /file.txt
Scan to Detect Firewall Settings
sudo nmap -sA 192.168.0.1
Scan to See Which Servers are Active
nmap -sP 192.168.1025.0/24
Find Host Interfaces, Routes, and Packets
nmap --iflist
Create Decoys While Scanning
Nmap can also be used to create decoys, which are intended to fool firewalls. While decoys can be used for nefarious purposes, it’s generally used to debug.
sudo nmap -D 192.168.0.1,192.168.0.2,...
Wireshark is a free and open-source packet analyzer. It is used for network troubleshooting, analysis, software and communications protocol development, and education. Originally named Ethereal, the project was renamed Wireshark in May 2006 due to trademark issues
sudo zypper -n install tcpdump
Get us HTTPS traffic :
This showed some HTTPS traffic, with a hex display visible on the right portion of the output (alas, it’s encrypted). Just remember—when in doubt, run the command above with the port you’re interested in, and you should be on your way.
tcpdump -nnSX -vv port 443
Everything on an interface
tcpdump -i eth0
Find Traffic by IP
tcpdump host 1.1.1.1
Filtering by Source and/or Destination
If you only want to see traffic in one direction or the other, you can use src and dst.
tcpdump src 1.1.1.1
tcpdump dst 1.0.0.1
Finding Packets by Network
To find packets going to or from a particular network or subnet, use the net option.
tcpdump net 1.2.3.0/24
Get Packet Contents with Hex Output
Hex output is useful when you want to see the content of the packets in question, and it’s often best used when you’re isolating a few candidates for closer scrutiny.
tcpdump -c 1 -X icmp
Show Traffic Related to a Specific Port
You can find specific port traffic by using the port option followed by the port number.
tcpdump port 3389
tcpdump src port 1025
Show Traffic of One Protocol
If you’re looking for one particular kind of traffic, you can use tcp, udp, icmp, and many others as well.
tcpdump icmp
Show only IP6 Traffic
You can also find all IP6 traffic using the protocol option.
tcpdump ip6
Find Traffic Using Port Ranges
You can also use a range of ports to find traffic.
tcpdump portrange 21-23
Find Traffic Based on Packet Size
If you’re looking for packets of a particular size you can use these options. You can use less, greater, or their associated symbols that you would expect from mathematics.
tcpdump less 32
tcpdump greater 64
tcpdump <= 128
Reading / Writing Captures to a File (pcap)
It’s often useful to save packet captures into a file for analysis in the future. These files are known as PCAP (PEE-cap) files, and they can be processed by hundreds of different applications, including network analyzers, intrusion detection systems, and of course by tcpdump itself. Here we’re writing to a file called capture_file using the -w switch.
tcpdump port 80 -w capture_file
Read From File
tcpdump -r capture_file
Combinations
- AND and or &&
- OR or or ||
- EXCEPT not or !
Raw Output View
Use this combination to see verbose output, with no resolution of hostnames or port numbers, using absolute sequence numbers, and showing human-readable timestamps.
tcpdump -ttnnvvS
From specific IP and destined for a specific Port
Let’s find all traffic from 10.5.2.3 going to any host on port 3389.
tcpdump -nnvvS src 10.5.2.3 and dst port 3389
From One Network to Another
Let’s look for all traffic coming from 192.168.x.x and going to the 10.x or 172.16.x.x networks, and we’re showing hex output with no hostname resolution and one level of extra verbosity.
tcpdump -nvX src net 192.168.0.0/16 and dst net 10.0.0.0/8 or 172.16.0.0/16
Non ICMP Traffic Going to a Specific IP
This will show us all traffic going to 192.168.0.2 that is not ICMP.
tcpdump dst 192.168.0.2 and src net and not icmp
Traffic From a Host That Isn’t on a Specific Port
This will show us all traffic from a host that isn’t SSH traffic (assuming default port usage).
tcpdump -vv src mars and not dst port 22
Keep in mind that when you’re building complex queries you might have to group your options using single quotes. Single quotes are used in order to tell tcpdump to ignore certain special characters—in this case below the “( )” brackets. This same technique can be used to group using other expressions such as host, port, net, etc.
tcpdump 'src 10.0.2.4 and (dst port 3389 or 22)'
Isolate TCP Flags
You can also use filters to isolate packets with specific TCP flags set.
Isolate TCP RST flags.
tcpdump 'tcp[13] & 4!=0'
tcpdump 'tcp[tcpflags] == tcp-rst'
Isolate TCP SYN flags.
tcpdump 'tcp[13] & 2!=0'
tcpdump 'tcp[tcpflags] == tcp-syn'
Isolate packets that have both the SYN and ACK flags set.
tcpdump 'tcp[13]=18'
Isolate TCP URG flags.
tcpdump 'tcp[13] & 32!=0'
tcpdump 'tcp[tcpflags] == tcp-urg'
Isolate TCP ACK flags.
tcpdump 'tcp[13] & 16!=0'
tcpdump 'tcp[tcpflags] == tcp-ack'
Isolate TCP PSH Flags.
tcpdump 'tcp[13] & 8!=0'
tcpdump 'tcp[tcpflags] == tcp-push'
Isolate TCP FIN Flags.
tcpdump 'tcp[13] & 1!=0'
tcpdump 'tcp[tcpflags] == tcp-fin'
Everyday Recipe Examples
Wireshark is a free and open-source packet analyzer. It is used for network troubleshooting, analysis, software and communications protocol development, and education. Originally named Ethereal, the project was renamed Wireshark in May 2006 due to trademark issues
sudo zypper -n install wireshark
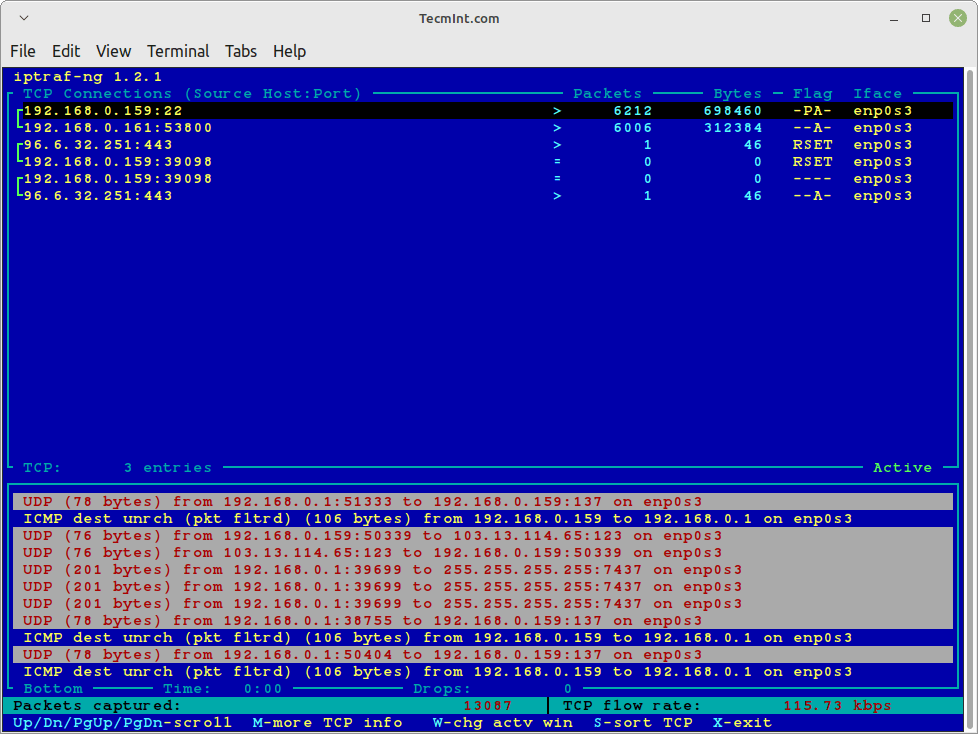
IPTraf-ng is a console-based Linux network statistics monitoring program that shows information about IP traffic, which includes information such as:
1- Current TCP connections
2- UDP, ICMP, OSPF, and other types of IP packets
3- Packet and byte counts on TCP connections
4- IP, TCP, UDP, ICMP, non-IP, and other packet and byte counts
5- TCP/UDP counts by ports
6- Packet counts by packet sizes
7- Packet and byte counts by IP address
8- Interface activity
9- Flag statuses on TCP packets
10- LAN station statistics
sudo zypper -n install iptraf-ng
is a free, powerful and cross-platform desktop application used for quickly and effectively creating diagrams. It runs on all major platforms such as Unix/Linux, Windows, and Mac OS X. yEd supports a wide variety of diagram types allowing you to create diagrams manually or import external data for manipulation or analysis.
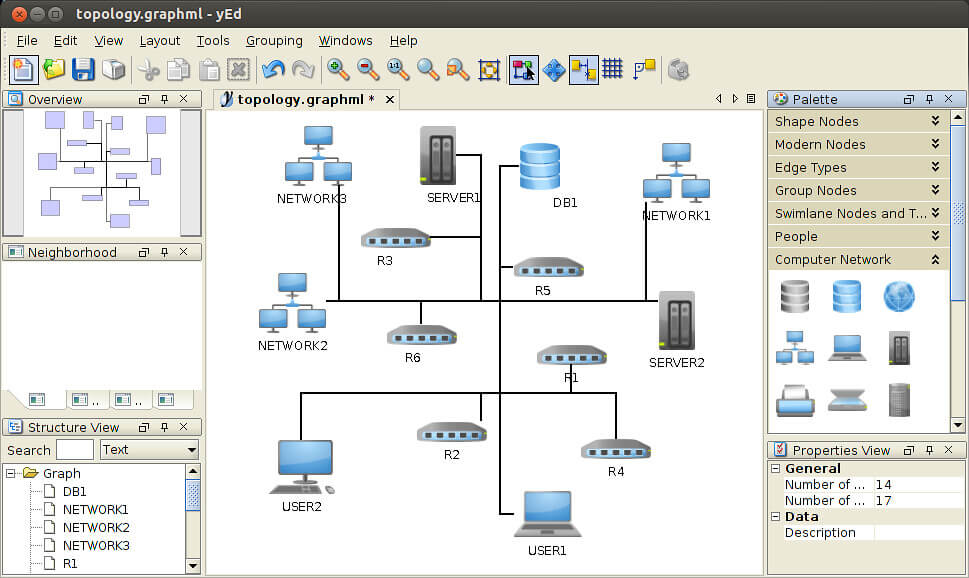
wget https://www.yworks.com/resources/yed/demo/yEd-3.22_with-JRE15_64-bit_setup.sh

sudo zypper -n install docker
sudo systemctl start docker
sudo systemctl enable docker
If you want to use ADB and Fastboot, sideload an APK or Zip, flash a custom recovery or the stock factory images, access and control your Android device using a computer, you’ll need to enable Developer Options and turn on USB Debugging. Without having them enabled, Android devices just can’t communicate with the computer. Here’s how to enable Developer Options on Android devices from different manufacturers.
OpenSuse Leap 15.3
sudo zypper addrepo https://download.opensuse.org/repositories/hardware/openSUSE_Leap_15.3/hardware.repo
sudo zypper refresh
sudo zypper install android-tools
zypper --gpg-auto-import-keys ar -f http://download.opensuse.org/repositories/CrossToolchain:/avr/openSUSE_Leap_15.3 'CrossToolchain:avr'
zypper ref
zypper in arduino
usermod -a -G dialout,lock,uucp YOURUSERNAME
picocom is a minimal dumb-terminal emulation program.
sudo zypper -n install picocom
sudo systemctl status 'systemd-tmpfiles-*'
When the systemd-tmpfiles-setup service unit is started, it runs the systemd-tmpfiles –create –remove command. The command checks for configuration files from:
/usr/lib/tmpfiles.d/.conf /run/tmpfiles.d/.conf /etc/tmpfiles.d/*.conf
If there are files and directories marked for deletion in above configuration files, the’ll be removed. For the files and directories marked for creation, they are created with the correct permissions if necessary.
cat /usr/lib/systemd/system/systemd-tmpfiles-clean.timer
Result:
#  This file is part of systemd.
#
#  systemd is free software; you can redistribute it and/or modify it
#  under the terms of the GNU Lesser General Public License as published by
#  the Free Software Foundation; either version 2.1 of the License, or
#  (at your option) any later version.

[Unit]
Description=Daily Cleanup of Temporary Directories
Documentation=man:tmpfiles.d(5) man:systemd-tmpfiles(8)

[Timer]
OnBootSec=15min
OnUnitActiveSec=1d
In above example, the systemd-tmpfiles-clean.service will be triggered 15 minutes after the system has booted up. Any other trigger happens 24 hours after the last service trigger. You can adjust the values to your liking.
If you make a change, ensure you reload service.
sudo systemctl daemon-reload
sudo systemctl enable --now systemd-tmpfiles-clean.timer
How To Manually Clean Temporary Files
Let’s configure systemd-tmpfiles to clean the /mytmp directory. This will ensure the directory does not contain files that that have not been used in the last 3 days.
You can copy the example configuration file and update it – /usr/lib/tmpfiles.d/tmp.conf
Edit the file like below.
sudo vim /etc/tmpfiles.d/mytmp.conf
Result:
See tmpfiles.d(5) for details
# Clear tmp directories separately, to make them easier to override
q /mytmp 1777 root root 3d
If you want to ensure a directoty exist with correct owneship, create a configuration like below.
d /run/mytmp 0700 root root 60s
Any file in this directory that remains unused in the last 60 seconds must be purged.
Once the file is created, use the following command to ensure the file contains the appropriate configuration.
sudo systemd-tmpfiles --create /etc/tmpfiles.d/mytmp.conf
If you don’t see any error in the output, then the it confirms that the configuration settings are correct. You can invoke a manual clean anytime with the command:
sudo systemd-tmpfiles --clean /etc/tmpfiles.d/mytmp.conf
cd /tmp && wget https://github.com/KooshaYeganeh/SUSE-JalaliDate/archive/refs/heads/main.zip && unzip main.zip && cd SUSE-JalaliDate.main && sudo cp mycal /usr/bin && rm main.zip && echo "mycal installed [ OK ]"
After installation, just enter the mycal command in the terminal
1- Downlod:
sh -c "$(curl -fsSL https://raw.githubusercontent.com/fzerorubigd/persian-fonts-linux/master/farsifonts.sh)"
2- unzip Files
3- Move ttf Files to /usr/share/fonts Directory
install SeLinux on Opensuse Leap 15.4
sudo zypper addrepo https://download.opensuse.org/repositories/security:SELinux/15.4/security:SELinux.repo
sudo zypper refresh
sudo zypper install selinux-policy
sudo zypper in selinux-policy-targeted selinux-policy-devel selinux-autorelabel
sudo zypper install i3 dmenu i3status
For sample config check my i3 config at this Link
cd /tmp && wget https://github.com/KooshaYeganeh/i3wm/archive/refs/heads/main.zip && unzip main.zip && cd i3wm-main && cp i3config ~/.config/i3/config && mkdir ~/.config/i3status && cp i3statusconfig ~/.config/i3status/config && cd && echo "i3 Installed and Configured [ OK ]"

If you are a programmer and you have a Sousse virtual server and you want to set it up for programming and security, you can use the following tools:
sudo zypper -n install clamav
Updating virus database signatures
sudo freshclam
ٔImportant Note : If an error occurs while updating the signatures, you can download the database separately and place it in your specified path.
wget https://database.clamav.net/daily.cvd
sudo mkdir /var/lib/clamav
mv daily.cvd /var/lib/clamav/daily.cvd
sudo systemctl start clamav-freshclam
Use clamAV
scan system:
sudo clamscan --infected --recursive --remove /
scan directory
sudo clamscan --infected --remove --recursive /home/koosha/Desktop
sudo zypper -n install rkhunter
Scan Linux Server for rootkits & Malware :
rkhunter --check
sudo zypper -n install wget
cd /tmp/
wget http://www.rfxn.com/downloads/maldetect-current.tar.gz
tar xfz maldetect-current.tar.gz
cd maldetect-1.6.4
./install.sh
cd
Configuring Maldet
sudo vi /usr/local/maldetect/conf.maldet
find the following lines and edit them to as below
# To enable the email notification.
email_alert="1"

# Specify the email address on which you want to receive an email notification.
email_addr="user@domain.com"

# Enable the LMD signature autoupdate.
autoupdate_signatures="1"

# Enable the automatic updates of the LMD installation.
autoupdate_version="1"

# Enable the daily automatic scanning.
cron_daily_scan="1"

# Allows non-root users to perform scans.
scan_user_access="1"

# Move hits to quarantine & alert
quarantine_hits="1"

# Clean string based malware injections.
quarantine_clean="0"

# Suspend user if malware found.
quarantine_suspend_user="1"

# Minimum userid value that be suspended
quarantine_suspend_user_minuid="500"

# Enable Email Alerting
email_alert="1"

# Email Address in which you want to receive scan reports
email_addr="you@domain.com"

# Use with ClamAV
scan_clamscan="1"

# Enable scanning for root-owned files. Set 1 to disable.
scan_ignore_root="0"
Updating Maldet First run the following command to create the correct paths for the logged-in user; you may have issues updating without doing this.
sudo /usr/local/sbin/maldet --mkpubpaths
To update the Maldet virus definitions database, execute the following command:
maldet -u
check for newer versions of the actual software, type the following command :
maldet -d
Scan with Maldet :
maldet -a /
Once the scan is completed, check the scan report by using the following command.
maldet --report
maldet --report 220127-0714.16224
Quarantine
maldet -q 220127-0714.16224
sudo zypper addrepo https://download.opensuse.org/repositories/security/15.5/security.repo && sudo zypper refresh && zypper install chkrootkit
Tiger is a free, open source collections of shell scripts for security audit and host intrusion detection, for Unix-like systems such as Linux. It’s a security checker written entirely in shell language and employs various POSIX tools in the backend. It’s major purpose is to check the system configuration and status.
wget -c http://download.savannah.gnu.org/releases/tiger/tiger-3.2rc3.tar.gz && tar -xzf tiger-3.2rc3.tar.gz && mkdir /opt/scripts && mv tiger-3.2 /opt/scripts && echo -e "tiger Script Installed [ OK ]\n" && echo "You can Find This Script in /opt/scripts/tiger-3.2 Directory"
Run
sudo ./tiger
Lynis is a battle-tested security tool for systems running Linux, macOS, or Unix-based operating system. It performs an extensive health scan of your systems to support system hardening and compliance testing
sudo zypper -n install lynis
Scan With Lynis :
sudo lynis audit system
for more Details you can use -c flag:
sudo lynis audit system -c
Fail2ban is an intrusion prevention software framework. Written in the Python programming language, it is designed to prevent against brute-force attacks. It is able to run on POSIX systems that have an interface to a packet-control system or firewall installed locally, such as iptables or TCP Wrapper
sudo zypper -n install fail2ban
Status
sudo systemctl status fail2ban
Fail2ban Configuration
The default Fail2ban installation comes with two configuration files, /etc/fail2ban/jail.conf and /etc/fail2ban/jail.d/defaults-debian.conf. It is not recommended to modify these files as they may be overwritten when the package is updated. Fail2ban reads the configuration files in the following order. Each .local file overrides the settings from the .conf file:
/etc/fail2ban/jail.conf
/etc/fail2ban/jail.d/.conf*
/etc/fail2ban/jail.local
/etc/fail2ban/jail.d/.local*
For most users, the easiest way to configure Fail2ban is to copy the jail.conf to jail.local and modify the .local file. More advanced users can build a .local configuration file from scratch. The .local file doesn’t have to include all settings from the corresponding .conf file, only those you want to override.
Create a .local configuration file from the default jail.conf file:
cd /etc/fail2ban/
sudo cp jail.conf jail.local
To start configuring the Fail2ban server open, the jail.local file with your text editor :
sudo vi /etc/fail2ban/jail.local
The file includes comments describing what each configuration option does. In this example, we’ll change the basic settings.
Whitelist IP Addresses
IP addresses, IP ranges, or hosts that you want to exclude from banning can be added to the ignoreip directive. Here you should add your local PC IP address and all other machines that you want to whitelist.
Uncomment the line starting with ignoreip and add your IP addresses separated by space:
ignoreip = 127.0.0.1/8 ::1 123.123.123.123 192.168.1.0/24
Ban Settings
The values of bantime, findtime, and maxretry options define the ban time and ban conditions.
bantime is the duration for which the IP is banned. When no suffix is specified, it defaults to seconds. By default, the bantime value is set to 10 minutes. Generally, most users will want to set a longer ban time. Change the value to your liking:
bantime = 1d
To permanently ban the IP use a negative number.
findtime is the duration between the number of failures before a ban is set. For example, if Fail2ban is set to ban an IP after five failures (maxretry, see below), those failures must occur within the findtime duration
findtime = 10m
maxretry is the number of failures before an IP is banned. The default value is set to five, which should be fine for most users.
maxretry = 5
Email Notifications
Fail2ban can send email alerts when an IP has been banned. To receive emails, you need to have an SMTP installed on your server and change the default action, which only bans the IP to %(action_mw)s, as shown below:
action = %(action_mw)s
%(action_mw)s bans the offending IP and sends an email with a whois report. If you want to include the relevant logs in the email, set the action to %(action_mwl)s.
You can also adjust the sending and receiving email addresses:
destemail = admin@linuxize.com

sender = root@linuxize.com
Fail2ban Jails
Fail2ban uses a concept of jails. A jail describes a service and includes filters and actions. Log entries matching the search pattern are counted, and when a predefined condition is met, the corresponding actions are executed.
Fail2ban ships with a number of jail for different services. You can also create your own jail configurations.
By default, only the ssh jail is enabled. To enable a jail, you need to add enabled = true after the jail title. The following example shows how to enable the proftpd jail:
[proftpd]
enabled  = true
port     = ftp,ftp-data,ftps,ftps-data
logpath  = %(proftpd_log)s
backend  = %(proftpd_backend)s
The settings we discussed in the previous section, can be set per jail. Here is an example:
[sshd]
enabled   = true
maxretry  = 3
findtime  = 1d
bantime   = 4w
ignoreip  = 127.0.0.1/8 23.34.45.56
The filters are located in the /etc/fail2ban/filter.d directory, stored in a file with the same name as the jail. If you have a custom setup and experience with regular expressions, you can fine-tune the filters.
Each time you edit a configuration file, you need to restart the Fail2ban service for changes to take effect:
sudo systemctl restart fail2ban
Fail2ban Client
Fail2ban ships with a command-line tool named fail2ban-client which you can use to interact with the Fail2ban service.
To view all available options, invoke the command with the -h option:
fail2ban-client -h
This tool can be used to ban/unban IP addresses, change settings, restart the service, and more. Here are a few examples:
Check the jail status:
sudo fail2ban-client status sshd
Unban an IP:
sudo fail2ban-client set sshd unbanip 23.34.45.56
Ban an IP:
sudo fail2ban-client set sshd banip 23.34.45.56
Vim is a free and open-source, screen-based text editor program
sudo zypper -n install vim
git clone https://github.com/VundleVim/Vundle.vim.git ~/.vim/bundle/Vundle.vim
Git is free and open source software for distributed version control: tracking changes in any set of files, usually used for coordinating work among programmers collaboratively developing source code during software development. Its goals include speed, data integrity, and support for distributed, non-linear workflows
sudo zypper -n install git
TCP Wrapper is a host-based networking ACL system, used to filter network access to Internet Protocol servers on operating systems such as Linux or BSD. It allows host or subnetwork IP addresses, names and/or ident query replies, to be used as tokens on which to filter for access control purposes
sudo zypper -n install tcpd
Understanding hosts.allow and hosts.deny
When a network request reaches your server, TCP wrappers uses hosts.allow and hosts.deny (in that order) to determine if the client should be allowed to use a given service.
By default, these files are empty, all commented out, or do not exist. Thus, everything is allowed through the TCP wrappers layer and your system is left to rely on the firewall for full protection. Since this is not desired, due to the reason we stated in the introduction, make sure both files exist:
ls -l /etc/hosts.allow /etc/hosts.deny
The syntax of both files is the same:
services : clients : option1 : option2 : ...
services is a comma-separated list of services the current rule should be applied to. clients represent the list of comma-separated hostnames or IP addresses affected by the rule. The following wildcards are accepted: ALL matches everything. Applies both to clients and services. LOCAL matches hosts without a period in their FQDN, such as localhost. KNOWN indicate a situation where the hostname, host address, or user are known. UNKNOWN is the opposite of KNOWN. PARANOID causes a connection to be dropped if reverse DNS lookups (first on IP address to determine host name, then on host name to obtain the IP addresses) return a different address in each case. Finally, an optional list of colon-separated actions indicate what should happen when a given rule is triggered.
You may want to keep in mind that a rule allowing access to a given service in /etc/hosts.allow takes precedence over a rule in /etc/hosts.deny prohibiting it. Additionally, if two rules apply to the same service, only the first one will be taken into account.
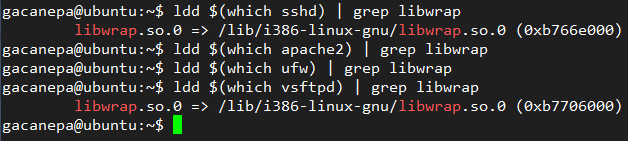
Unfortunately, not all network services support the use of TCP wrappers. To determine if a given service supports them, do:
ldd /path/to/binary | grep libwrap
If the above command returns output, it can be TCP-wrapped. An example of this are sshd and vsftpd, as shown here:
How to Use TCP Wrappers to Restrict Access to Services
As you edit /etc/hosts.allow and /etc/hosts.deny, make sure you add a newline by pressing Enter after the last non-empty line.
To allow SSH and FTP access only to 192.168.0.102 and localhost and deny all others, add these two lines in /etc/hosts.deny:
sshd,vsftpd : ALL
ALL : ALL
and the following line in /etc/hosts.allow:
sshd,vsftpd : 192.168.0.102,LOCAL
#
# hosts.deny    This file contains access rules which are used to
#       deny connections to network services that either use
#       the tcp_wrappers library or that have been
#       started through a tcp_wrappers-enabled xinetd.
#
#       The rules in this file can also be set up in
#       /etc/hosts.allow with a 'deny' option instead.
#
#       See 'man 5 hosts_options' and 'man 5 hosts_access'
#       for information on rule syntax.
#       See 'man tcpd' for information on tcp_wrappers
#
sshd,vsftpd : ALL
ALL : ALL
#
# hosts.allow   This file contains access rules which are used to
#       allow or deny connections to network services that
#       either use the tcp_wrappers library or that have been
#       started through a tcp_wrappers-enabled xinetd.
#
#       See 'man 5 hosts_options' and 'man 5 hosts_access'
#       for information on rule syntax.
#       See 'man tcpd' for information on tcp_wrappers
#
sshd,vsftpd : 192.168.0.102,LOCAL
These changes take place immediately without the need for a restart.
In the following image you can see the effect of removing the word LOCAL from the last line: the FTP server will become unavailable for localhost. After we add the wildcard back, the service becomes available again.

To allow all services to hosts where the name contains example.com, add this line in hosts.allow:
ALL : .example.com
and to deny access to vsftpd to machines on 10.0.1.0/24, add this line in hosts.deny:
vsftpd : 10.0.1.
3- Enable and Start
sudo systemctl enable hapee-2.6-lb
sudo systemctl start hapee-2.6-lb
Install additional modules
zypper search hapee-2.6r1
zypper search hapee-extras
Install a module
sudo zypper install hapee-2.6r1-lb-update
ecryptfs cryptographic filesystem (utilities) eCryptfs is a POSIX-compliant enterprise-class stacked cryptographic filesystem for Linux.
sudo zypper -n install ecryptfs-utils
AIDE (Advanced Intrusion Detection Environment) is a small yet powerful, free open source intrusion detection tool, that uses predefined rules to check file and directory integrity in Unix-like operating systems such as Linux. It is an independent static binary for simplified client/server monitoring configurations.
sudo zypper -n install aide
Aide 0.14

Compiled with the following options:

WITH_MMAP
WITH_POSIX_ACL
WITH_SELINUX
WITH_PRELINK
WITH_XATTR
WITH_LSTAT64
WITH_READDIR64
WITH_ZLIB
WITH_GCRYPT
WITH_AUDIT
CONFIG_FILE = "/etc/aide.conf"
You can open the configuration using your favorite editor.
vi /etc/aide.conf
It has directives that define the database location, report location, default rules, the directories/files to be included in the database.
Understanding Default Aide Rules
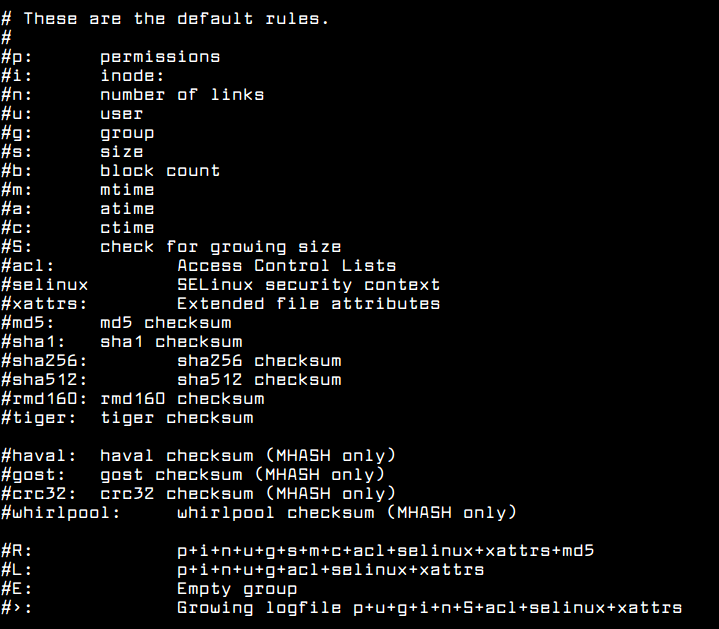
Understanding Default Aide Rules
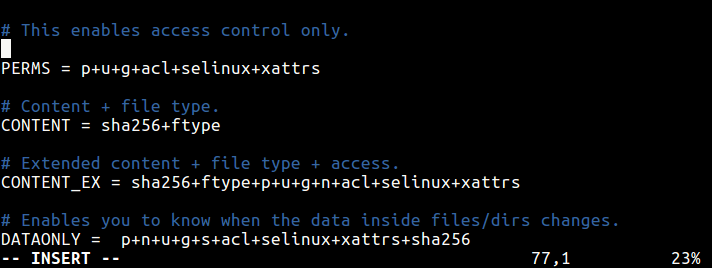
PERMS = p+u+g+acl+selinux+xattrs
The PERMS rule is used for access control only, it will detect any changes to file or directories based on file/directory permissions, user, group, access control permissions, SELinux context and file attributes.
This will only check file content and file type.
CONTENT = sha256+ftype
This is an extended version of the previous rule, it checks extended content, file type and access.
CONTENT_EX = sha256+ftype+p+u+g+n+acl+selinux+xattrs
The DATAONLY rule below will help detect any changes in data inside all files/directory.
The DATAONLY rule below will help detect any changes in data inside all files/directory.
Defining Rules to Watch Files and Directories
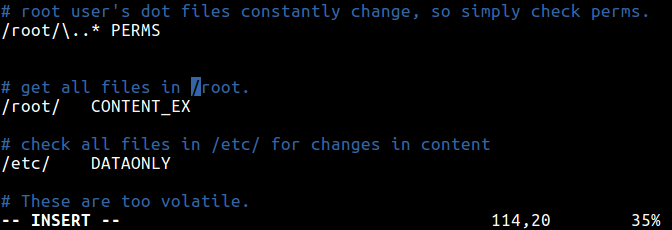
Once you have defined rules, you can specify the file and directories to watch. Considering the PERMS rule above, this definition will check permissions for all files in root directory.
/root/\..* PERMS
This will check all files in the /root directory for any changes.
/root/ CONTENT_EX
To help you detect any changes in data inside all files/directory under /etc/, use this.
/etc/ DATAONLY
Using AIDE to Check File and Directory Integrity in Linux
Start by constructing a database against the checks that will be performed using --init flag. This is expected to be done before your system is connected to a network.
The command below will create a database that contains all of the files that you selected in your configuration file.
aide --init
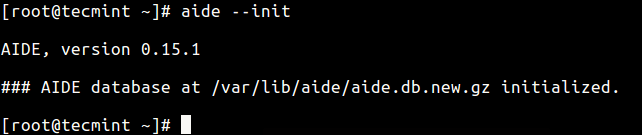
Then rename the database to /var/lib/aide/aide.db.gz before proceeding, using this command.
mv /var/lib/aide/aide.db.new.gz /var/lib/aide/aide.db.gz
It is recommended to move the database to a secure location possibly in a read-only media or on another machines, but ensure that you update the configuration file to read it from there.
After the database is created, you can now check the integrity of the files and directories using the --check flag.
aide --check
It will read the snapshot in the database and compares it to the files/directories found you system disk. If it finds changes in places that you might not expect, it generates a report which you can then review.
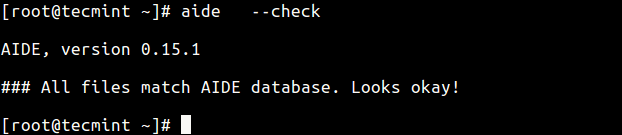
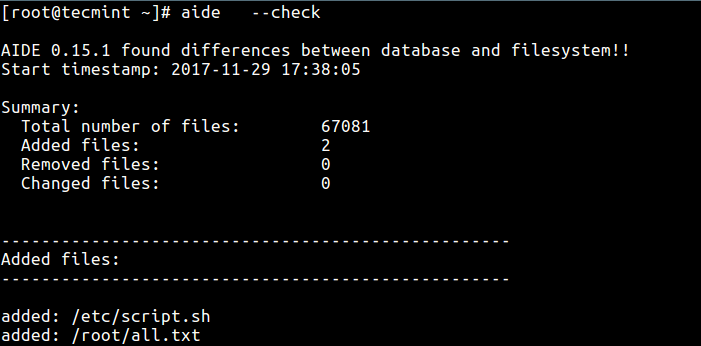
Since no changes have been made to the file system, you will only get an output similar to the one above. Now try to create some files in the file system, in areas defined in the configuration file.
# vi /etc/script.sh
# touch all.txt
Then run a check once more, which should report the files added above. The output of this command depends on the parts of the file system you configured for checking, it can be lengthy overtime.
aide --check
u need to run aide checks regularly, and in case of any changes to already selected files or addition of new file definitions in the configuration file, always update the database using the --update option:
aide --update
After running a database update, to use the new database for future scans, always rename it to /var/lib/aide/aide.db.gz:
# mv /var/lib/aide/aide.db.new.gz /var/lib/aide/aide.db.gz
- That’s all for now! But take note of these important points:
- One characteristic of most intrusion detection systems AIDE inclusive, is that they will not provide solutions to most security loop holes on a system. They however, assist in easing the the intrusion response process by helping system administrators examine any changes to system files/directories. So you should always be vigilant and keep updating your current security measures.
- It it highly recommended to keep the newly created database, the configuration file and the AIDE binary in a secure location such as read-only media (possible if you install from source).
- For additional security, consider signing the configuration and/or database.
Security is an incredibly complex problem when administering online servers. While it is possible to configure firewalls, fail2ban policies, secure services, and lock down applications, it is difficult to know for sure if you have effectively blocked every attack.
A host-based intrusion detection system (HIDS), works by collecting details about your computer’s filesystem and configuration. It then stores this information to reference and validate the current state of the system. If changes are found between the known-good state and the current state, it could be a sign that your security has been compromised.
A popular host-based intrusion detection system on Linux is tripwire. This software can keep track of many different filesystem data points in order to detect whether unauthorized changes have occurred.
In this article, we will discuss how to install and configure tripwire on an Ubuntu 12.04 installation. Due to the nature of intrusion detection systems, it is best to run through this guide shortly after creating your server, so that you can verify that the filesystem is clean.
Get supporting software from the distro
zypper in gcc make libstlport_gcc4-devel gcc45-c++ gcc-c++
Get tripwire:
mkdir /tmp/tripwire && cd /tmp/tripwire/
wget http://downloads.sourceforge.net/project/tripwire/tripwire-src/tripwire-2.4.2-src/tripwire-2.4.2-src.tar.bz2?use_mirror=iweb&ts=1280546281
tar -jxvf tripwire-2.4.2-src.tar.bz2
cd tripwire-2.4.2-src
…now, compile and install to /usr/local (this is the default, which can be changed), according to the INSTALL instructions:
./configure
make
…Edit the settings as needed in install/install.cfg and run:
make install
…It will prompt you to create and use your “site” and “local” password.
Configure Tripwire
At this point, it has built keys for you, and created sample files for you in /usr/local/etc. You need a “config” file and a “policy” file to use tripwire.
To build the configuration file, you can make a default plain-text configuration file, and just edit it to taste and move forward (you can change it later if needed).
vi /usr/local/etc/twcfg.txt
Then encode and sign the plain-text file and install it as the new configuration file:
/usr/local/sbin/twadmin --create-cfgfile --site-keyfile /usr/local/etc/site.key /usr/local/etc/twcfg.txt
A default policy text file is provided for you as well, and you’ll need to edit that to tune it to your system:
vi /usr/local/etc/twpol.txt
To encode that text policy file and install it as a working policy file for your system, build it like this:
/usr/local/sbin/twadmin --create-polfile /usr/local/etc/twpol.txt
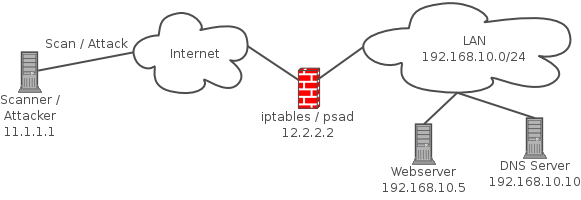
psad is a collection of three lightweight system daemons (two main daemons and one helper daemon) that run on Linux machines and analyze iptables log messages to detect port scans and other suspicious traffic. A typical deployment is to run psad on the iptables firewall where it has the fastest access to log data.
mkdir /tmp/psad
cd /tmp/psad
wget http://www.cipherdyne.org/psad/download/psad-2.2-1.x86_64.rpm
rpm -ivh psad-2.2-1.x86_64.rpm
cd ..
rm -rf psad
Edit the PSAD configuration file.
sudo vi /etc/psad/psad.conf
EMAIL_ADDRESSES - change this to your email address.
HOSTNAME - this is set during install - but double check and change to a FQDN if needed.
ENABLE_AUTO_IDS_EMAILS - set this to Y if you would like to receive email notifications of intrusions that are detected.
Add iptables LOG rules for both IPv4 and IPv6.
iptables -A INPUT -j LOG
iptables -A FORWARD -j LOG
ip6tables -A INPUT -j LOG
ip6tables -A FORWARD -j LOG
Reload and update PSAD.
psad -R
psad --sig-update
psad -H
Note : To check the status of PSAD, open a Terminal Window and enter :
psad --Status
sudo zypper -n install nmap
sudo zypper -n install tcpdump
ModSecurity web application firewall
sudo zypper -n install nginx-module-modsecurity
sudo zypper -n install modsecurity

HAProxy, which stands for High Availability Proxy, is a popular open source software TCP/HTTP Load Balancer and proxying solution which can be run on Linux, macOS, and FreeBSD.
sudo zypper -n install haproxy
SSHFS itself is a file system in user space (FUSE) that uses the SSH File Transfer Protocol (SFTP) to mount a remote file system. The sshfs command is a client tool for using SSHFS to mount a remote file system from another server locally on your machine.
sudo zypper -n install sshfs
Use sshfs
sshfs koosha@192.168.1.105:/home/koosha/Documnets ~/mnt
When you’re done with the remote file system, unmount it with the fusermount command:
fusermount -u ~/mnt
Mounting a remote file system on startup
add This Lines to /etc/fstab
koosha@opensuse:/home/koosha/Pictures /home/koosha/mnt sshfs
The USBGuard software framework provides system protection against intrusive USB devices by implementing basic whitelisting and blacklisting capabilities based on device attributes. To enforce a user-defined policy, USBGuard uses the Linux kernel USB device authorization feature. The USBGuard framework provides the following components:
1- The daemon component with an inter-process communication (IPC) interface for dynamic interaction and policy enforcement. 2- The command-line interface to interact with a running USBGuard instance. 3- The rule language for writing USB device authorization policies. 4- The C++ API for interacting with the daemon component implemented in a shared library.
install:
sudo zypper -n install usbguard
sudo zypper -n install usbguard-tools
manage:
sudo systemctl start usbguard
sudo usbguard list-devices
sudo usbguard allow-device 1 or 2
sudo usbguard block-device 1 or 2
For More Information : USBGuard Informations
If you have a MariaDB database on your server, I suggest you use this script to diagnose configuration problems and increase stability.
MainLink : https://github.com/major/MySQLTuner-perl
Download Link : https://github.com/major/MySQLTuner-perl/archive/refs/heads/master.zip
1- To change the port in the MySkill service, comment out the line that is the port and enter the desired port.
2- If you have a web application, it is better to separate the database server from the application server. In this case, the binding address must be defined for this issue.
My Configs:
sudo vi /etc/my.cnf.d/server.cnf
#
# These groups are read by MariaDB server.
# Use it for options that only the server (but not clients) should see
#
# See the examples of server my.cnf files in /usr/share/mysql/
#

# this is read by the standalone daemon and embedded servers
[server]

# this is only for the mysqld standalone daemon
[mysqld]

#
# * Galera-related settings
#
[galera]
# Mandatory settings
#wsrep_on=ON
#wsrep_provider=
#wsrep_cluster_address=
#binlog_format=row
#default_storage_engine=InnoDB
#innodb_autoinc_lock_mode=2
#
# Allow server to accept connections on all interfaces.
#
bind-address=192.168.1.100
port = 3380
#
# Optional setting
#wsrep_slave_threads=1
#innodb_flush_log_at_trx_commit=0

# this is only for embedded server
[embedded]

# This group is only read by MariaDB servers, not by MySQL.
# If you use the same .cnf file for MySQL and MariaDB,
# you can put MariaDB-only options here
[mariadb]

# This group is only read by MariaDB-10.5 servers.
# If you use the same .cnf file for MariaDB of different versions,
# use this group for options that older servers don't understand
[mariadb-10.5]
DoS Deflate is a lightweight bash shell script designed to assist in the process of blocking a denial of service attack. It utilizes the command below to create a list of IP addresses connected to the server, along with their total number of connections.
wget http://www.inetbase.com/scripts/ddos/install.sh
chmod 0700 install.sh
./install.sh
How To Check The Number Of Connected Ips:-
sh /usr/local/ddos/ddos.sh
How To Edit Configuration File:-
vi /usr/local/ddos/ddos.conf
How To Restart DDos Deflate:-
sh /usr/local/ddos/ddos.sh -c
zypper install -n wget tar gcc pkg-config pcre-devel libyaml-devel \
    libpcap-devel zlib-devel file-devel make libnetfilter_queue-devel \
    libjansson-devel mozilla-nss-devel libcap-ng-devel lua53-devel
Suricata 4
wget https://www.openinfosecfoundation.org/download/suricata-4.0.5.tar.gz
tar -xvf suricata-4.0.5.tar.gz
cd suricata-4.0.5
For Leap 15
CPPFLAGS="-I/usr/include/libnetfilter_queue/ -I/usr/include/libnfnetlink/" ./configure \
    --prefix=/usr --sysconfdir=/etc --localstatedir=/var --enable-nfqueue --enable-lua
Suricata 3
wget http://www.openinfosecfoundation.org/download/suricata-3.1.tar.gz
tar -xvzf suricata-3.1.tar.gz
cd suricata-3.1
Make
make
sudo make install
sudo ldconfig
Auto setup
You can also use the available auto setup features of Suricata:
ex:
make install-conf
make install-conf will do the regular "make install" and then it will automatically create/setup all the necessary directories and suricata.yaml for you.
make install-rules
make install-rules will do the regular "make install" and then it will automatically download and set up the latest ruleset from Emerging Threats available for Suricata
make install-full
make install-full will combine everything mentioned above (install-conf and install-rules) - and will present you with a ready to run (configured and set up) Suricata
Basic Setup
When using Debian or FreeBSD, make sure you enter all commands as root/super-user because for these operating systems it is not possible to use 'sudo' without installing and configuring it first.
Start with creating a directory for Suricata's log information.
sudo mkdir /var/log/suricata
To prepare the system for using it, enter:
sudo mkdir /etc/suricata
The next step is to copy classification.config, reference.config and suricata.yaml from the base build/installation directory (ex. from git it will be the oisf directory) to the /etc/suricata directory. Do so by entering the following:
sudo cp classification.config /etc/suricata
sudo cp reference.config /etc/suricata
sudo cp suricata.yaml /etc/suricata
Auto setup
You can also use the available auto setup features of Suricata:
ex:
./configure && make && make install-conf
The make install-conf option will do the regular "make install" and then automatically create/setup all the necessary directories and suricata.yaml.
./configure && make && make install-rules
The make install-rules option will do the regular "make install" and it automatically downloads and sets up the latest ruleset from Emerging Threats available for Suricata
./configure && make && make install-full
The make install-full option combines everything mentioned above (install-conf and install-rules) - and will present you with a ready to run (configured and set up) Suricata
Setting variables
Make sure every variable of the vars, address-groups and port-groups in the yaml file is set correctly for your needs. A full explanation is available in the Rule vars section of the yaml. You need to set the ip-address(es) of your local network at HOME_NET. It is recommended to set EXTERNAL_NET to !$HOME_NET. This way, every ip-address but the one set at HOME_NET will be treated as external. It is also possible to set EXTERNAL_NET to 'any', only the recommended setting is more precise and lowers the chance that false positives will be generated. HTTP_SERVERS, SMTP_SERVERS, SQL_SERVERS, DNS_SERVERS and TELNET_SERVERS are by default set to HOME_NET. AIM_SERVERS is by default set at 'any'. These variables have to be set for servers on your network. All settings have to be set to let it have a more accurate effect.
Next, make sure the following ports are set to your needs: HTTP_PORTS, SHELLCODE_PORTS, ORACLE_PORTS and SSH_PORTS.
  windows:[]
  bsd: []
  bsd-right: []
  old-linux: []
  linux: [10.0.0.0/8, 192.168.1.100, "8762:2352:6241:7245:E000:0000:0000:0000"]
  old-solaris: []
  solaris: ["::1"]
  hpux10: []
  hpux11: []
  irix: []
  macos: []
  vista: []
  windows2k3: []
Rule set management and download
Rule Management with suricata-update
or just download and untar the ruleset in a directory of your choosing (or yaml config setting) from here:
http://rules.emergingthreats.net/open/suricata/
or if you prefer you can download and use a VRT ruleset.
It is recommended to update your rules frequently. Emerging Threats is modified daily, VRT is updated weekly or multiple times a week.
Interface cards
To check the available interface cards, enter:
ifconfig
Now you can see which one you would like Suricata to use.
To start the engine and include the interface card of your preference, enter: Tests for errors rule Very recommended --init-errors-fatal
sudo suricata -c /etc/suricata/suricata.yaml -i wlan0 --init-errors-fatal
Instead of wlan0, you can enter the interface card of your preference.
To see if the engine is working correctly and receives and inspects traffic, enter:
cd /var/log/suricata
Followed by:
tail http.log
And:
tail -n 50 stats.log
To make sure the information displayed is up-dated in real time, use the -f option before http.log and stats.log:
tail -f http.log stats.log
Writing Effective Suricata Rules with Examples
Install Zeek on SUSE 15.4
sudo zypper addrepo https://download.opensuse.org/repositories/security:zeek/15.4/security:zeek.repo
sudo zypper refresh
sudo zypper install zeek-lts
Install Zeek on openSUSE Leap 15.4
sudo zypper addrepo https://download.opensuse.org/repositories/security:zeek/openSUSE_Leap_15.4/security:zeek.repo
sudo zypper refresh
sudo zypper install zeek-lts
Install Zeek on SLE 15 SP3
sudo zypper addrepo https://download.opensuse.org/repositories/security:zeek/SLE_15_SP3/security:zeek.repo
zypper refresh
zypper install zeek-lts
openSUSE Leap 15.5
to Install openSCAP on openSUSE Leap 15.5:
zypper addrepo https://download.opensuse.org/repositories/security/15.5/security.repo
zypper refresh
zypper install openscap
then You need to download it from openscap project repository.
wget https://raw.githubusercontent.com/OpenSCAP/openscap/maint-1.2/utils/oscap-ssh
sudo su -
chmod 755 oscap-ssh
mv -v oscap-ssh /usr/local/bin
chown root:root /usr/local/bin/oscap-ssh
furthermore we need to make keyless by adding the public key to remote host.
take the content of id_rsa.pub from home directory of user of the policy server. then go to the remote host and make authorized_keys file if not exists in home directory of user under .ssh and add whole content of id_rsa.pub of the policy server.
after that give 600 rights to authorized_keys and 700 to .ssh directory, which is placed under home directory of user.
chmod 700 /home/gopal/.ssh
chmod 600 /home/gopal/.ssh/authorized_keys
Introduction to scap security guide
scap security guide is a security policy that is written in scap document. it covers many areas of system security and provides best practices to check security audits in hosts.
In addition, this guide consists of predefined rules and remediations scripts for target hosts.
scap security guide with openscap can be used together to perform security audits in an automated way.
It implements security guidelines recommended by respected authorities PCI DSS, STIG, and USGCB.
Download this scap security guide from scap project repo and extract it.
wget https://github.com/ComplianceAsCode/content/releases/download/v0.1.50/scap-security-guide-0.1.50.zip
unzip scap-security-guide-0.1.50.zip
Now we will perform vulnerability check with the collaboration of openscap and scap security guide content in another ubuntu host which has IP 192.168.1.104. Launching compliance test:
oscap-ssh gopal@192.168.1.104 22 xccdf eval --profile xccdf_org.ssgproject.content_profile_standard --report ~/192.168.1.104.html ~/Downloads/scap-security-guide-0.1.50/ssg-ubuntu1804-ds-1.2.xml
oscap-ssh: this is a script that allows us to ssh to the remote host to check the security audit.
xccdf_org.ssgproject.content_profile_standard: this is a xccdf profile id(benchmark id) which is part of xccdf xml file.
And this is the main xccdf file “ssg-ubuntu1804-ds-1.2.xml” which we would use to check the vulnerability of hosts.
however this is in-build security rules which come with scap security guide.
After running the above command, we will get an evaluation report which explicitly displays remote hosts details with pass and fail status of various security rules.
openSCAP GitHub: https://github.com/OpenSCAP
Munin is a networked resource monitoring tool that can help analyze resource trends and "what just happened to kill our performance?" problems. It is designed to be very plug and play. A default installation provides a lot of graphs with almost no work
sudo zypper -n install munin
1- Install Zabbix repository
rpm -Uvh --nosignature https://repo.zabbix.com/zabbix/6.4/sles/15/x86_64/zabbix-release-6.4-1.sles15.noarch.rpm
zypper --gpg-auto-import-keys refresh 'Zabbix Official Repository'
2- Activate Web and Scripting Module
SUSEConnect -p sle-module-web-scripting/15/x86_64
The actual URL for web scripting module may be different depending on particular service pack. Use the following command to determine the right one.
SUSEConnect --list-extensions
3- Install Zabbix server, frontend, agent
zypper in zabbix-server-mysql zabbix-web-mysql zabbix-apache-conf-php8 zabbix-sql-scripts zabbix-agent
4- Create initial database
Make sure you have database server up and running.
Run the following on your database host.
# mysql -uroot -p
password
mysql> create database zabbix character set utf8mb4 collate utf8mb4_bin;
mysql> create user zabbix@localhost identified by 'password';
mysql> grant all privileges on zabbix.* to zabbix@localhost;
mysql> set global log_bin_trust_function_creators = 1;
mysql> quit;
n Zabbix server host import initial schema and data. You will be prompted to enter your newly created password.
zcat /usr/share/zabbix-sql-scripts/mysql/server.sql.gz | mysql --default-character-set=utf8mb4 -uzabbix -p zabbix
Disable log_bin_trust_function_creators option after importing database schema.
# mysql -uroot -p
password
mysql> set global log_bin_trust_function_creators = 0;
mysql> quit;
5- Configure the database for Zabbix server
Edit file /etc/zabbix/zabbix_server.conf
DBPassword=password
6- Start Zabbix server and agent processes
Start Zabbix server and agent processes and make it start at system boot.
systemctl restart zabbix-server zabbix-agent apache2
systemctl enable zabbix-server zabbix-agent apache2
7- Open Zabbix UI web page The default URL for Zabbix UI when using Apache web server is http://host/zabbix
sudo zypper -n install ansible
1.vagrant
sudo zypper -n install vagrant
2- To install Virtualbox on SUSE/openSUSE, run:
sudo zypper install virtualbox
Before you begin -> 1-: installing Puppet Server.
or Before You begin -> 2-:Install puppet
1 - Install a release package to enable Puppet Platform repositories.
2 - Confirm that you can run Puppet executables.
The location for Puppet’s executables is /opt/puppetlabs/bin/, which is not in your PATH environment variable by default.
The executable path doesn’t matter for Puppet services — for instance, service puppet start works regardless of the PATH — but if you’re running interactive puppet commands, you must either add their location to your PATH or execute them using their full path.
To quickly add the executable location to your PATH for your current terminal session, use the command export PATH=/opt/puppetlabs/bin:$PATH. You can also add this location wherever you configure your PATH, such as your .profile or .bashrc configuration files.
For more information, see details about file and directory locations.
3 - Install the puppet-agent package on your Puppet agent nodes using the command appropriate to your system:
sudo zypper install puppet-agent
4 - (Optional) Configure agent settings.
For example, if your master isn’t reachable at the default address, server = puppet, set the server setting to your Puppet master’s hostname with the following command: puppet config set server --section main.
For other settings you might want to change, see a list of agent-related settings.
5 - Start the puppet service: sudo /opt/puppetlabs/bin/puppet resource service puppet ensure=running enable=true.
6 - (Optional) To see a sample of Puppet agent’s output and verify any changes you may have made to your configuration settings in step 5, manually launch and watch a Puppet run: sudo /opt/puppetlabs/bin/puppet agent --test
7 - Sign certificates on the certificate authority (CA) master.
On the Puppet master : Run sudo /opt/puppetlabs/bin/puppet cert list to see any outstanding requests. Run sudo /opt/puppetlabs/bin/puppet cert sign to sign a request.
As each Puppet agent runs for the first time, it submits a certificate signing request (CSR) to the CA Puppet master. You must log into that server to check for and sign certificates. After an agent’s certificate is signed, it regularly fetches and applies configuration catalogs from the Puppet master.
Terraform is an infrastructure-as-code software tool created by HashiCorp. Users define and provide data center infrastructure using a declarative configuration language known as HashiCorp Configuration Language, or optionally JSON.
sudo zypper -n install terraform
tuned
The tuned daemon can be used to apply system tuning adjustments either dynamically, or statically. There are pre-defined tuning profiles that reflect particular workload requirements.
sudo zypper -n install tuned tuned-utils tuned-utils-systemtap
sudo systemctl start tuned
sudo tuned-adm active
sudo tuned-adm profile desktop
or
sudo tuned-adm profile balanced
for more Info to Optimize Opensuse Read Document Below:
System Analysis and Tuning Guide
sudo zypper install apache2
sudo systemctl start apache2 && sudo systemctl enable apache2 && sudo systemctl status apache2
sudo firewall-cmd --permanent --add-port=80/tcp && sudo firewall-cmd --permanent --add-port=443/tcp && sudo firewall-cmd --reload
sudo zypper install mariadb mariadb-client
sudo systemctl start mariadb && sudo systemctl enable mariadb && sudo systemctl status mariadb
sudo mysql_secure_installation
Once the script is invoked, carefully read the description at each step. You should set a strong root user password, remove anonymous users, disable remote root access, remove the test database and access to it and finally reload privileges table.
sudo zypper install php php-mysql php-gd php-mbstring apache2-mod_php7
sudo a2enmod php7
sudo systemctl restart apache2
echo "<?php phpinfo(); ?>" | sudo tee /srv/www/htdocs/info.php
mysql -u root -p
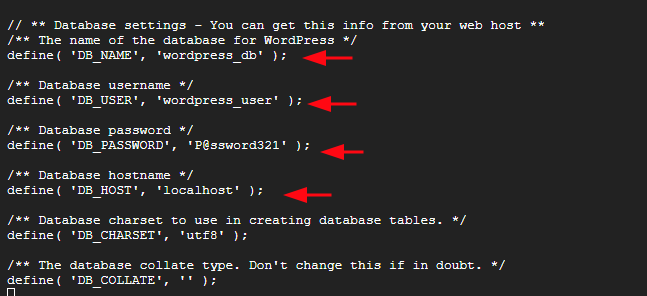
CREATE DATABASE wordpress_db;
GRANT ALL PRIVILEGES ON wordpress_db.* TO 'wordpress_user' IDENTIFIED BY 'P@ssword321';
FLUSH PRIVILEGES;
exit;
wget http://wordpress.org/latest.tar.gz
tar -xvf latest.tar.gz && mv wordpress/ /srv/www/htdocs/ && sudo cp /srv/www/htdocs/wordpress/wp-config-sample.php /srv/www/htdocs/wordpress/wp-config.php
sudo vim /srv/www/htdocs/wordpress/wp-config.php
sudo chown -R wwwrun:www /srv/www/htdocs/ && sudo chmod 775 -R /srv/www/htdocs/
sudo vim /etc/apache2/conf.d/wordpress.conf
<virtualhost *:80>
servername example.com
documentroot "/srv/www/htdocs/wordpress/"
<directory "/srv/www/htdocs/">
AllowOverride All
Require all granted
</directory>
</virtualhost>
sudo systemctl restart apache2
If after Updating OpenSuse 15.5 you have a problem with no sound in the system, run this command
sudo zypper -n install sof-firmware && sudo /sbin/ldconfig -v /usr/lib64/audacity