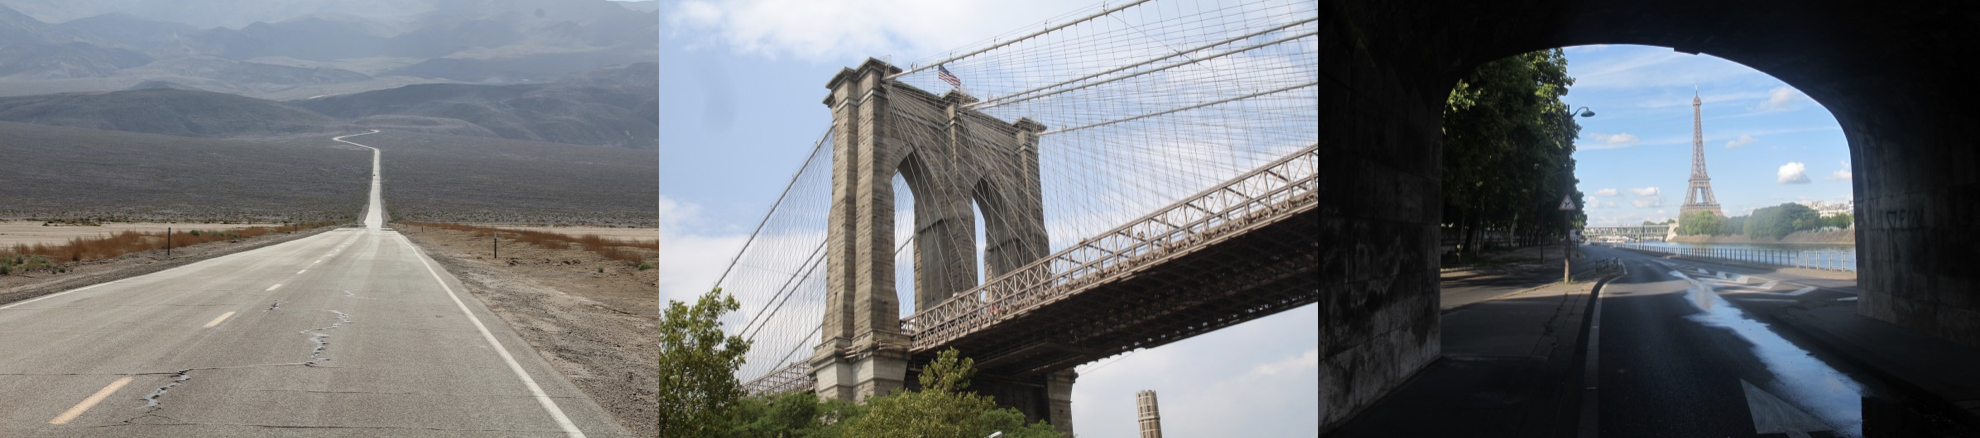
Photo sharing and photo storage services like to have location data for each photo that is uploaded. With the location data, these services can build advanced features, such as automatic suggestion of relevant tags or automatic photo organization, which help provide a compelling user experience. Although a photo's location can often be obtained by looking at the photo's metadata, many photos uploaded to these services will not have location metadata available. This can happen when, for example, the camera capturing the picture does not have GPS or if a photo's metadata is scrubbed due to privacy concerns.
If no location metadata for an image is available, one way to infer the location is to detect and classify a discernible landmark in the image. Given the large number of landmarks across the world and the immense volume of images that are uploaded to photo sharing services, using human judgment to classify these landmarks would not be feasible.
In this project, we take the first steps towards addressing this problem by building models to automatically predict the location of the image based on any landmarks depicted in the image.
The project goes through the machine learning design process end-to-end: performing data preprocessing, designing and training CNNs, and comparing the accuracy of different CNNs
A Convolutional Neural Network (CNN) is created to classify landmarks, with a focus on visualizing the dataset, preparing it for training, and building the network from scratch. Emphasis is placed on the decision-making process regarding data processing and network architecture. The best network is then exported using Torch Script.
corresponding Jupyter Notebook: cnn_from_scratch.ipynb
Try installing the notebook if it gives an error in the GitHub viewer. It seems like a common issue. Maybe it happens due to some elements in the notebook
A CNN is established for landmark classification using Transfer Learning. Different pre-trained models are explored, and a specific model is chosen for the classification task. The process includes training and testing the transfer-learned network, accompanied by an explanation of the decision-making behind selecting the pre-trained network. The optimal transfer learning solution is exported using Torch Script.
corresponding Jupyter Notebook: transfer_learning.ipynb
src folder contains a file for each function implementation along with its test cases.
The Jupyter Notebooks contain the basic structure of the project with the code to call and run all the functions together but without the actual implementation of each function.
-
Clone This repository
-
Navigate to the repo Directory:
- Open a terminal and navigate to the directory where you installed the starter kit.
-
Download and Install Miniconda:
- Follow the Miniconda installation instructions relevant to your operating system.
-
Create a New Conda Environment:
- Open a terminal and run the following commands:
conda create --name landmark python=3.7.6 pytorch=1.11.0 torchvision torchaudio cudatoolkit -c pytorch
- Open a terminal and run the following commands:
-
Activate the Environment:
- Run the following command:
conda activate landmark
Note: You will need to activate your environment every time you open a new terminal.
- Run the following command:
-
Install Required Packages:
- Run the following command:
pip install -r requirements.txt
- Run the following command:
-
Test GPU Availability:
- Execute the following command (only if you have an NVIDIA GPU on your machine with proper Nvidia drivers installed):
This should return
python -c "import torch;print(torch.cuda.is_available())"True. If it returnsFalse, your GPU cannot be recognized by PyTorch. Test withnvidia-smito check if your GPU is working. If not, check your NVIDIA drivers. If you encounter difficulties, consider using the Project Workspace instead of working locally.
- Execute the following command (only if you have an NVIDIA GPU on your machine with proper Nvidia drivers installed):
-
Install and Open Jupyter Lab:
- Run the following commands:
pip install jupyterlab
jupyter lab
- Run the following commands:
This was the third project of the "Udacity Machine Learning Fundamentals Nandegree" offered by AWS as part of the "AWS AI & ML scholarship"
Confirmation link: link