Wi-Fi LED Controller - shield for the Wemos D1 Mini ESP8266 for addressable RGB LEDs (WS2811, WS2812, APA102, etc).
This is a progect for the Wemos D1 Mini ESP8266 board that makes it easy to control addressable LED strips or strands (RGB LEDs such as WS2811, WS2812, APA102 etc.).
The Wemos D1 Mini is an excellent mini Wi-Fi development board based on the ESP8266. We've used it extensively in development of addressable RGB LED art projects such as LED Pixel Clock https://github.com/Lightwell-bg/LEDPixelClock
You can use preset effects and color control programs that allow the controllable LEDs to be displayed. Clock adjustment and manipulation is performed via buttom, WEB-interface or APP LWDevices or LWDevices2.
-
https://play.google.com/store/apps/details?id=eu.ledlightwell.lwdevices
-
https://play.google.com/store/apps/details?id=eu.ledlightwell.lwdevices2
- Control over 100 LEDs
- Lighting effects on LED strip according to a given 29 program or randomly
- Day and night mode;
- Ability to set work on a schedule because of synchronization with NTP time servers
- Control via button or WEB-interface from PC, tablet or smartphone
- High brightness
- Brightness adjustment
- Firmware update via Wi-Fi
- Information display on 3 languages: English, Russian, Bulgarian
- An option to install different alternative Open Source firmware
- Hackable: Open source hardware and firmware, Displays information read via UART
- ESP8266 (aka the ESP8266 D1 Mini): http://alii.pub/4d0k85
- 100uF 25V Capacitor
- N-Channel Enhancement Mode Power MOSFET 2N7000 (optional)
- 2 and 3 pin P=5.08mm Screw terminal
- 2.5mm 6.3mm DC005-T25 AC/DC Power Connectors
- 12VDC Round Button SPST 7.5x10.55mm Tactile Switches
- KEY-TH_4P-L6.0-W6.0-H4.3-LS7.5-P4.5 Tactile Switches
- Power supply 5V 8A - $11 from Aliexpress http://got.by/4d0ngf
Note: Using the links provided here help to support these types of projects. Thank you for the support.
You can purchase a PCB with soldered elements and connectors for connecting the indicator and sensors, or just a PCB and a set of elements for installation. https://diy-led.eu/product/christmas-wi-fi-pixel-controller-for-addressable-led/
| WeMos D1 MiniI ESP8266 | |
|---|---|
| D5 (GPIO14) | DI LED |
| D6 (GPIO12) | Button (low level active) |
Use the Arduino guide for details on how to installing and manage libraries https://www.arduino.cc/en/Guide/Libraries
The following packages and libraries are used (download and install):
- ArduinoJson by Benoit Blanchon https://github.com/bblanchon/ArduinoJson.git
- TimeLib by Michael Margolis https://github.com/PaulStoffregen/Time Michael Margolis
- Timezone https://github.com/JChristensen/Timezone
- FastLED https://github.com/FastLED/FastLED
- arduinoWebSockets https://github.com/Links2004/arduinoWebSockets
- OneButton https://github.com/mathertel/OneButton
- NetCrtESP by Lightwell https://github.com/Lightwell-bg/NetCrtESP
- ESPTimeFunc by Lightwell https://github.com/Lightwell-bg/ESPTimeFunc
Note: There could be some issues if using different versions of the libraries.
Editing the Config.h file is optional. Edit number and type of controlled LEDs. SSID and password for Wi-Fi are managed in the Web Interface. It is not required to edit the Config.h file before loading and running the code. **NOTE: **The settings in the Config.h are the default settings for the first loading. After loading you can change the settings via the Web Interface or APP. If you want to change settings again in the Config.h, you will need to erase the file system on the Wemos or use the “Reset Settings” option in the Web Interface.
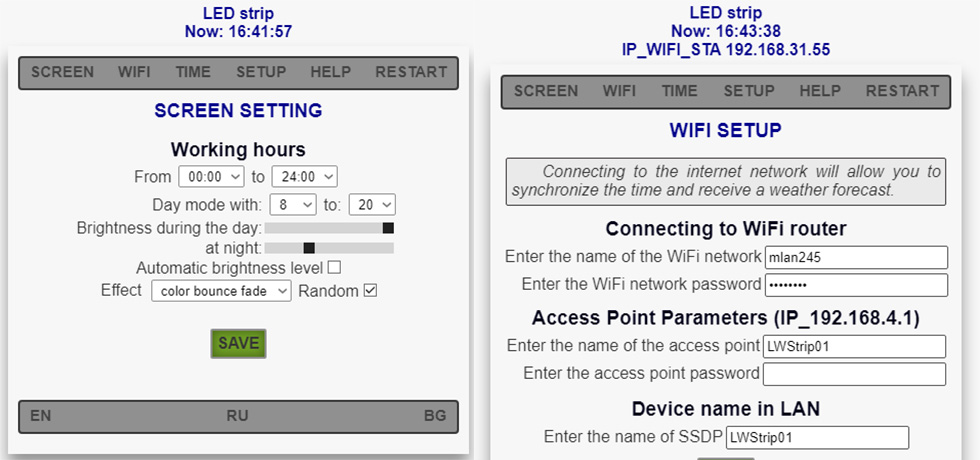
During the first time run ESP8266 will try to connect to your Wi-Fi and fail (because it doesn't have any previously saved Wi-Fi credentials). This will cause it to start up an access point, which serves up a captive configuration portal. You can connect to this access point to select and enter credentials for your network. Save configuration and restart device. (ESP8266 will restart and connect to your Wi-Fi network).
All device management is carried out using a web browser. On first power-up, Wi-Fi Pixel Controller will serve a hotspot called LWStrip01. For device adjustment and manipulation open a webpage with the 192.168.4.1 address. Within this hotspot you can manually override the time and date, show effect, brightness and update software.
For Wi-Fi network connection please input its SSID and password. After successful connection **Wi-Fi Pixel Controller **will begin to receive and transmit information over the Internet. NTP servers are used to get accurate time.
With the button you can control the following functions:
- One click - changing the effect of LED strip
- Double click – On/Off strip
- Long press – change brightness