![]()
This is an e-commerce website for collectibles products that I created for Milestone Project 4 (Full Stack Frameworks with Django) in Code Institute, Ireland. The use of the website is for educational purposes only, yet all of the features function as if it were a legitimate e-commerce site. It is a mobile-friendly website and the link to the website is available HERE.
For the website, there are two sorts of users. One type of consumer is someone who wants to look at collectibles and buy them online. The store owner, on the other hand, is primarily concerned with selling collectibles and running a business. I am a full-stack web developer who created an e-commerce website to help users achieve their core goals and tell their stories.
Shopper's User Story

Note:
ID9: Only a keyword is used in the search function.
Owner's User Story

Note:
ID5: Products should never be deleted on a real e-commerce website; instead, they should be made unavailable or something similar. There is a delete products feature because this is an instructional website that should use CRUD.
All of the functions and features listed in the tables below are minimal needs for achieving the user's major goals and stories defined in the User Stories section, and they are implemented in the website. (On a scale of 1 [least] - 5 [most])
| Opportunity | Importance | Viability / Feasibility |
|---|---|---|
| Displaying products by group of categories | 5 | 5 |
| Displaying products by category | 5 | 5 |
| Viewing product details | 5 | 4 |
| Search Function | 4 | 5 |
| Sorting Function | 4 | 5 |
| Modifying products in shopping bag | 5 | 4 |
| Checkout Function | 5 | 4 |
| Secure payment | 5 | 4 |
| Written confirmation after purchase | 5 | 5 |
| Create an account | 4 | 4 |
| Updating personal details | 4 | 5 |
| Resetting password | 4 | 4 |
| Email subscription | 3 | 4 |
| Add, Edit, Remove products (Admin only) | 4 | 4 |
Listed below are the extra functions and features that can improve the website, although they are not required to accomplish the present user goals and stories. Some are not executed because I don't have the necessary skills and knowledge yet, while others are due to a lack of time.
| Opportunity | Importance | Viability / Feasibility |
|---|---|---|
| Displaying number of product images per product | 4 | 2 |
| (e.g. Image from front, side, back) | ||
| Enlarging image when hovering | 3 | 2 |
| Refinements options* | 3 | 2 |
| More detailed categories and advertisement | 3 | 2 |
| Creating account with social media | 3 | 2 |
| Product comparison** | 3 | 1 |
| Payment in different currencies | 2 | 1 |
The following is a list of required pages with features and functions based on the needs of accomplishing user and owner objectives and stories. The admin user's product management requires the implementation of CRUD (Create, Read, Update, and Delete) functions on the website.
- The aim of the website is evident to everybody, and even first-time users know how to browse the website because of the simple design of the Home page. Groups of categories (e.g. Action Figures | Statues | Others) with subcategories (e.g. Others --> Jewelry | Prop Replica | Helm) are clearly displayed.
- Users can examine all of the products that belong to the group on product pages organized by category. This page directs users to the categories in this group.
- Product pages by category, which allow consumers to see all of the products that fall under that category.
- Users may view all of the product details on the product details page. Users can also choose preferences (for example, kind) and place the product in a bag.
- Users can view all of their selected products on the Shopping Bag page before making a purchase. Users can alter the product's quantity or remove it entirely.
- Users can give shipping information and credit card information on the checkout page.
- Users receive confirmation of their purchase on the checkout success page.
- Users can establish an account on this website to preserve their shipping addresses and examine order history.
- Users can log in to the page via the login page.
- Users can view their personal information and order histories on the profile page.
- Users can safely log out of the website using the logout function, which returns them to the main page.
- Admins can add, update, and delete products on the Product Management pages (only for admins).
- When users visit a page that does not exist or is invalid, they are safely redirected to the home page through 404 and 500 pages.
— Front-end —
The website is composed of below core HTML pages and has some CSS and JavaScript
-
Home (
index.html)
This is the website's main page. There is a logo, as well as a search function, navigation to Group of Categories & Categories, Register & Login and Shopping bag pages, a hero image with Shop Now button included. Users can click on the icons of well-known brands to see the brands' items easily shopping by brand. There is a section called "Why LoTR Collectibles?" that explains why you should buy from the shop. There is a footer with a subscription form to register to newsletter and some social icons. *All of the html files have the same header and footer. -
Products (
products.html,products/<category_name>.html)
Users can view products by a group of categories and categories, as well as access the product details page, on these sites. -
Product Details (
product/<product_id>.html)
The pages where users can view product details and add items to their shopping bag by selecting criteria (e.g. kind). -
Shopping bag (
bag.html)
Users may examine all of the selected products and their details on this page. Users have the ability to change the number and remove products. For the final phase of the purchase process, there is a button that takes you to a checkout page. -
Checkout (
checkout.html)
This is the page where users can complete their purchase. Stripe, a secure platform for credit card payments, is utilized to process payments on the website. -
Checkout Success (
checkout_success.html)
When the payment procedure is complete, users are directed to a confirmation page. The order number, shipping address, and product details are all visible to users. This page can be accessed from the Profile page for registered users. -
Register (
signup.html)
Users can establish an account on this page to save their information for future purchasing and to keep track of their purchases. The Django Allauth package is used to generate a form with a built-in function. -
Login (
login.html)
Users can use this page to log in to the website and visit the Profile page to view their personal information and purchasing history. The Django Allauth package is used to generate a form with a built-in function. -
Profile (
profile.html)
Users can view their personal information and purchase histories on this website. -
Add Products (
add_products.html)
Only Admin has access to this page, which allows them to add a new product to the website. -
Edit Products (
edit_products.html)
Only Admin has access to this page and may edit products. -
Page 404 & 500 (
404.html,500.html)
When a page is not accessible or is invalid, the error pages appear, and users are safely sent to the Home page. -
Base Templates (
base.htmlandbase.css)
The template papers contain fundamental html and css components and are used in conjunction with other html files. -
Admin (
/admin)
The admin panel, which can be built with a Django project and allows the administrator to manage products and other data. -
CSS & JavaScript (
.css&.js)
CSS and JavaScript files of those HTML files are created in the same folder as the app.
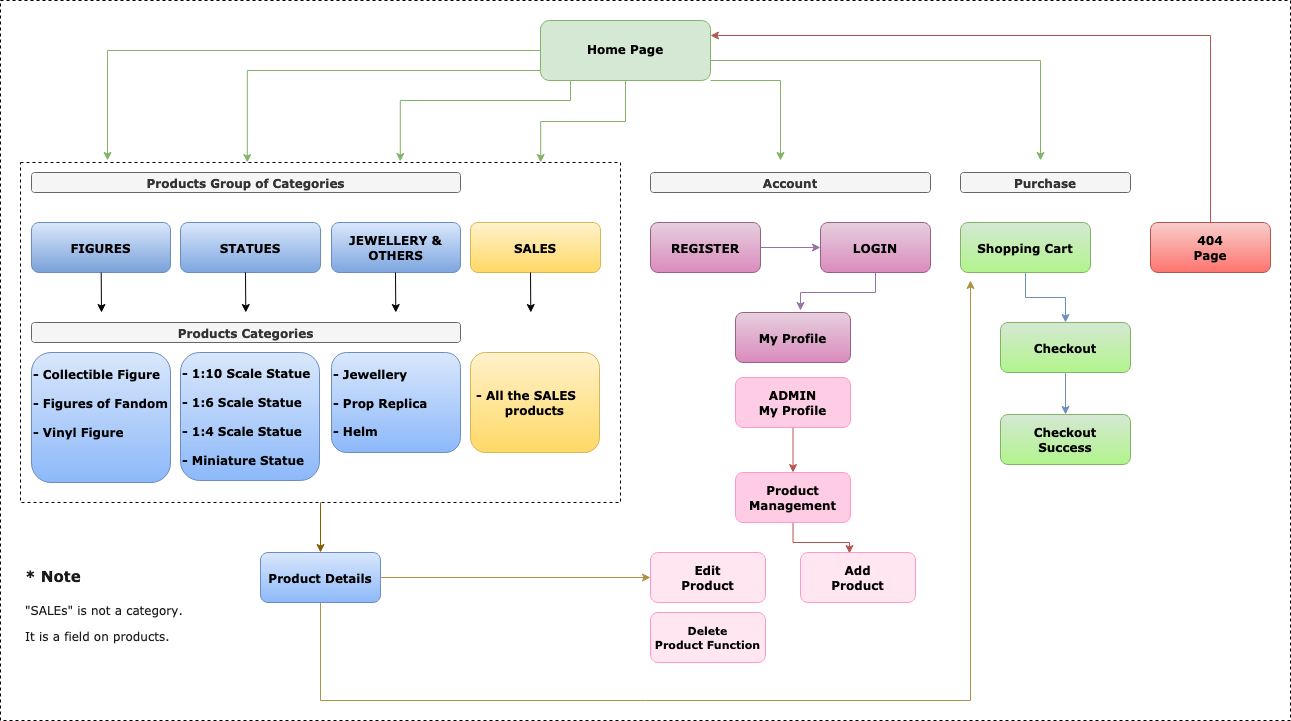
The website's flowchart, which depicts the key relationships between the pages, is shown below. (The majority of the pages are connected to one another with permission.)
— Back-end —
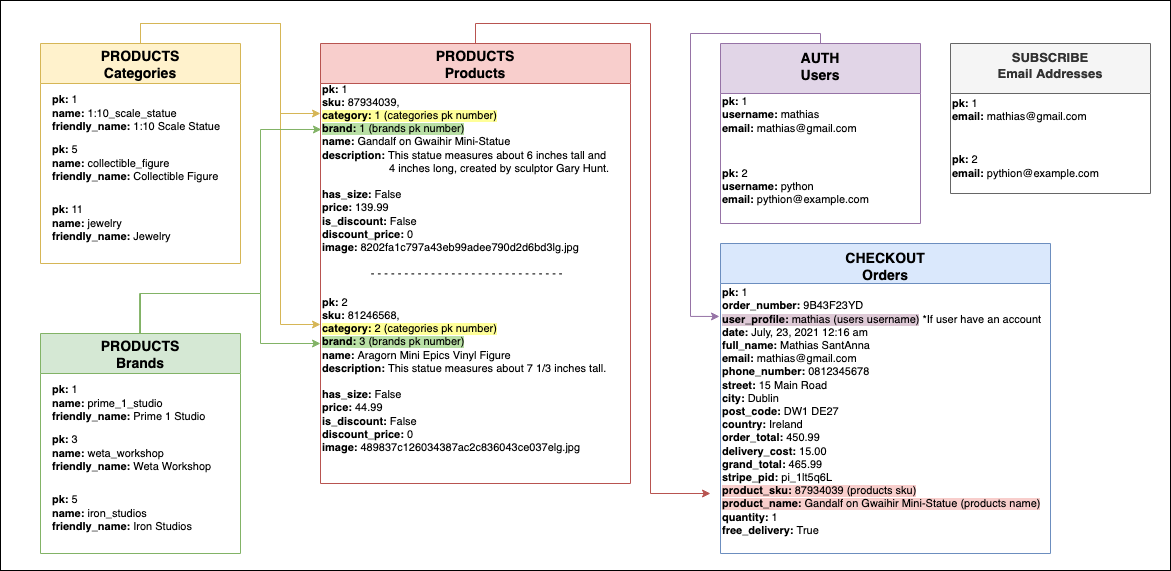
Users can purchase things as either guest users or account holders. Guest users are unable to preserve personal information for future purchases since personal information such as their name, email address, shipping address, and other details are associated with their order in the database. Account holder users who register an account with their email address and username, user name (user profile) is connected with their orders allowing personal information to be obtained. Each product is assigned to a category and a brand, both of which are identifiable by an id. Each order has a unique order number that is produced when the order is processed, as well as information on the shopper and the goods.
In development mode, SQLite, a Django built-in database, is used, whereas in production mode, Heroku Postgre is used. All static files and folders for the website in production mode are stored on AWS (Amazon Web Services).
The database's data relationships are displayed in the chart below.
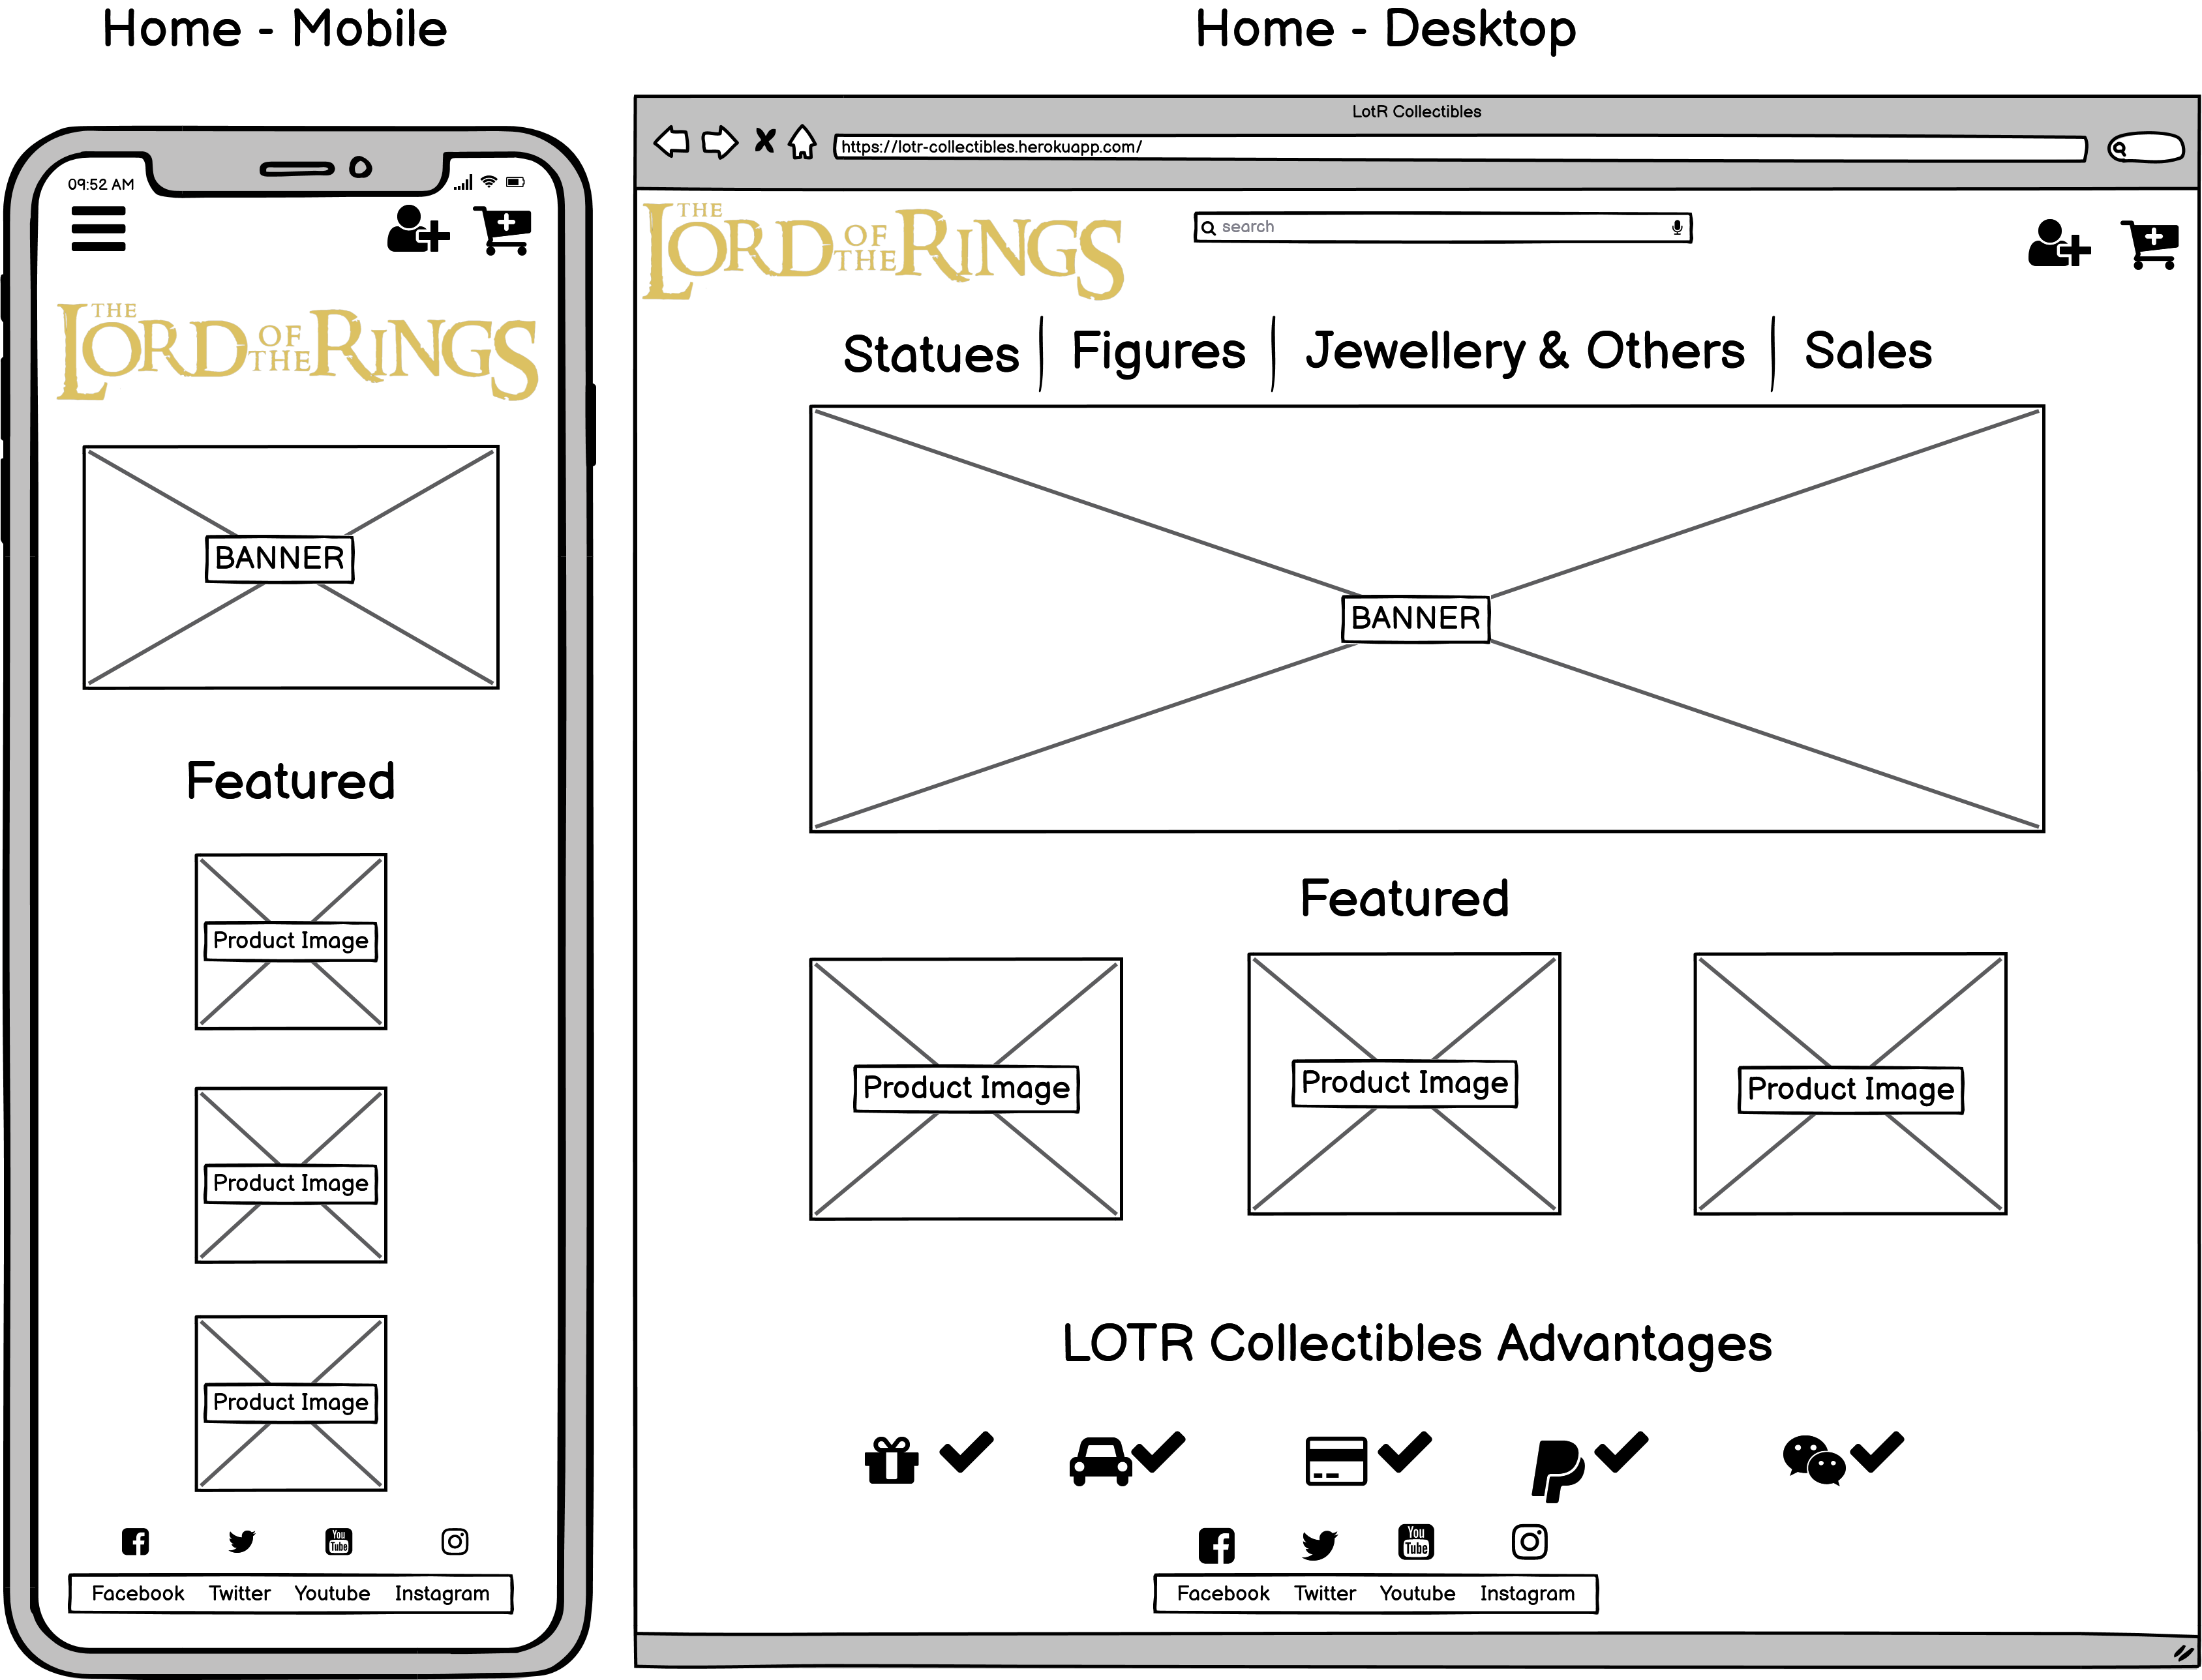
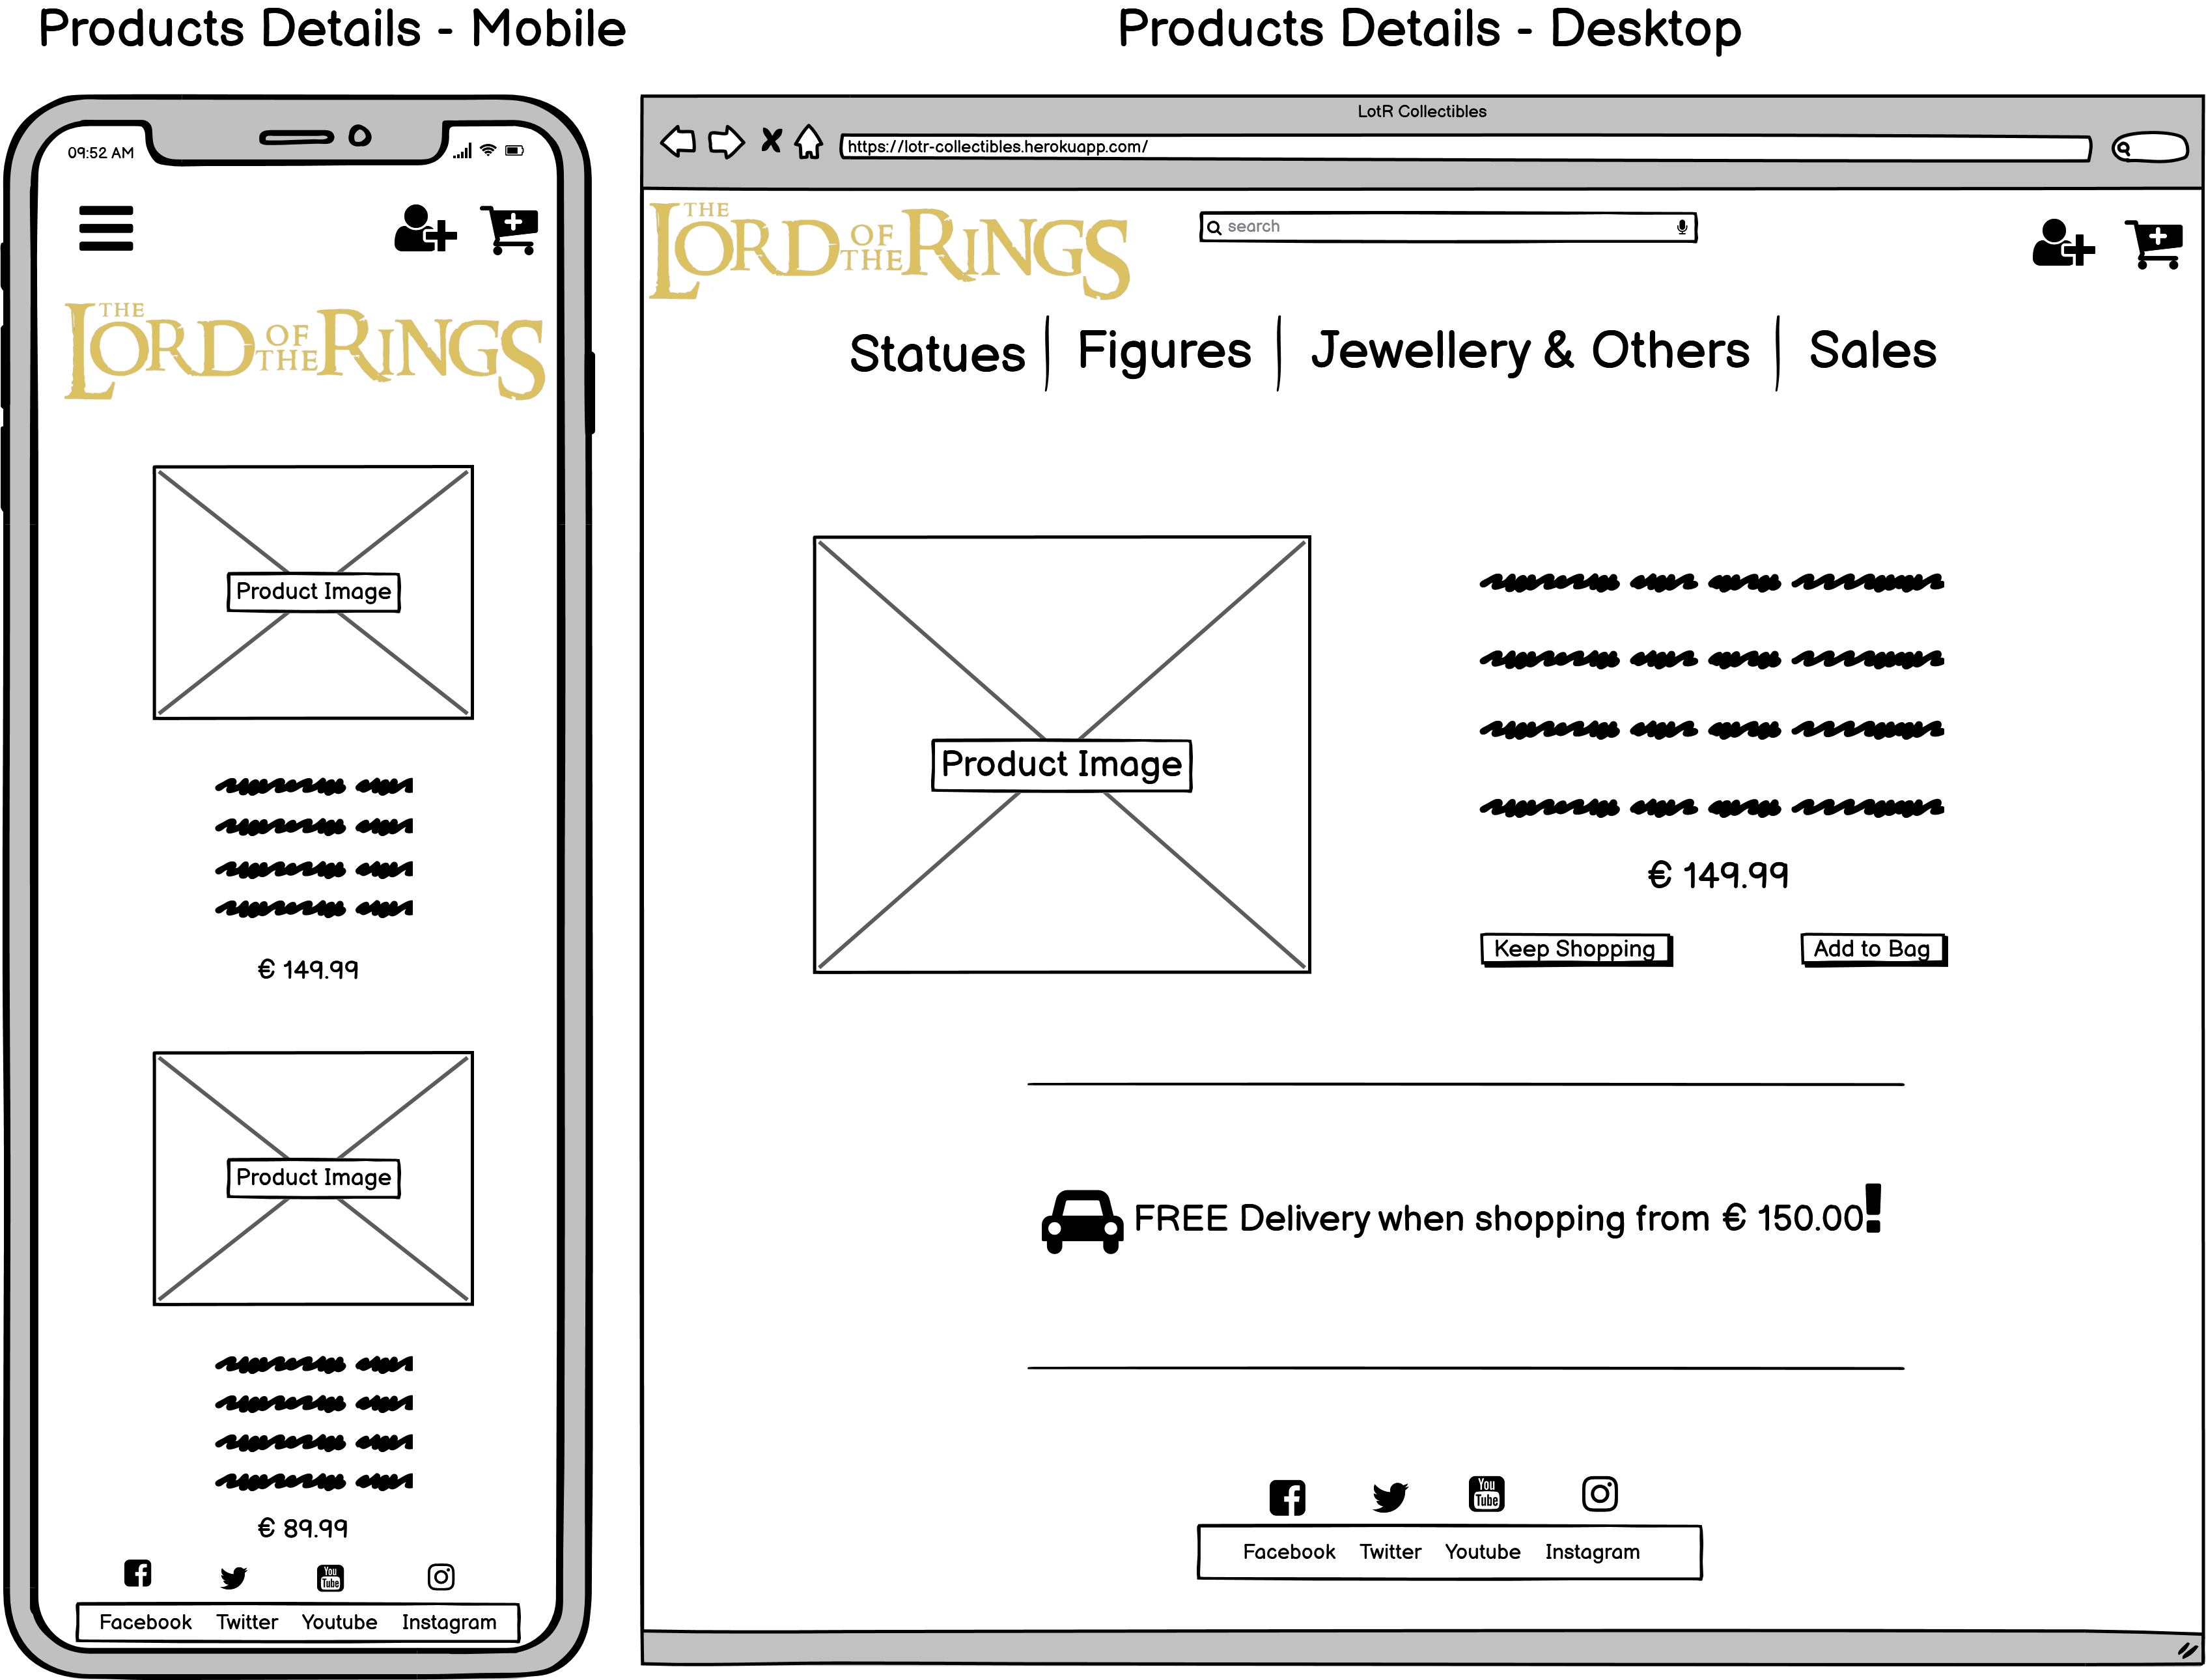
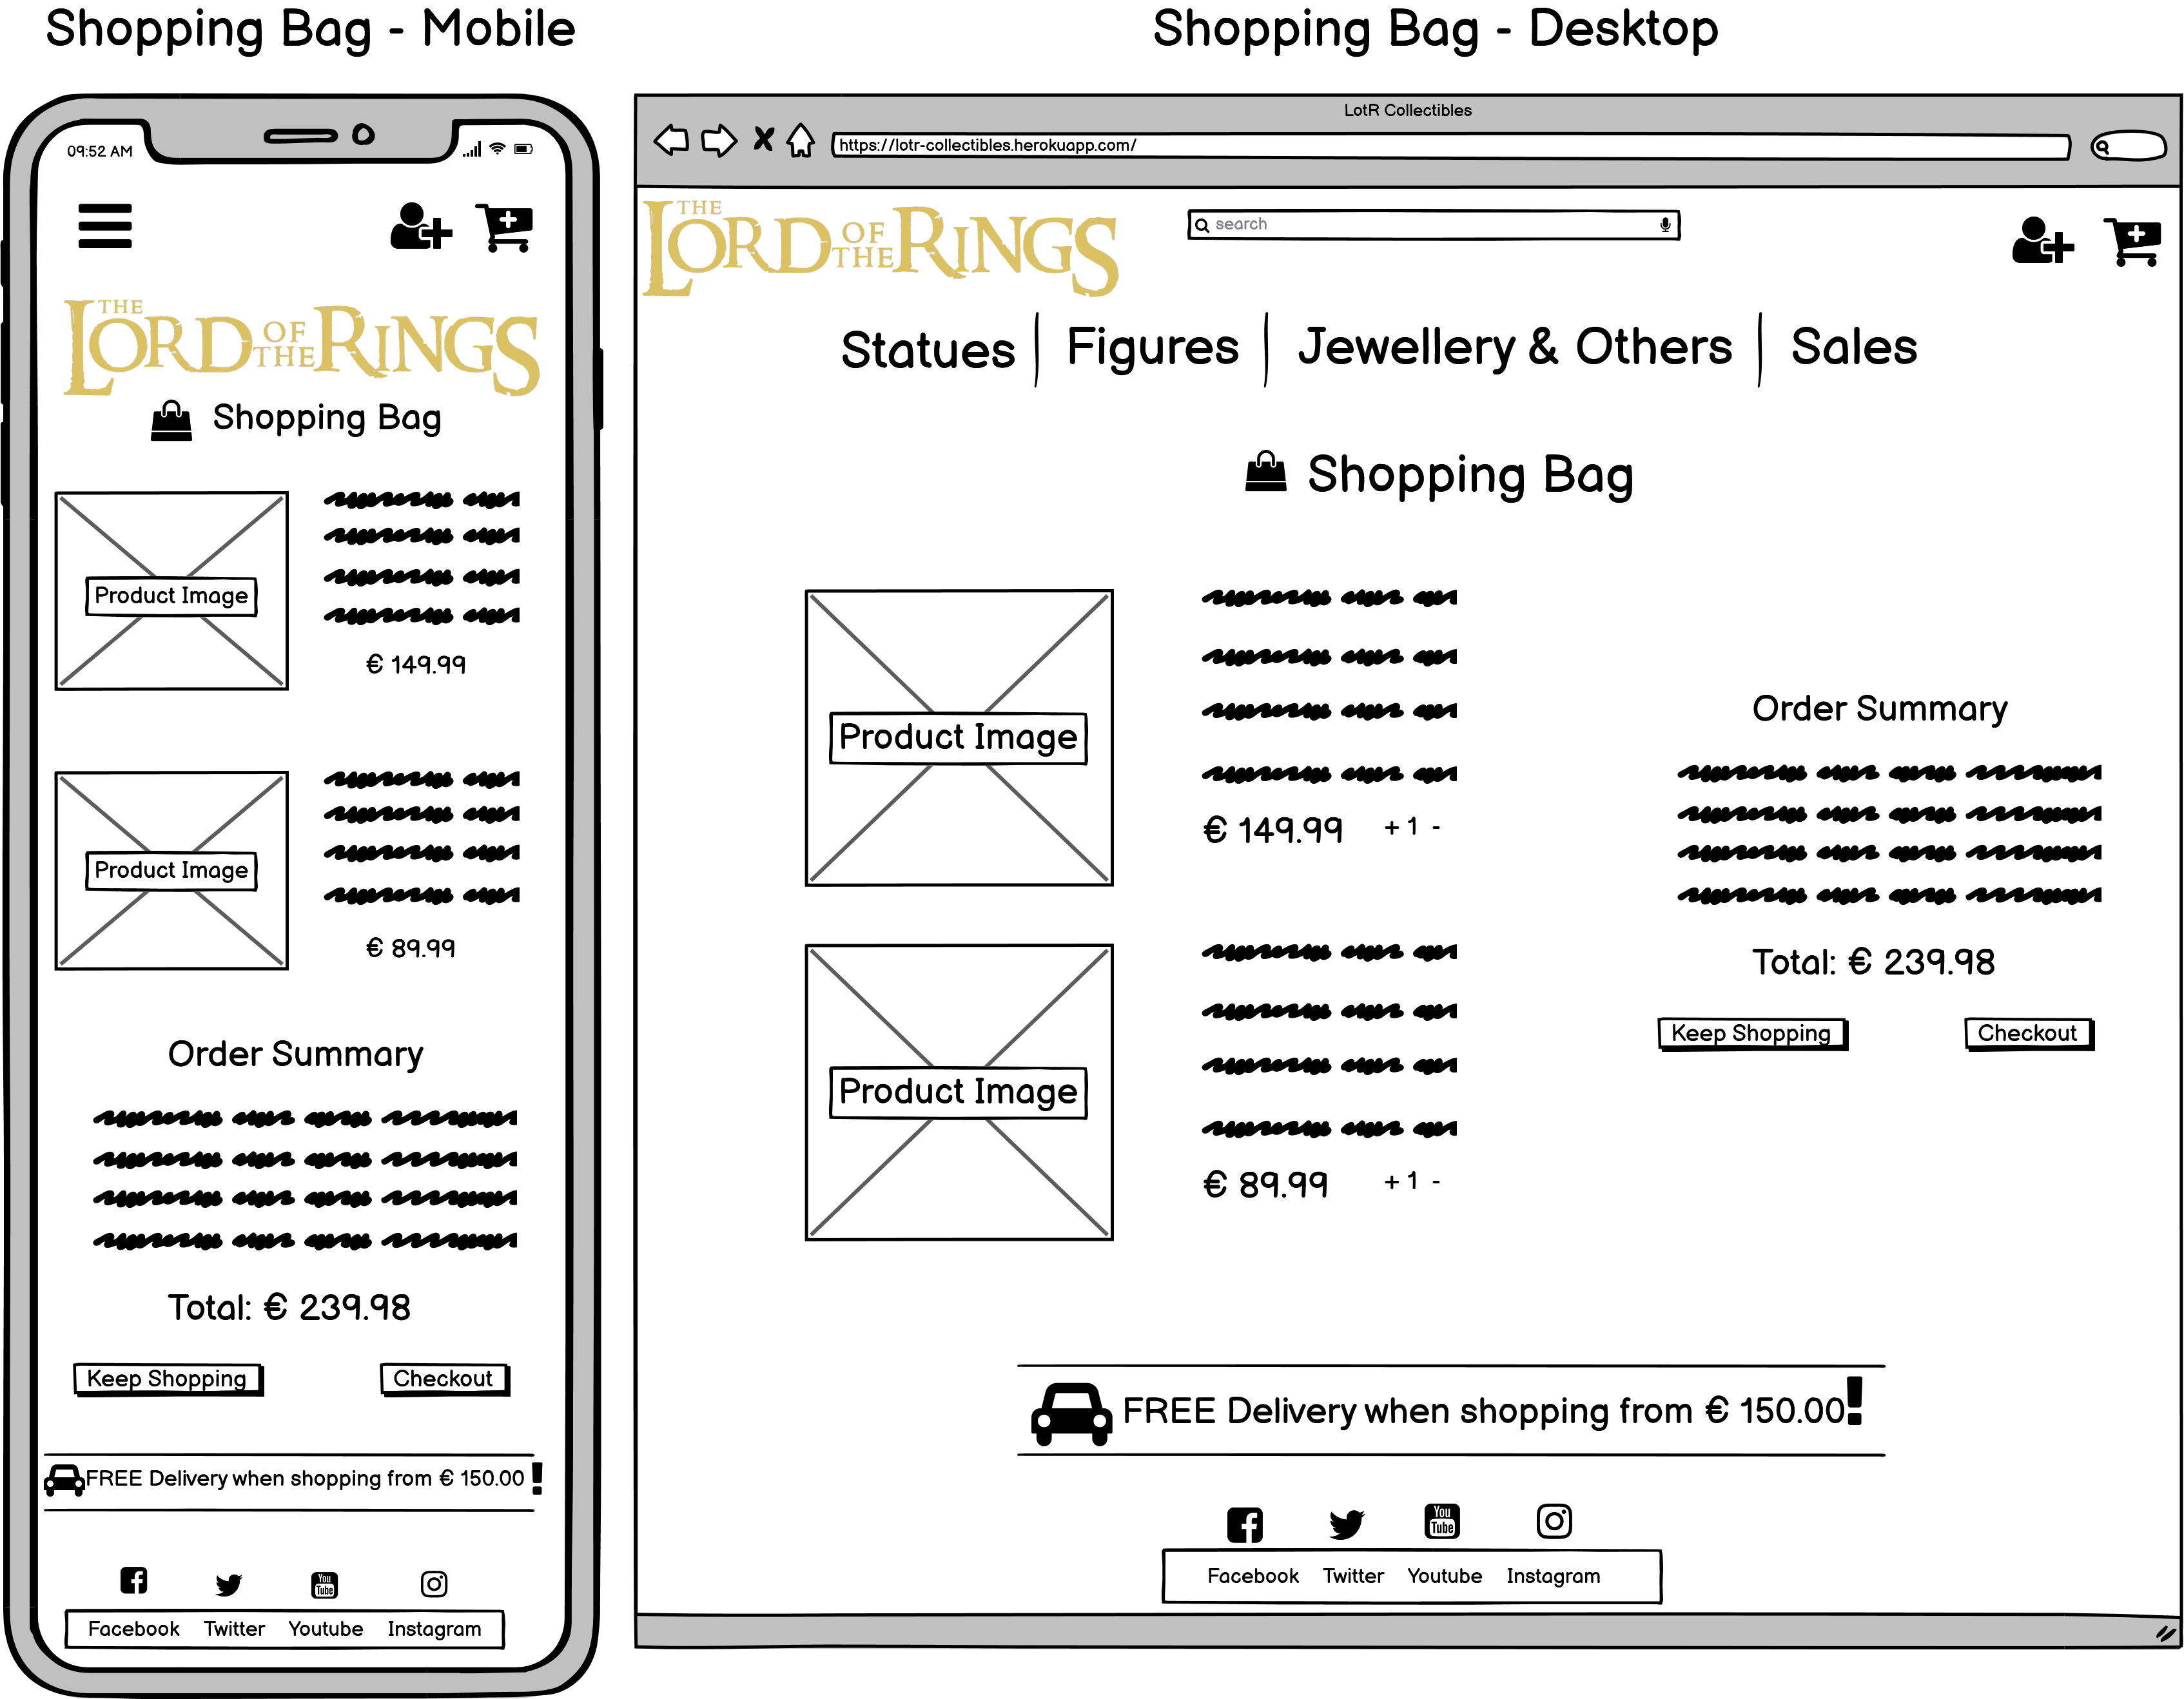
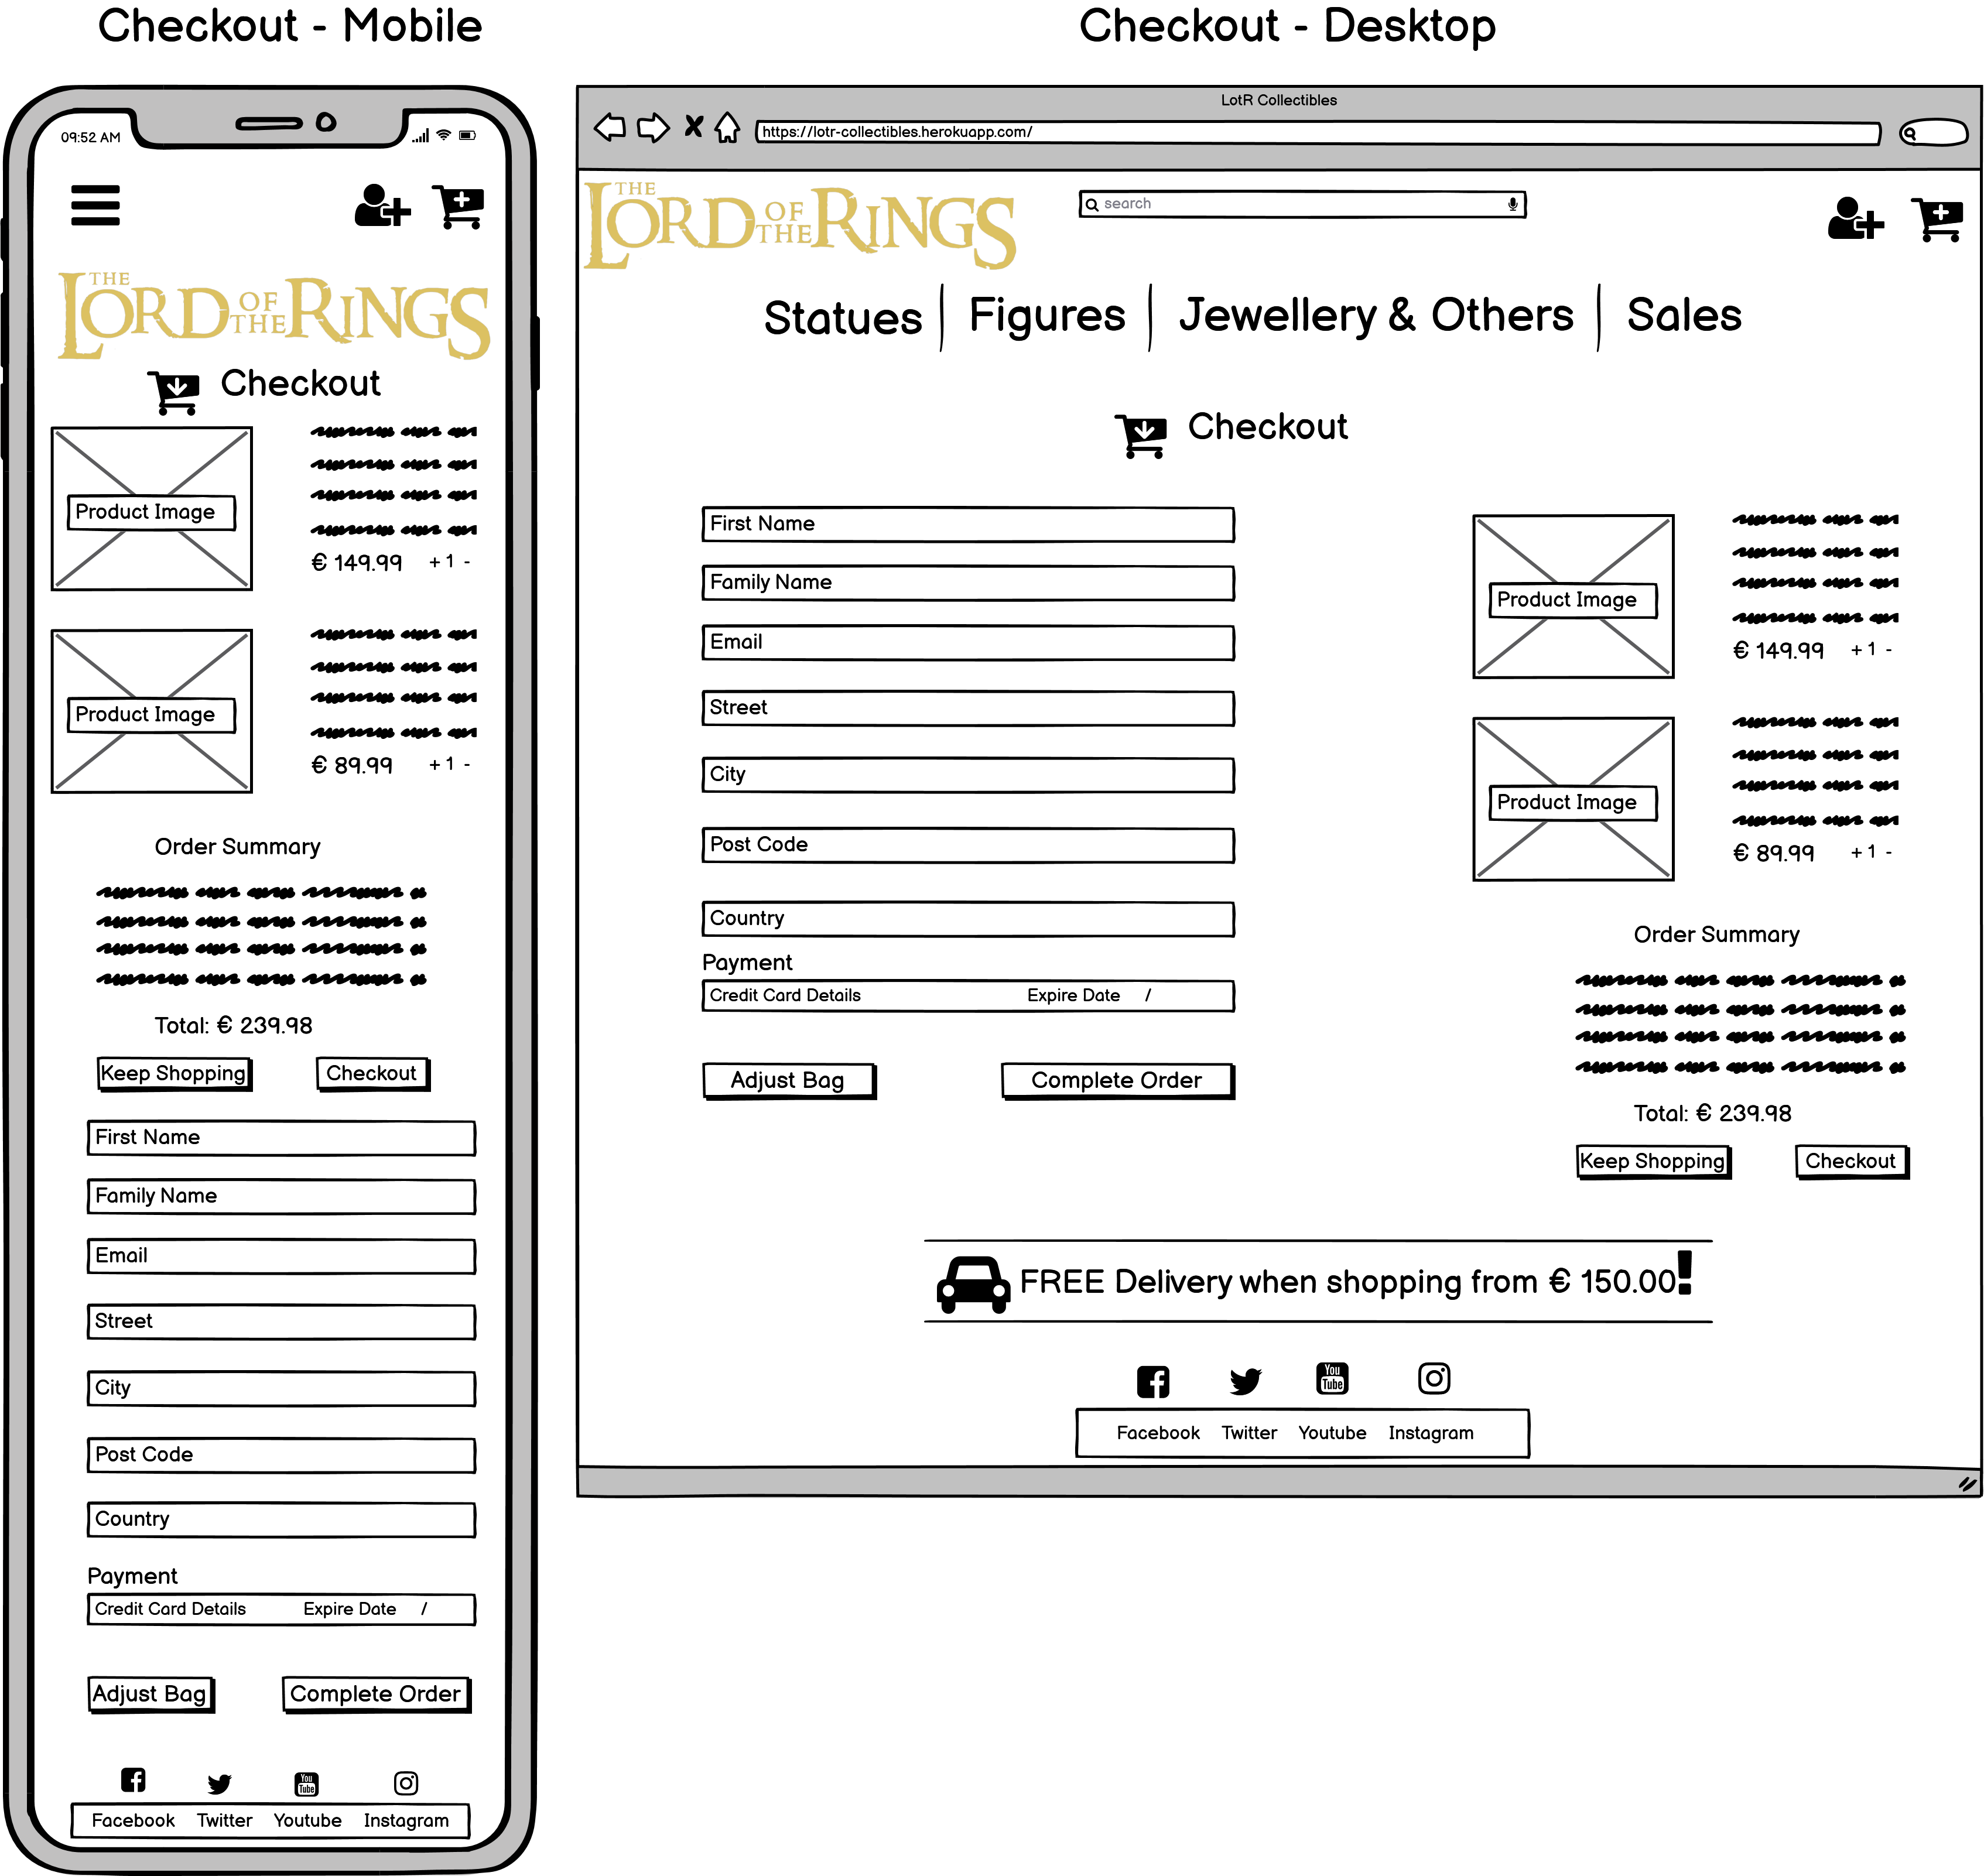
The website is designed to be seen on a desktop because it is easier to visualize the entire image of the website; however, it is also fully mobile responsive, so consumers using a mobile phone will have no trouble finding and purchasing things. The wireframes for the website's main pages are shown here.
Home (index.html)
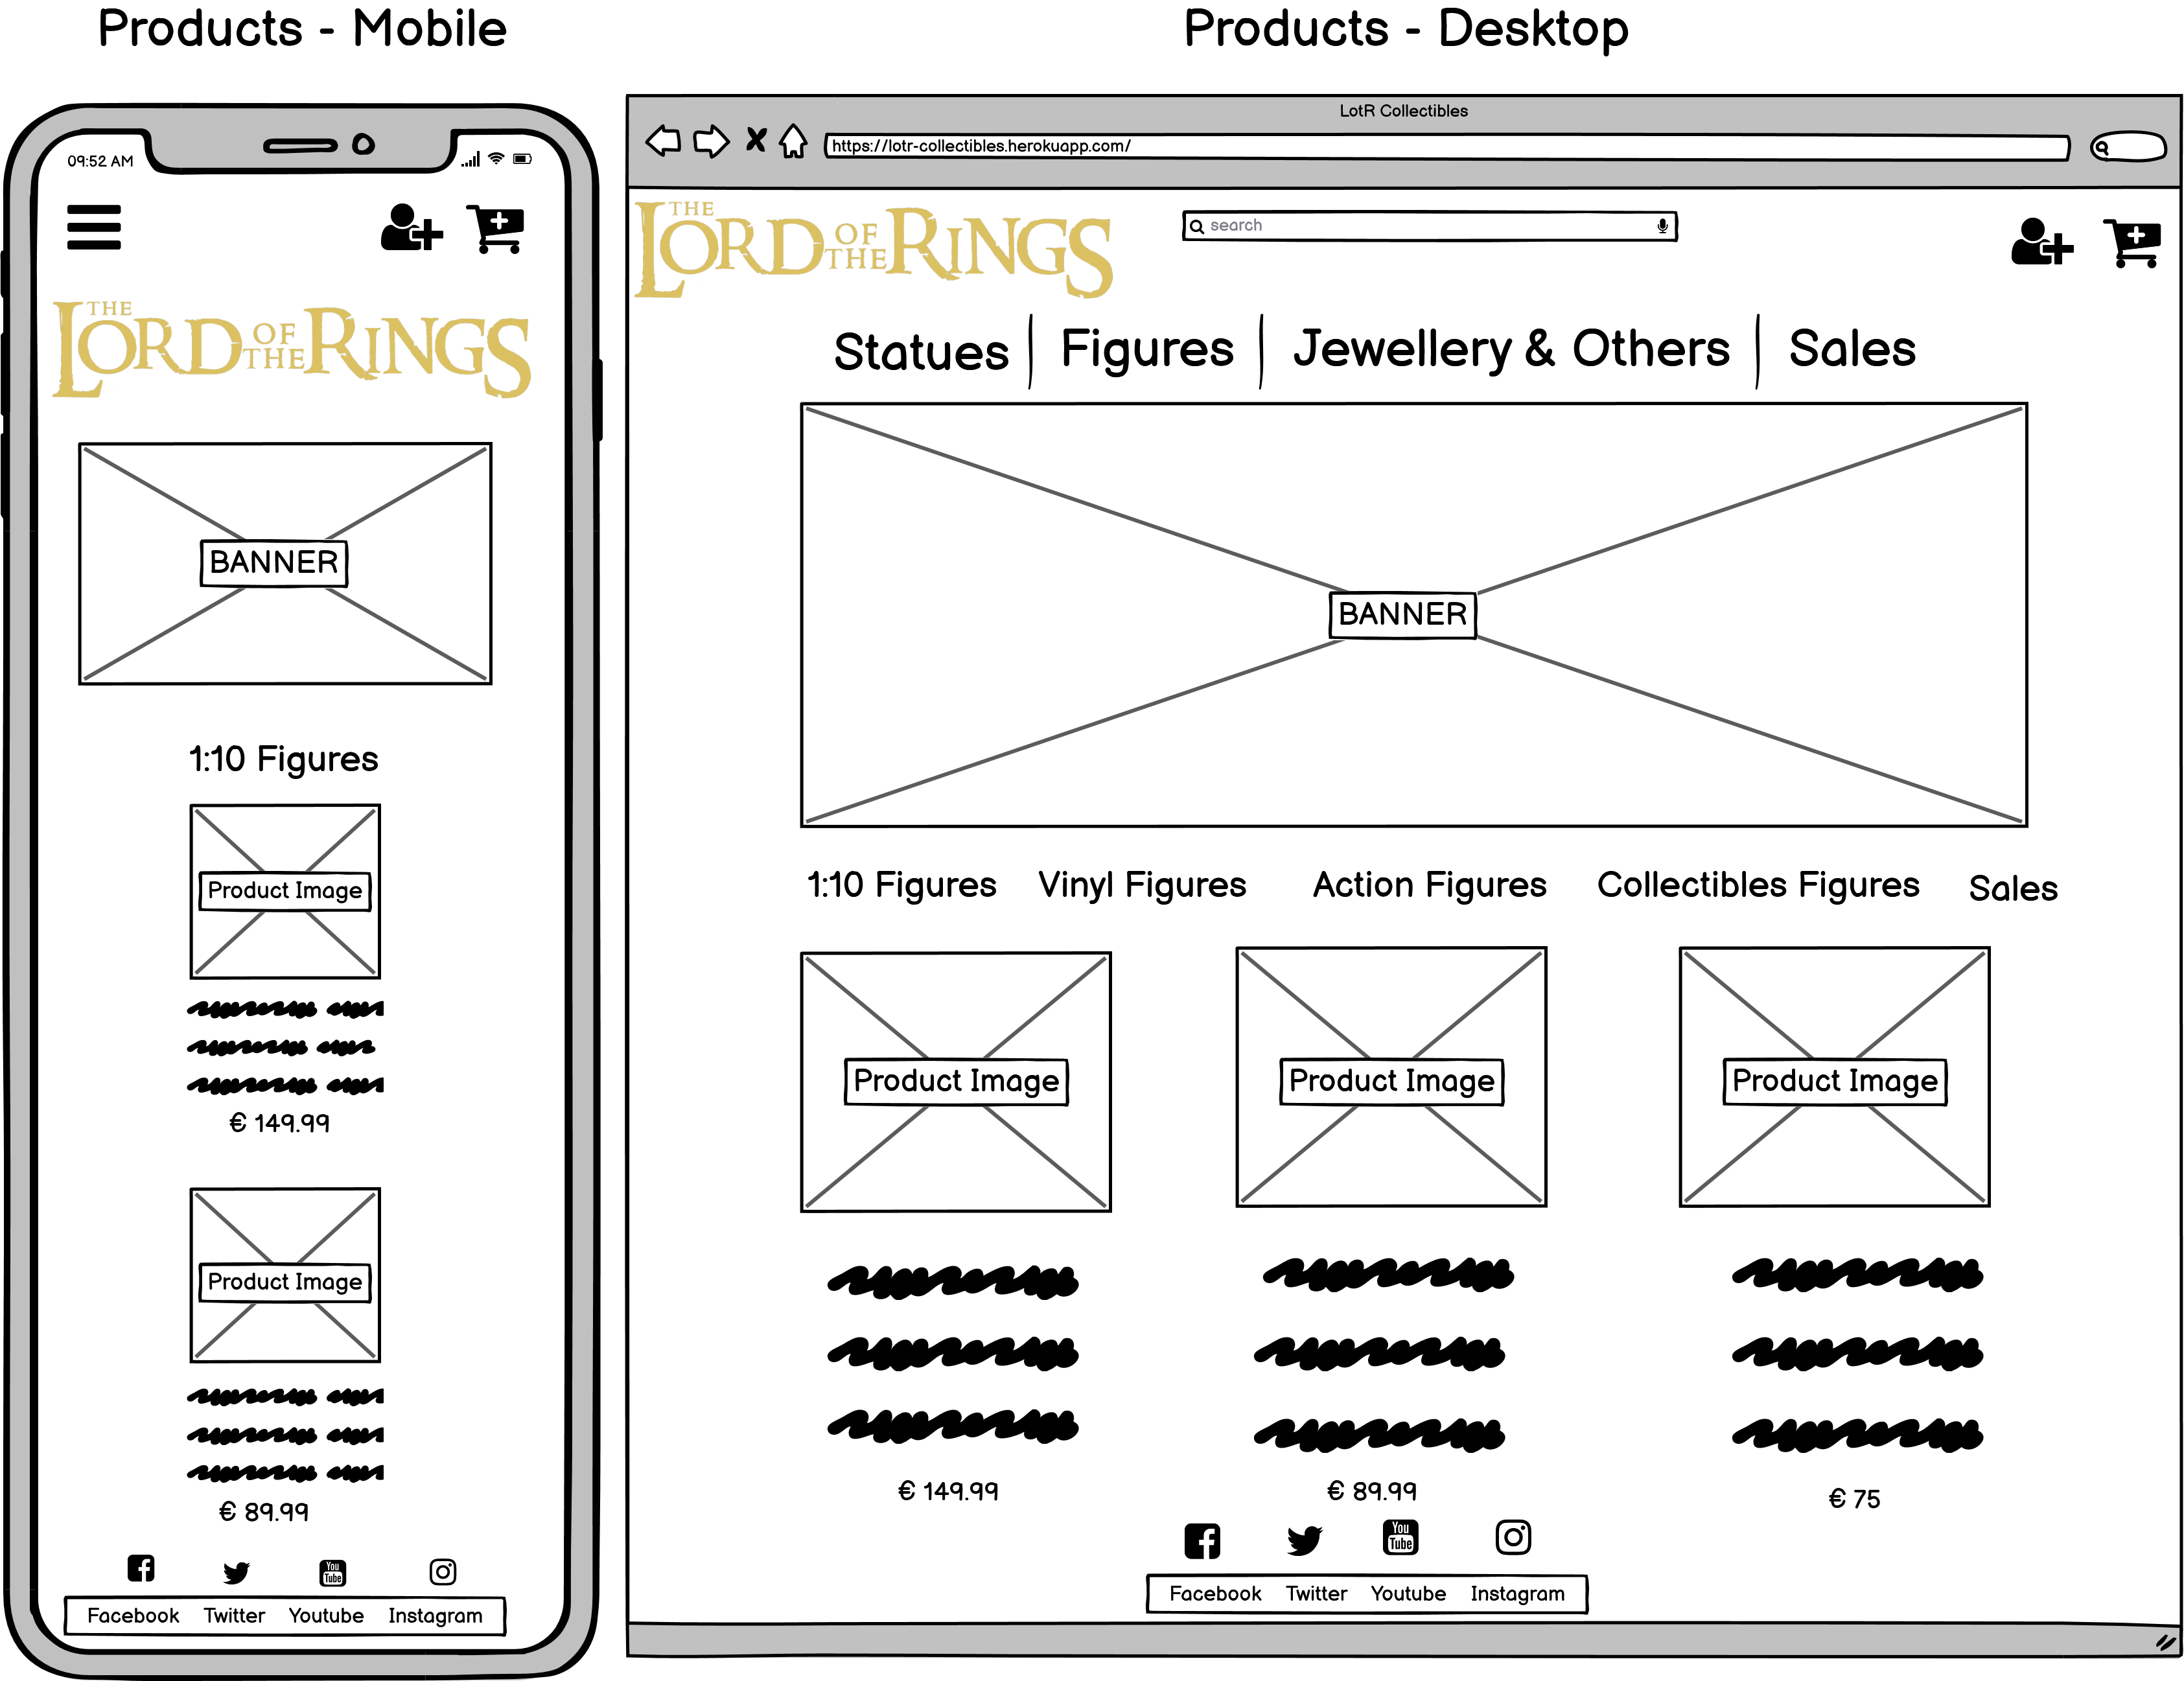
Products (products.html)
Product Details (product/product_id.html)
Shopping bag (bag.html)
Checkout (checkout.html)
Checkout Complete (checkout_complete.html)
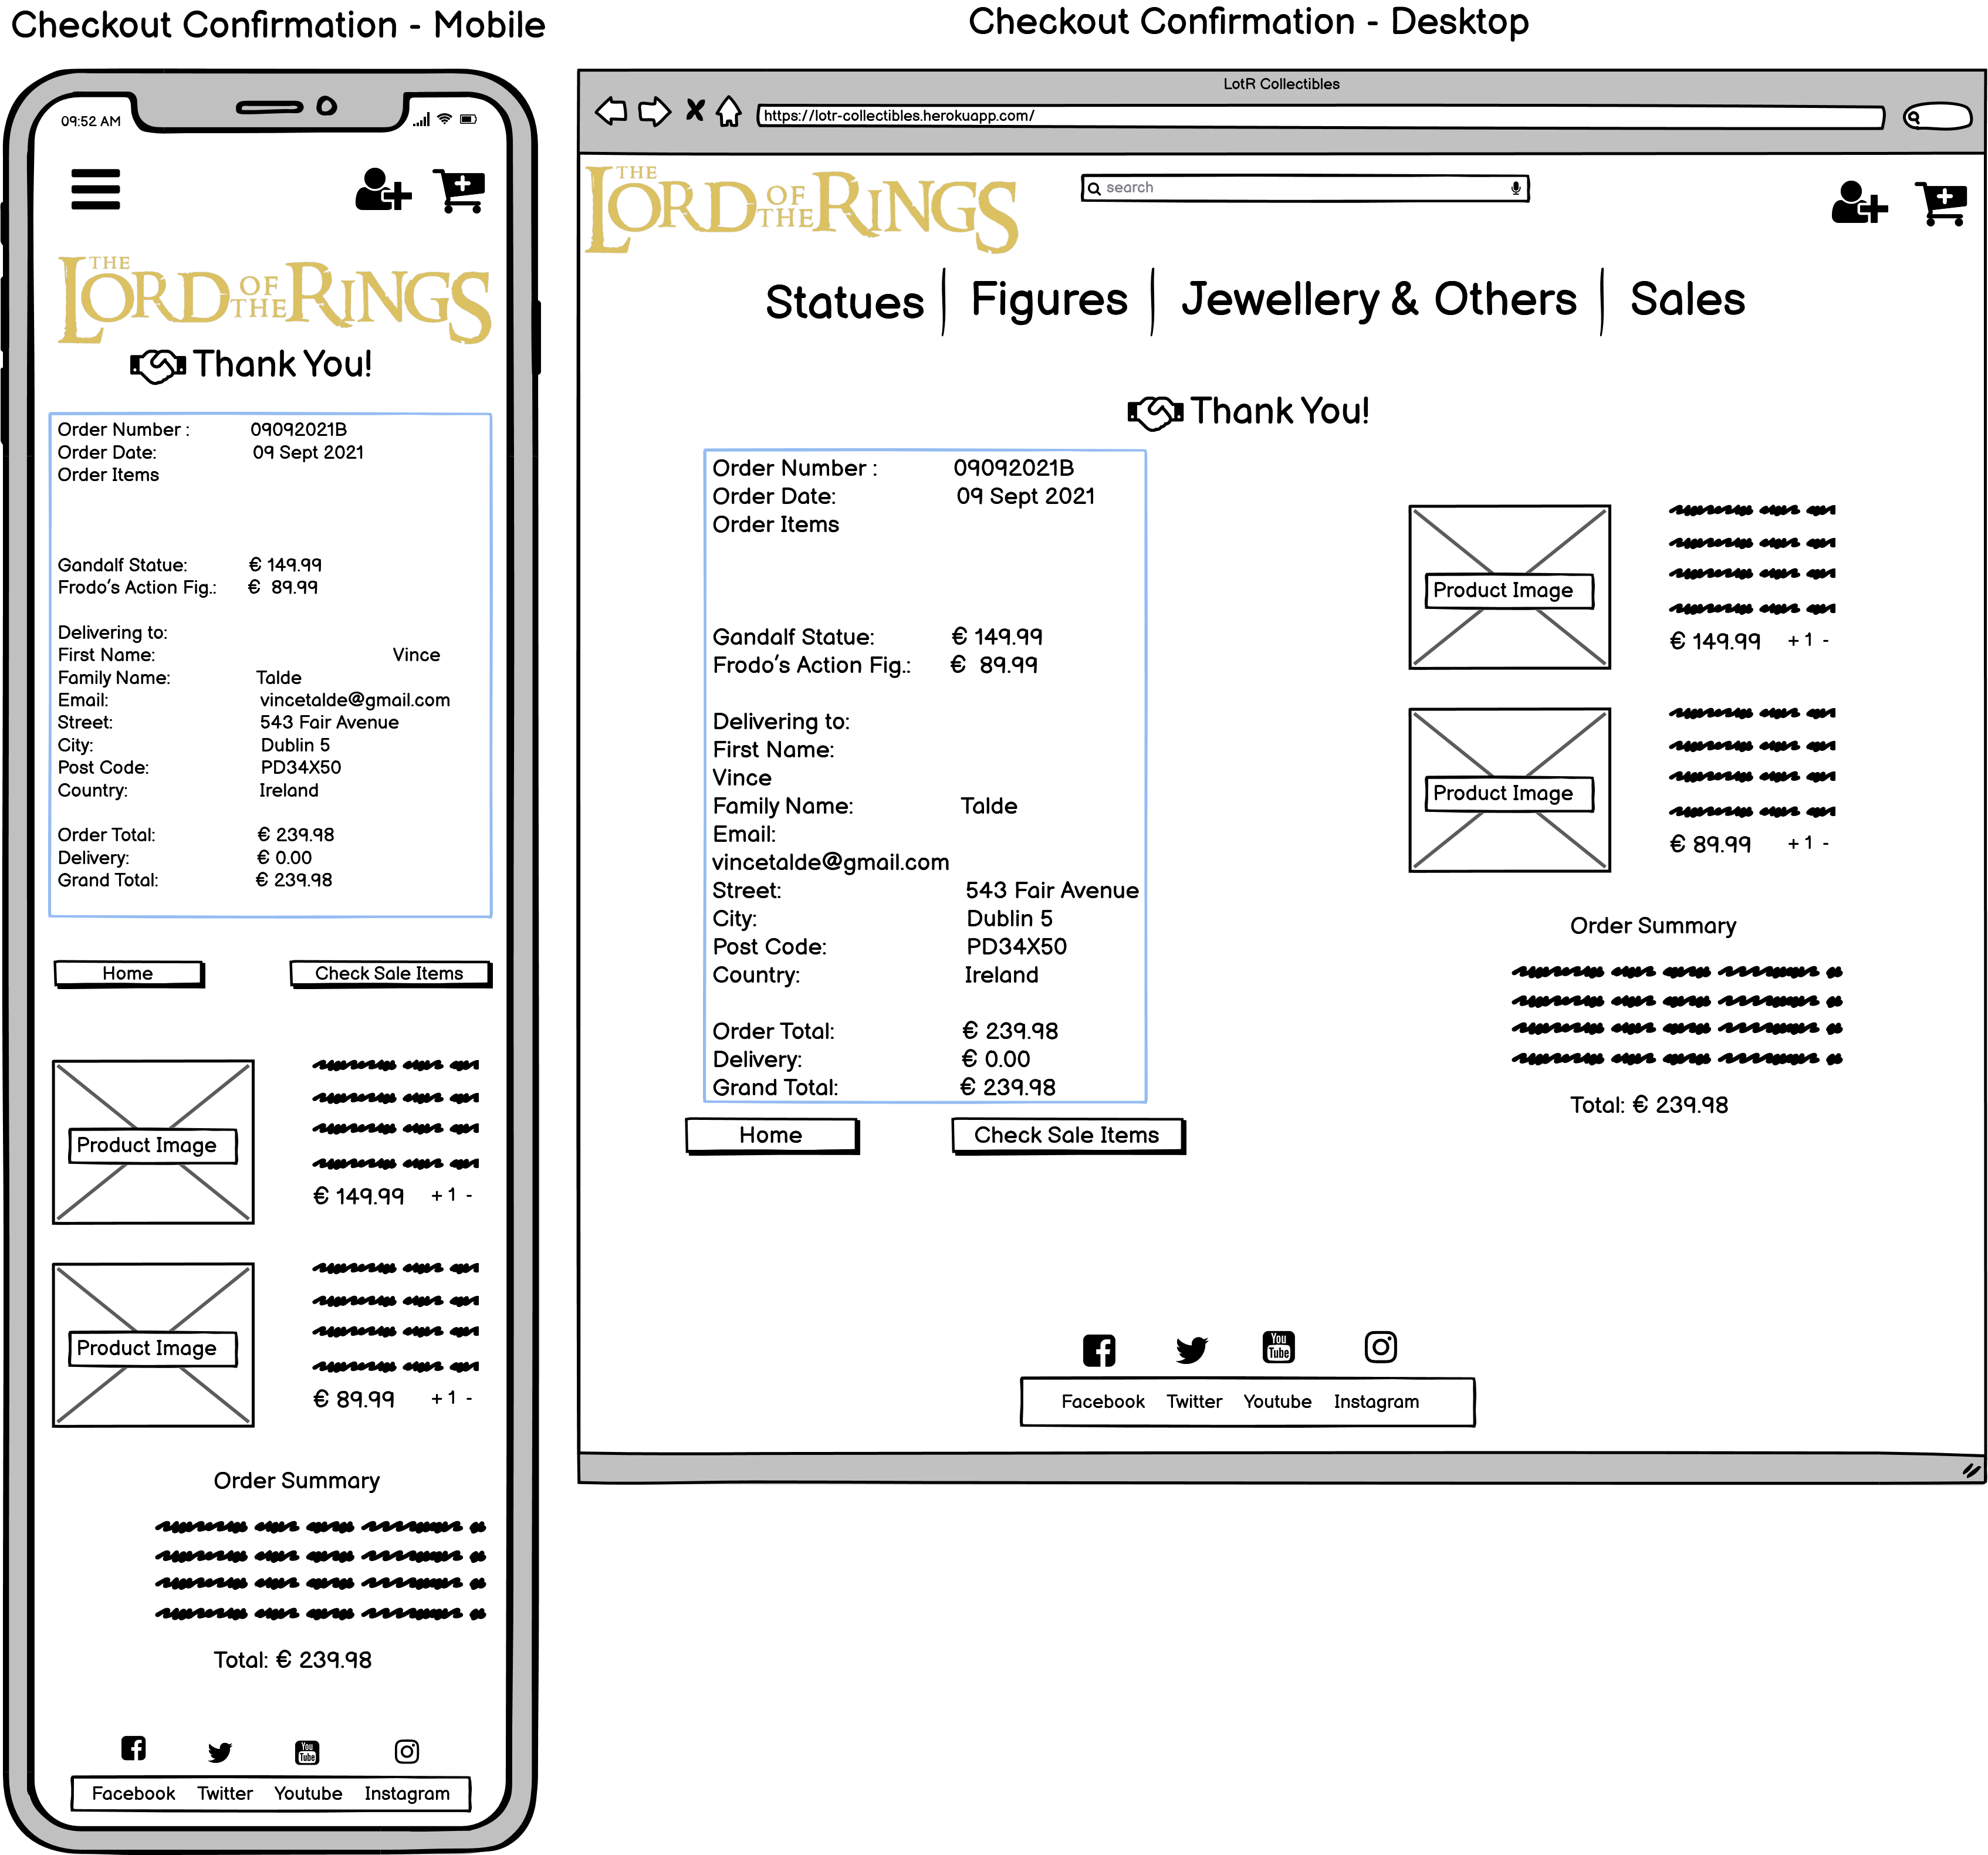
Note:
There is no image of the product or information about it on the website.
Register (signup.html)
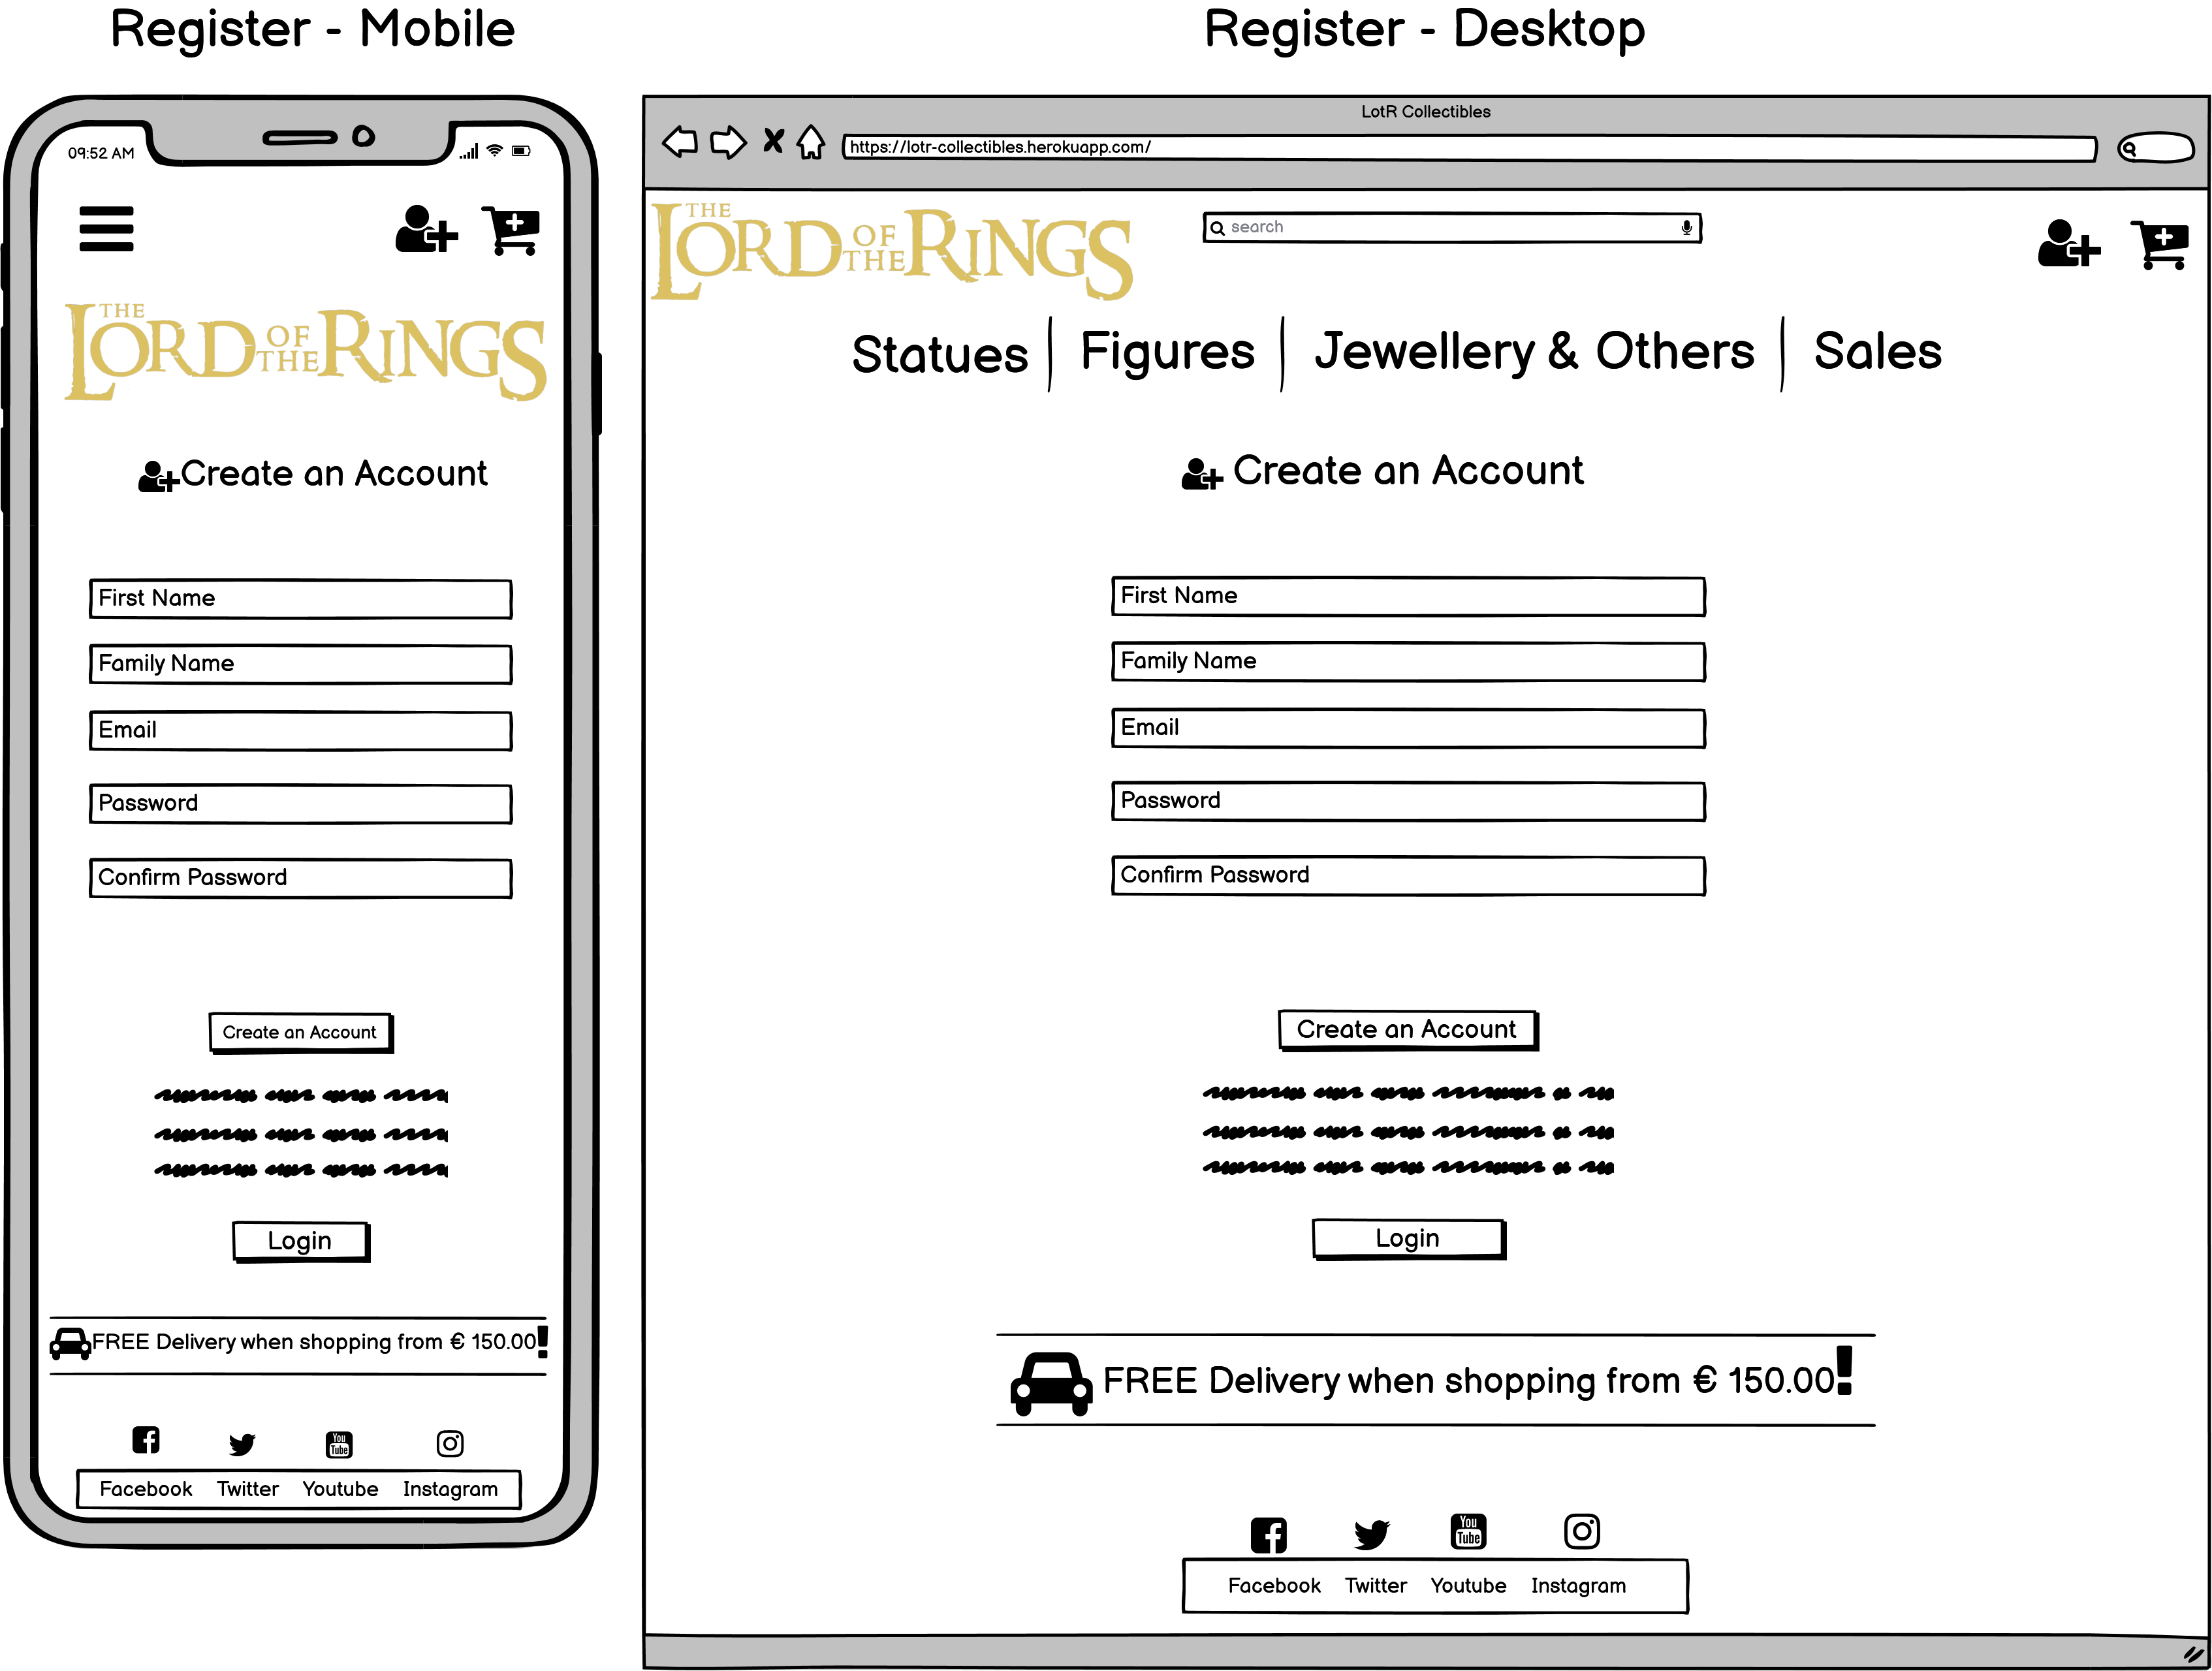
Login (login.html)
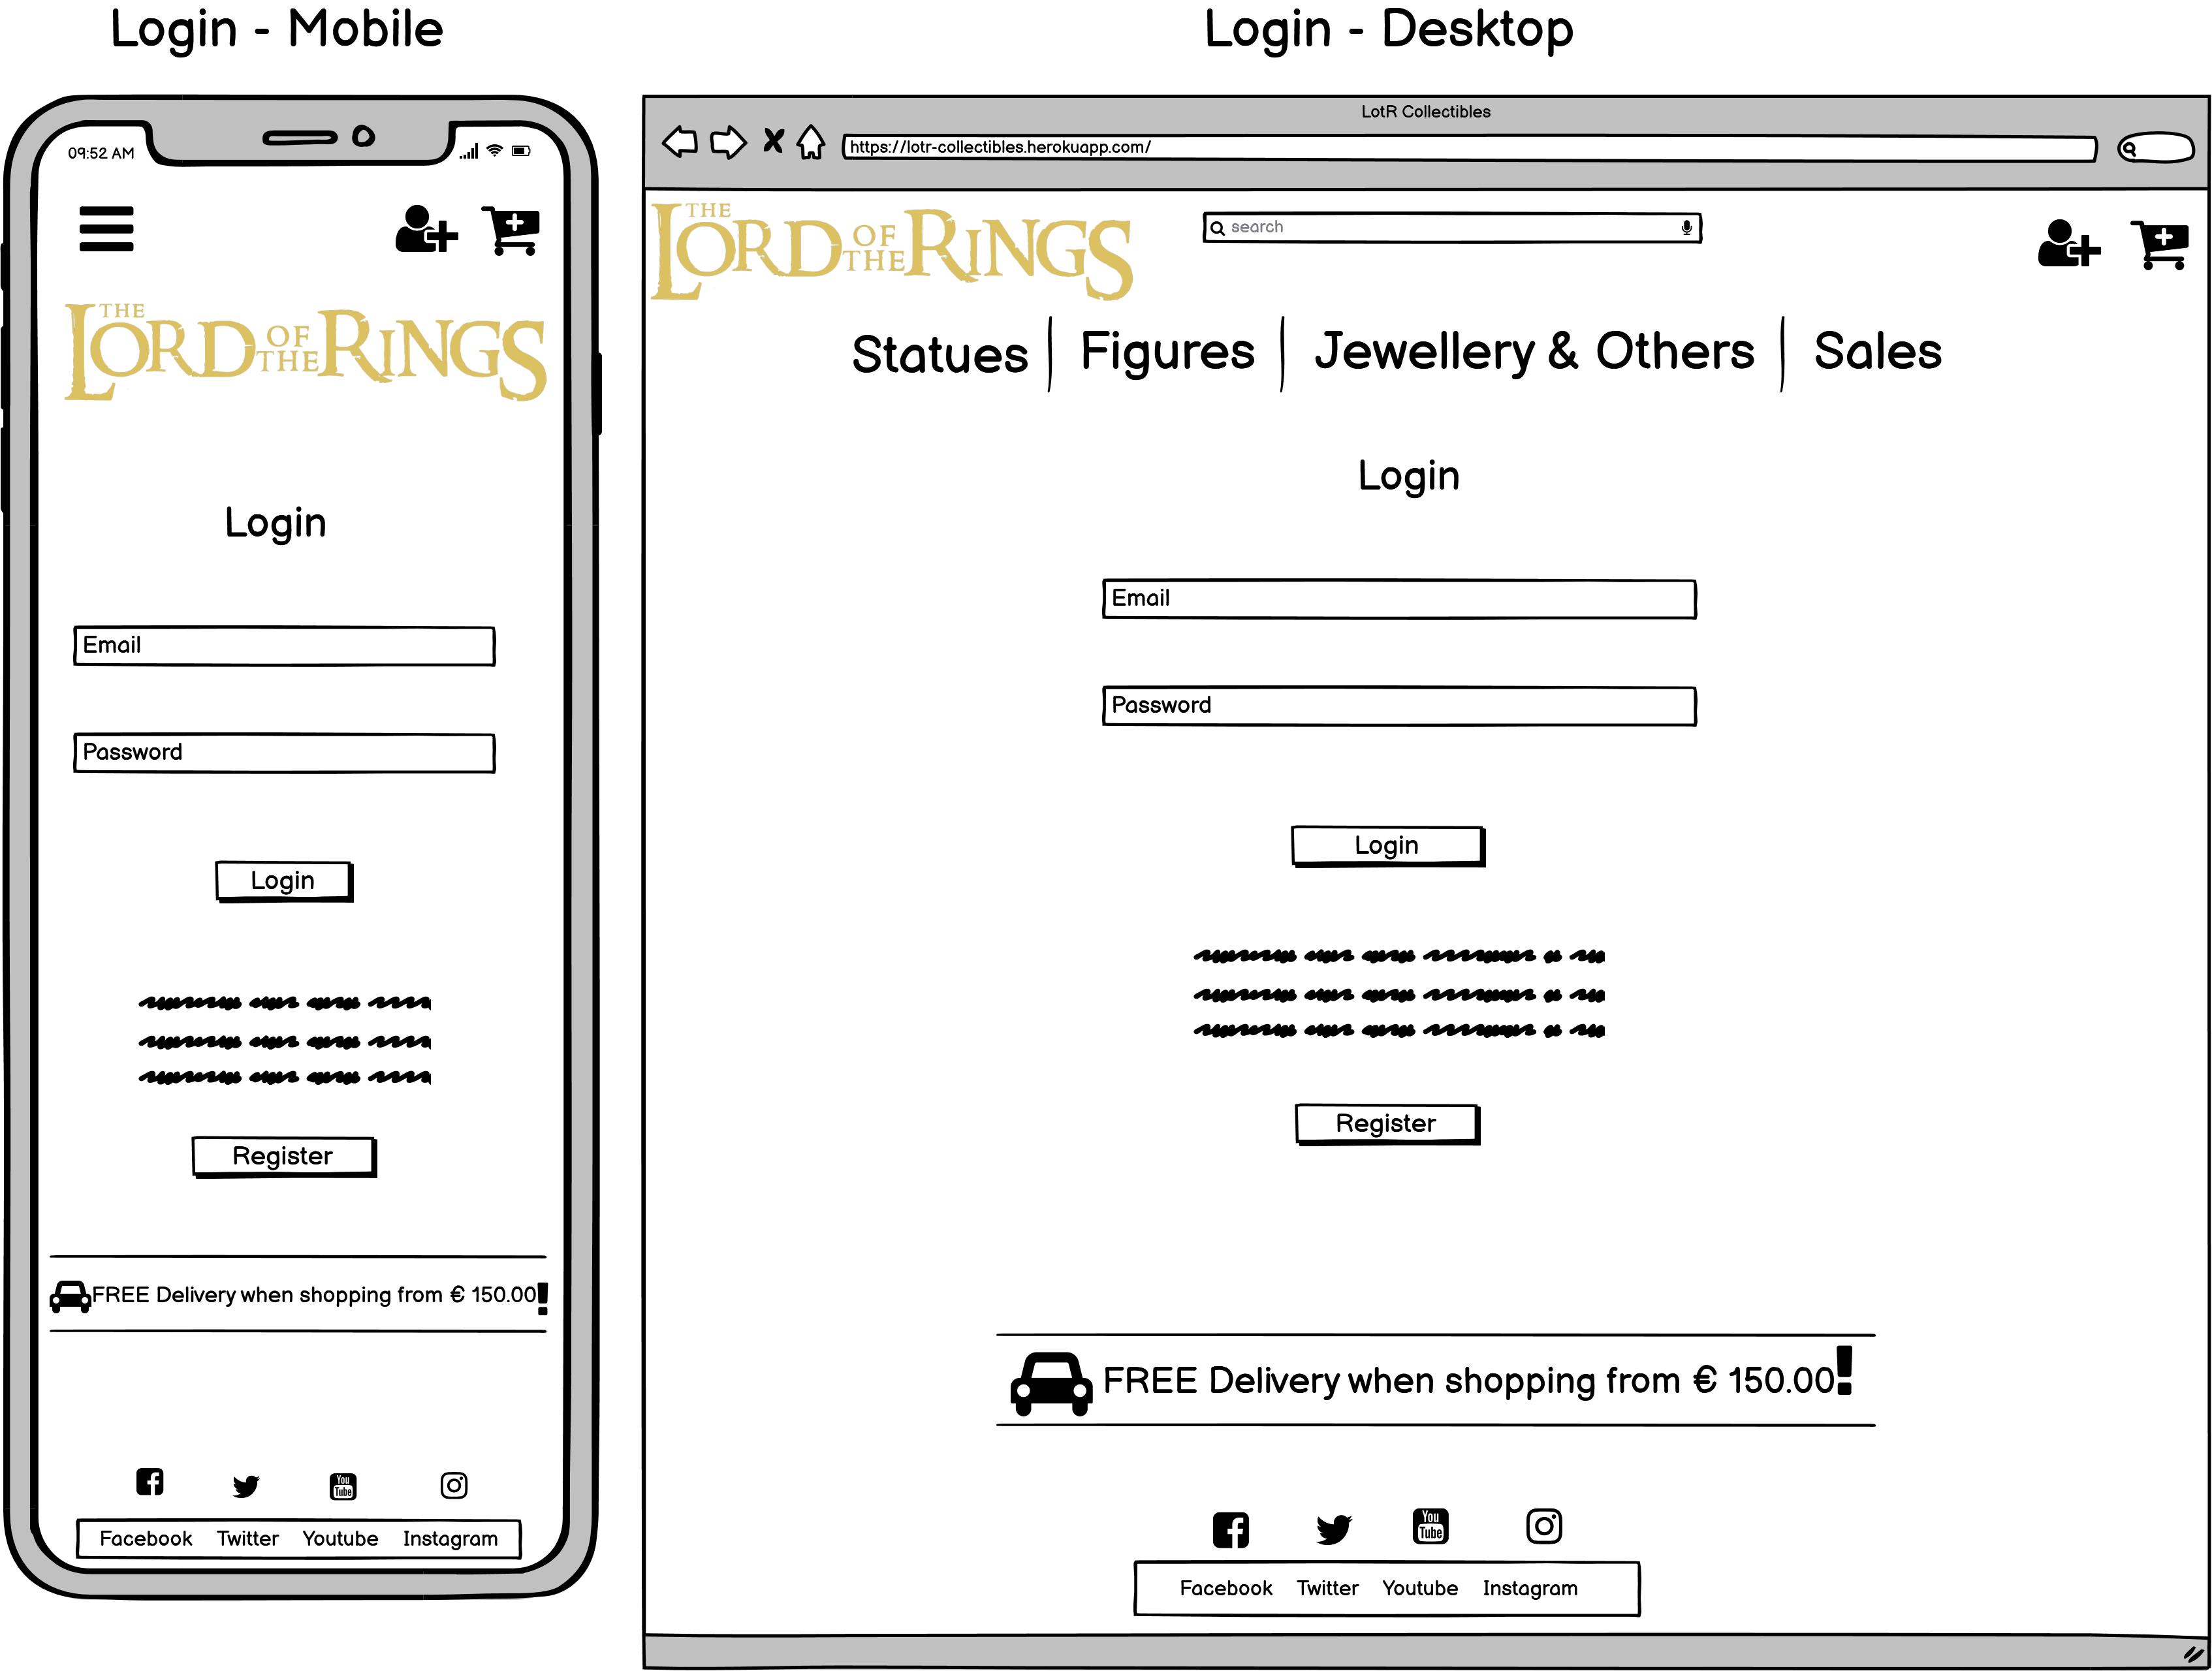
Profile (profile.html)
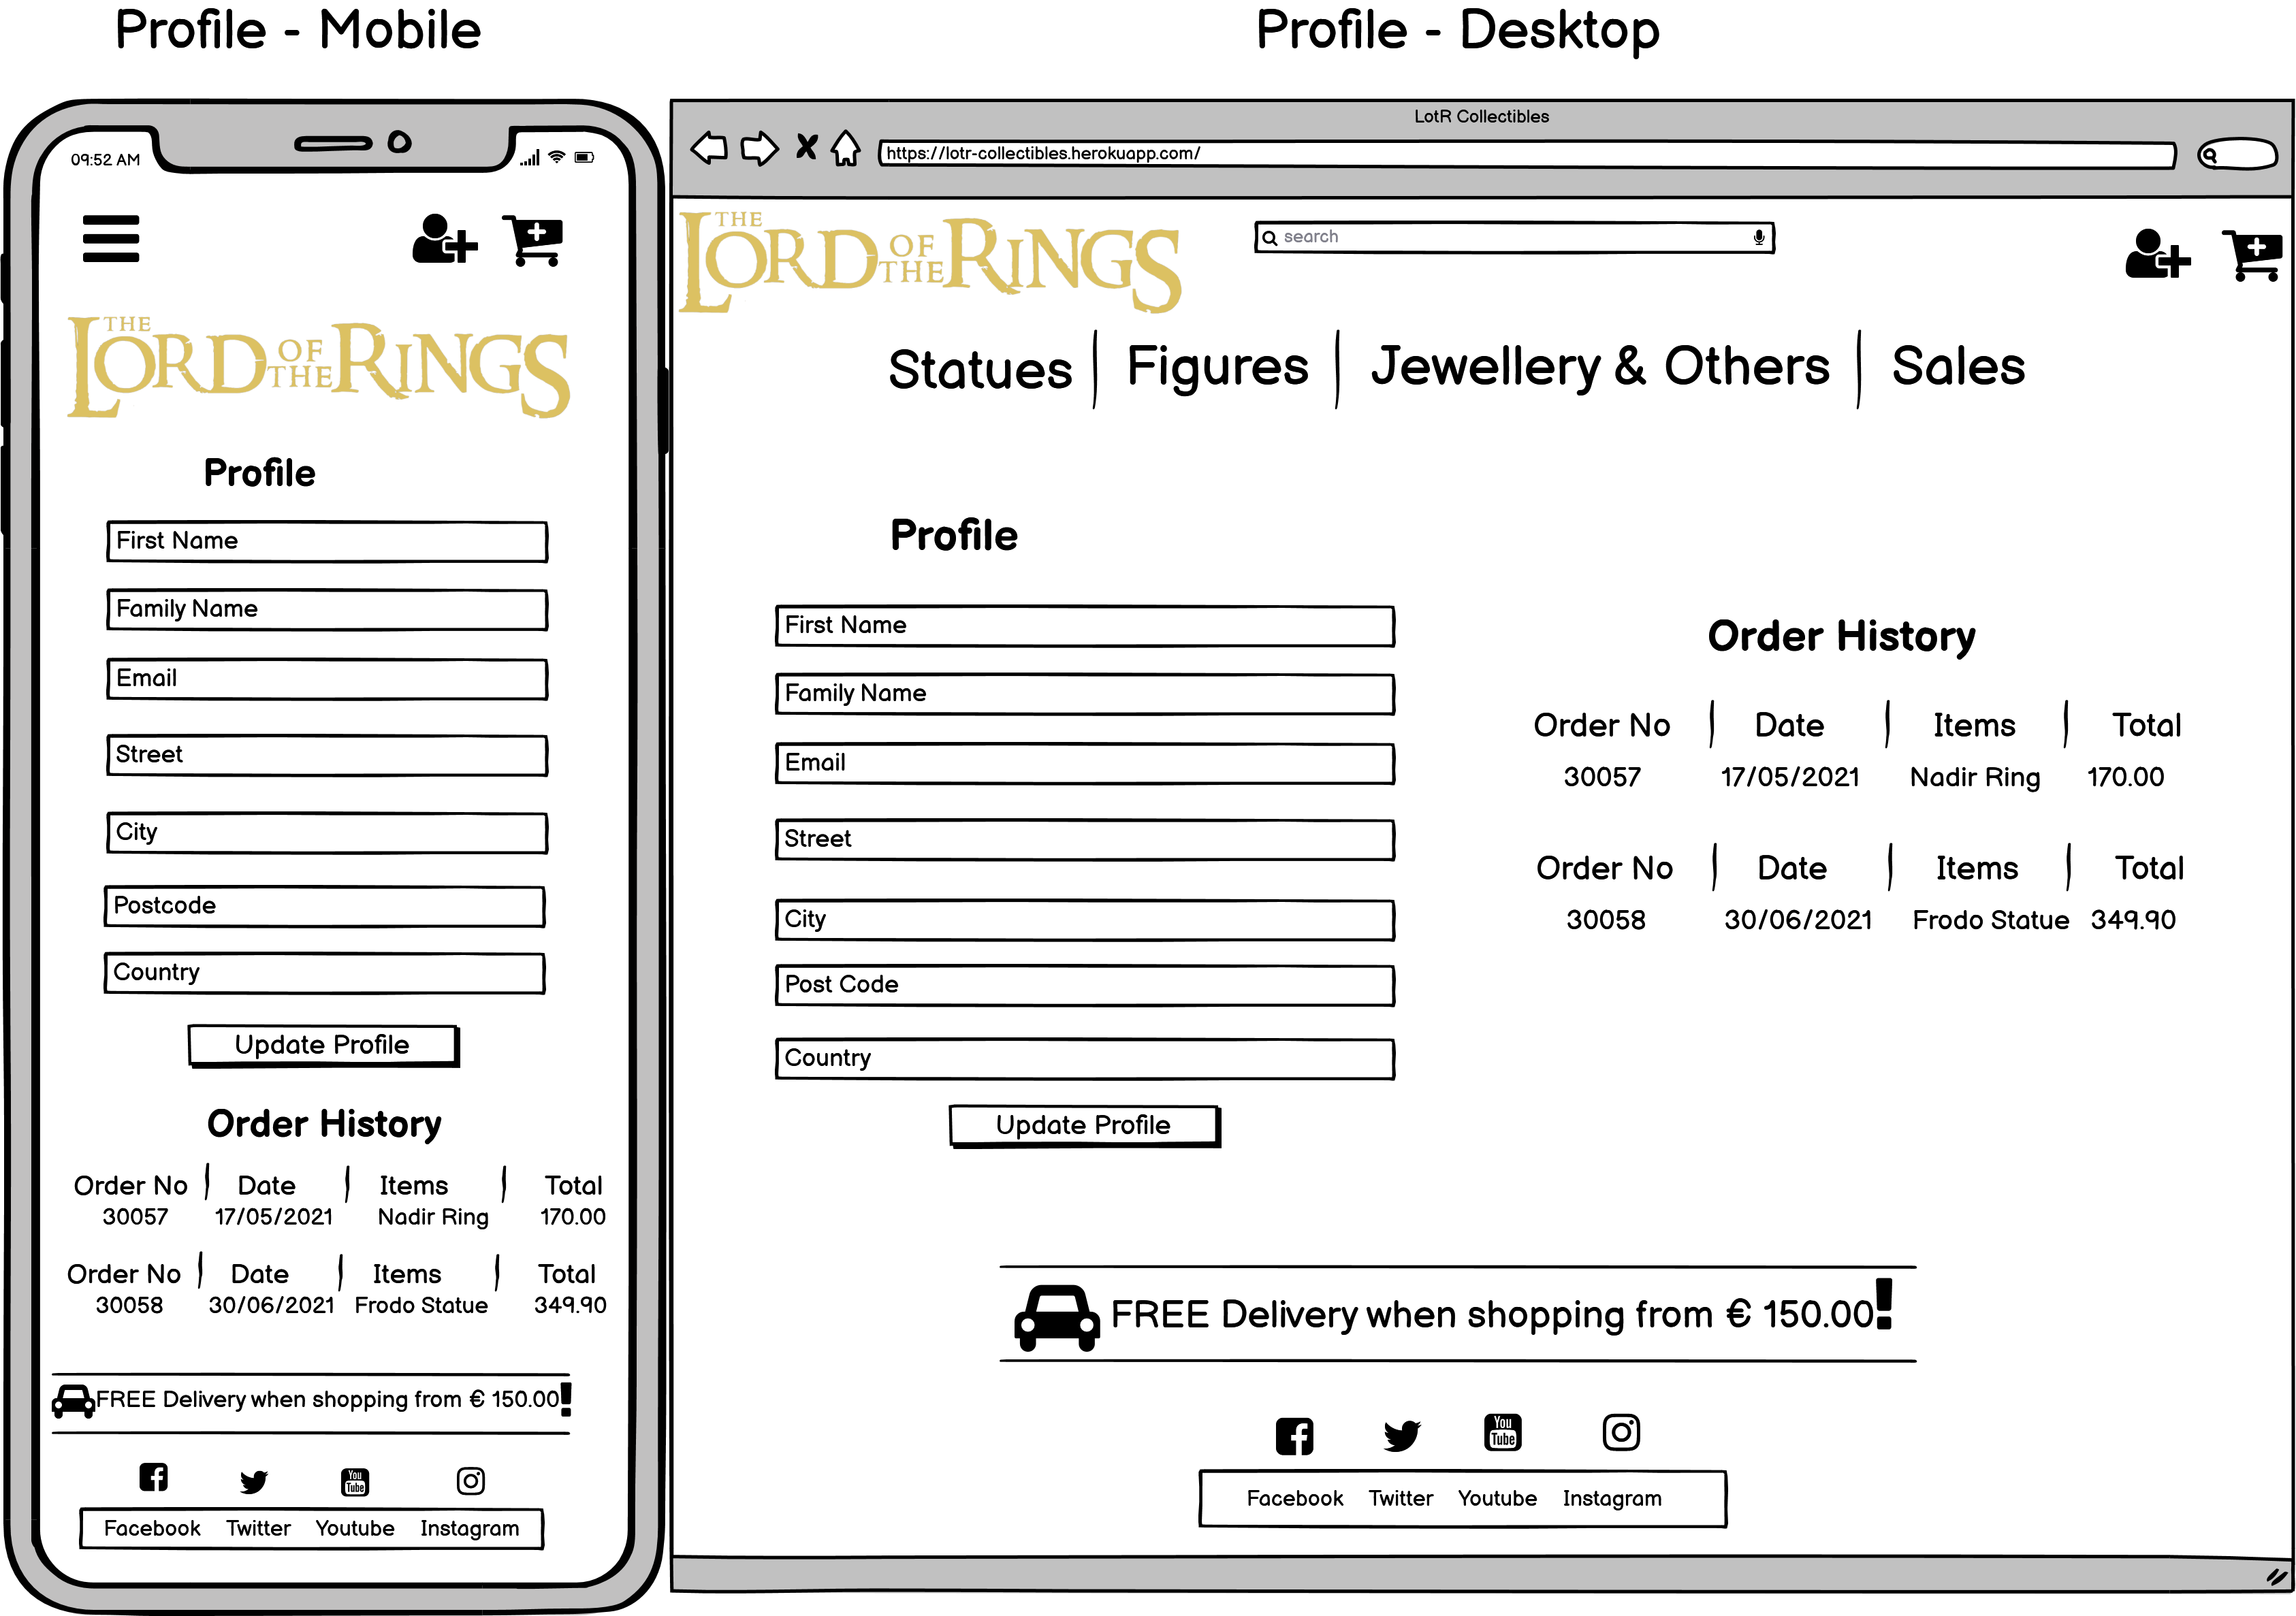
Product Management (product_management.html)
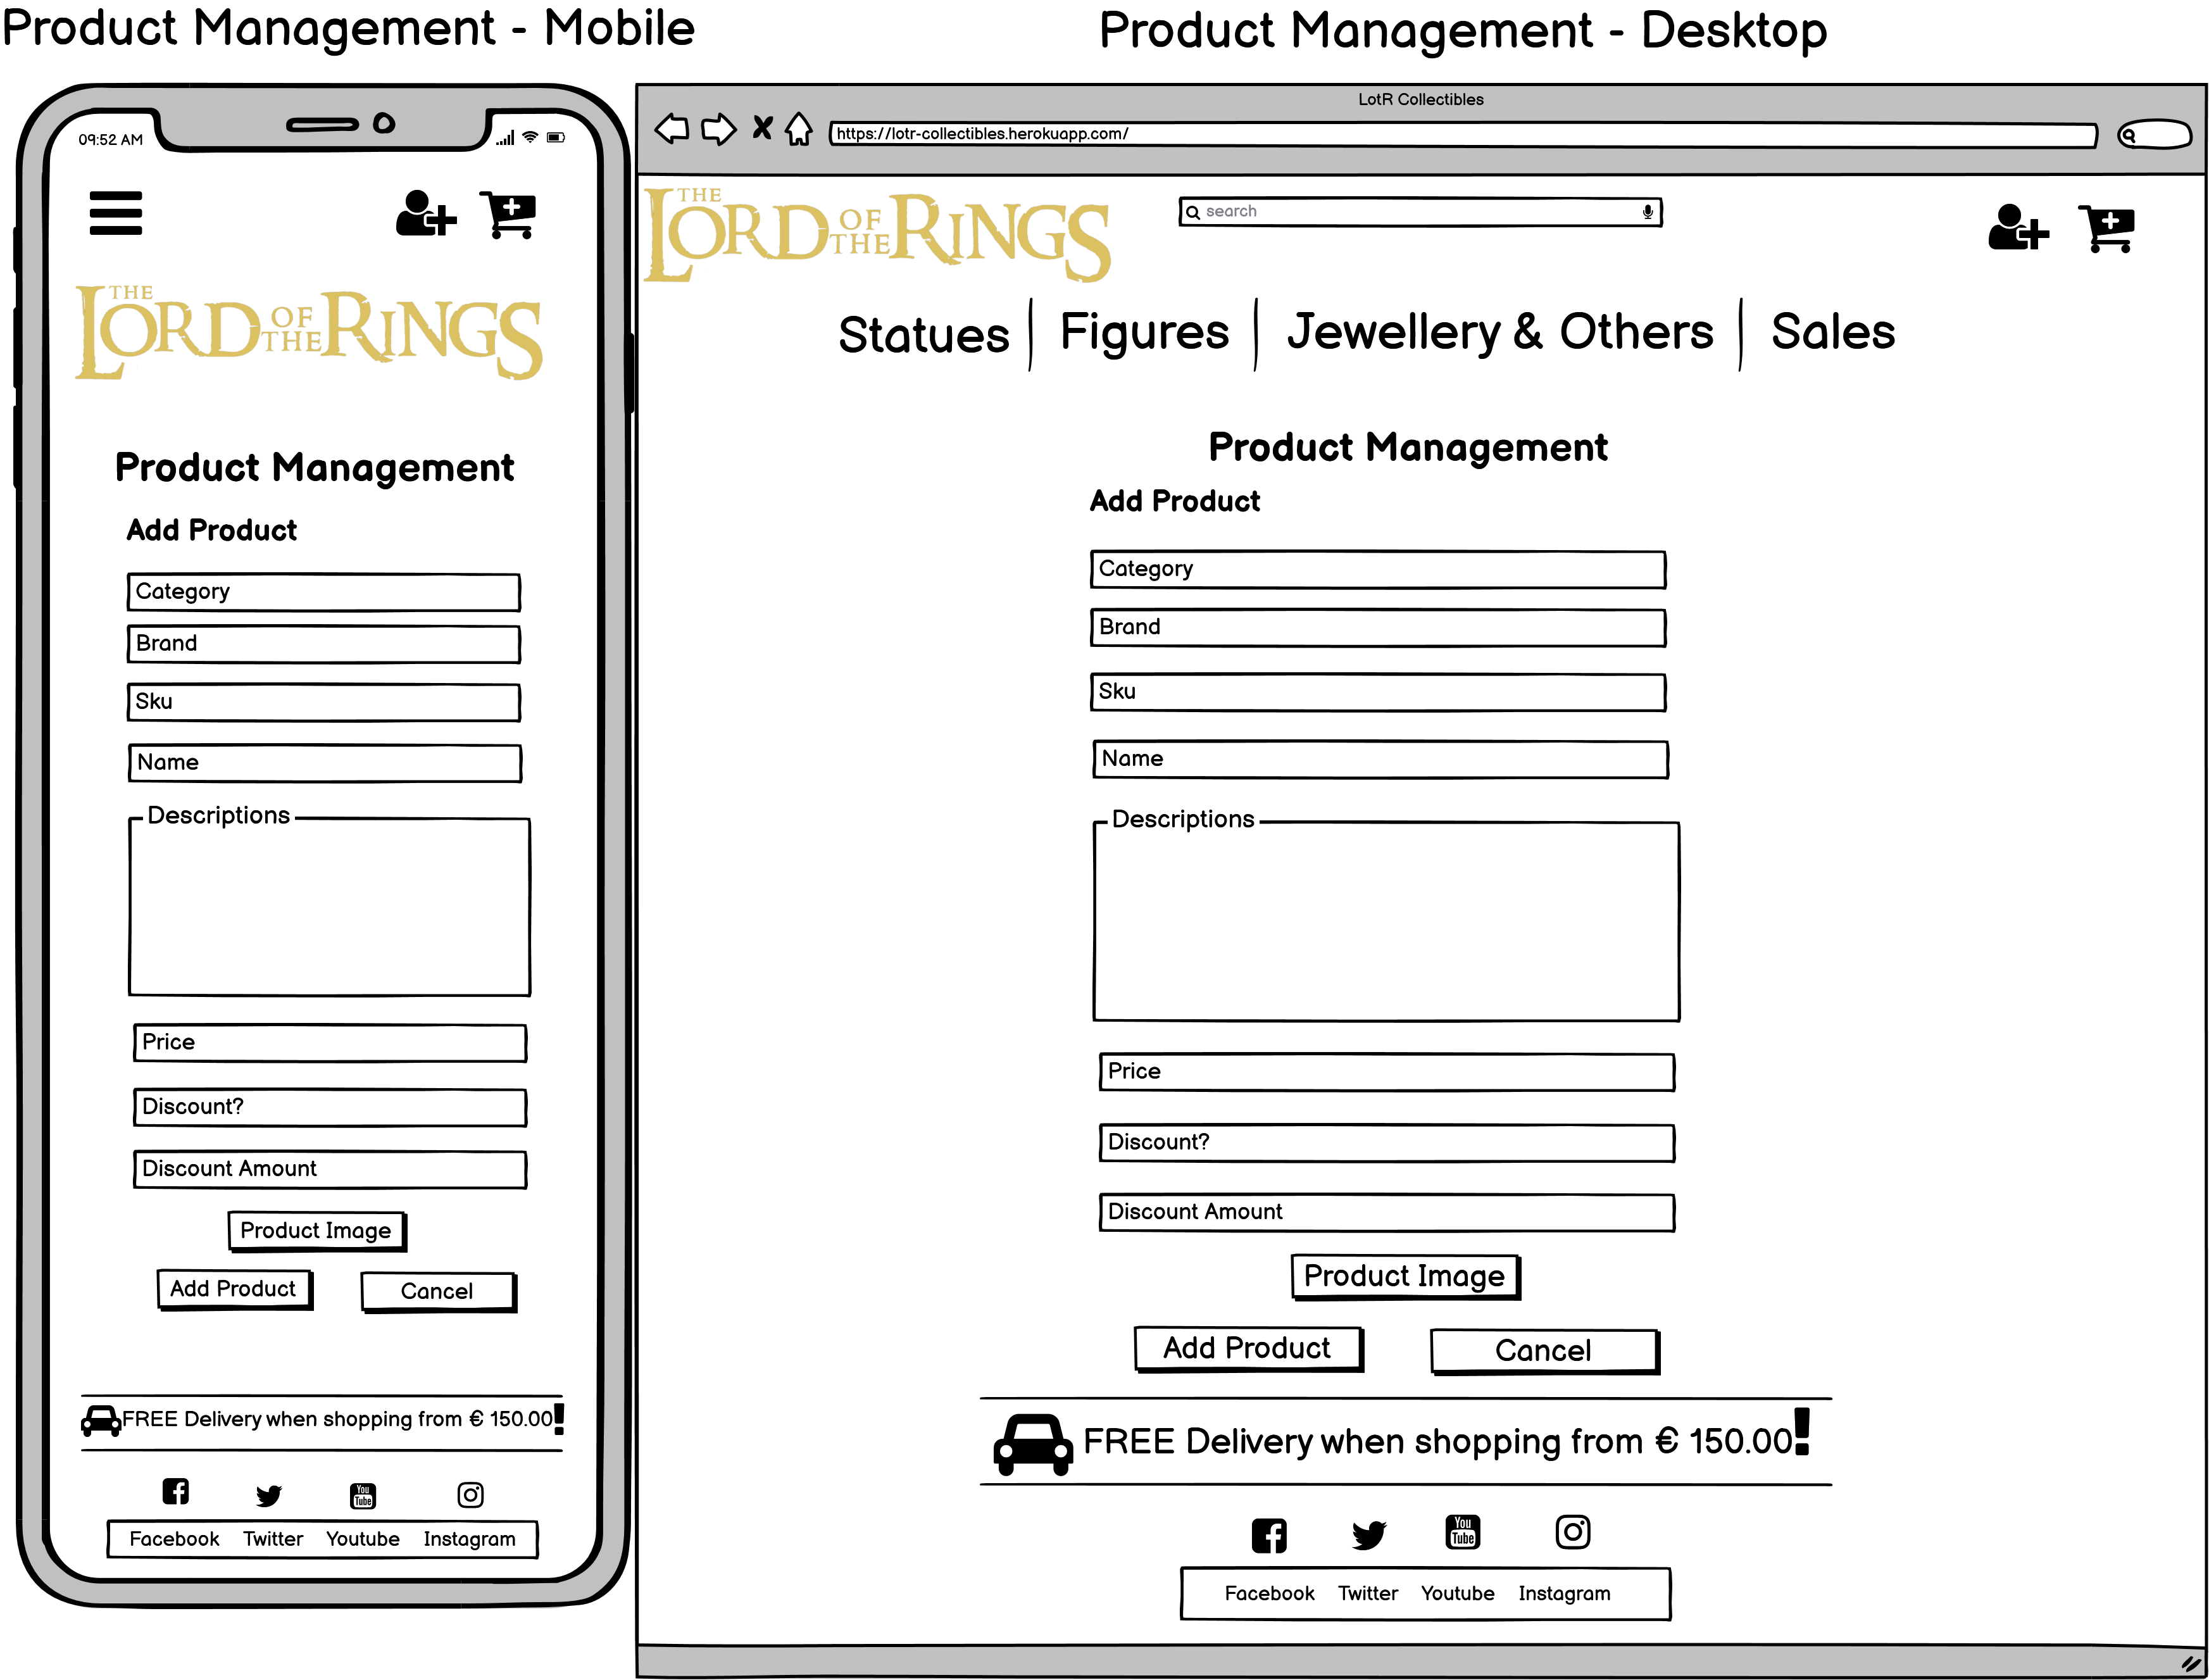
Page 404 (page_404.html)

Note:
Page 500: Same as page 404
— Colours —
This is an e-commerce site with a number of products and photos that include a variety of colors, White (#FFFFFF) is chosen as the main background color to keep the website's overall image consistent. The shop colour is Hunter Green (#09572A) and this is used for some icons and fonts. Back Chocolate (#231703) is used as the main font colour, Maximum Yellow Red (#E7BA55) is utilized for buttons and alerts to stand them out. Middle Green Yellow (#9AB250) is utilized for anything else that requires the user's attention. These are the base colours and similar colours utilized across the website in various aspects and sections.
Note:
Hunter Green (#09572A) is not used for any fonts or icons but used for the colour of toast success

— Typography —
All of the texts are written in Abril Fatface because readability is a crucial feature for e-commerce websites from the user's perspective. Also, if you want a better website UX, make it look like a book title. Uses Roboto as a second typeface, which is a popular Google font.

Because this is a full-stack website with both front-end and back-end components, as well as numerous Django apps, features, and functions, a good website development plan is essential to maximize development efficiency. This project makes use of the GitHub project planner, which includes a Kanban planner. The website's key activities* are summarized below, with additional detailed tasks given on GitHub Projects. This allows for not just precise planning but also ensures that nothing is neglected during the process.
*Follow the same process as Code Institute Mini Project, Boutique Ado
- Planning The Website with UX5 Planes
- Project Set-Up (Installing Django, Setting up Project, Testing connection, Creating Django superuser)
- Authentication & Authorization (Installing Allauth, Testing)
- The Base Template (Creating base template)
- The Home Page (Navigation bar, Header and Footer)
- Products Set-Up (Creating Products app, Installing data, Filtering & Searching)
- The Shopping bag (Adding and adjusting products)
- Toasts (Real-time notification)
- Checkout with Stripe (Function, Form, Testing Stripe)
- Profile (Displaying personal details and order history)
- Product Admin (CRUD function for products)
- Deployment (AWS, Heroku)
- Emails (Setting up email functionality)
- Code Refactoring (Checking code, Reviewing the design and updating)
- Testing (Testing for HTML, CSS, JavaScript, Python, User Stories, Functions and Features)
- Final Check Before Submission
Note:
CSS: Because I used to get confused by Bootstrap CSS classes and my own CSS classes in past projects, I utilized two dashes (a form of BEM methodology) on all CSS classes in this project.
- Create with HTML5, CSS3 (with Material Design for Bootstrap), JavaScript, Python (Django Framework), Stripe, AWS and Heroku
- It is composed of 1 Django product with 5 apps.
- It is formed of 1 base html template and 12 major html files. (With the exception of sub html files and a few allauth html files.)
- Modal for information on "Delivery Cost"
- A toast is made for the user's action.
- All of the features that have been planned Strategy Plane and Scope Plane
-
Displaying number of product images per product: This would most likely be possible to create using the same approach as Carousel, but because I can't be certain and don't have time to work on it, I've decided to leave it out of this project.
-
Product Rating: This might be possible to implement, but unfortunately due to a lack of time I decide to leave it out in this project.
-
Enlarging image when hovering: On hover, there are a couple options for enlarging (zooming) photographs, however I'm not sure if they are the same as enlarging product images for e-commerce companies. I don't have time to dig into the intricacies right now, therefore I've decided to keep it out of this project.
-
Refinements options: This could be done using other filter combinations, but I don't have the skills to do it right now, so I'm going to leave it out of this project.
-
More detailed categories and advertisement: This is to have more detailed categories (e.g., there are only 10 categories, but a true e-commerce website should have more categories available = more products) and more detailed advertisements (e.g., different colors, size, features, etc.). Because I don't have time to work on it right now, I've decided to leave it out of this project.
-
Creating an account with social media: Looking at a tutorial, I'm not sure if this can be done quickly. All of the testing has been completed, and all of the functions have been confirmed to work; however, due to the risk of breaking something unintentionally by linking social account login, I have decided to leave this for this project; however, this is something I would like to try in the future as a challenge with my own project.
-
Payment in different currencies: This might be feasible with Stripe instead of Django, but I'm not sure how. Because this isn't a critical feature in the current project and I don't have time to investigate it, I've decided to leave it out.
- HTML5 for markup
- CSS3 for style
- Material Design for Bootstrap 5 & 4 (an open-source toolkit based on Bootstrap for developing Material Design) for the mainframe of the website
- JavaScript for interaction
- Python3 as a backend programming language
- Django (an open-source web framework) as the main framework of Python
- SQLite (Django built-in database) as database in development mode
- PostgreSQL (Heroku built-in) as database in production mode
- Google Fonts for fonts
- Font Awesome for icons
- Stripe for credit card payment
- AWS (Amazon Web Services) for host static files and images for the website
- Gitpod as Integrated Development Environment (IDE)
- Git for local version control, keeping the files & documents
- GitHub for online version control and keeping the files & documents
- Heroku for deploying the website
- Code Institute Course Materials
- Stack Overflow
- YouTube
- W3schools
- Balsamiq for wireframes
- Adobe for resizing images
- PNG to ICO for converting png to ico for favicon
- Canva for creating logos and some images
- Multi Device Website Mockup Generator for mockup
- Autoprefixer for parsing CSS and add vendor prefixes
- W3C Markup Validation Service for testing HTML code
- W3C CSS Validation Service for testing CSS code
- jshint for testing JavaScript code
- PEP8 Online for checking Python code compliance
- Chrome DevTools for testing, style checking and debugging
Testing report is available TESTING.md
— Heroku App Deployment —
On the deployment part, I succeed when building up the app but the app crashes, and in the logs --tail it shows an error to the GET method. What was happening was that heroku couldn't load the static files.
I had to roll back a few commits and start again the deployment. I missed one step of adding SECRET KEY, and also did a typo in settings.py. In the end that worked out for me.
— Images not loading (AWS - S3 Bucket) —
In the begging I thought that the issue was with the connection between the databases (sqlite -> Postgres). Because once I've deployed I continued adding more products, but I notice that in the deployed website (heroku) they weren't been added.
Because I had already a session with my mentor to show my progress with the Milestone Project, we end up trying to fix this issue.
So we tried to check if there was something wrong in the setting, with the paths and base directory, I tried to see if I had more than one DB sqlite, and it was only one, everything was fine. I also tried to add a new product to see if the rows in the postgres DB would go up, but they haven't changed at all.
After a while, we figured that I had to leave the var DISABLE_COLLECTSTATIC=1 in Heroku, and DEBUG=True in the setting.py to see the issue in detail.

The tutors pointed that the issue was with the AWS Bucket permissions, The action called : "PutObject" had a access denied.
After I changed the code like in the image below the images were loading as they should.

— Order Summary been smashed down —
The issue was the order summary been "pushed down" when the bootstrap hidden classes (.d-none etc) are there in bag.html, when I add more products it completely disappears, but on mobile it's working fine though.
When I have up to 2 products in the bag It shows the Order Summary in the bottom. even though I had it as class="d-none d-lg-block col-lg-3 mt-lg-2

The tutors pointed that was a opened div somewhere in the bag templates, after investigating I founded one in the bag.html and another one in product_details_mobile.html

After fixing that The Order summary went back to the right position (col-3), as it was suppose to be.
— Accounts page does NOT exist —
When trying to Login, Register or access Profile page (My Account), get screen error: DoesNotExist at /accounts/login.

After some time with tutor helping me out, he figured that could be a strange error from the "PAGE_ID" variable in settings.py changed on it's own.
To fixed, I only needed to change from "1" to "2", and the accounts pages went back to fully functional.

Git as a local repository and GitHub as a remote repository are used for the project, and below is how they are used as the version control for the project.
— Setting Up —
-
Create a remote repository in GitHub by clicking "New repository" on the main page

-
Use Code Institute Template, put the repository name and click Create Repository making sure to select public

-
Open the repository with Gitpod which is my Integrated Development Environment (IDE). Initialization, including initial commit, is done using the Code Institute Template, thus there is no need to do
git initcommand when open IDE, or to usegit push -u origin maincommand for my first commit.gitignorefile, which is highly crucial for the project and contains certain secret information. It is made using a Code Institute template, so it is not necessary to develop it, however, it is verified to include files such as pycache, *.sqlite3, env.py etc


— Commitments —
- When a portion or even a group of work is finished, it is committed in git and pushed to GitHub to ensure that the work's history is properly logged and that the work is not lost in unexpected circumstances. For this, the commands listed below are utilized.
* git status | To check the status of new/modified folders, files, and documents
* git add . | To put all new and updated work on the stage in git
  git add <specific file> is used when different types of work are done but do not want to commit everything on the same commitment
* git commit -m "Example commit" | To commit the work on the stage in git before pushing it to GitHub
* git push | To update the repository in GitHub for main branch
  git push origin <branch name> is used when pushing git into GitHub for sub-branches
— Branches —
- During testing process the creation of a branch is required instead of testing it utilizing the main branch. If the testing goes well, merge the branch into the main branch; if it doesn't, leave it alone and continue working on the main branch. For this, the commands listed below are utilized.
* git branch <branch name> | To create a new branch
* git checkout <branch name> | To switch branch
* git branch | To check current branch
* git merge <branch name> | To merge sub-branch into main, do this on main branch
Note:
Due to the lack of static files in the main branch on production mode, the free-collectibles branch is utilized for updates, and the same code is transferred to the main branch without merging
This project's website demands back-end technology such as a server, application, and database, so it is deployed in Heroku, which is a cloud platform with a service supporting several programming languages, because GitHub can only host a static website. Heroku Postgres is used for the database. AWS services, which is also a cloud-based platform, is utilized to store static files and images as Heroku has no files system to store new files *Reference from Code Institute Slack.
The steps for deploying the website to Heroku and setting up static files and images in AWS are outlined below.
— HEROKU —
-
Create an app in Heroku. Click New, put App name and select region

-
Add Heroku Postgres for the database

-
Install
dj_database_urlandpsycopg2-binaryto use Heroku Postgres, and runpip3 freeze > requirements.txtcommand to add them on requirements.txt

-
Update
settings.pyof the product (lotr_collectibles). Importdj_database_url, comment out sqlite databases and add dj databases variable temporary while the database is transferred to Heroku Postgres

-
Run
python3 manage.py showmigrationscommand to see the status of migrations (Currently not migrated). Runpython3 manage.py migratecommand to migrate

-
Import all products data. Run
python3 manage.py loaddatacommand to load the categories first, brands next and products the last. Because all products are related with categories and brands, the sequence in which they are loaded is crucial. -
Create a super user with
python3 manage.py createsuperusercommand for product admin -
Install
gunicornwhich acts as the webserver, and freeze it into requirements file withpip3 freeze > requirements.txtcommand

-
Create a Procfile which specifies the commands that are executed by the app on startup

-
Temporary disable collectstatic by setting
heroku config:set DISABLE_COLLECTSTATIC = 1and host name of Heroku to allowed hosts insettings.py -
Initialise Heroku in git with
heroku git:remote -a lort-collectiblesand put git into Heroku withgit push heroku main -
Set up automatic deployment when git is pushed to GitHub. Go to Deployment on Heroku, search the GitHub repository, connect and click Enable Automatic Deploys


-
Create a new secret key, add it to Heroku, and keep it up to date
settings.py. Change the setting of Debug mode that only True in Development mode


-
Check the Activity Feed for Builds in Progress to ensure that the automatic deployment is working.


— AWS —
-
Open S3 and create a new bucket, which stores the files, by completing the name and region

-
Set up basic settings. Enable static website hosting so that it gives a new endpoint for accessing from the internet. Put
index.htmlanderror.htmlas default values

-
Set up CORS configuration which is the access between Heroku and this S3 Bucket

-
Set up Bucket Policy. Generate a policy with AWS policy generator. Add /* at the end of Resource to allow access to all resources in the bucket

-
Create a user to obtain access to the bucket. Go to IAM (Identity and Access Management) and create a group for user to live in. Then, create a policy by importing pre-built policy


-
Attach the policy to the group


-
Make a new user and add it to the group. When a user is added to a group, a csv file with the Access Key ID and Secret access key is created, which is used to authenticate them with the Django app. * It is critical to download and save the file because you will not be able to do it again.


— Connecting to DJANGO —
-
Install two new packages,
pip3 install boto3,pip3 install django-storages, and runpip3 freeze > requirements.txtcommand to add them on requirements.txt

-
Update
settings.pyto tell Django which bucket it should communicate with *It's critical to keep your AWS access keys private since they can be used to store or move data in the bucket, and Amazon will charge you for it.

-
Add these secret keys on Heroku and set USE_AWS = True

-
Create
custom_storages.pyto tell Django to use S3 to store static files and upload images when it is in production

-
Add
AWS_S3_CUSTOM_DOMAIN = f'{AWS_STORAGE_BUCKET_NAME}.s3.amazonaws.com'to tell Django where the static files come from in production and add some settings for Static and Media files onsettings.py

-
Add all the updates in git, commit it and push it to GitHub. Heroku runs
python3 manage.pyto collectstatic during the process it also looks for static files in all of the apps and project folders. Then, when it's in production, it leverages S3 domain settings in conjunction with custom storage classes to provide the URL where things should be saved. This can be confirmed in S3 bucket

-
Add Cache control on
settings.pyas static files do not change often and to improve the performance for users

-
Upload product images via S3. Create a folder, and upload images


-
Verify superuser's email address on Heroku Postgres. Login admin and check the VERIFIED and PRIMARY boxes


-
Add Stripe keys to Heroku Config Vars and create a new webhook endpoint


— HTML5 —
- MDB Navbar for navigation bar
- MDB Cards for displaying products
- MDB Modal for displaying delivery cost
- MDB Footer for footer
- Bootstrap Alerts for alert
— CSS3 —
- Hover.css for floating logos with shadow
— JavaScript —
- W3Schools for scroll back to top button
— Python —
- All Products contents: From Weta Workshop, Iron Studios, Prime 1 Studio, Asmus, and Sideshow as well.
- All other contents: Self-written
— Logo & Favicon —
— Images —
- Readme Banner: Sideshow
- Background Image: created by me using canva with lotr logo from pinterest
- Popular Brand Logo: Asmus
- Popular Brand Logo: Iron Studios
- Popular Brand Logo: Prime 1 Studio
- Popular Brand Logo: Weta Workshop
- All Products images: From all above and Sideshow as well.
I would like to thank:
- For all Code Institute Tutors, Scott, Johann, Kevin, Michael, Stephen, Jo, Igor and Sheryl, for giving me a guidance on how to solve different issues
- Rimom Costa for the meeting with me and teaching me some important fundamentals of programming along the way.
- Brian Macharia for giving me advice on some subjects and helping with the project. He has mentored this project since the beginning being very approachable. It was only possible to conclude it because of his support and advice. His main contributions were giving an initial North so that it was possible to start effectively, providing ideas, demonstrating the technical criteria and pointing out proper feedback on the errors that should be corrected. In other words, his assistance was essential for the success of this project, so, I am taking the opportunity to express my gratitude for each mentoring session that enabled the completion this work.