
Achatina is a slowly evolving set of examples that do visual inferencing using Docker containers on small computers, usually relatively slowly.
One of my goals for achatina is to make everything here easily understandable. To that end, almost all of the code files in the examples provided here are small and and each directory builds a completely self-contained and composable microservice. As a former teacher of university Computer Science courses for many years, I found that keeping examples small and self-contained enables most people to understand them quickly.
Most of the code is written in Python because this language is both popular and easy to learn. I used Docker for these containers because Docker is by far the easiest OCI container technology I have found. I used Makefiles to capture the commands used to build and run the containers and to highlight the environment variables you can use to configure them. I also wrote a small bash helper function to do things like get the local hot's LAN IP address because make is not great at doing things like this.
The enclosed documentation gives a high level overview for the architecture, and details the contributions of the individual microservice components. These microservices include the top level program container, achatina, 3 different visual inferencing "plugin" containers, and 3 shared services containers that support achatina. Plugins do the interesting work and they can stand alone if desired (i.e., all of the others are optional, depending upon your needs). The Dockerfiles, Makefiles, and source code files here contain important details not in this README.md. Here is a map of the key documents:
├── README.md ................. the document you are reading!
├── Makefile .................. mostly this Makefile runs make in the subdirs
├── checks.mk ................. a Makefile fragment to check your env variables
├── helper .................... the small bash utility I mentioned above
│
├── achatina
│   ├── Makefile .............. builds this container -- lots of docs in here!
│   ├── Dockerfile.* .......... alpine-based + mqtt, kafka, python requests
│   └── achatina.py ........... 142 lines (more than half to consume config)
│
├── plugins
│   ├── cpu-only
│   │   ├── Makefile .......... just a basic Makefile for the CPU-only plugin
│   │   ├── Dockerfile.* ...... ubuntu Dockerfiles for cpu plugin (all arches)
│   │   └── darknet.py ........ my code adds a REST API (at the bottom, ~190loc)
│   ├── cuda
│   │   ├── Makefile .......... just a basic Makefile for the CUDA plugin
│   │   ├── Dockerfile.* ...... NVIDIA Dockerfiles for amd64 and arm64 only
│   │   └── darknet.py ........ my code adds ~190 lines for a REST API
│   └── openvino
│       ├── Makefile .......... just a basic Makefile for the OpenVino plugin
│       ├── Dockerfile.* ...... Intel Dockerfiles for amd64 and arm32 only
│       └── openvinoyolo.py ... my code adds ~270 lines for a REST API
│
└── shared
    ├── monitor
    │   ├── Makefile .......... just a basic Makefile for the monitor service
    │   ├── Dockerfile.* ...... alpine Dockerfiles for the monitor (all arches)
    │   └── monitor.py ........ 128 line web server (monitors achatina results)
    ├── mqtt
    │   ├── Makefile .......... builds an MQTT broker (see inside for test info)
    │   ├── Dockerfile.* ...... alpine Dockerfiles for MQTT (all arches)
    │   ├── mosquitto.conf .... basic configuration file for the MQTT broker
    │   └── mqtt.sh ........... 3 line script to launch MQTT broker with config
    ├── nvcsirestcam
    │   ├── Makefile .......... builds the nvcsirestcam service -- many docs in here
    │   ├── Dockerfile.* ...... ubuntu Dockerfiles for nvcsirestcam (arm64 only)
    │   └── nvcsirestcam.py ... 160 line NVIDIA Jetson MIPI CSI camera web service
    └── restcam
        ├── Makefile .......... builds the restcam service -- many docs in here
        ├── Dockerfile.* ...... ubuntu Dockerfiles for restcam (all arches)
        ├── cam.sh ............ 35 line (bash) `fswebcam` camera web service
        └── start.sh .......... 3 line script to launch cam.sh
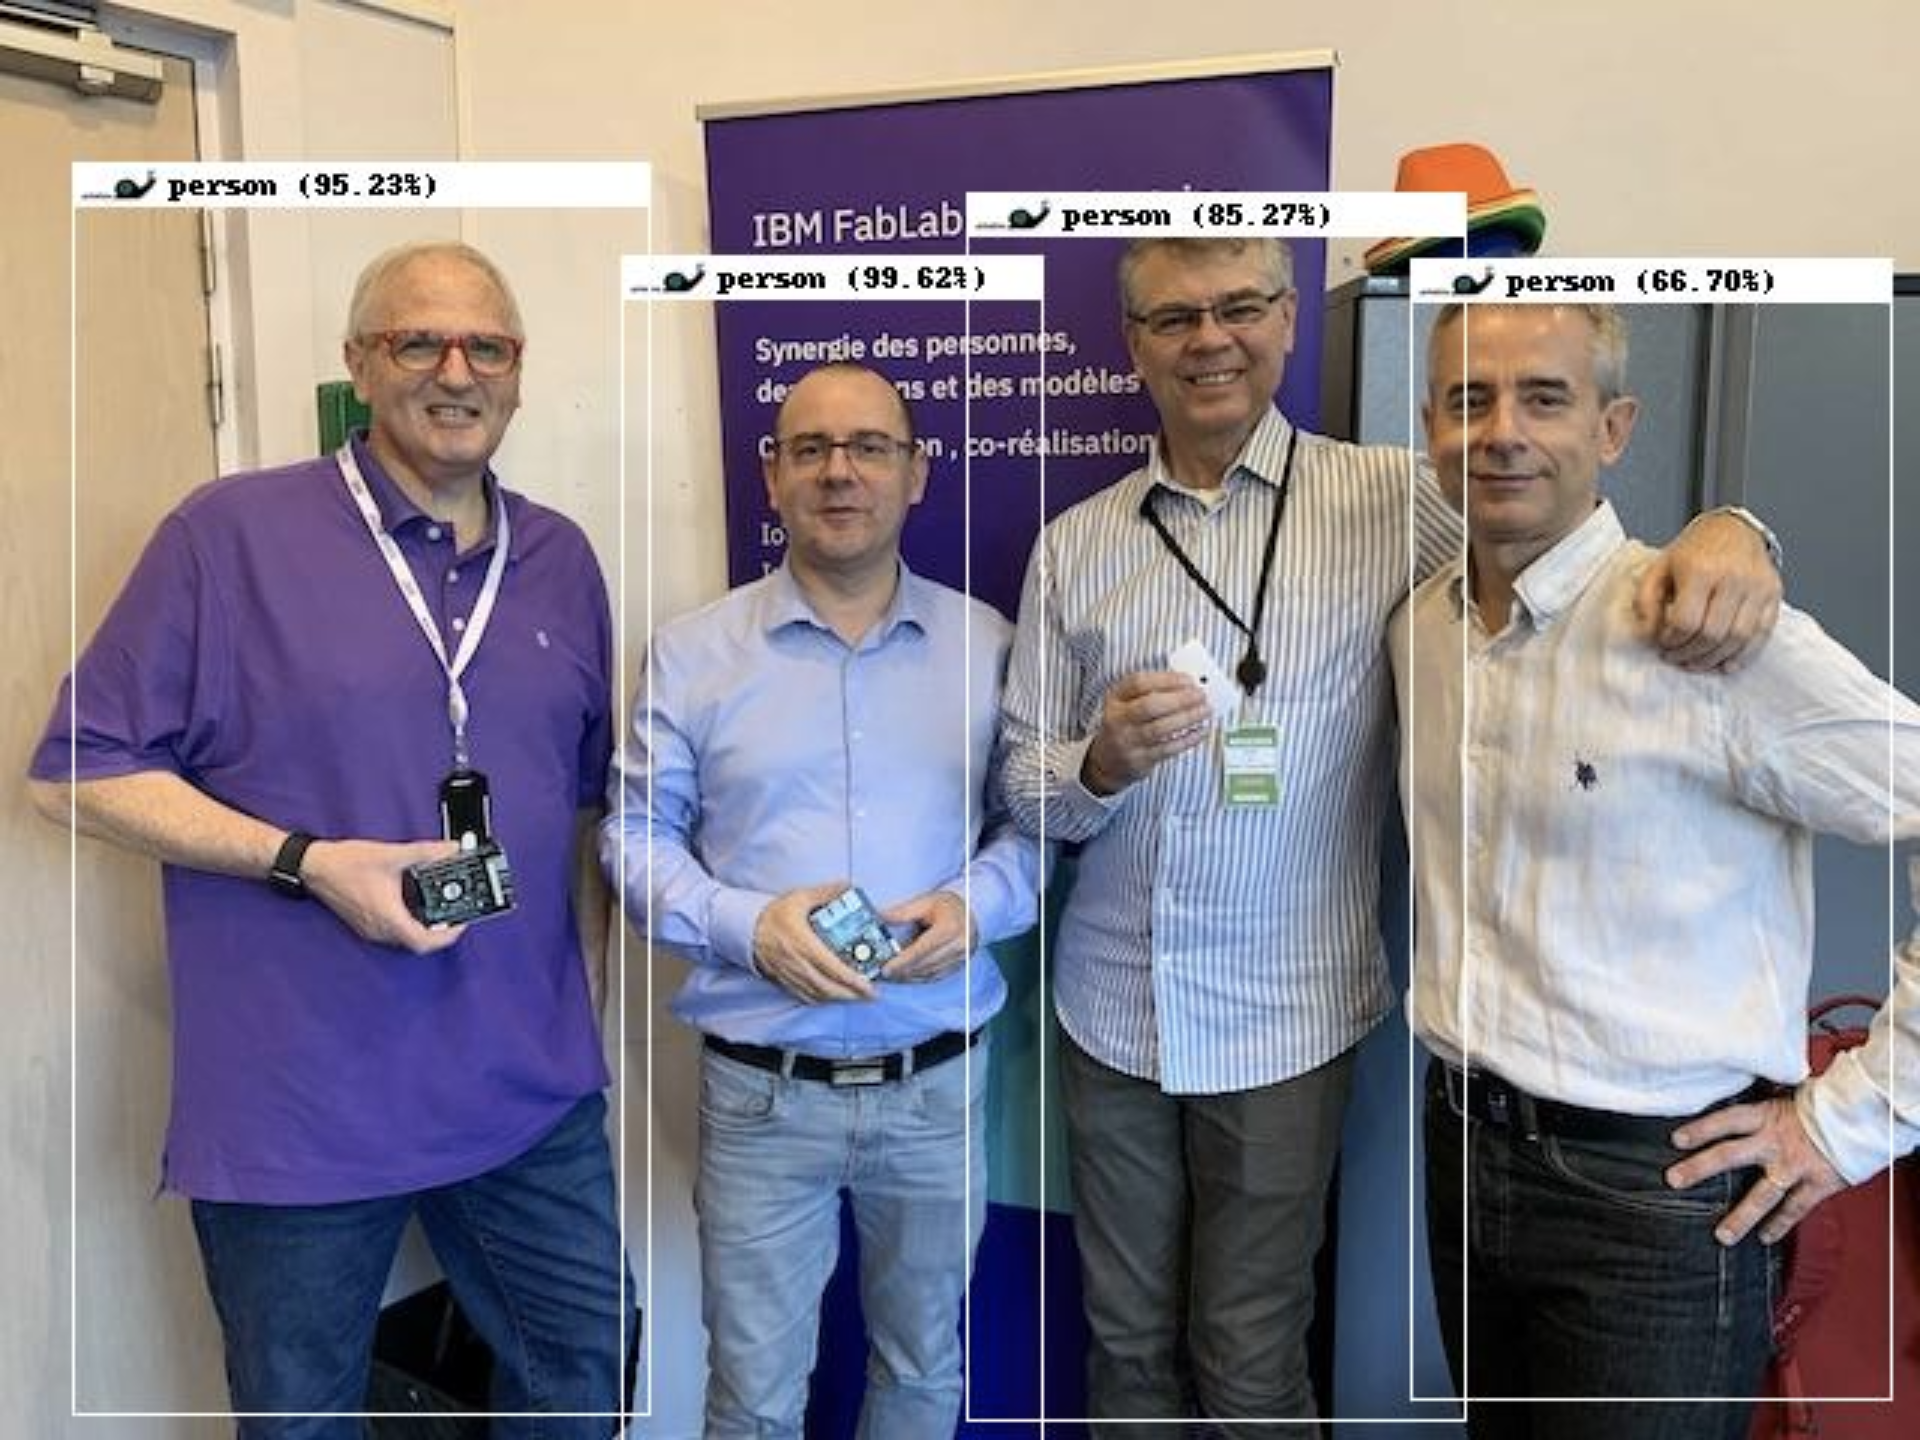
The examples in this repository do visual inferencing. That is, these examples examine visual images and try to infer something interesting from the images. For example, they may try to detect whether there are any people or elephants in the image. In general, when they detect something, they try to classify it, and they annotate the incoming image to highlight what was detected. They also construct a standard JSON description of everything detected, and with the resulting base64-encoded image embedded as well. Here's an example output image:
Some of these examples are based on the YOLO/DarkNet models trained from the COCO data set. The openviino example is based on PINTO0309/YoloV2, which is also trained on COCO. The COCO data set contains examples of 80 classes of visual objects from people to teddybears.
These YOLO examples are easy to work with, and they run on small computers, so they area great fit for achatina.
All of the examples here require a recent version of Docker to be installed (I think version 18.06 or newer will work, maybe older ones too).
Using docker makes these examples extremely portable, requiring little or no setup on any host to use these examples. Usually all prerequisites are embedded within the resulting Docker containers. I try to do almost all of my coding within Docker containers these days, and achatina is no exception.
To quickly try this on your Linux machine:
- make sure docker, git and make are installed
- (optionally) attach a camera device (usually on
/dev/video0, and compatible withfswebcam) - clone this git repo, then cd into the top directory
- put your dockerhub.com ID into the DOCKERHUB_ID environment variable, e.g.:
export DOCKERHUB_ID=ibmosquito(or set it to your favorite color... doesn't really matter what it is set to) - run
make run(or some other target) -- theruntarget will build and then run the CPU-only example (so it should work on almost any device, ARM32v6 and up, ARM64, and x86) - when everything finishes building and comes up, point your browser to port
5200on this host machine, i.e., go to:http://ipaddress:5200/(e.g.,http://localhost:5200/if you are running the browser on the same machine).
For more info, read the Makefiles in each of these directories to see how the Docker containers are started, and the environment variables you can use to configure them differently (e.g., for a local camera on a different path than /dev/video0, or for any compatible remote webcam service).
Many of the examples use the following 3 shared service containers:
(Optional. Not needed if you want to use some other camera service)
All of these examples are also designed to make use of a camera, or a webcam. By default they try to use the local restcam shared service and it, in turn, uses the popular fswebcam software to view the world through your camera. If image retrieval fails (e.g., if you don't have a camera attached) the raw original of the image above (before inferencing, and without any bounding boxes, labels, etc.) will be provided by the restcam service. The restcam service provides images in the form of an image file, suitable for embedding in an HTML document. So you can easily replace the restcam service with another image source anywhere on your LAN or even out on the Internet.
(Optional. Not needed if you want to use some other camera service)
All of these examples are also designed to make use of a camera, or a webcam. For NVIDIA Jetson machines with MIPI CSI cameras, we can use nvcsirestcam shared service. Similar to restcam, the nvcsirestcam service provides images in the form of an image file, suitable for embedding in an HTML document. So you can easily replace the nvcsirestcam service with another image source anywhere on your LAN or even out on the Internet.
(Optional, but required if you will use the monitor service)
Although it is not strictly necessary for the inferencing, all of the examples publish their inferencing results to the /detect topic on the local shared mqtt broker. This MQTT broker is primarily an aid for debugging and for developer convenience. You can subscribe to this topic locally and see the JSON metadata that is generated each time inferencing is performed.
(Optional. Requires the mqtt service)
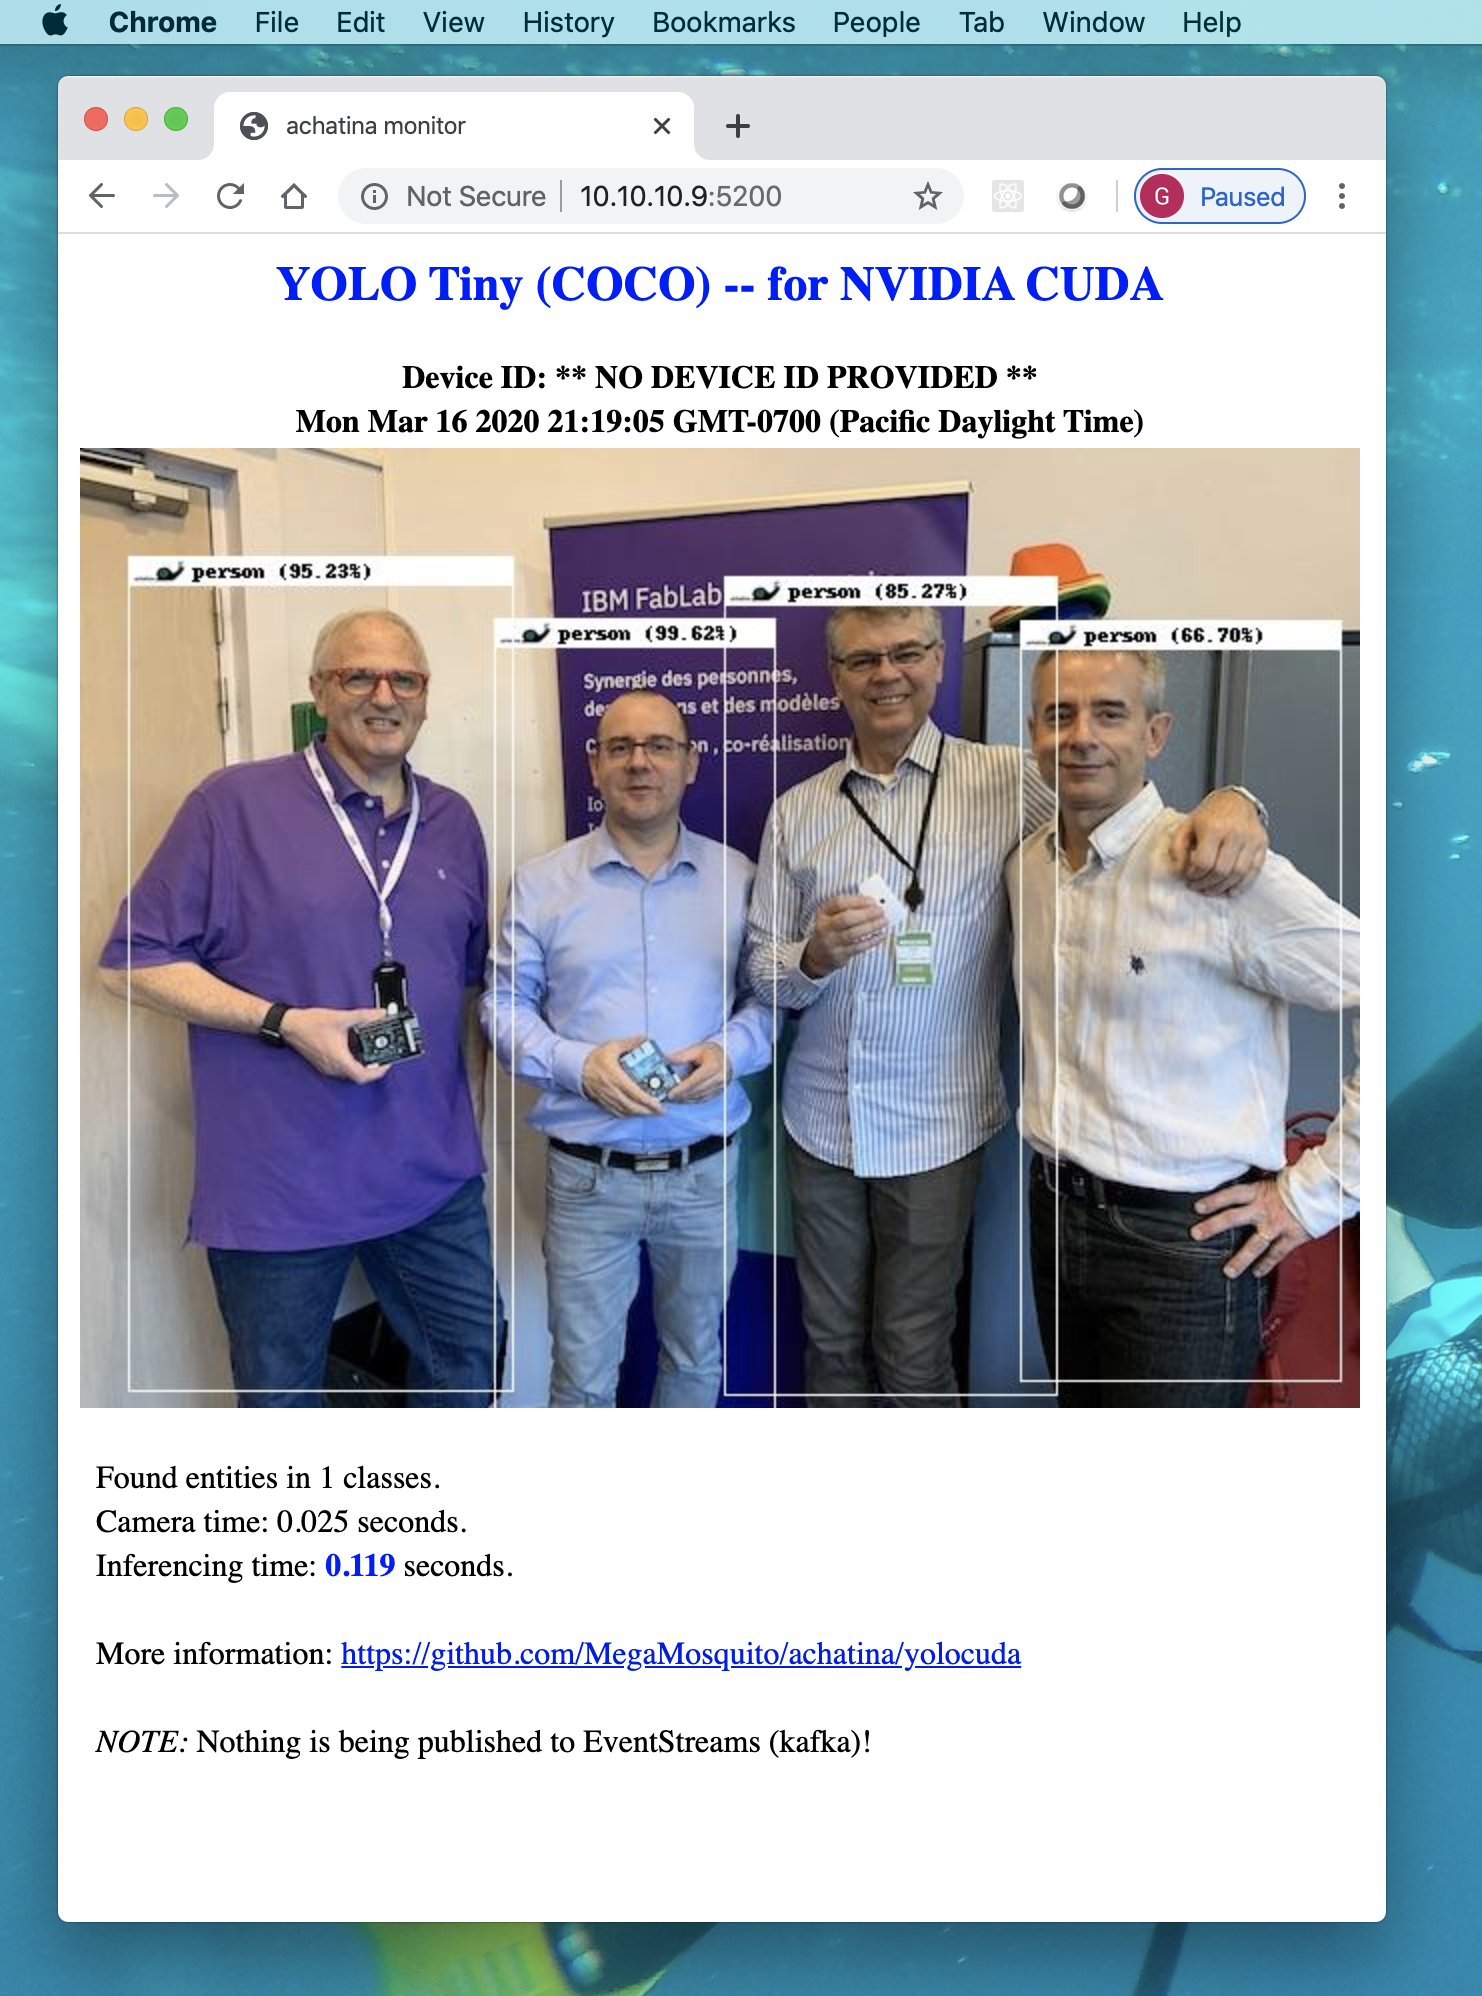
The shared monitor service is also not required, but it enables a quick local check of these examples. When you are running these examples you can navigate to the host's port 5200 using your browser to see live output. There you should see output similar to this:
This repository contains the following example plugins:
The CPU-only plugin works on arm32, arm64, and amd64 hardware using only the CPU(s) of the machine. CPUs are not very fast for visual inferencing, but if that's all you've got, you can still do cool stuff with them. And hey, if it takes 60 seconds to detect something in an image, maybe that is more than fine for your particular application. If so, you can save some of your cash, because the accelerated examples usually have significant additional costs. Achatina may be slow, but she's happy with just a CPU to work with. She doesn't need any fancy inferencing accelerators to get the job done.
Using an NVIDIA GPU (or other GPU or specialized visual inferencing hardware, like an Intel VPU) to accelerate inferencing will usually significantly improve achatina's speed. Accelerated examples available currently include:
The CUDA example is GPU-accelerated. The CUDA plugin relies on the NVIDIA CUDA software which requires an NVIDIA GPU. The CUDA plugin should work with any NVIDIA GPU, and has been tested on GTX GPUs, Tesla T4, and Jetson TX1, TX2, Nano 4GB, Nano 2GB, and Xavier NX.
The OpenVino example is VPU-accelerated. The OpenVino plugin relies on the Intel OpenVino software which requires an Intel VPU. The OpenVino plugin should work with any Intel Movidius VPU, and it has been tested on a 2-VPU Movidius Myriad card and the Movidius Neural Compute stick 2.
Each of these examples consists of multiple Docker containers providing services to each other privately and exposing some services on the host. Each of them also is designed to optionally push its results to a local or remote MQTT broker and/or a remote Apache Kafka endpoint (broker). If you provide Kafka credentials for a broker you have configured, then you can subscribe to that Kafka broker from other machines and monitor the output remotely.
The examples here are structured with 5 "microservices":
restcam-- a webcam service (you can optionally usenvcsirestcamor any other web cam service and not include thisrestcamservice at all if you wish)mqtt-- a locally accessible MQTT broker (intended for development and debugging; it can optionally be removed)monitor-- a tiny web server, implemented with Python Flask for monitoring the example's output (intended for development and debugging, it can optionally be removed)- an object detector "plugin" service -- an object detection and classification REST service. Example plugins are provided in the "plugins" subdirectory.
- the "achatina" application -- this is a top level application container that invokes one of the object detector plugin services, passing it the URL of the web cam to use (the
restcamservice by default), and receiving back the inferencing results. It then (optionally) publishes the results to the localmqttbroker for debugging (and for the localmonitorto notice and present on a web page). It also publishes the same data to a remote Kafka broker if the appropriate credentials are configured.
The diagram below shows the common architecture used for these examples:
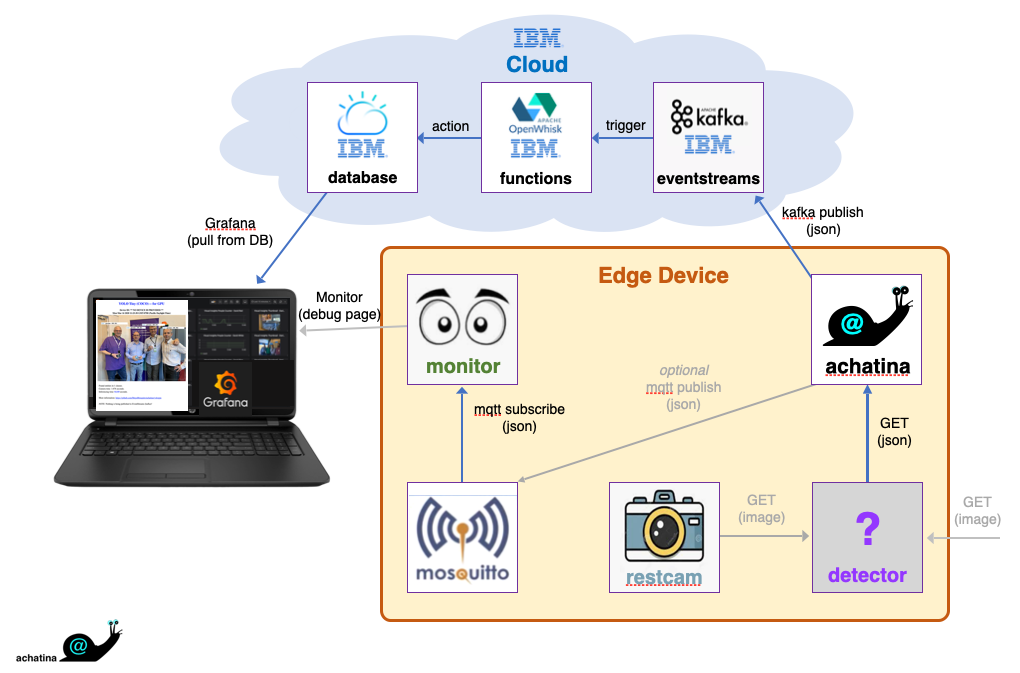
Arrows in the diagram represent the flow of data. Squares represent software components. The achatina app starts by invoking a REST GET on the plugin detector service, passing the image source URL. The detector then invokes a REST GET on that image source URL (either the default restcam, nvcsirestcam service, or some other source), runs its inferencing magic upon it, then it responds to the REST GET from the app with the results, encoded in JSON (the image, and metadata about what was detected). Normally the app then publishes to mqtt (optional) and the remote Kafka broker (if credentials were provided). The monitor is watching mqtt and provides a local web server on port 5200 where you can see the results.
This architecture enables the visual inferencing engine to remain "hot" awaiting new images. That is, at initial warm-up, the neural network is configured and the model weights are loaded, and they remain loaded ("hot") forever after that. They do not need to be reloaded each time inferencing is performed. This is important because neural network models tend to be large, so loading the edge weights is a time-consuming process. If you load them for each individual inferencing task, performance would be much slower. Although achatina may be slow, she does avoid this particular performance degradation altogether.
The detector is expected to deliver a JSON payload back to the app. That JSON is then enhanced by the app to add some information for the monitor to show about the detector used in the example (source, source-url, and kafka-sub). The resulting JSON that is published to MQTT and kafka has this form:
{
  "source": "CUDA",
  "source-url": "https://github.com/MegaMosquito/achatina/tree/master/",
  "kafka-sub": " ... <a complete kafkacat subscribe command, if used> ... ",
  "detect": {
    "tool": "cuda",
    "deviceid": "nano-2gb",
    "image": " ... <large base64-encoded image is here> ...",
    "date": 1584407149,
    "time": 0.132,
    "camtime": 1.682,
    "entities": [
      {
        "eclass": "person",
        "details": [
          { "confidence": 0.996, "cx": 277, "cy": 296, "w": 139, "h": 394 },
          { "confidence": 0.952, "cx": 120, "cy": 270, "w": 191, "h": 403 },
          { "confidence": 0.853, "cx": 405, "cy": 276, "w": 166, "h": 394 },
          { "confidence": 0.667, "cx": 550, "cy": 283, "w": 160, "h": 366 }
        ]
      },
      {
        "eclass": "elephant",
        "details": [
          ...
        ]
      }
    ]
  }
}
Fields like source, source-url, and tool provide information about this particular detector plugin. The device sending the data is identified with deviceid.
The image field contains a base64-encoded post-inferencing image. In the image, all detected entities are highlighted with bounding boxes that have a label across the top stating the entity class and the classification confidence. This field is typically very large so it makes watching the raw MQTT output a bit challenging. Try this to watch the /detect topic but suppress the huge base64 image encoding:
mosquitto_sub -h 127.0.0.1 -p 1883 -t /detect | jq '.detect.image=""'The date field shows the UTC date and time that the image was acquired and inferencing began. The camtime field states the time in seconds that was required to acquire the image from the webcam. The time field states the time in seconds that the inferencing step took.
There may be zero or more entities of zero or more classes detected (YOLO/COCO only knows 80 classes). The detected entities are organized by class. The details array for each detected class contains entries showing for each detected entity the classification confidence (between 0.0 and 1.0), the center location (cx, cy) and the bounding box size (w, h) surrounding the entity.
If kafka credentials were provided, then the kafkacat command to subscribe is provided when publishing to MQTT. This is redundant in the kafka data so it is omitted when sending the JSON to kafka.
Written by Glen Darling mosquito@darlingevil.com, March 2020. V2 written by Glen Darling mosquito@darlingevil.com, October 2020.
Numerous additional contributions by Clement Ng clementdng@gmail.com.
Inspired by earlier related work from my former teammate, David Martin.